- Автоматизация монтирования samba-разделов в Mac OS
- Причины неудобств
- На первых порах
- Безопасность
- Улучшения и расширение
- Перспективы
- Mac os share folder smb
- Question: Q: How to edit «smb.conf»
- All replies
- natritmeyer / mount_smbfs.sh
- This comment has been minimized.
- SaundersB commented Oct 21, 2015
- This comment has been minimized.
- schovi commented Nov 7, 2016
- This comment has been minimized.
- vbotay commented Jan 26, 2017
- This comment has been minimized.
- mschwartz commented Apr 6, 2017 •
- This comment has been minimized.
- S99P commented Oct 4, 2017
- macOS: How to mount a SMB share from the command line A small guide explaining how to mount a UNC/SMB share between a macOS environment and other mac/win/linux systems and access it from the command-line.
- Creating the UNC/SMB Share
- Mounting the SMB Share
Автоматизация монтирования samba-разделов в Mac OS
Причины неудобств
Каждый раз для подключения к самбе надо изрядно потыкать мышкой: Finder -> Подключение к серверу -> ввод имени сервера (-> первый раз ещё и пароль спросят) -> выбор папок, которые нужно подключить -> Ok. Потом, если захочется делать бэкап в примонтированную по самбе директорию, прийдётся ещё и образ .sparsebundle создавать, и монтировать ещё и его. Всё это, возможно, и не сильно напрягает, если делать раз в пару недель на стационарном ПК, который постоянно находится в одной и той же сети и не выключается так же, как и сервер. Но когда это надо делать после каждого включения/пробуждения ноутбука — это ни в какие ворота не лезет. Плюс к этому выяснилось, что если не отмонтировать разделы и сменить сеть (скажем прийти к соседу в гости), то система изрядно виснет после выхода из сна, ибо не находит сервер с шарами, а, в редких случаях, ещё и в kernel panic случается. Всё это сильно омрачило радость поднятия сервера и мечты о том что больше я даже вспоминать не буду о бэкапах, пока они мне не понадобятся (тьфу тьфу тьфу). Было решено, что процесс нужно автоматизировать.
На первых порах
В попыхах были нагуглены способы монтирования самбы и тут же родился маленький скрипт из парочки идентичных команд следующего вида:
Так же было найдено как сделать аттач образа для TimeMachine:
hdutil оказался более смышлёным и создание папок не потреловал.
Первая версия скрипта была готова.
Безопасность
Очень напрягало указание пароля в явном виде при монтировании. Почитав ман для mount_smbfs узнал про nsmb.conf. Но идея так же не шибко понравилась, так как всё равно пароль хранится где-то в файле в открытом виде. Тут же вспомнил, что через GUI пароль спрашивают единожды, а далее вытаскивают из keychain. Захотелось использовать её. Оказалось автоматически, как если бы взял nsmb.conf и дописал ключик -N к mount_smbfs, пароль подставляться не будет (чуда не произошло). Прийдёся его сначала получать через security и затем передавать в нужное место. Для сих целей была нагуглена и переделана под свои нужды функция:
После этого явное указание пароля было заменено на:
Паранойя отступила, но любознательность и перфекционизм остались, поэтому дело продолжилось.
Улучшения и расширение
Захотелось сделать один скрипт для монтирование всего и сразу, да так сделать, чтобы он расширяемый было и повторять код много раз не пришлось, плюс чтобы смотрел что уже в системе примонтировано и второй раз монтировать не пытался. Сказано — сделано. Опишу всё по-порядку.
Для определения примонтированости, на первом этапе, был использован самый «топорный» метод
Но сразу же стало понятно, что директория может и присутствовать, но не являться точкой монтирования для чего-либо. Поэтому сделал функцию для проверки:
Метод тоже не идеален, но уже гораздо лучше, нежели простая проверка наличия директории.
То же самое было сделано и для проверки образа бэкапа:
После некоторых раздумий и чтения форумов метод раздулся и стал сразу проверять примонтирован ли образ, и, если нет, то монтировать его.
Далее нужна была функция для выполнения проверок и автоматизации по монтированию любого количества шар с сервера. Вот какой она получилась:
Внимательный читатель заметит, что во-первых: можно и имя сервера передавать в параметрах к функции, а не хардкодить его, а во-вторых: в скрипте встречается неизвестная функция is_samba_exist.
Отвечаю по-порядку: 3-й параметр для функции было делать лень, ибо пока второго сервра с самбой не планируется; функция is_samba_exist имеет следующий вид:
Несложно догадаться, что функция проверяет наличие шары с указанным именем в текущей сети.
Таким образом основная часть скрипта стала простой, понятной и расширяемой:
На последок, по образу и подобию вышеописанного скрипта, был создан ещё один, но уже для отмонтирования сразу всего:
Вот и всё. Дальше скрипты были унесены к своим собратьям в
/.script. Получили короткие алиасы в .bash_profile и стали помогать мне с самбой.
Перспективы
В будущем, когда дойдут руки, хочется подружить скрипты со SleepWatcher, дабы выполнялись они после выхода из сна и перед уходом в него же. То есть, чтобы совсем ничего не надо было делать руками и автоматизация стала полной.
Источник
Mac os share folder smb
В Mac OS, как и в Windows, есть возможность создания сетевой папки (диска), а также способ расшарить папку Mac для Windows. Ниже будут рассмотрим подробнее, как создать сетевую папку в мак OS? .
Если не удалось обнаружить необходимый диск в общедоступных ресурсах, действуем так.
Запускаем Finder.
Нажимаем хоткеи Command+K.
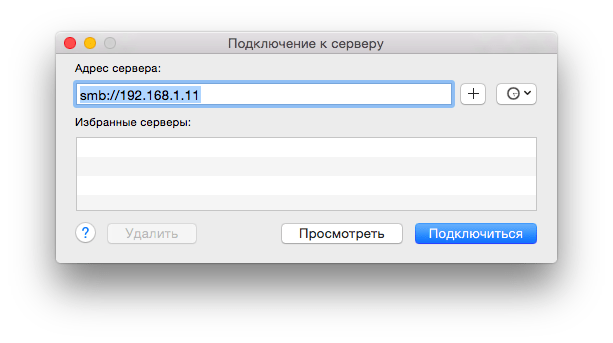
Должно будет появится окошко «Подключение к серверу«, если да, то необходимо набрать полный путь к сетевому диску, куда собираетесь подключиться. Если вы понимаете, о чем вообще в данной статье идет речь, то должны уже знать этот путь (иначе проконсультируйтесь с владельцем сервера). Формат должен быть таким: протокол//имя компьютера (или ip).
Жмем Подключиться. Иногда еще требуется ввести пароль.
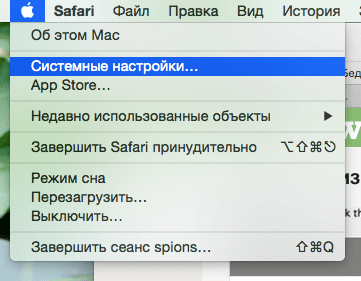
Минутку, но это не все. Дальше нам надо, чтобы такой диск был сразу доступен при каждой загрузке, это делается в Объектах входа, а там в настройках системы.
Далее переходим в Пользователи/группы, объекты входа, выбираем нужный диск и добавляем.
Вот теперь с этим закончили. Далее рассмотрим вопрос расшаривания сетевой папки OS X для оси Windows.
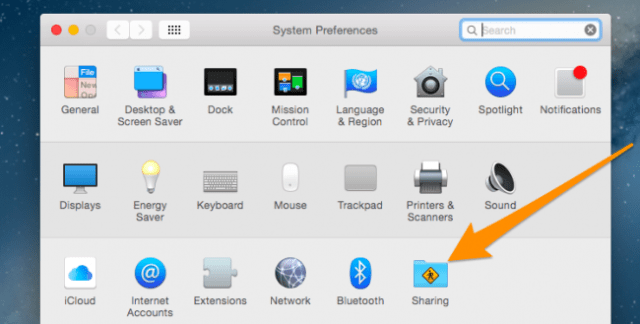
Переходим в те же настройки системы и выбираем, как ни странно, Sharing.
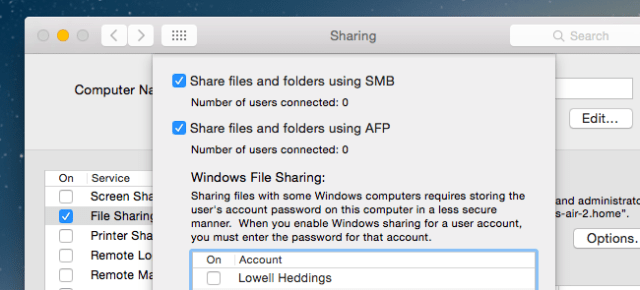
Там ставим галочку на шаринге файлов.
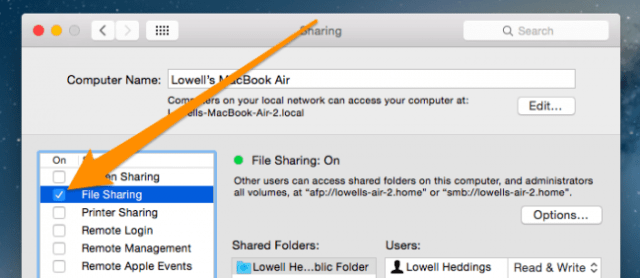
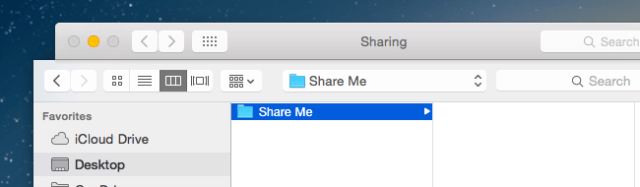
Нажимаем плюсик под колоночкой Shared Folders.
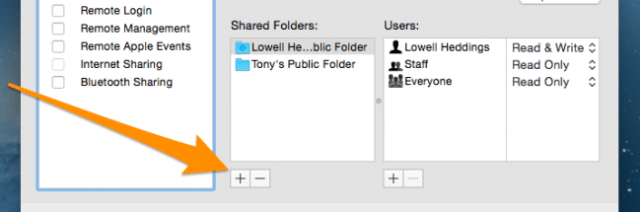
Выбираем папку, которую желаем сделать общей — в нашей ситуации Share Me.
И, наконец, чтобы эту папку могли видеть пользователи Windows, ставится галочка на опции «Share files and folder using SMB«.
Любая другая папка обрабатывается так же. Успехов!
Источник
Question: Q: How to edit «smb.conf»
Hi there,
i would like to share some folders directly from the smb.conf
I am able to do that with Linux, but i my Mac i can’t find this file!
Anyone can help me?
Other question is:
where mac os puts the sharing folder settings when you edit the system preferences?
MacBook Pro 5.5, Mac OS X (10.6.6)
Posted on Jan 29, 2011 9:43 AM
All replies
Loading page content
Page content loaded
The file is here:
If you’re not sure where a file is located, the find command is typical, or you can use Spotlight from the command line:
Mac has /etc linked over into /private, as you’ll discover. (This is implemented such that going after /etc directly does work correctly.)
Off the top, I don’t recall the details of the plists the Server Admin settings; it’s typical to use the command-line serveradmin tool for that purpose. And using the provides tools is an approach which avoids derailing the command-line serveradmin and Server Admin GUI tools through an errant edit. Issue +man serveradmin+ for details.
As for technical resources, the File Server Administration, Introduction to the Command Line manuals are in the [documentation set|http://www.apple.com/server/macosx/resources/documentation.html], and will provide details on the typical Apple approach. (Carrying over Linux norms for directly accessing configuration files can sometimes lead to operational problems, too. There are various discussions of this around, including [TS3144|http://support.apple.com/kb/TS3144].)
Jan 29, 2011 10:52 AM
Thank you for your quick answer!
Now i can see the smb.conf but i can’t edit it with:
sudo open -a /Applications/TextEdit.app /etc/smb.conf
So Mac os saves the sharing folder settings in a .plist file in /Users/TechnoPhil/Library/Preferences?
Message was edited by: filippo1982
Jan 29, 2011 11:17 AM
sudo nano /etc/smb.conf
sudo vim /etc/smb.conf
sudo emacs /etc/smb.conf
I’d create a copy first, particularly if you don’t have a full backup of your disk.
If you’re just getting going with a shell text editor, then you’ll probably want to use nano and then work your way to vim or emacs or (if you prefer a GUI editor) have a look at textwrangler and its text-mode capabilities, or at macvim and its GUI interface.
Using many of the GUI-facing editors and saving out RTF files and other such (and text files can be encoded in many different ways) can lead to configuration file corruptions and problems with tools or even with booting the operating system.
Using Textedit.app is a common way to corrupt Unix-layer files, too.
So Mac os saves the sharing folder settings in a .plist file in /Users/TechnoPhil/Library/Preferences?
Off-hand, I haven’t needed to look at the details of the implementations underneath the serveradmin tool and Server Admin in this area.
And FWIW, I would not expect to see the server-wide share settings in /User. I’d expect to see those over in /Library. The [file and directory structures used by Mac OS X|http://developer.apple.com/library/mac/#documentation/MacOSX/Conceptual/BPFil eSystem/BPFileSystem.html] are a superset of those found on Unix and POSIX platforms.
Mac OS X and Mac OS X Server make heavy use of plist files, yes. This is tied into the plutil tool, as well as the defaults command, and at various tools that are part of Xcode including Property List Editor.app and such.
If you’re coming over from Linux and want to know more about the platforms, then read the manuals end-to-end for a high-level introduction to the norms and expectations, and then have a look at Amit Singh’s Mac OS X Internals book, then start Googling around for details and procedures.
It can also help if you make an effort to forget a whole lot of what you know about Linux administration, particularly around how management is based on editing command files. Mac OS X works differently, and is managed entirely differently than Linux.
Put another way, you look likely to be headed for a learning experience here. Have fun, but definitely have a backup first.
Shell commands are unforgiving of errors. Shell commands with sudo are particularly unforgiving. Have a backup. Or three.
Источник
natritmeyer / mount_smbfs.sh
| # Mounting the share is a 2 stage process: |
| # 1. Create a directory that will be the mount point |
| # 2. Mount the share to that directory |
| # Create the mount point: |
| mkdir share_name |
| # Mount the share: |
| mount_smbfs //username:password@server.name/share_name share_name/ |
| # Unmount the share: |
| umount share_name |
This comment has been minimized.
Copy link Quote reply
SaundersB commented Oct 21, 2015
This comment has been minimized.
Copy link Quote reply
schovi commented Nov 7, 2016
Awesome. Behaviour of Finder is really really really bad 🙁
This comment has been minimized.
Copy link Quote reply
vbotay commented Jan 26, 2017
Does anybody know workaround if password ends with ‘!’ ?
In that case I have following error message
This comment has been minimized.
Copy link Quote reply
mschwartz commented Apr 6, 2017 •
This comment has been minimized.
Copy link Quote reply
S99P commented Oct 4, 2017
After reading this I tried:
I checked that it was there and then tried the mount_smbfs command with modification of variable names and ran:
mount_smbfs //leUserName:lePassWord@WinBox-pc/WinShare WinShare/
The shell wrote:
mount_smbfs: mount error: /Users/MyVolume/Desktop/WinShare: Unknown error: -1073741412
I checked that WinShare folder was where it was supposed to be (I was on the Desktop for everything, including Terminal).
I can’t find error -1073741412 anywhere. Can anyone educate me? TIA
BTW I’ve opened the WinBox-pc using: open smb://WinBox-pc/DATA/ (opens the DATA folder on WinBox-pc)
and that works; we don’t have to retype the Username and Password, and our target folder on WinBox-pc opens.
Again, can anybody educate me as to why this works but mount_smbfs doesn’t?
TIA
s99p
Источник
macOS: How to mount a SMB share from the command line A small guide explaining how to mount a UNC/SMB share between a macOS environment and other mac/win/linux systems and access it from the command-line.
Today I had to build one of my Electron-based apps for macOS, so that it could be installed and executed on macOS. If you know Electron, you most likely know that its native multi-platform capabilities are great: you just have to run the builder from the same OS you want to build your executable installer for; in case you don’t, well… you can make amend by reading this post or just skip such topic entirely, since it’s not what we’ll be talking about in this post.
Anyway, I don’t own a macOS, therefore I use a Virtual Machine with macOS Mojave (aka 10.14) to deal with such kind of tasks: I just launch the VM, clone (or update) my Electron project with GitHub and use NPM or YARN to build (or update) the node_modules folder: once done, I can build it with electron-builder or some similar tools. Pretty easy, isn’t it?
However, today I managed to further improve such technique by finding a way to entirely avoid the GitHub clone/download/NPM part, thus saving a valuable amount of disk space on my VM: I was able to do that by using a SMB share from my Windows host PC to the macOS VM… Which brings us to the main topic of this article.
What I am about to describe below is a UNC/SMB share between Windows and macOS, but the same procedure can also be used (with very minor differences) to connect any kind of SMB share.
Creating the UNC/SMB Share
The first thing I did was to share my /Projects/ root folder using a standard Windows UNC share: I assigned read and write permissions to a protected user (let’s call it User) with a strong password (for example, Pass).
Mounting the SMB Share
Right after that I switched to the macOS VM and used the mount_smbfs command (a shortcut for mount -t smbfs) to mount the share to the /Volumes/Projects folder in the following way:
Источник


