- How to Start PostgreSQL Server on Mac OS X via Homebrew
- Install PostgreSQL via Homebrew
- Using a LaunchAgent and plist to Launch PostgreSQL on Startup
- Manually Starting PostgreSQL
- Start/Stop PostgreSQL Without Homebrew
- Startup Troubleshooting: Did You Run initdb ?
- Установка и подключение PostgreSQL на Mac Os
- Установка PostgreSQL на Mac Os
- Не обязательно
- Подключение к PostgreSQL на Mac OS
- Как подключиться к PostgreSQL на Mac OS
- Подключение в сторонней программе к БД
- DataGrip
- Исправление ошибок
- Читайте также
- PostgreSQL Setup : Mac Edition
- Reduce your efforts on PostgreSQL installation and issues in Mac OS with these 4 steps
- Step 1 : Getting Homebrew
- Step 2: Installing PostgreSQL
- Step 3: Initialize Database
- Step 4.1: Connect to database via command line
- 17 Practical psql Commands That You Don’t Want To Miss
- Summary: in this tutorial, we give you a list of common psql commands that helps you query data from PostgreSQL…
- Step 4.2: Connect to database via Popular GUIs
- Recommended GUIs
- 1. Postico
- 2. pgAdmin
- 3. DataGrip
- How to Start a PostgreSQL Server on Mac OS X
- Using Homebrew
- (Optional) Creating a Custom Data Directory
- Using PostgreSQL App
- Using Terminal with the PostgreSQL App
How to Start PostgreSQL Server on Mac OS X via Homebrew
Install PostgreSQL via Homebrew
Likely most OS X users know of Homebrew , but Homebrew is a package manager for OS X that allows you to easily install and run a massive library of applications and utilities with ease.
We won’t go through the entire (albeit short) installation process of Homebrew, but if you wish to install Homebrew and use it for PostgreSQL management, check out the installation command on the official documentation. If you aren’t sure if Homebrew is installed, try the which brew command from the terminal to verify.
Once Homebrew is installed, you can install PostgreSQL by issuing the following commands in your terminal:
The first two commands are used to update Homebrew and report any potential issues (if necessary). Then, of course, brew install postgres is the one-line command for installing PostgreSQL.
You should see a good deal of useful information in the output during installation, much of which should be copied down for use in the next sections.
Using a LaunchAgent and plist to Launch PostgreSQL on Startup
In most cases, you’ll likely wish to have PostgreSQL launch when you start up your system, so you’ll need to tell your computer this is your desire.
First, you’ll need to create a directory for your LaunchAgents to reside (if the directory doesn’t exist already). LaunchAgents in OS X are simple scripts used by launchd that cause the system to run programs or code during startup.
Create your user -specific LaunchAgents directory with this command, if necessary:
Now you’ll need to create a symbolic link from the script that actually allows Postgres to run to the LaunchAgents directory. A symbolic link is similar to creating a new copy of a file for use in another directory, but since the link is вЂsymbolic’, the link is just a forwarding address: any request made to that symbolic link location is actually “forwarded along” or redirected to where the real file actually resides.
Link to the plist (property list) file that was generated by Homebrew and place that new symbolic link in LaunchAgents with this command:
Note: Double-check that the command is correct: It should’ve been part of the installation output mentioned above when Homebrew installed Postgres initially.
Finally, we load the new symbolic link’ed LaunchAgent file using the launchctl load command, which is specifically what informs the computer to run this script and start Postgres when the computer launches. Again, the exact command to enter for your own installation will be an output during Homebrew’s Postgres installation, but it should look something like this:
Manually Starting PostgreSQL
To manually startup Postgres without rebooting, again you should be able to use the command that was output during the installation, like so:
This will attempt to launch Postgres in daemon mode, which means it will be running as a background process without taking over your terminal.
Start/Stop PostgreSQL Without Homebrew
In the event that you don’t have (or don’t wish to use) Homebrew for Postgres, yet you have Postgres installed already, you can also manually start it with pg_ctl , which is the launch utility provided by Postgres itself.
This will start Postgres (assuming default directories):
And this will stop Postgres:
Startup Troubleshooting: Did You Run initdb ?
In some cases, if you have trouble running Postgres, be sure you’ve executed the initdb command one time, which causes Postgres to initialize the database cluster for a new installation and allows you to connect with the default postgres user.
Источник
Установка и подключение PostgreSQL на Mac Os
Устанавливаем PostgreSQL на Mac OS.
Установка PostgreSQL на Mac Os
Добавляем в автозапуск при старте системы Mac OS.
Также можно запустить вручную:
Не обязательно
Если автозагрузка не сработает. Можно провести такие манипуляции:
Директория автозагрузки находится здесь:
Добавляем в автозагрузку
Подключение к PostgreSQL на Mac OS
Подключение на Mac OS немного отличается от Linux. Проверим пользователей:
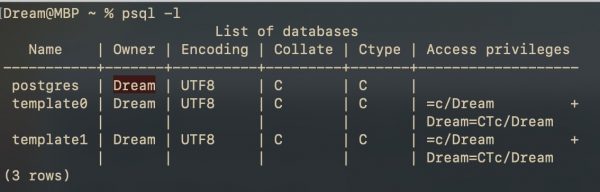
Для подключения указываем Owner из таблицы выше:
Как создать БД и пользователя, следовать инструкции:
https://ploshadka.net/postgresql/
Если коротко, то для локалки достаточно ввести в консоль:
Как подключиться к PostgreSQL на Mac OS
На localhost достаточно создать базу данных и подключиться к ней указав только её имя:
Остальное подхватиться по умолчанию.
Подключение в сторонней программе к БД
DataGrip
На примере программы DataGrip:
![]()
Исправление ошибок
Статья по исправлению некоторых ошибок с правами доступа.
Читайте также
Кстати, на сайте нет рекламы. У сайта нет цели самоокупаться, но если вам пригодилась информация можете задонатить мне на чашечку кофе в макдаке. Лайкнуть страницу или просто поблагодарить. Карма вам зачтется.
Источник
PostgreSQL Setup : Mac Edition
Reduce your efforts on PostgreSQL installation and issues in Mac OS with these 4 steps

PostgreSQL, also known as Postgres, is a free and open-source relational database management system emphasizing extensibility and technical standards compliance. It is designed to handle a range of workloads, from single machines to data warehouses or Web services with many concurrent users.
If you already have Homebrew installed, you can skip to Installing PostgreSQL. Otherwise, let’s keep going.
Step 1 : Getting Homebrew
To install PostgreSQL on the command line we will be using a package manager called Homebrew. In MacOSX 10.7 or higher, the Ruby interpreter comes pre-installed. Let’s start by copying and pasting the following command into our command line:
Step 2: Installing PostgreSQL
The first thing we’re going to do is install Postgres. There are two main ways to get Postgres onto your machine:
- Using a graphical installer like BigSQL or Postgres.app (Requires macOS 10.12 for latest)
- Using a package manager to install via the command line.
You can pick whichever option is right for you. For this tutorial, let’s see how to install on the command line.
How to check if PostgreSQL is installed in you mac?

Remove previous versions of PostgreSQL
Delete all Files of Postgres
Install Postgres with Homebrew
Start PostgreSQL server
To have launchd start postgresql now and restart at login:
Or, if you don’t want/need a background service you can just run:
Step 3: Initialize Database
If terminal shows an error like below:

Remove old database file
rm -r /usr/local/var/postgres
Run the initdb command again

Step 4.1: Connect to database via command line
Postgres works pretty hard to make itself usable right out of the box without you having to do anything. By default, it automatically creates the user postgres . Let’s see what other users it has created. Let’s start by using the psql utility, which is a utility installed with Postgres that lets you carry out administrative functions without needing to know their actual SQL commands.
Start by entering the following on the command line:
(You may need to use sudo psql postgres for this command to work, depending on how your system is configured).

17 Practical psql Commands That You Don’t Want To Miss
Summary: in this tutorial, we give you a list of common psql commands that helps you query data from PostgreSQL…
Step 4.2: Connect to database via Popular GUIs
There are many clients for PostgreSQL on the Mac. You can find many of them in the Community Guide to PostgreSQL GUI Tools in the PostgreSQL wiki. Some of them are quite powerful; some are still a bit rough. Here’s a list of all the Mac Apps I found (in alphabetic order):
Recommended GUIs
1. Postico
Postico is a modern Postgres client for OSX, built by the same developer who built Postgres.app (mentioned above). It is free, but you can buy a license to unlock additional power features. This is the GUI that I use to manage Postgres because it is built specifically for Mac and has a beautiful, very easy to use (but powerful) UI. It also includes an SQL editor for complex queries.
2. pgAdmin
pgAdmin is the oldest of the Postgres GUIs, its first version being released just a few months after Postgre’s first release in 1996. Having been rewritten several times, it can run on Linux, MacOSX, and Windows, and features powerful database management tools including a syntax-highlighted SQL editor. Designed to run on both client machines and on deployed servers, pgAdmin is capable of handling advanced cases that Postico cannot. It’s dashboard is one of it’s kind and is an absolute essential tool when using Postgres in a distributed microservice architecture.
3. DataGrip
DataGrip is my favorite when it comes to IDEs. It is a modern IDE developed by JetBrains that offers efficient schema navigation, an intelligent query console, and version control integration. DataGrip also resolves references in your SQL code and helps you refactor them.
Источник
How to Start a PostgreSQL Server on Mac OS X
Last modified: August 09, 2021
There are two main ways to install PostgreSQL on mac OS X.
Using Homebrew
Homebrew can be installed by running the following command in a terminal:
/usr/bin/ruby -e «$(curl -fsSL https://raw.githubusercontent.com/Homebrew/install/master/install)»
If Homebrew is already installed, make sure that it is up to date by running:
Then ensure there are no conflicts or errors using:
Homebrew is a powerful package manager with many uses, including installing and running postgreSQL. This can be done by typing the following command into a terminal: 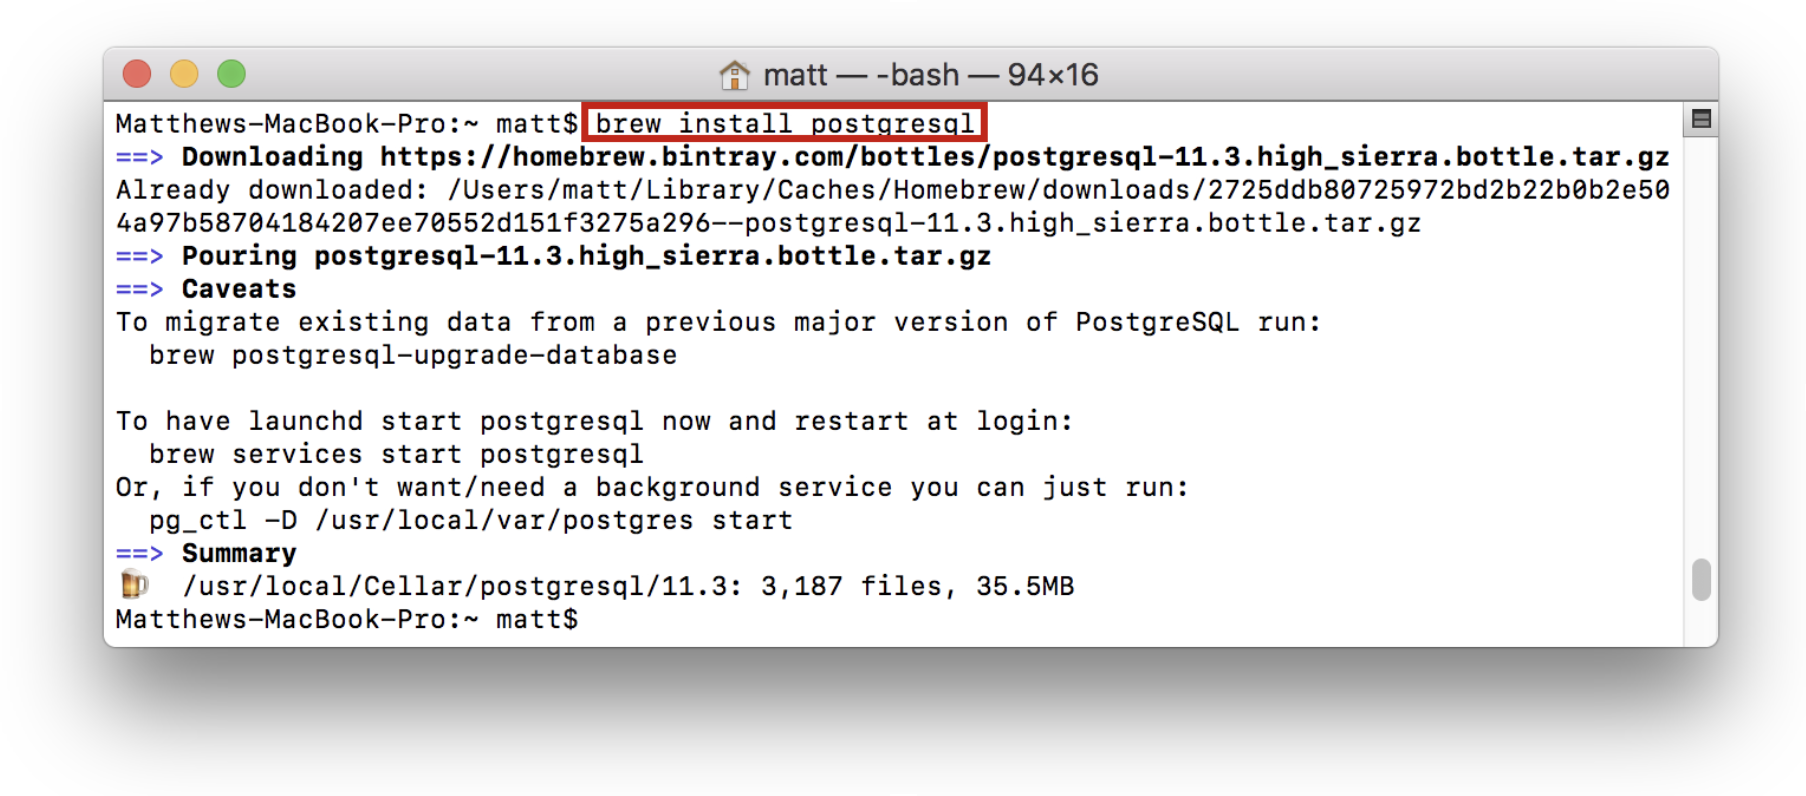
Now that postgres is installed the default server can be started by running the command:
This will start up a postgres server hosted locally on port 5432. The server will be run out of the directory /usr/local/var/postgres .
It can now be accessed by typing the following command:
This will connect to the server and access the postgres database. Once this is done:
- Schemas and tables can be created
- Data can be loaded and deleted from the database
- Queries can be run
The process should look like this: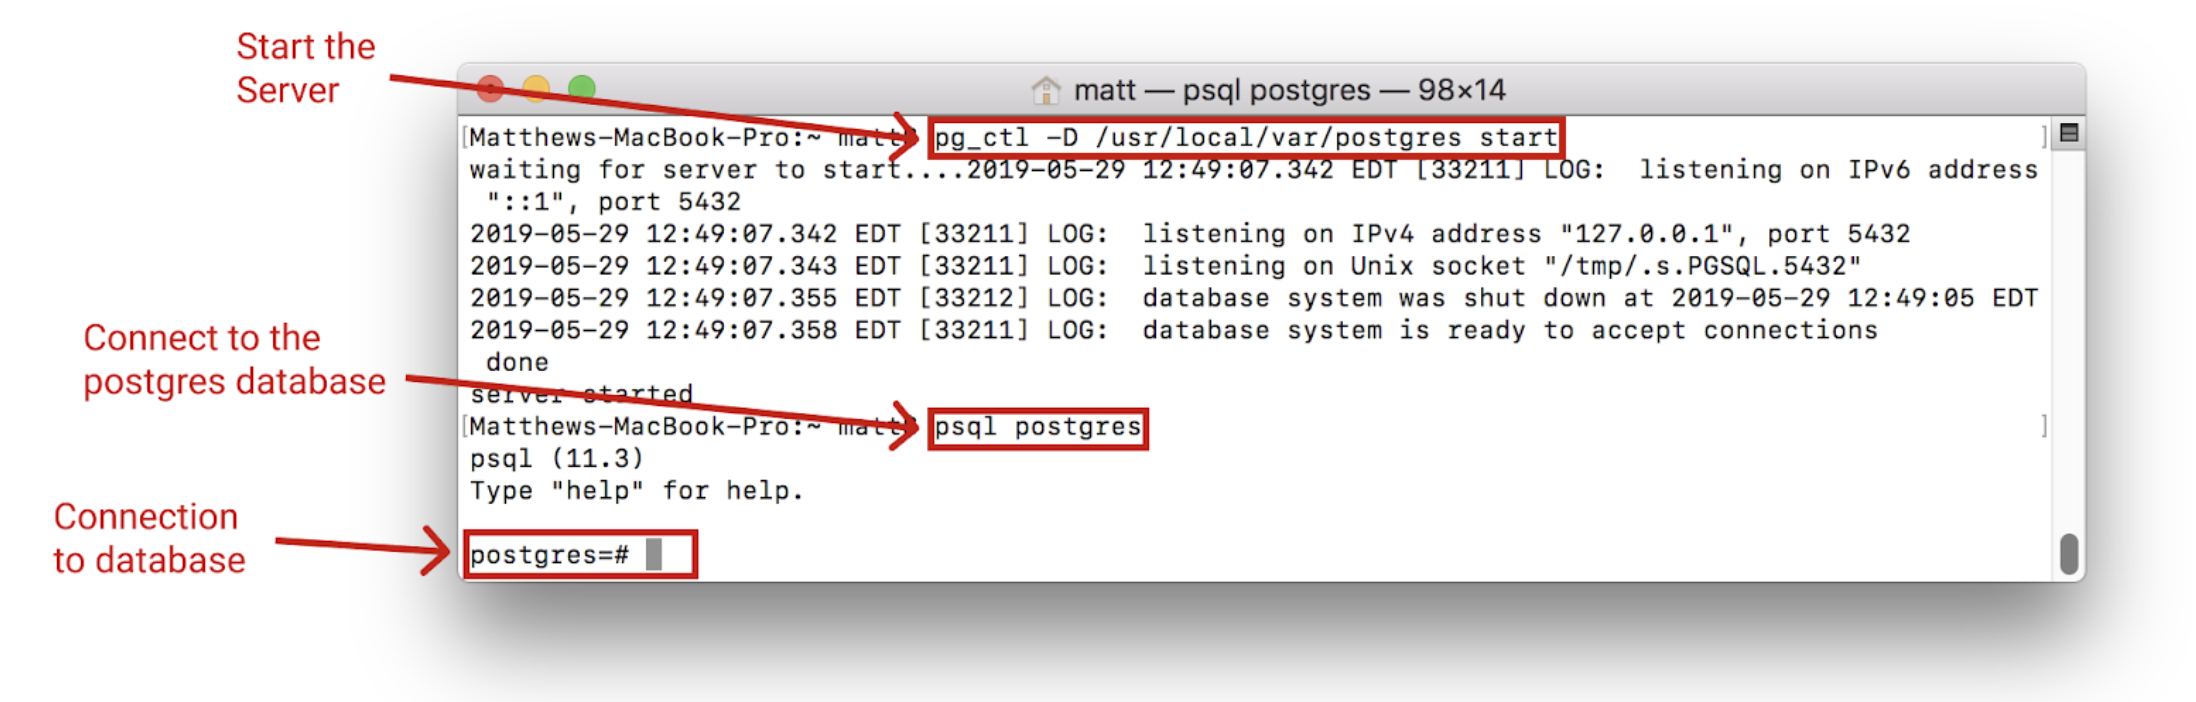
This shows that the server has been started and can be connected to.
(Optional) Creating a Custom Data Directory
A custom data directory can also be used for a server. To do this, first create a directory to be used as the server location. For example, create a directory called myData in the home directory: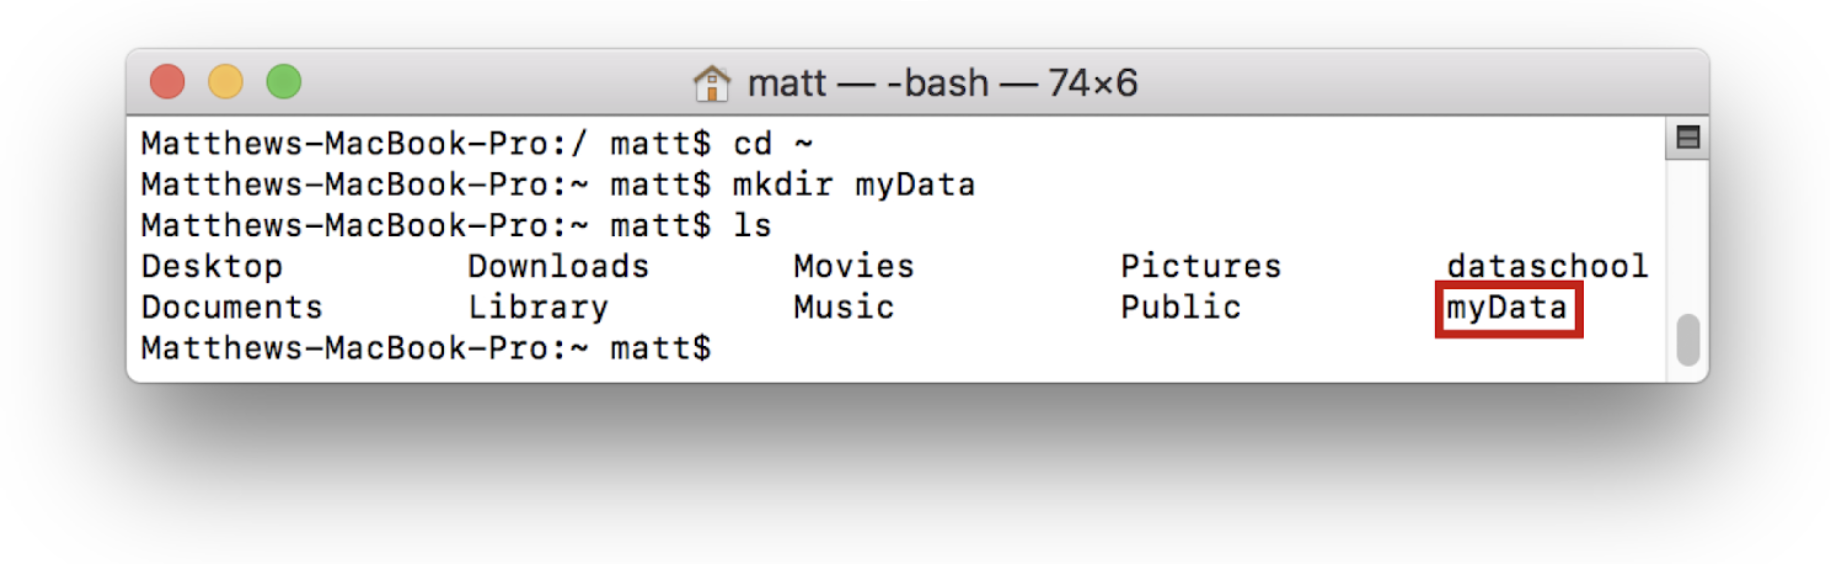
Once the directory is created, the server can be initialized. This means that we configure the directory and add the necessary files to run the server. To do this run the initdb command as shown: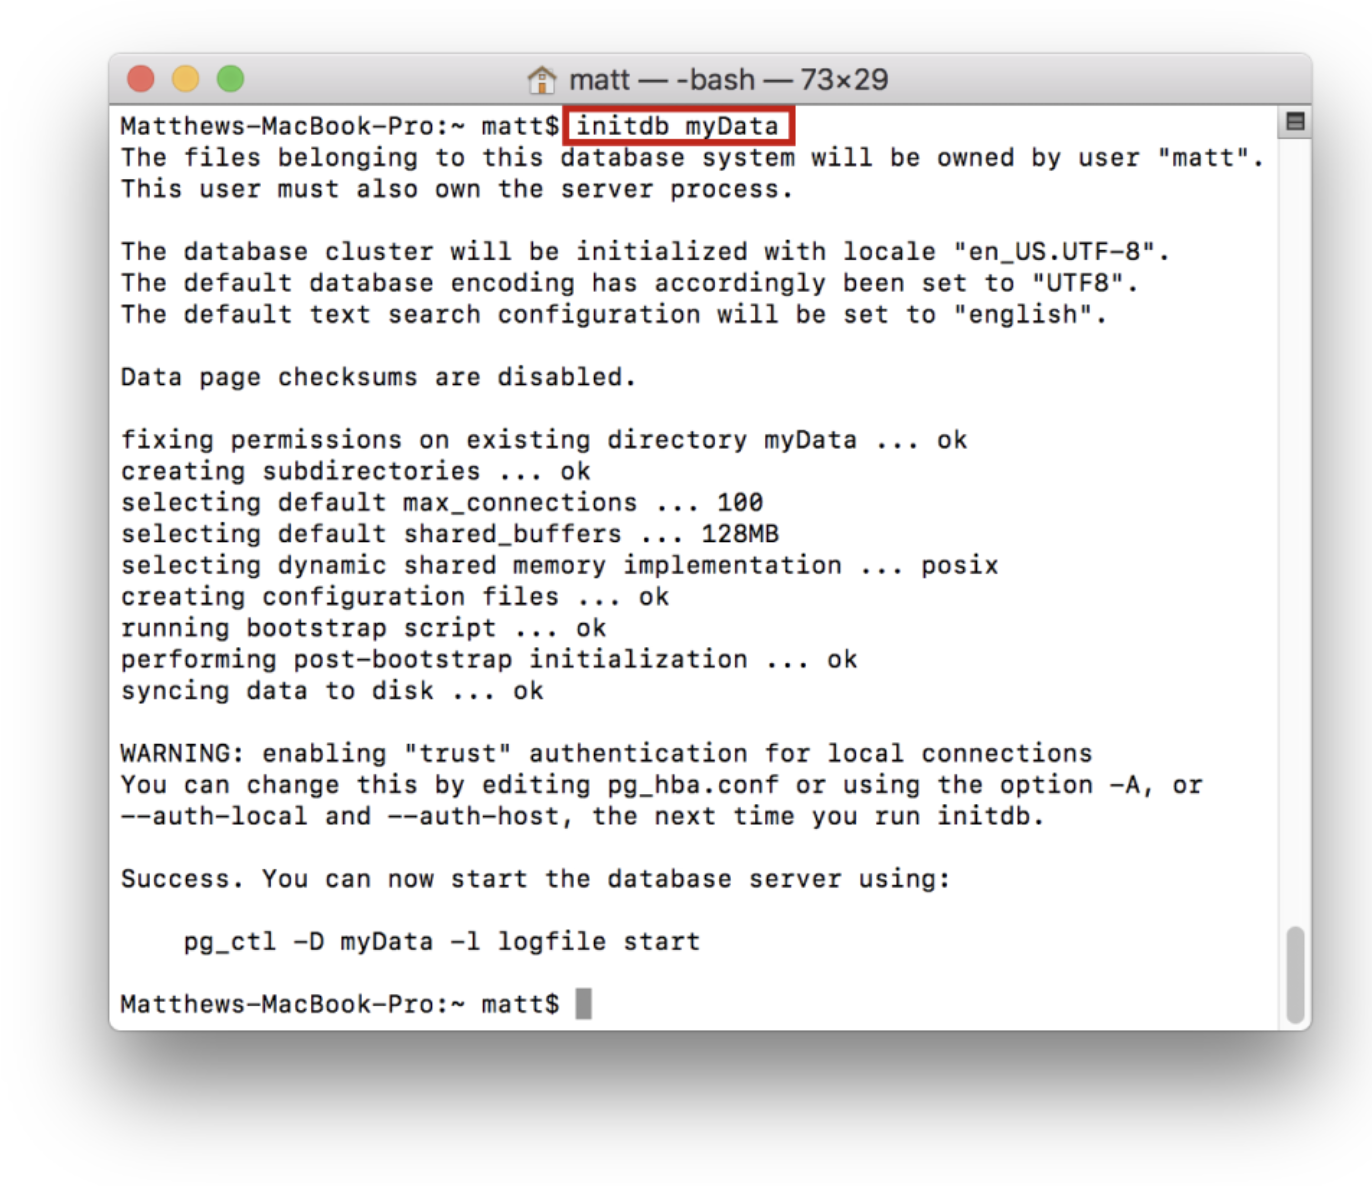
This will fill the myData directory with files necessary to run the server:
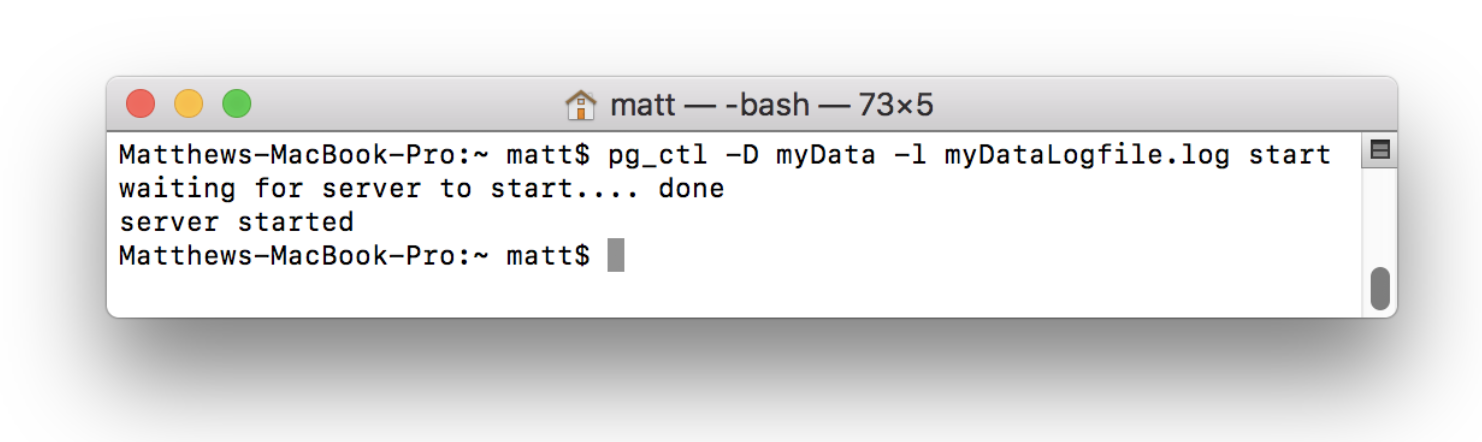
Now that the server is initialized and the log file is created, you can start the server from this directory. To do this use the command and substitute in for the specified values:
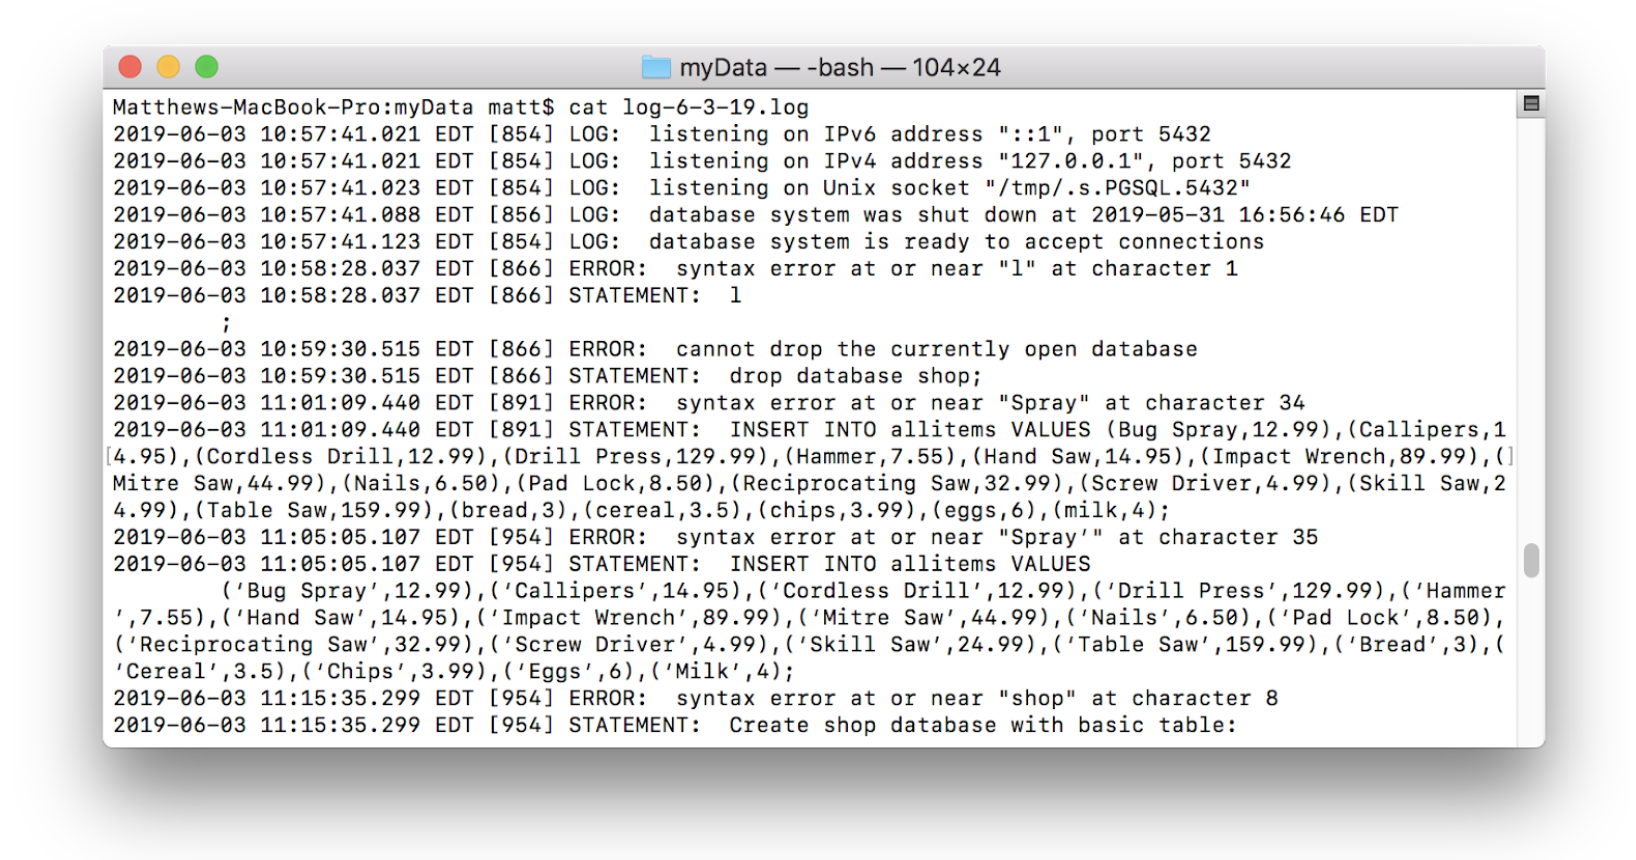
The “Data Directory” refers to the directory that was just initialized (in this case myData). The “Log file” is a file that will record server events for later analysis. Generally log files are formatted to contain the date in the file name (e.g. “2018-05-27.log” or “myData-logfile-2018-05-27.log”) and should be stored outside of the database that they are logging so as to avoid unnecessary risks. Log files can be dense to read but are very useful for security and debugging purposes:
The command above will generate a log file like the one shown, start the server, and tie the log file to the server. If a log file is not specified, events will be logged to the terminal:
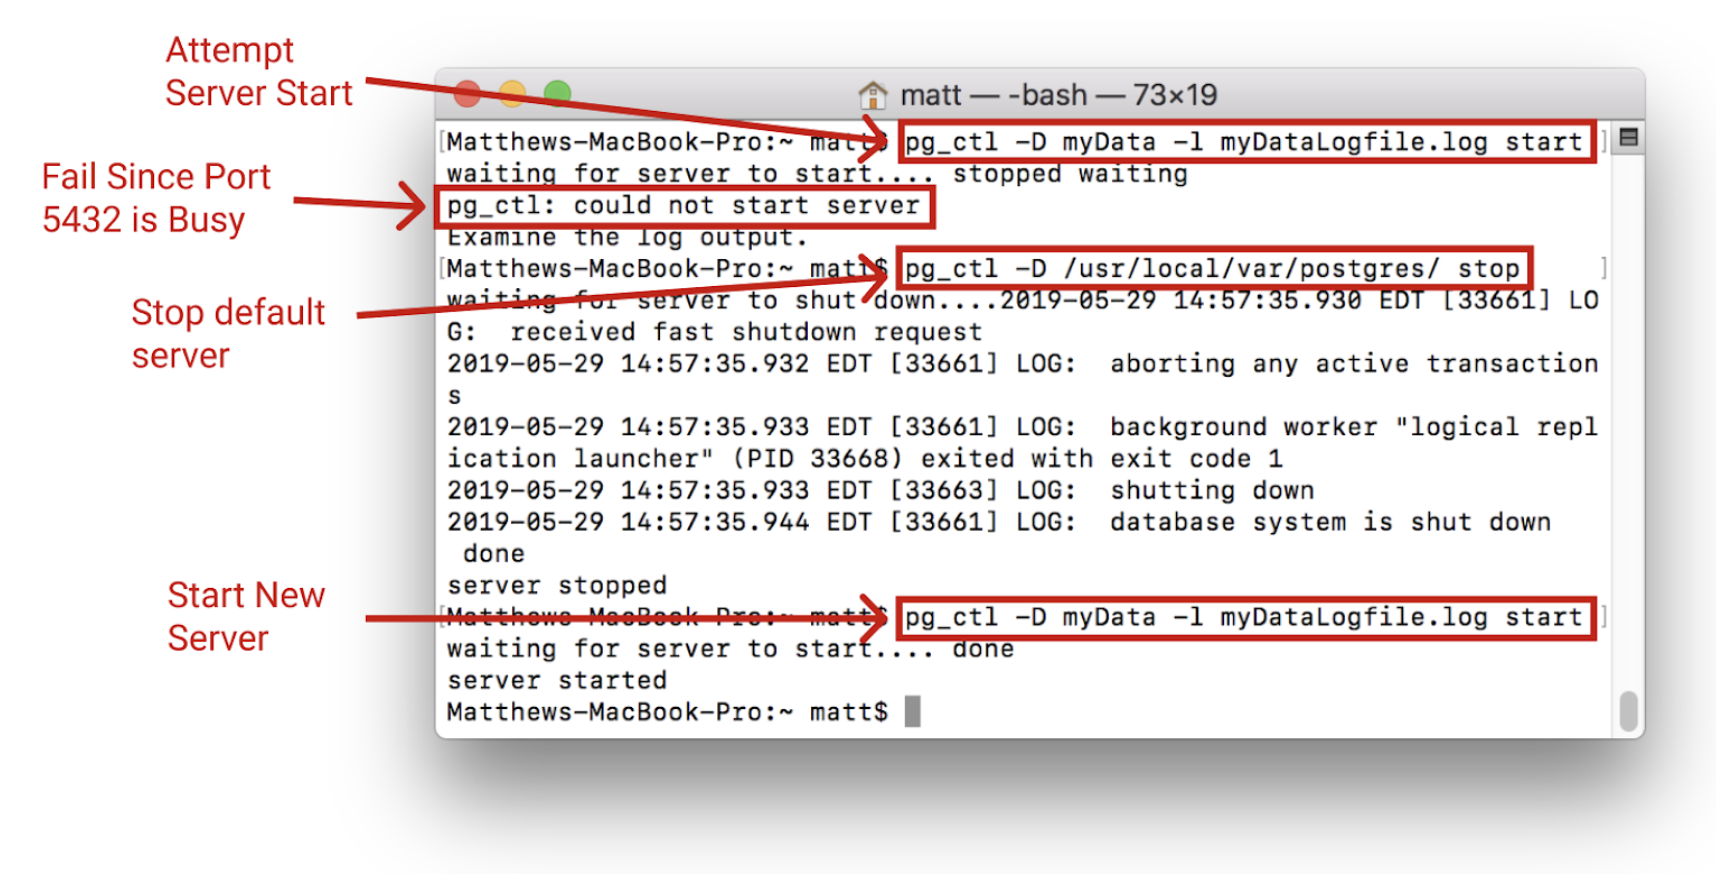
The server will only start if the port is free. If the default server is running it must first be stopped using the pg_ctl -D /usr/local/var/postgres stop command:
Once started, it can be connected to the same way as before using:
Using PostgreSQL App
To run a server through the postgres app, the first step is to download the program. The app can be downloaded on postgresapp.com. Once the app is downloaded and moved into the applications folder, the app can be opened.
Open the Postgres app:
In order to start the server, click the start button.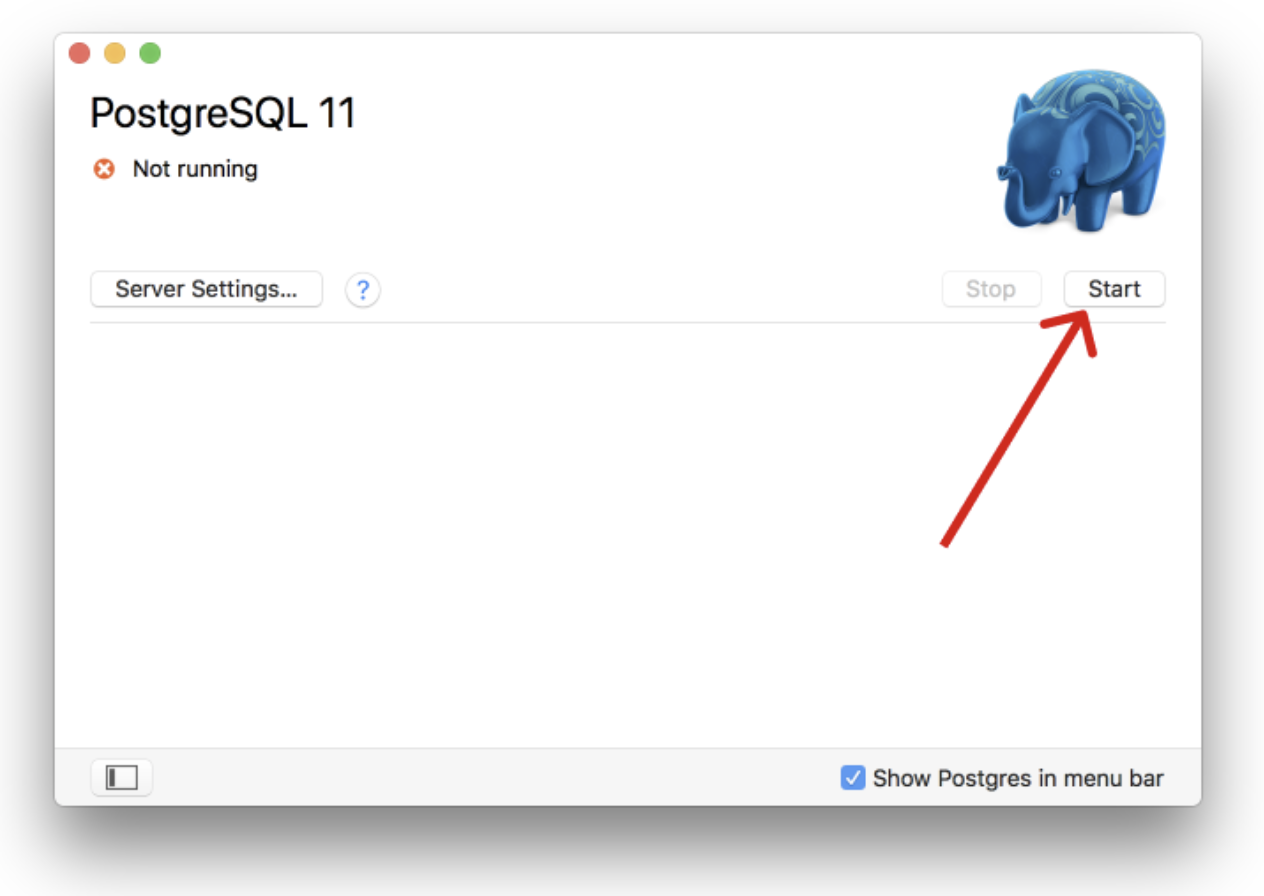
This will start the server. Details on the server can be found by opening the server settings: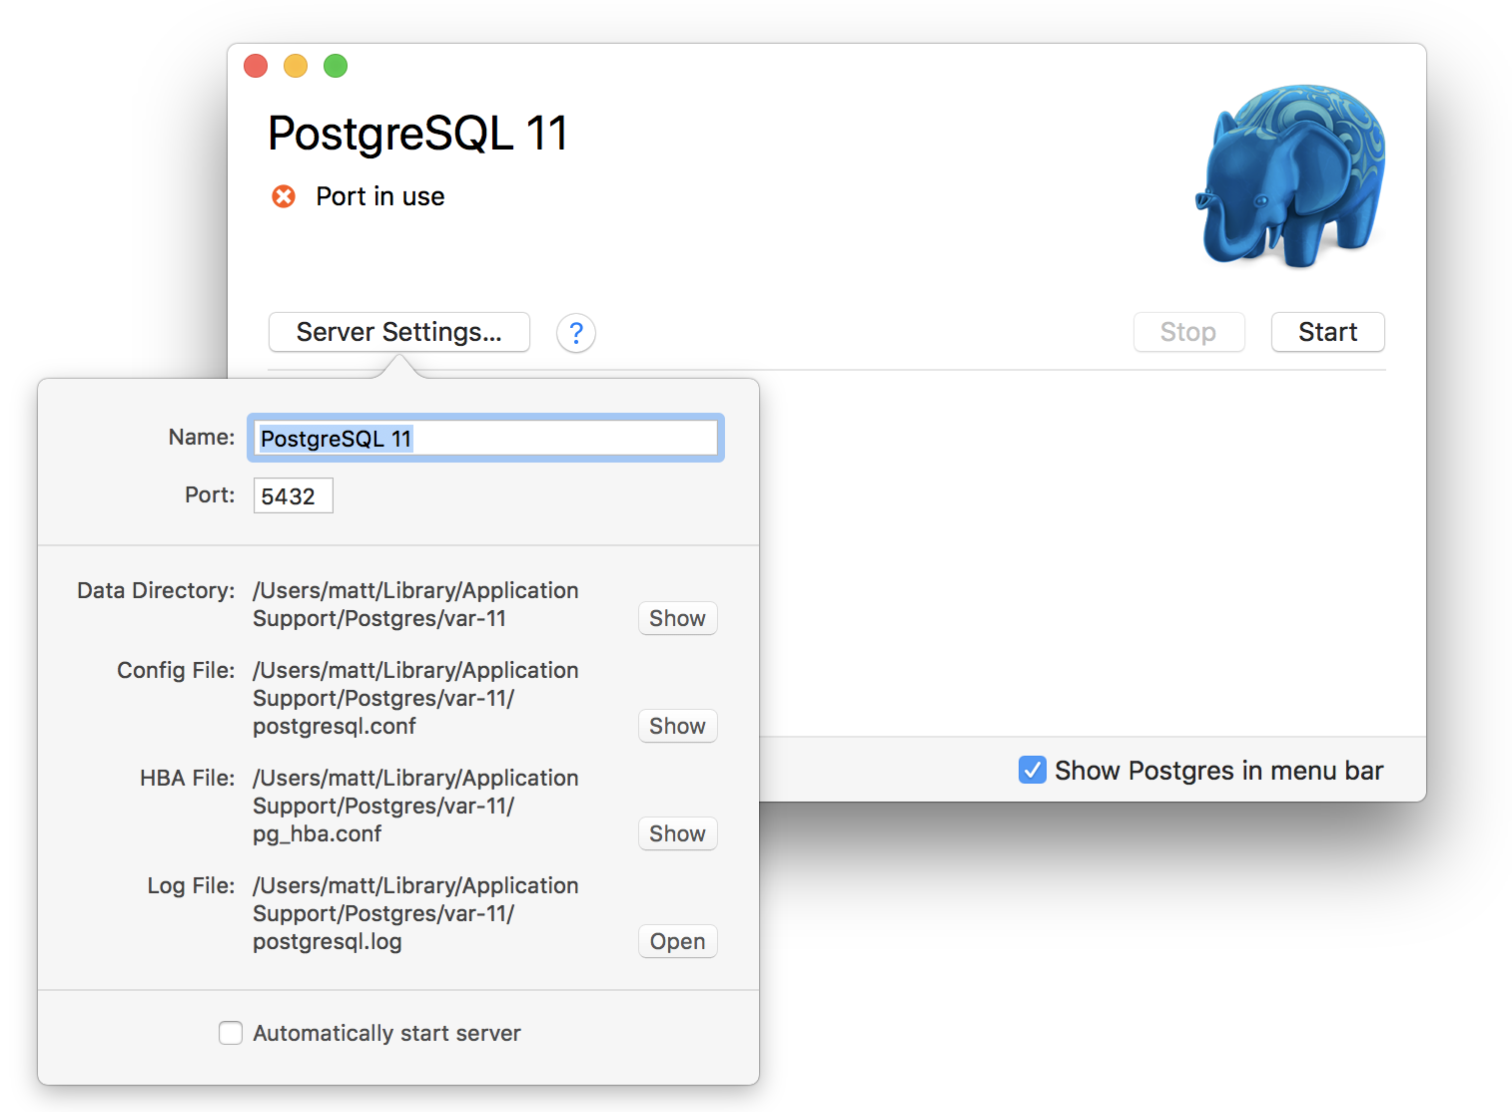
This interface shows all the essential information regarding the server. It also allows the port to be changed very easily. This is useful because multiple PostgreSQL servers can
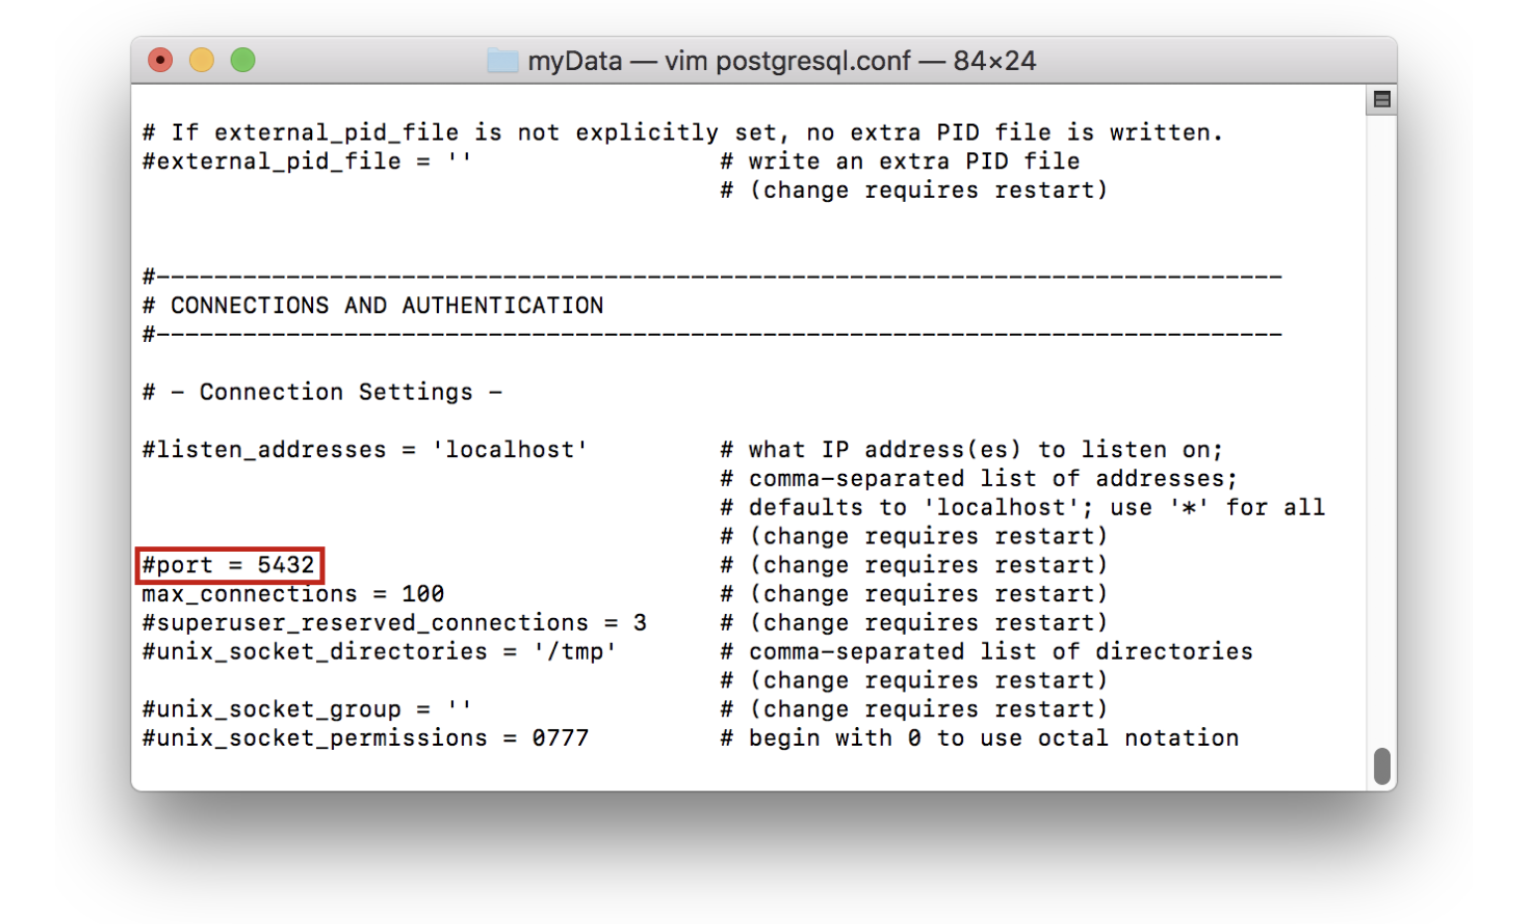
Note: To change the port in the terminal, the вЂpostgres.conf’ file (which can be found in the data directory) must be edited. This looks like the following:
Using Terminal with the PostgreSQL App
Once the app has been downloaded, command line tools can be used as well. These tools can be accessed by typing:
For example, the вЂpostgres’ database on the server can be connected to using the psql tool with postgres as an argument:
Rather than typing out the full path each time however, the path can be added to a file that will allow significantly easier access to the tools, allowing the tools be accessed from any directory on the computer. To do this, the following command can be run in the terminal:
Once this is done, the вЂpostgres’ database can be accessed by simply typing:
Источник


