- How to Start PostgreSQL Server on Mac OS X via Homebrew
- Install PostgreSQL via Homebrew
- Using a LaunchAgent and plist to Launch PostgreSQL on Startup
- Manually Starting PostgreSQL
- Start/Stop PostgreSQL Without Homebrew
- Startup Troubleshooting: Did You Run initdb ?
- PostgreSQL не работает на Mac
- abhishekdev / com.edb.launchd.postgresql-9.1.plist
- How to Start a PostgreSQL Server on Mac OS X
- Using Homebrew
- (Optional) Creating a Custom Data Directory
- Using PostgreSQL App
- Using Terminal with the PostgreSQL App
How to Start PostgreSQL Server on Mac OS X via Homebrew
Install PostgreSQL via Homebrew
Likely most OS X users know of Homebrew , but Homebrew is a package manager for OS X that allows you to easily install and run a massive library of applications and utilities with ease.
We won’t go through the entire (albeit short) installation process of Homebrew, but if you wish to install Homebrew and use it for PostgreSQL management, check out the installation command on the official documentation. If you aren’t sure if Homebrew is installed, try the which brew command from the terminal to verify.
Once Homebrew is installed, you can install PostgreSQL by issuing the following commands in your terminal:
The first two commands are used to update Homebrew and report any potential issues (if necessary). Then, of course, brew install postgres is the one-line command for installing PostgreSQL.
You should see a good deal of useful information in the output during installation, much of which should be copied down for use in the next sections.
Using a LaunchAgent and plist to Launch PostgreSQL on Startup
In most cases, you’ll likely wish to have PostgreSQL launch when you start up your system, so you’ll need to tell your computer this is your desire.
First, you’ll need to create a directory for your LaunchAgents to reside (if the directory doesn’t exist already). LaunchAgents in OS X are simple scripts used by launchd that cause the system to run programs or code during startup.
Create your user -specific LaunchAgents directory with this command, if necessary:
Now you’ll need to create a symbolic link from the script that actually allows Postgres to run to the LaunchAgents directory. A symbolic link is similar to creating a new copy of a file for use in another directory, but since the link is вЂsymbolic’, the link is just a forwarding address: any request made to that symbolic link location is actually “forwarded along” or redirected to where the real file actually resides.
Link to the plist (property list) file that was generated by Homebrew and place that new symbolic link in LaunchAgents with this command:
Note: Double-check that the command is correct: It should’ve been part of the installation output mentioned above when Homebrew installed Postgres initially.
Finally, we load the new symbolic link’ed LaunchAgent file using the launchctl load command, which is specifically what informs the computer to run this script and start Postgres when the computer launches. Again, the exact command to enter for your own installation will be an output during Homebrew’s Postgres installation, but it should look something like this:
Manually Starting PostgreSQL
To manually startup Postgres without rebooting, again you should be able to use the command that was output during the installation, like so:
This will attempt to launch Postgres in daemon mode, which means it will be running as a background process without taking over your terminal.
Start/Stop PostgreSQL Without Homebrew
In the event that you don’t have (or don’t wish to use) Homebrew for Postgres, yet you have Postgres installed already, you can also manually start it with pg_ctl , which is the launch utility provided by Postgres itself.
This will start Postgres (assuming default directories):
And this will stop Postgres:
Startup Troubleshooting: Did You Run initdb ?
In some cases, if you have trouble running Postgres, be sure you’ve executed the initdb command one time, which causes Postgres to initialize the database cluster for a new installation and allows you to connect with the default postgres user.
Источник
PostgreSQL не работает на Mac
Ошибка в полном объеме гласит:
PSQL: не удалось подключиться к серверу: нет такого файла или каталога. Работает ли сервер локально и принимает подключения через сокет домена Unix «/tmp/.s.PGSQL.5432»?
Я второй раз настраиваю Postgresql через Homebrew на моем Mac, и я понятия не имею, что происходит. Раньше это работало. В какой-то момент я, должно быть, ввел команду, которая все испортила. Я не уверен. Теперь всякий раз, когда я ввожу команду SQL из командной строки, я получаю вышеуказанное сообщение. Я запустил команду, чтобы проверить, работает ли сервер, и, очевидно, это не так. Если я пытаюсь запустить сервер с помощью
$ postgres -D / usr / local / pgsql / data
Я получаю следующую ошибку:
postgres не может получить доступ к файлу конфигурации сервера «/usr/local/pgsql/data/postgresql.conf»: такого файла или каталога нет
Я удалил и переустановил Postgresql через Homebrew, но проблема остается. Я полностью в растерянности относительно того, как заставить это работать. Любая помощь будет оценена.
Проблема также может быть связана с аварийным процессом, который оставил postmaster.pid файл позади.
Запустите эту команду, чтобы вручную запустить сервер:
Я получал то же самое
петля Homebrew установить / запустить / остановить / перезапустить безрезультатно .
Наконец-то brew postgresql-upgrade-database сработало.
Кажется, я был на 9.6 вместо 10.4, и мой последний перезапуск App Store перезапустил все мои серверы баз данных .
Я только что решил ту же проблему. Это просто потому, что я забыл правильно запустить его перед использованием.
Для чистой установки postgresql в Mac OS процесс будет (используя команду brew ):
тогда, если вы хотите автоматически запускаться postgresql при входе в систему:
или вы просто хотите запустить его в любое время:
Если ваш случай более сложный, давайте brew uninstall postgresql повторим эти шаги.
Надеюсь, это поможет!
Я продолжал получать вышеупомянутую ошибку, и ни одно из вышеупомянутых решений не работало для меня. Наконец, следующее решение решило мою проблему в Mac OS X
Установите postgres, используя brew
Установить Brew Services
Для запуска postgres в качестве фонового сервиса
Чтобы остановить postgres вручную
Мы также можем использовать Brew Services для перезапуска Postgres
Это происходит, когда сервер postgres не работает. Шаги, чтобы правильно установить Postgres через Homebrew на MAC:
brew install postgres
initdb /Users/ /db -E utf8 [Это инициализирует postgres для использования данного каталога в качестве каталога базы данных. Обычно не рекомендуется использовать каталог пользователя для хранения базы данных. Отредактируйте файл sudoers для добавления initdb и аналогичных команд, а затем запустите initdb в / usr / local / var / postgres]
pg_ctl -D /Users/ /db -l logfile start [После успешного выполнения шага 2 будет предложено запустить шаг 3. Эта команда запускает сервер вручную.]
Это сработало для меня. Измените каталог postgresql в соответствии с версией вашей системы.
Общий путь- rm /usr/local/var/postgres/postmaster.pid
но для postgresql@9.6 в моем системном пути есть rm /usr/local/var/postgresql@9.6/postmaster.pid
перезапустите postgresql@9.6- brew services restart postgresql@9.6
Я просто раскомментирую в /etc/postgresql/9.5/main/postgresql.conf
и перезапустите postgres. И для меня это работает.
недавно я прошел через аналогичную проблему. есть только другая проблема и решение. Я запускал 2 версии postgres (9.3 и 9.6), хотя сервер был настроен на работу на 2 разных портах, но кое-как команда psql на bash пытается подключиться к порту по умолчанию 5432. Убедитесь, что сервер работает, и проверьте, настройки вашего порта, затем запустите psql -p
postgres . Решением является изменение порта.
Я долго искал, и это было самое чистое и аккуратное решение:
Недавно я обновил Postgres с 9.2 до 9.3, используя bg upgrade postgres. Процесс прошел гладко, и pg_upgrade — очень удобный инструмент.
Тем не менее, возникли проблемы, когда я попытался запустить любые спецификации, необходимые для подключения к Postgres. Хотя Postgres определенно бежал, я вдруг получил:
не удалось подключиться к серверу: нет такого файла или каталога (PG :: ConnectionBad). Сервер работает локально и принимает подключения через сокет домена Unix «/var/pgsql_socket/.s.PGSQL.5432»? Проблема заключалась в том, что новая версия Postgres прослушивает /tmp/.s.PGSQL.5432. Я мог бы возиться с конфигом и заставить Postgres использовать сокет домена, которым он был ранее, или четко указать Rails, как подключаться, но оба этих подхода казались работой, которую мне не нужно было делать. Я ни разу не велел Rails подключаться к postgres по этому пути, Rails предполагал это, и теперь его предположения были неверны.
Исправить это просто, если немного удивительно. Когда вы устанавливаете гем ‘pg’, он определяет, какая версия Postgres установлена, и соответственно устанавливает путь к сокету домена. Решение так же просто, как переустановить драгоценный камень. $ gem uninstall pg $ cd my-rails-app/ $ bundle install
обновить его с помощью команды
если у вас есть следующая ошибка Команда ‘brew’ не найдена, но может быть установлена с помощью: sudo apt install linuxbrew-wrapper
затем установите его с помощью команды
Для меня это также произошло после перезагрузки, и ни одно из вышеперечисленных решений не помогло мне. После проверки журнала сервера вот так:
Поэтому я изменил права доступа следующим образом:
и все снова заработало, и жизнь была хорошей.
Следующие шаги помогают мне:
brew удалить postgresql brew установить postgresql brew postgresql-upgrade-database
Источник
abhishekdev / com.edb.launchd.postgresql-9.1.plist
| xml version = » 1.0 » encoding = » UTF-8 » ?> |
| DOCTYPE plist PUBLIC «-//Apple Computer//DTD PLIST 1.0//EN» |
| «http://www.apple.com/DTDs/PropertyList-1.0.dtd»> |
| plist version = » 1.0 » > |
| dict > |
| key > Disabled key > |
| false/> |
| key > Label key > |
| string > com.edb.launchd.postgresql-9.1 string > |
| key > ProgramArguments key > |
| array > |
| string > /Library/PostgreSQL/9.1/bin/postmaster string > |
| string > -D/Library/PostgreSQL/9.1/data string > |
| array > |
| key > RunAtLoad key > |
| true/> |
| key > UserName key > |
| string > postgres string > |
| key > KeepAlive key > |
| dict > |
| key > SuccessfulExit key > |
| false/> |
| dict > |
| dict > |
| plist > |
| # # Stop PostgreSQL from auto starting in Mac OS X 10.7.x (Lion) |
| sudo launchctl unload -w /Library/LaunchDaemons/com.edb.launchd.postgresql-9.1.plist |
| # # Enable PostgreSQL to auto start in Mac OS X 10.7.x (Lion) |
| sudo launchctl load -w /Library/LaunchDaemons/com.edb.launchd.postgresql-9.1.plist |
| # # Manually Start PostgreSQL |
| # # su as user «postgres» and run server: |
| cd /Library/PostgreSQL/9.1/bin/ |
| ./pg_ctl -D /Library/PostgreSQL/9.1/data/ start |
| # # Manually Stop PostgreSQL |
| ./pg_ctl -D /Library/PostgreSQL/9.1/data/ stop |
| # # Note: |
| # # — Without «sudo» the commands seem to run successfully but don’t take effect |
| # # — Contents of com.edb.launchd.postgresql-9.1.plist in attached file (Permission MUST be: -rw-r—r— 1 root wheel) |
You can’t perform that action at this time.
You signed in with another tab or window. Reload to refresh your session. You signed out in another tab or window. Reload to refresh your session.
Источник
How to Start a PostgreSQL Server on Mac OS X
Last modified: August 09, 2021
There are two main ways to install PostgreSQL on mac OS X.
Using Homebrew
Homebrew can be installed by running the following command in a terminal:
/usr/bin/ruby -e «$(curl -fsSL https://raw.githubusercontent.com/Homebrew/install/master/install)»
If Homebrew is already installed, make sure that it is up to date by running:
Then ensure there are no conflicts or errors using:
Homebrew is a powerful package manager with many uses, including installing and running postgreSQL. This can be done by typing the following command into a terminal: 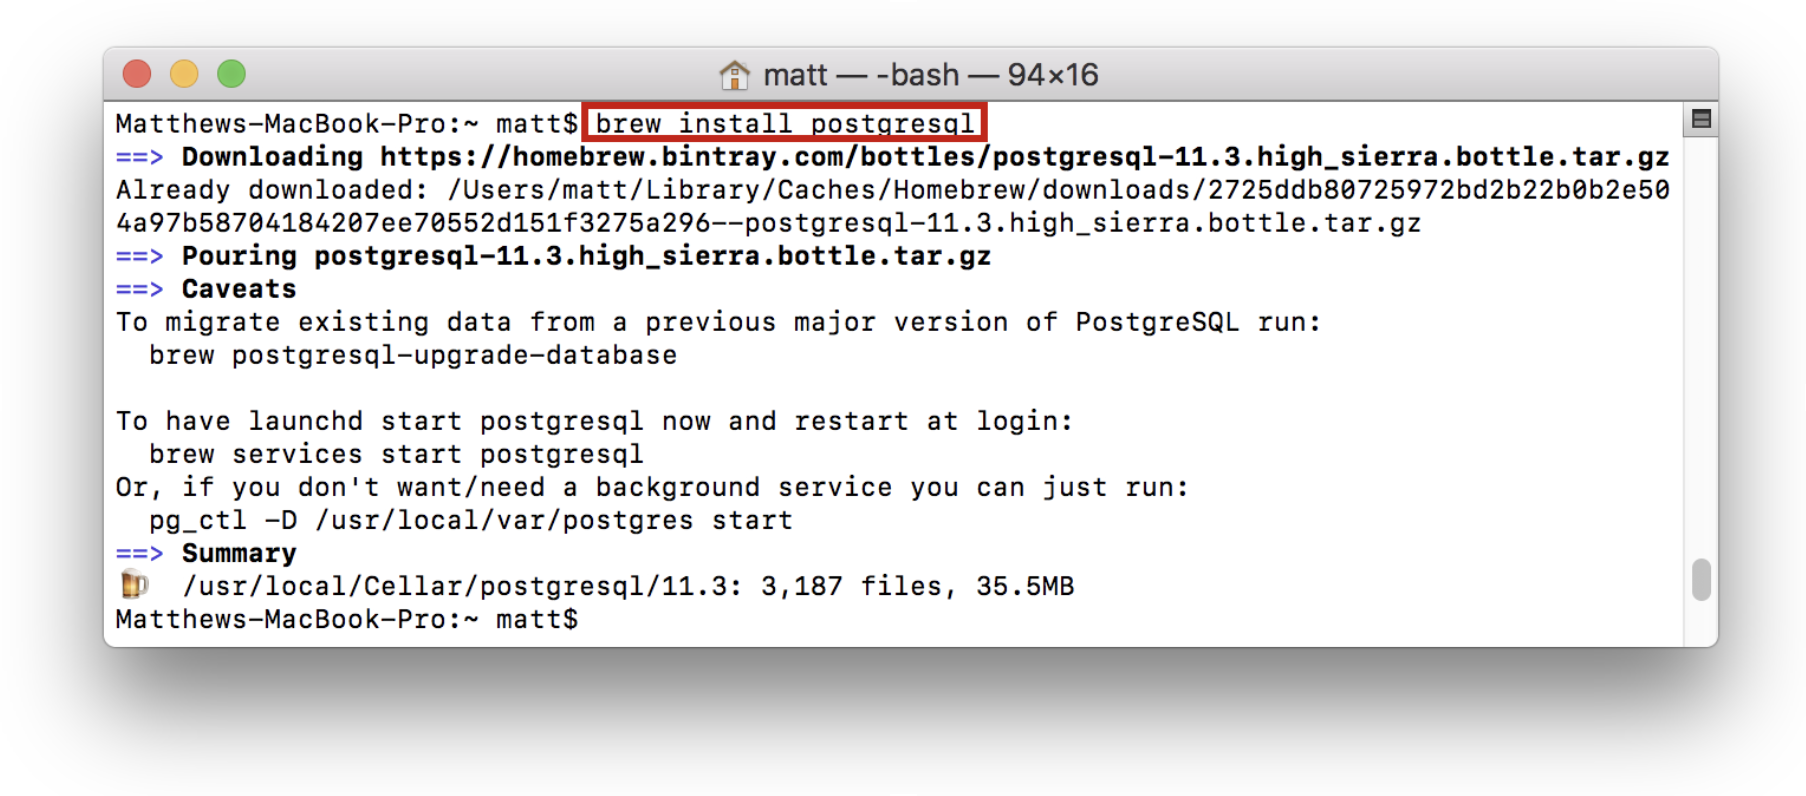
Now that postgres is installed the default server can be started by running the command:
This will start up a postgres server hosted locally on port 5432. The server will be run out of the directory /usr/local/var/postgres .
It can now be accessed by typing the following command:
This will connect to the server and access the postgres database. Once this is done:
- Schemas and tables can be created
- Data can be loaded and deleted from the database
- Queries can be run
The process should look like this: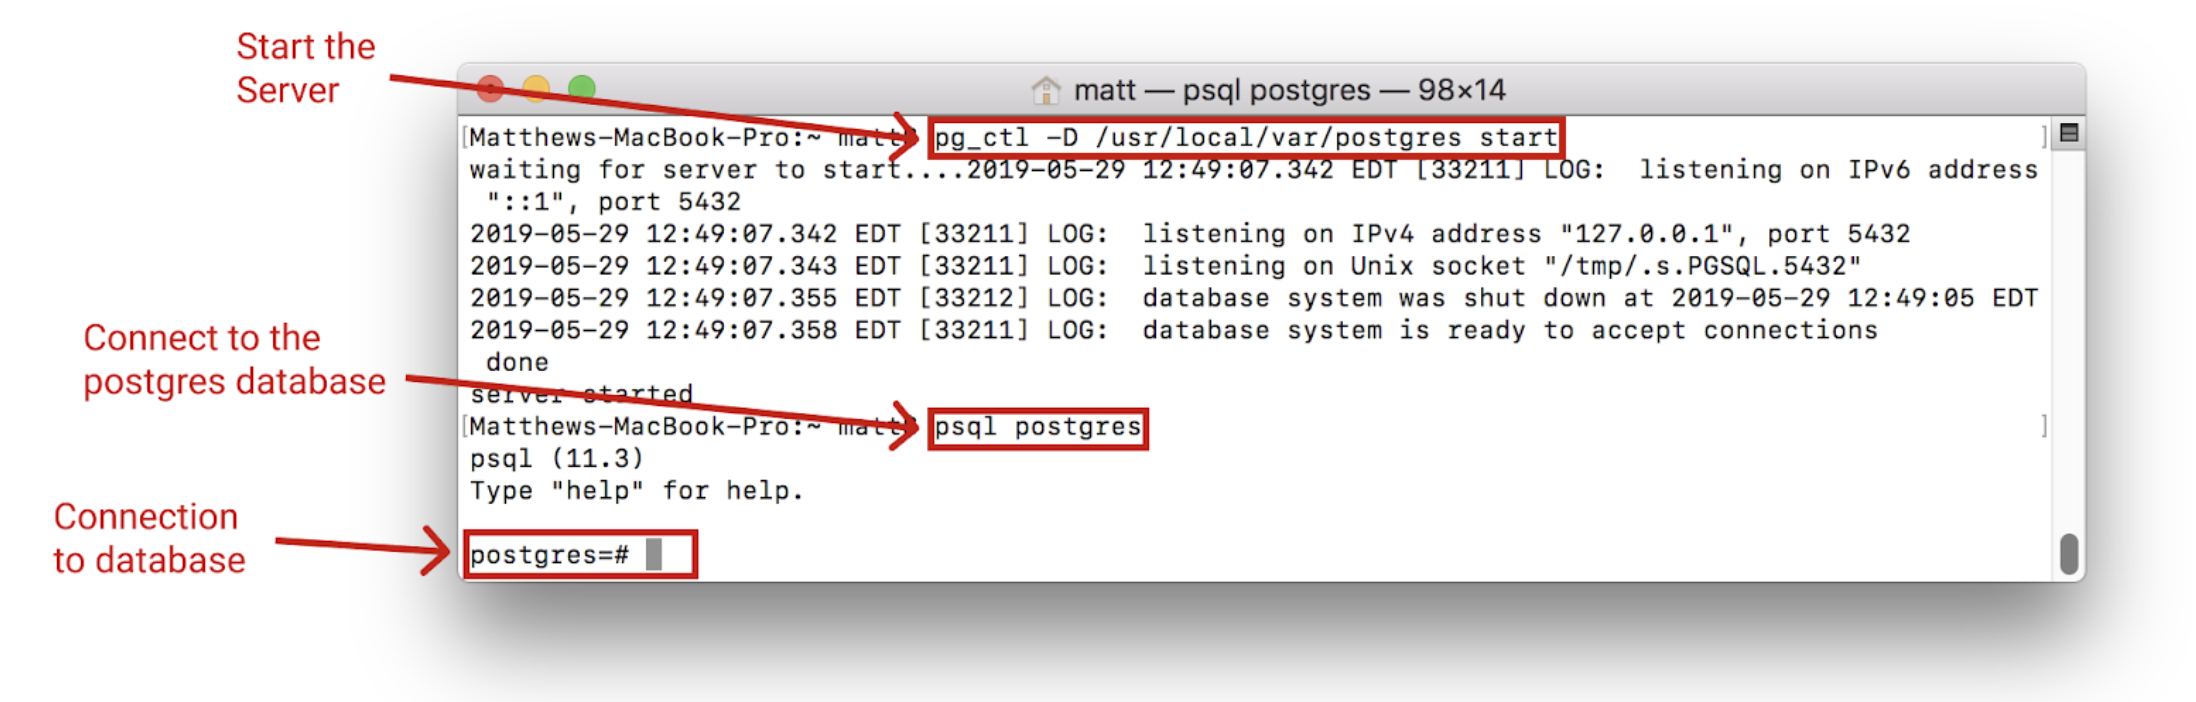
This shows that the server has been started and can be connected to.
(Optional) Creating a Custom Data Directory
A custom data directory can also be used for a server. To do this, first create a directory to be used as the server location. For example, create a directory called myData in the home directory: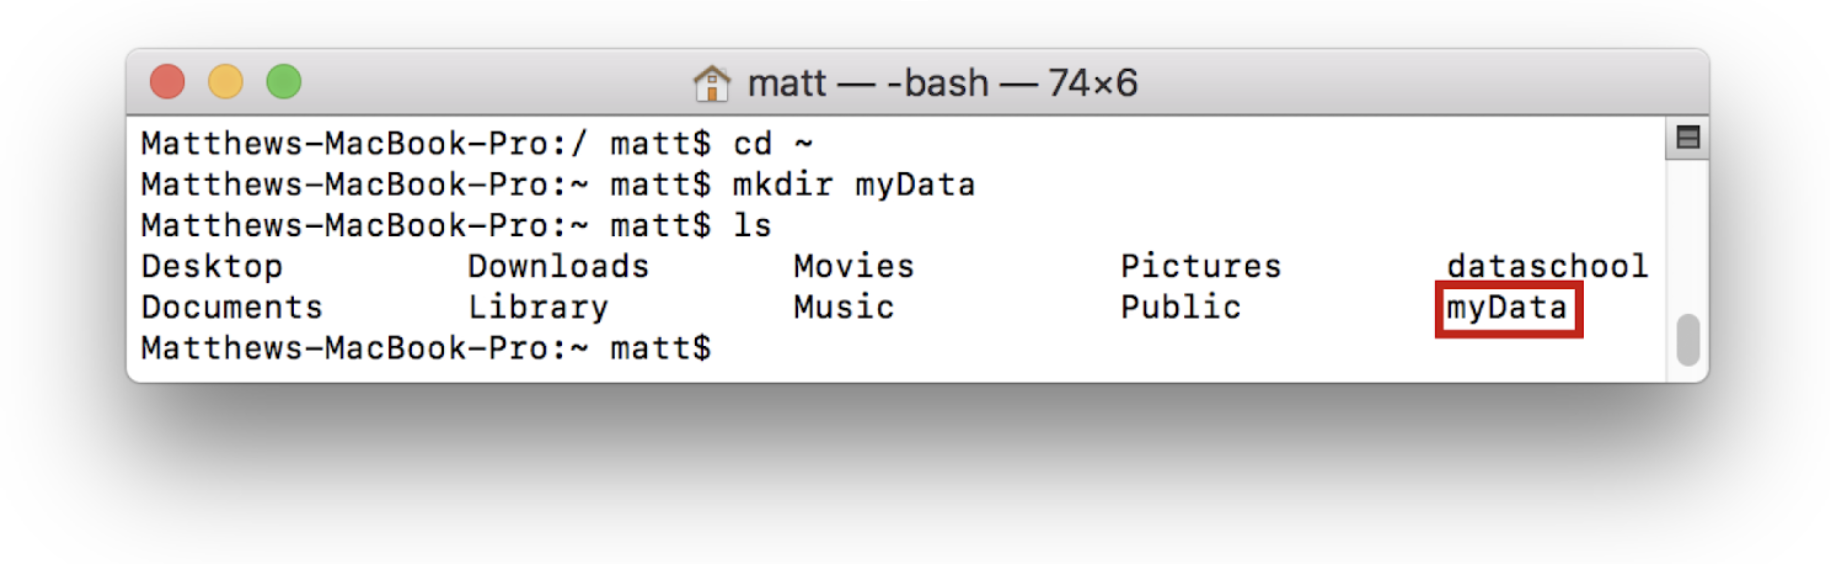
Once the directory is created, the server can be initialized. This means that we configure the directory and add the necessary files to run the server. To do this run the initdb command as shown: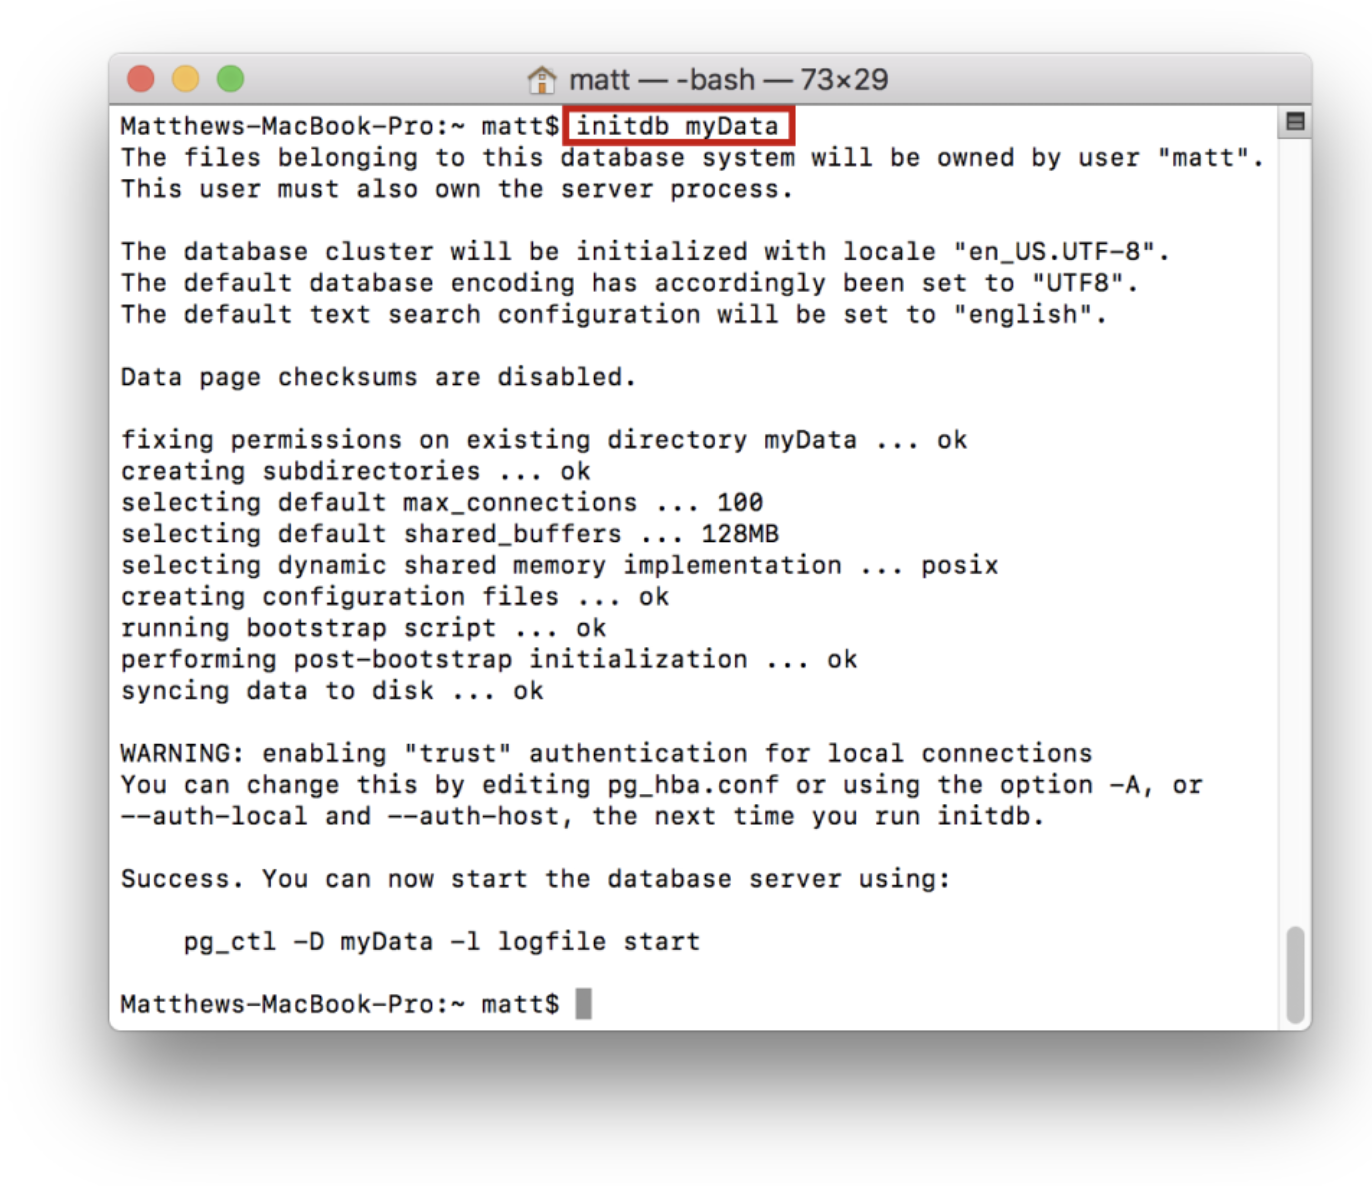
This will fill the myData directory with files necessary to run the server:
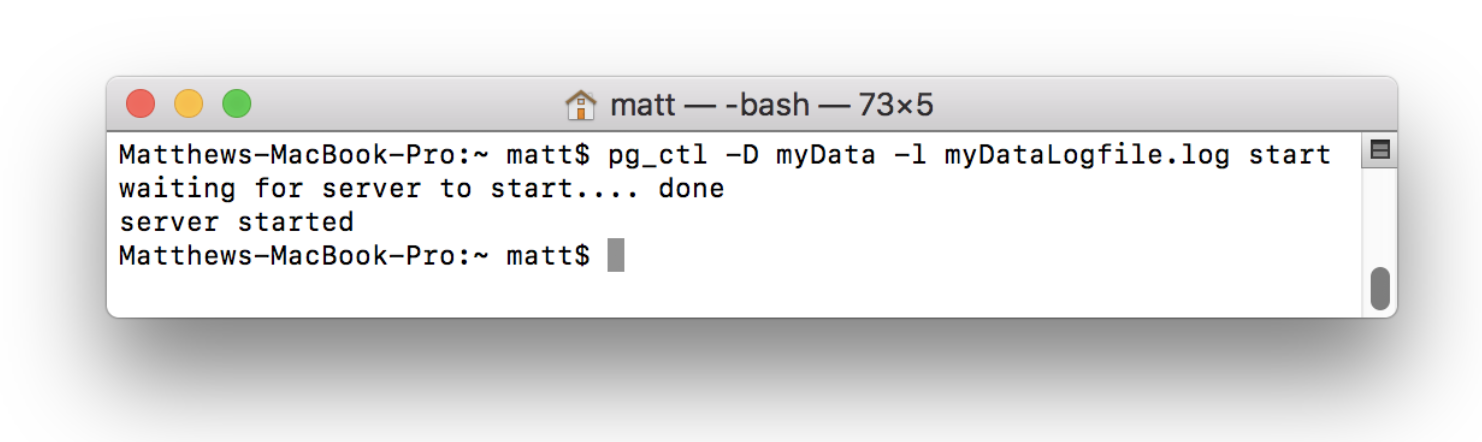
Now that the server is initialized and the log file is created, you can start the server from this directory. To do this use the command and substitute in for the specified values:
The “Data Directory” refers to the directory that was just initialized (in this case myData). The “Log file” is a file that will record server events for later analysis. Generally log files are formatted to contain the date in the file name (e.g. “2018-05-27.log” or “myData-logfile-2018-05-27.log”) and should be stored outside of the database that they are logging so as to avoid unnecessary risks. Log files can be dense to read but are very useful for security and debugging purposes:
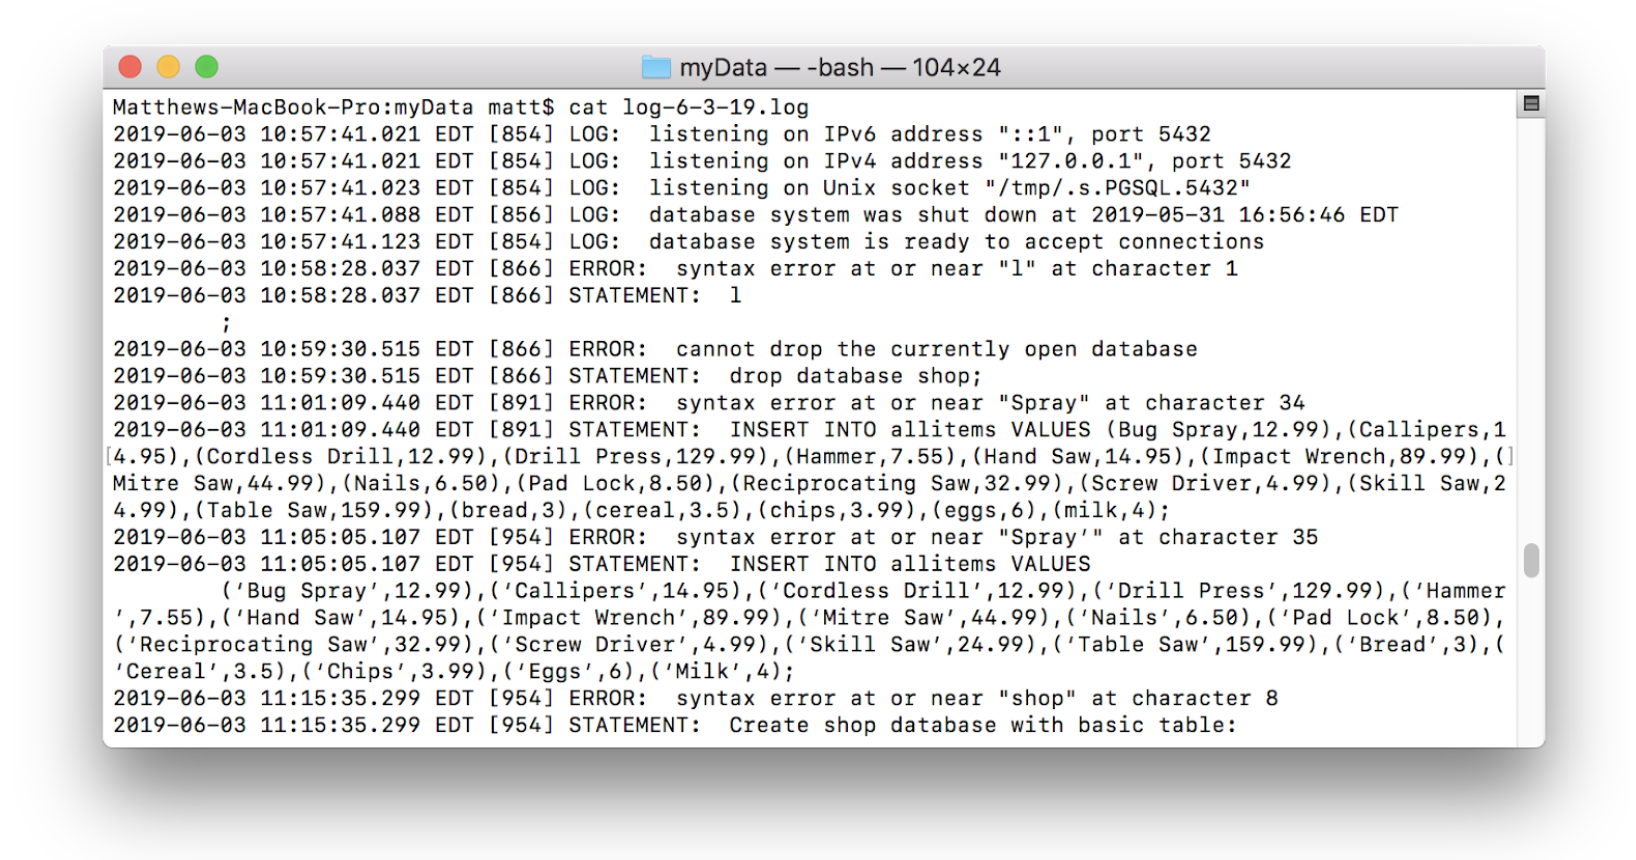
The command above will generate a log file like the one shown, start the server, and tie the log file to the server. If a log file is not specified, events will be logged to the terminal:
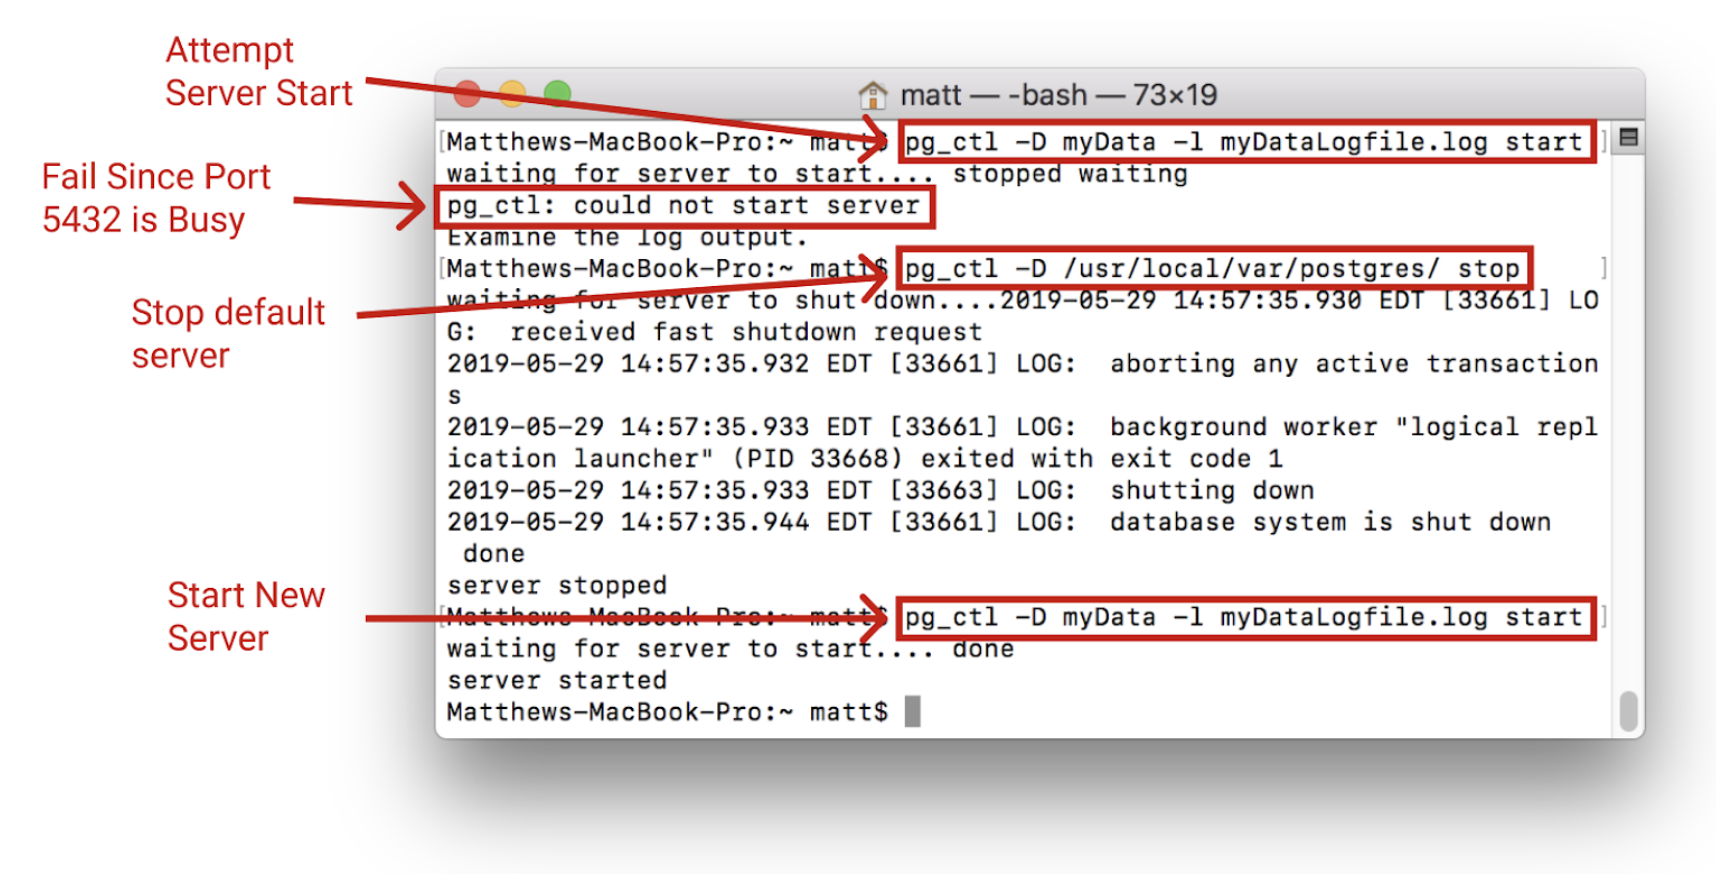
The server will only start if the port is free. If the default server is running it must first be stopped using the pg_ctl -D /usr/local/var/postgres stop command:
Once started, it can be connected to the same way as before using:
Using PostgreSQL App
To run a server through the postgres app, the first step is to download the program. The app can be downloaded on postgresapp.com. Once the app is downloaded and moved into the applications folder, the app can be opened.
Open the Postgres app:
In order to start the server, click the start button.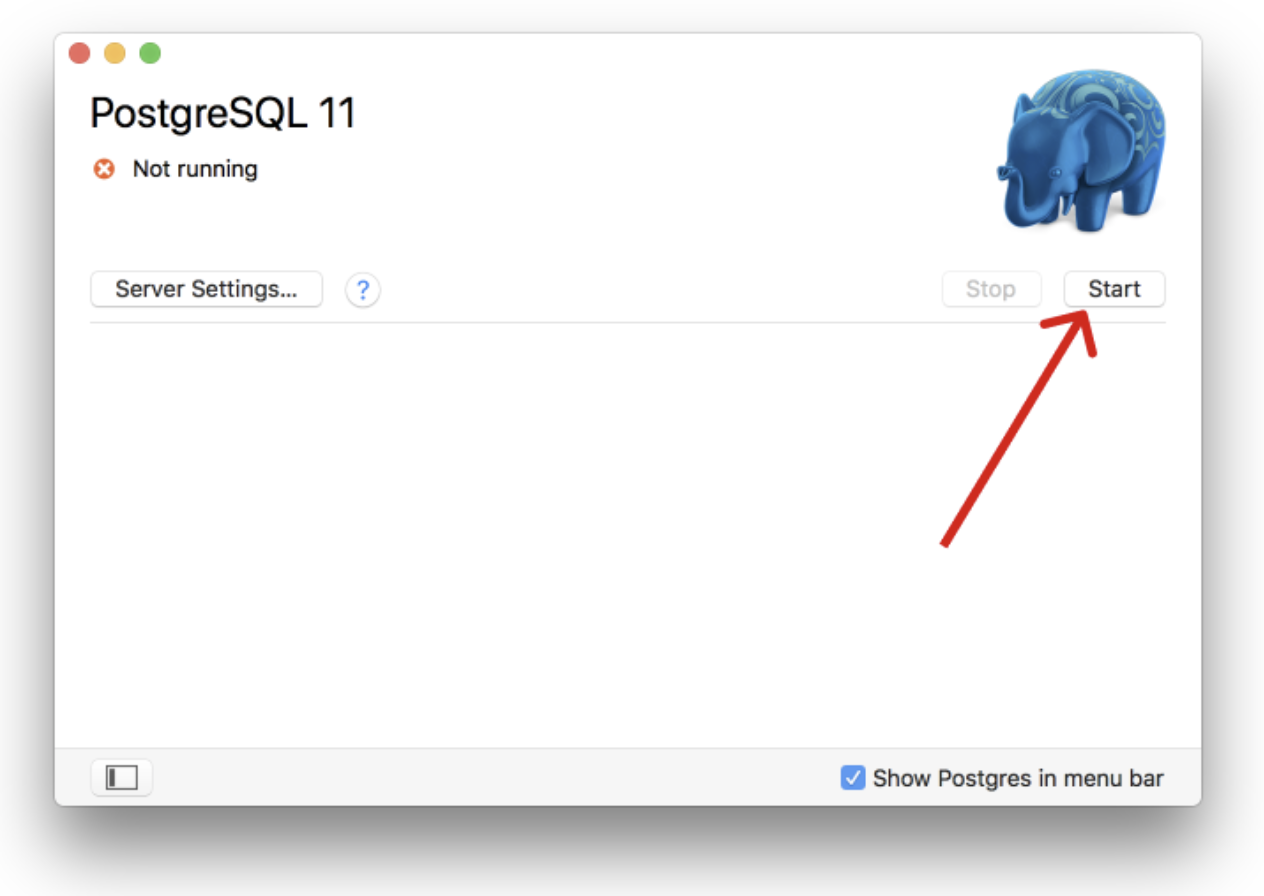
This will start the server. Details on the server can be found by opening the server settings: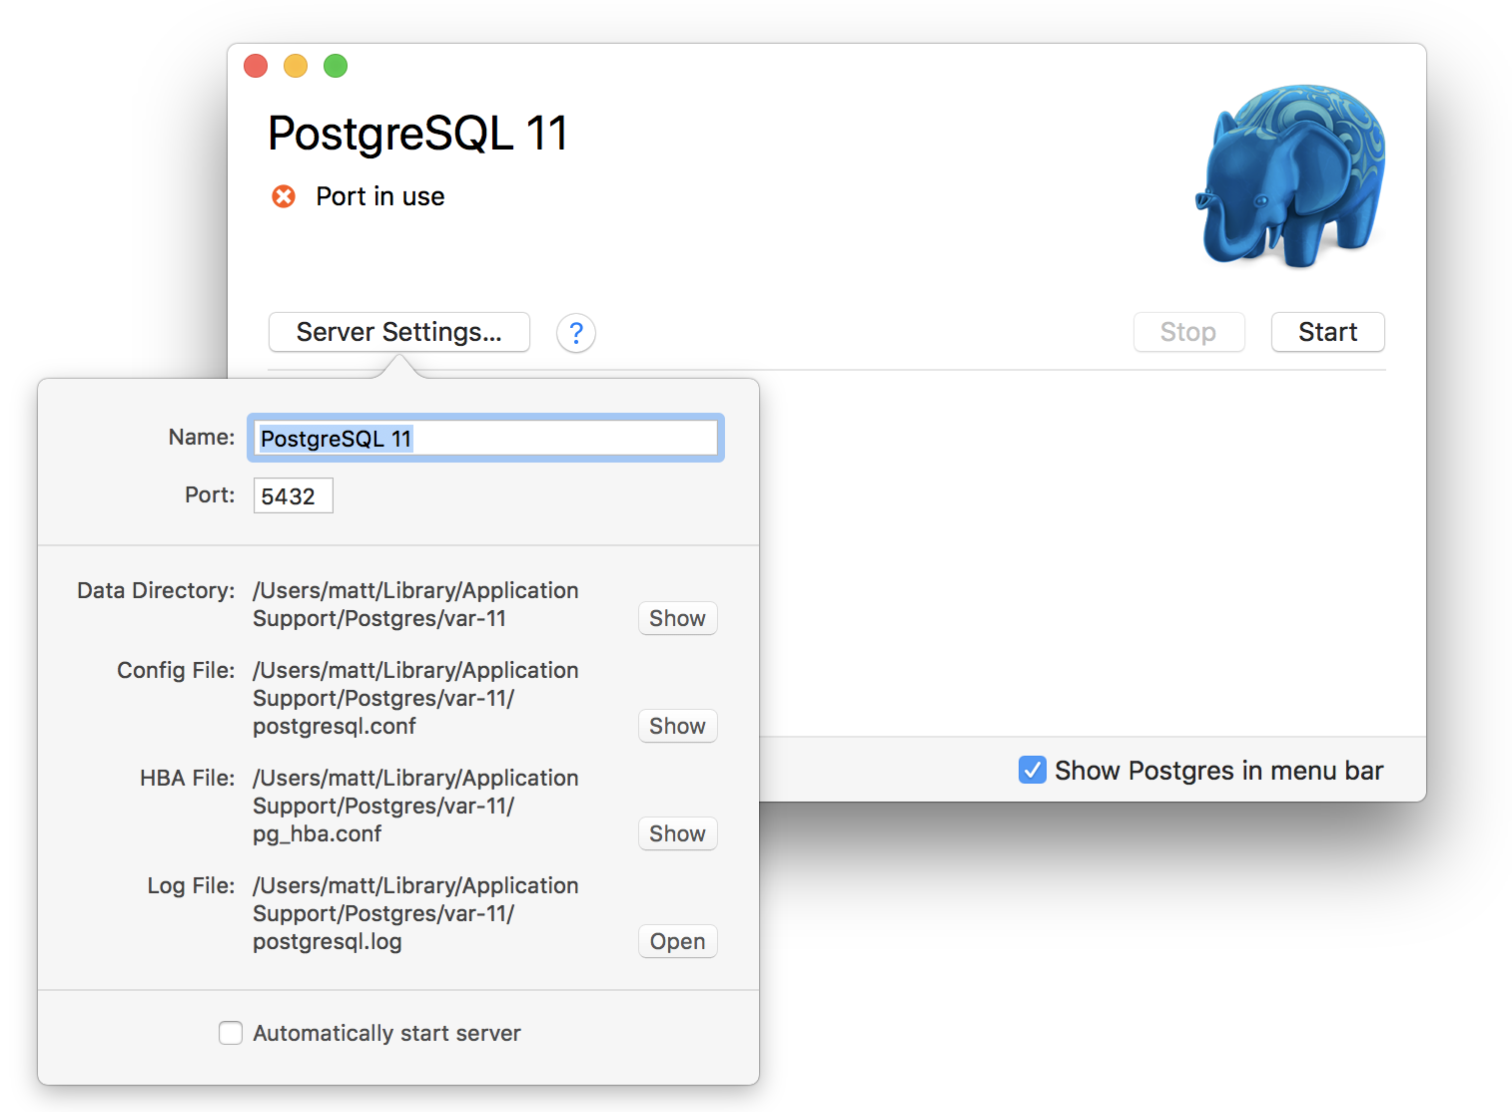
This interface shows all the essential information regarding the server. It also allows the port to be changed very easily. This is useful because multiple PostgreSQL servers can
Note: To change the port in the terminal, the вЂpostgres.conf’ file (which can be found in the data directory) must be edited. This looks like the following:
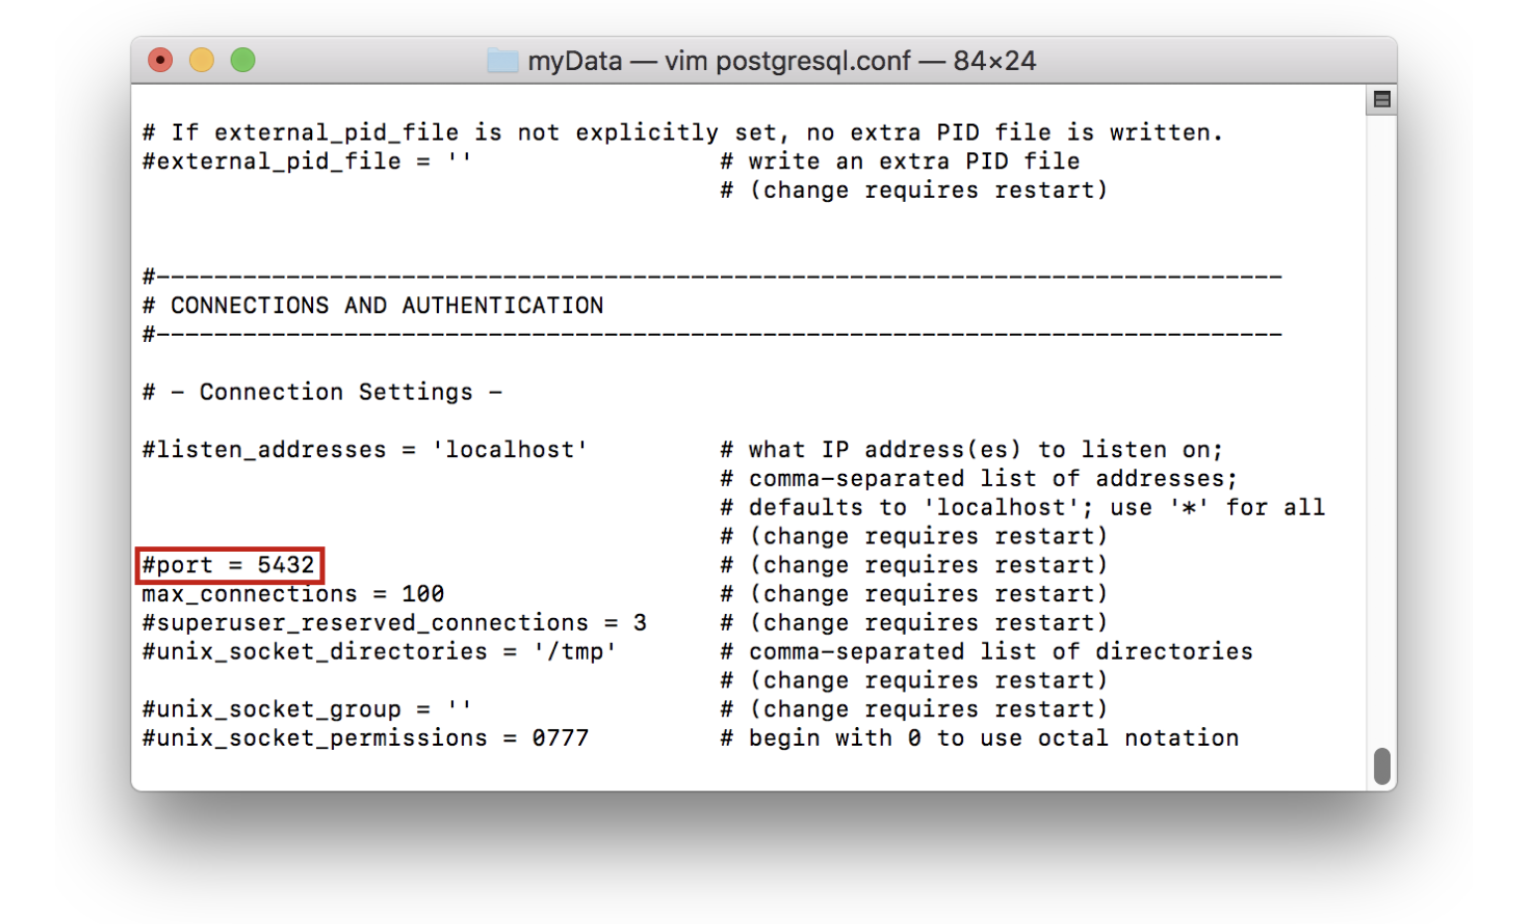
Using Terminal with the PostgreSQL App
Once the app has been downloaded, command line tools can be used as well. These tools can be accessed by typing:
For example, the вЂpostgres’ database on the server can be connected to using the psql tool with postgres as an argument:
Rather than typing out the full path each time however, the path can be added to a file that will allow significantly easier access to the tools, allowing the tools be accessed from any directory on the computer. To do this, the following command can be run in the terminal:
Once this is done, the вЂpostgres’ database can be accessed by simply typing:
Источник


