- Сжатие и распаковка файловых архивов с помощью Терминала на Mac
- Создание сжатого tar-архива
- Распаковка архива tar
- Open/Extract TAR File with Freeware on Windows/Mac/Linux
- Open/Extract TAR File on Windows
- Open/Extract TAR File on Mac
- Open/Extract TAR File on Linux
- How to Create and Open Tar File on Mac: 2 Easy Ways
- Open and Create Tar File on Mac
- What is a tar file?
- How to create tar file on Mac
- Method 1. Use professional software
- Method 2. Use Terminal
- How to open tar file on Mac
- Method 1. Use Cisdem Unarchiver
- Method 2. Use Terminal
- Conclusion
- Barlow
- How to Create a Tar GZip File from the Command Line
- Creating a Tar GZip Archive Bundle
- Opening .tar.gz Archives
- Related
- Enjoy this tip? Subscribe to our newsletter!
- Thank you!
- Related articles:
- 16 Comments
Сжатие и распаковка файловых архивов с помощью Терминала на Mac
При передаче папок и нескольких файлов между компьютерами может быть полезно сжать их в один архив. Это экономит место, позволяет передавать всего один объект вместо множества объектов и упрощает возобновление передачи, если задача будет по какой-либо причине приостановлена.
В Терминале можно использовать команду GNU tar для сжатия и распаковки файловых архивов. Стандартным расширением файла для сжатого архива tar является .tgz, но иногда имена файлов имеют расширение .tar.gz. Если архив не сжат, его имя оканчивается просто на .tar.
Совет. Создавать и распаковывать архивы легче в Finder (команду tar в Терминале рекомендуется использовать только в том случае, если нужно создать именно архив tar). См. Сжатие и распаковка файлов и папок.
Создание сжатого tar-архива
В приложении «Терминал»  на Mac введите команду tar и нажмите клавишу Return.
Для простого сжатия папки с именем, например LotsOfFiles, можно ввести:
Флаг z указывает на то, что архив сжимается и объединяется в один файл. Этот параметр обычно используется, но он не обязателен.
Если папка имеет большой размер, можно добавить флаг v и следить за процессом сжатия:
Распаковка архива tar
Чтобы распаковать tar-архив на Mac, выполните одно из следующих действий.
В приложении «Терминал» на Mac введите команду tar с флагом x , затем нажмите клавишу Return. Для просмотра сообщений о ходе сжатия также используйте флаг v . Например:
В Finder  на Mac дважды нажмите файл tar.
Источник
Open/Extract TAR File with Freeware on Windows/Mac/Linux
TAR (Tape ARchive) is both a file format (in the form of a type of archive bitstream) and the name of a program used to handle such files. The format was created in the early days of Unix and standardized by POSIX.1-1988 and later POSIX.1-2001.
Initially developed to write data to sequential I/O devices for tape backup purposes, tar is now commonly used to collect many files into one larger file for distribution or archiving, while preserving file system information such as user and group permissions, dates, and directory structures.
A tar archive consists of a series of file objects. Each file object includes any file data, and is preceded by a 512-byte header record. The file data is written unaltered except that its length is rounded up to a multiple of 512 bytes. The original tar implementation did not care about the padding and left the buffer unaltered, but most modern tar implementations fill the extra space with zeros. The end of an archive is marked by at least two consecutive zero-filled records. (The origin of tar’s record size appears to be the 512-byte disk sectors used in the Version 7 Unix file system.) The final block of an archive is padded out to full length with zeros.
The tar format continues to be used extensively in Unix, Linux and OS X. Linux versions use features prominently in various software distributions, with most software source code made available in .tar.gz (gzip compressed tar archives). The tar format is a basis of some types of containment and distribution.
tar archive files usually have the extension .tar, as in somefile.tar. The pun, tarball, is used to refer to a tar file.
A tar archive file contains uncompressed byte streams of the files which it contains. To achieve archive compression, a variety of compression programs are available, such as gzip, bzip2, xz, lzip, lzma, or compress, which compress the entire tar archive. Typically, the compressed form of the archive receives a filename by appending the format-specific compressor suffix to the archive file name. For example, a tar archive archive.tar, is named archive.tar.gz, when it is compressed by gzip.
| Short | Long | Compression |
| .tgz | .tar.gz | gzip |
| .tbz, .tbz2, .tb2 | .tar.bz2 | bzip2 |
| .taz, .tz | .tar.Z | compress |
| .tlz | .tar.lz, .tar.lzma | lzma |
| .txz | .tar.xz | xz |
Open/Extract TAR File on Windows
To open/extract TAR file on Windows, you can use 7-Zip, Easy 7-Zip, PeaZip, and so on. I recommend Easy 7-Zip. The Easy 7-Zip is an easy-to-use version of 7-Zip. The open source freeware keeps all features of 7-Zip and adds a few useful features that makes the software more user-friendly.
Easy 7-Zip works on Windows 10/8.1/8/7/Vista/2008/2003/XP/2000 (both 32-bit and 64-bit compatible).
- Free Download Easy 7-Zip
- Install Easy 7-Zip by step-by-step instructions
- The installation will associate TAR with Easy 7-Zip automatically
- Double-click on TAR file to open TAR file with Easy 7-Zip

You will see files or folders within the TAR file then, click button Extract to extract the TAR file.
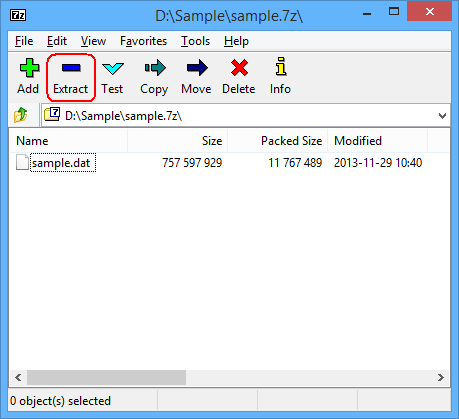
Alternatively, Right-click on TAR file on Windows Explorer 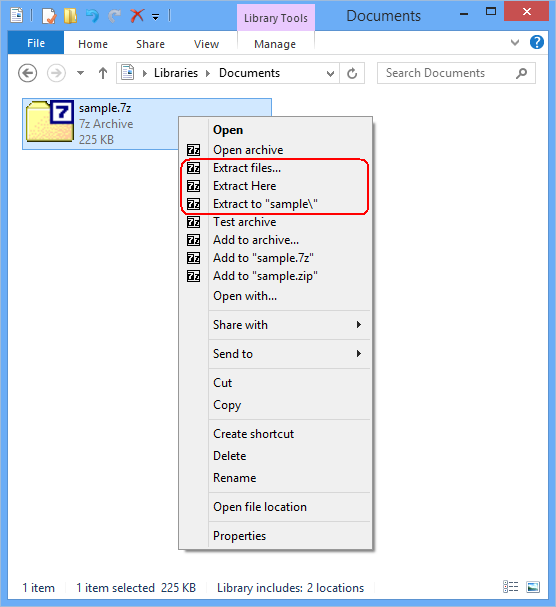
And then, choose Extract files. , Extract Here, or Extract to «folder\» to extract the TAR file.
Easy 7-Zip Download Links:
Open/Extract TAR File on Mac
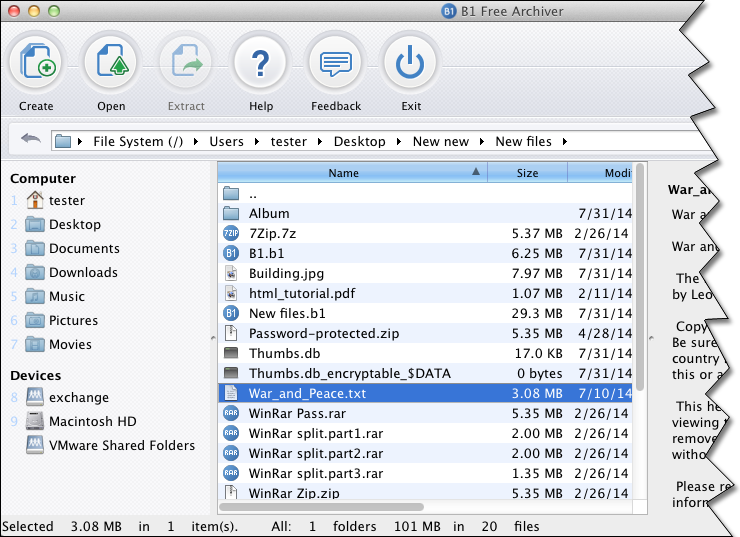
To open/extract TAR file on Mac, you can use Mac OS built-in utility Archive Utility, or third-part freeware. For example: GUI Tar, The Unarchiver, Keka, or B1 Free Archiver. B1 Free Archiver is recommended. B1 Free Archiver is a free software for creating archive folder and extracting archive file. B1 Archiver works on all platforms — Windows, Linux, Mac and Android. The freeware supports most popular formats including TAR.
B1 Free Archiver is compatible with:
- Mac OS X 10.9 Mavericks
- Mac OS X 10.8 Mountain Lion
- Mac OS X 10.7 Lion
- Mac OS X 10.6 Snow Leopard
Open/Extract TAR File on Linux
You need to use command tar. The tar is the GNU version of tar archiving utility.
Источник
How to Create and Open Tar File on Mac: 2 Easy Ways


You can easily group files or directories into one single archive file for convenient distribution, backup or other purposes. Tar is one of the mostly used archive file formats on Unix-like systems. This article will show you how to easily create tar file on Mac Catalina, Mojave, High Sierra and earlier and how to open it.
Open and Create Tar File on Mac
- Unzip tar, RAR, ZIP, 7z, ISO and 8 other archive file types
- Pack files to tar, ZIP and 7z with password protection
- Enable users to preview content without extracting
- Support batch extracting
- Extract split archive files or only selected files from an archive
 Free Download
What is a tar file?
 A tar file is an archive file created with a software utility of the same name. Compatible with Unix, Unix-like and Microsoft Windows, it is used to collect multiple files into an archive file (which can be called a tarball). The name tar stands for tape archive, and the format was originally developed to save data to tape drives.
It is just a way of collecting data of all kinds (files, directories, etc.) together and doesn’t do any kind of compression. A basic tar file has a .tar extension. You may see files ending with .tar.gz or .tar.bz2. What are they? They are still tar files (or tarballs). In cases like these, files are not only packed but also compressed with compressors such as gzip or bzip2. By doing so, one can create a smaller tar file for more efficient backup or distribution.
How to create tar file on Mac
Method 1. Use professional software
The best way to make a .tar file on Mac is to use Cisdem Unarchiver. This tar file creator is extremely easy for everyone to use. It offers a batch mode, allowing you to create tar files in bulk, which helps improve efficiency. Versatile and powerful, it supports 13 archive formats and can also work as a tar file extractor. The app is compatible with OS X 10.7 Lion or later.
Step 1. Download and install Cisdem Unarchiver. Launch it.
Step 2. In the toolbar, click iPack. To create tar file on Mac, click Add in the iPack window. Select the files or directories/folders you need to pack. Click Open.
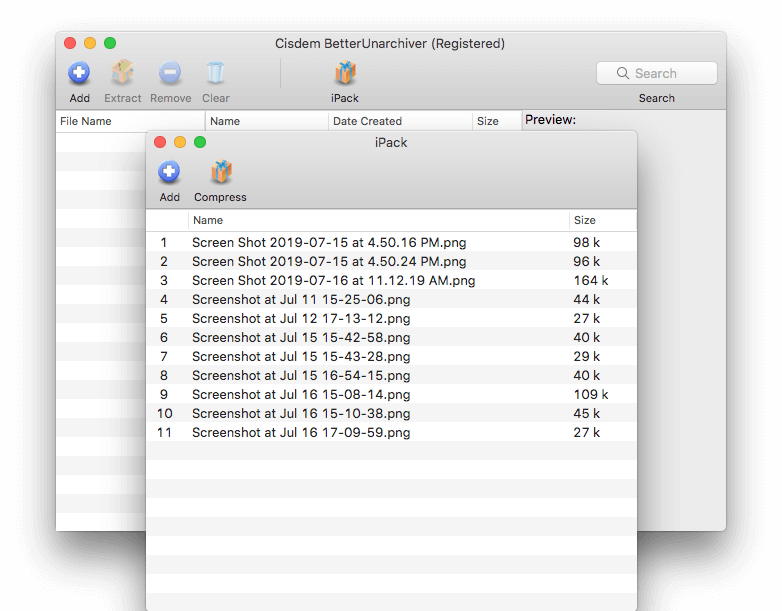
Step 3. Click Compress. Name your tar archive file and select a location to keep it. Click the Format dropdown list and choose the option Compress these files into a tar file.
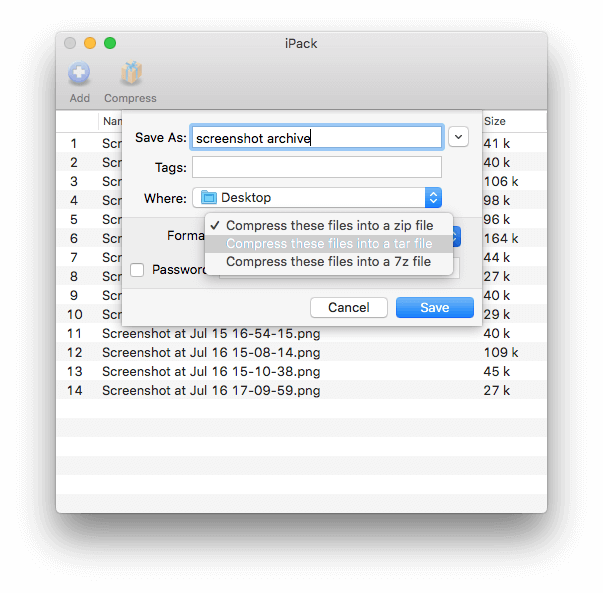
Step 4. Click Save.
Method 2. Use Terminal
macOS comes with a built-in solution to create tar files. The instructions below will show you how to create a .tar.gz file. If you don’t feel comfortable using Terminal, you can try the method above.
Step 1. Open Finder. Go to the top menu bar. Select Go > Utilities > Terminal.
Step 2. In Terminal, type syntax like:
tar -cvzf yourtarfilename.tar.gz itemstoarchive
For example, as shown in the screenshot below, to create tar file from all the files on desktop, you can type:
ar -cvzf desktoparchive.tar.gz /Users/YaphetS/Desktop/
.png)
Step 3. Hit Return. Now you should be able to find the .tar.gz file in Home.
How to open tar file on Mac
When it comes to opening a tar file, you can double-click the archive, and then your Mac (or Windows PC) will open it with an associated default or third-part app. However, if that doesn’t happen, you will need to open it using a different method.
Method 1. Use Cisdem Unarchiver
Cisdem Unarchiver can also be used to safely open and unzip tar files on Mac.
Step 1. Download this tar file extractor. Open it.
Step 2. In the tool bar, click Add. Select the tar file you want to open. Click Open.
Step 3. Now you can easily select file(s) to preview and extract. Here we will select the entire .tar file. Click Extract. Choose a folder. Click Save.
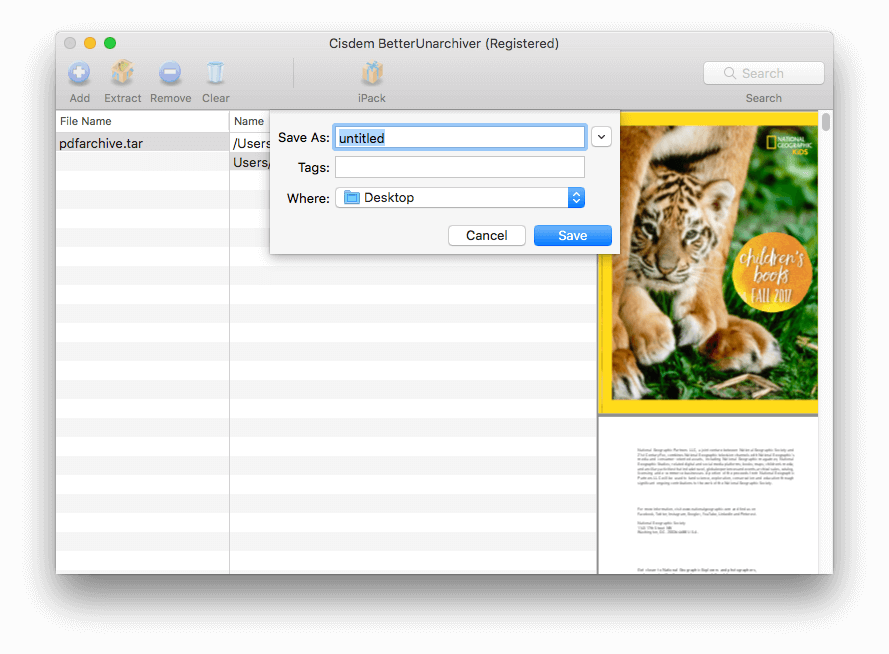
A new folder will be created, and you can find all the unzipped files there.
Method 2. Use Terminal
Step 1. To open tar file on Mac using command line, open Terminal.
Step 2. Type syntax like this:
tar xvzf desktoparchive.tar.gz
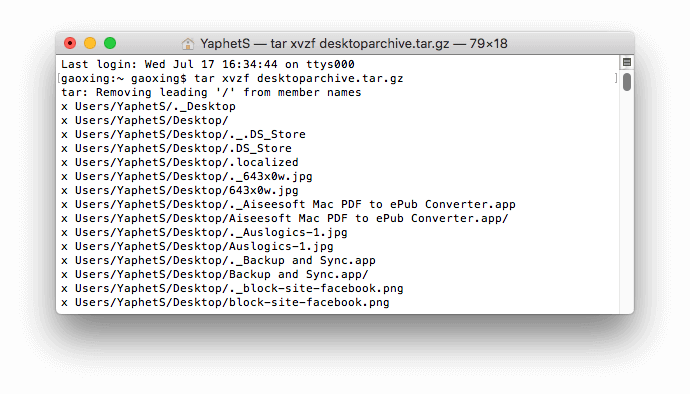
Step 3. Press Return.
To find the extracted files, open Finder and go to the toolbar at the top of your screen. Select Go > Home and find a folder called Users (which is newly created and contains a subfolder called Desktop). Click the said folder Desktop and you will find all the files that where once packed into the tar ball.
Note: Here’s an important note. A tar bomb can be created with using the tar command, which may lead to the risk of overwriting files. For more information, you can check out the tar bomb related content in this article.
Conclusion
It’s easy to create tar on Mac or untar such as an archive using software or in Terminal. If you often need to zip or unzip files, then it’s a good idea to use professional software like Cisdem Unarchiver. Of course, you can also choose to tar files by using command line.
Peter has always had great enthusiasm for writing, programming and web development. He likes writing about software and technology, his works are featured on some tech blogs or forums like Tom’s Hardware, CNET, etc.
Barlow
It can also save tar files with password. thanks for your article, this is what I need.
Источник
How to Create a Tar GZip File from the Command Line

You’re probably familiar with making your own zip files if you’ve ever needed to transfer a group of files or if you’re managing your own backups outside of Time Machine. Using the GUI zip tools are easy and user friendly, but if you want some more advanced options with better compression you can turn to the command line to make a tar and gzip archive. The syntax will be the same in Mac OS X as it is in Linux.
Creating a Tar GZip Archive Bundle
From the command line (/Applications/Terminal/), use the following syntax:
tar -cvzf tarballname.tar.gz itemtocompress
For example, to compress a directories jpg files only, you’d type:
tar -cvzf jpegarchive.tar.gz /path/to/images/*.jpg
The * is a wildcard here, meaning anything with a .jpg extension will be compressed into the jpegarchive.tar.gz file and nothing else.
The resulting .tar.gz file is actually the product of two different things, tar basically just packages a group of files into a single file bundle but doesn’t offer compression on it’s own, thus to compress the tar you’ll want to add the highly effective gzip compression. You can run these as two separate commands if you really want to, but there isn’t much need because the tar command offers the -z flag which lets you automatically gzip the tar file.
Opening .tar.gz Archives
Unpacking the gz and tar files can be done with applications like Pacifist or Unarchiver (free), or by going back to the command line with:
tar -xvf filename.tar
Generally you should untar things into a directory, or the present working directory will be the destination which can get messy quick.
Related
Enjoy this tip? Subscribe to our newsletter!
Get more of our great Apple tips, tricks, and important news delivered to your inbox with the OSXDaily newsletter.
Thank you!
You have successfully joined our subscriber list.
Related articles:
16 Comments
Might be nice to include how to use the compression level of gzip. Something like the following in bash:
$ GZIP=-9 tar -czf examplearchive.tar.gz examplearchive/
I tried to converd a file by commandline to tar.gz extention, but I get an error: “‘tar’is not recognized as an internal or external command, operable program or batch file.”
Do I need to install a program or do something else before running the command “tar -cvzf jpegarchive.tar.gz /path/to/images/*.jpg”?
What OS are you using?? I don’t know if non-standard Linux distros have tar by default yet. I know all the mainstream distros and *cough* mac do but FreeBSD and other non-standard linux distros might not
[…] it just compresses them. If you want to add a group of files to a bzip archive you’d want to use tar beforehand. Some versions of tar even support creating bz2 archives natively with the -j flag, but […]
A .tar, .gz or .tar.gz file also unpacks with the default “Archiver Utility”, at least on 10.7.
That said, I think it’s a good idea to have people use the command line, if only to get a feeling that under the hood there is something else than icons and windows.
I always advise people to use Linux from time to time, rather than just the Mac 100% of the time.
The benefits of using Linux as an alternative is that it forces you to gain useful technical knowledge that also applies to the Mac. It’s like driving stick-shift.
Whereas… using Windows is a waste of time, I find.
Umm, windows has its uses, such as gaming, but yes, linux is like using stick-shift mac. I use linux or windows by preference, since i have no real use for *cough* expensive garbage
No, there is nothing in driving a stick shift that gives you any deep insights to “the art of driving”.
Same goes for unix, it won’t teach you anything useful as such. It’s really, really useful though.
Thanks for writing this. Most of us have a hard time remembering stuff like this.
I forget things like this so it’s nice to have the refresher, sometimes we have our heads so thick in the sands of iOS and OS X that we forget the core of both operating systems is BSD unix.
Old school knowledge, refreshed for the new generation of UNIX / Mac users. Thanks for writing it all out. Top notch.
Seriously, who the hell doesn’t know how to create a tarball from the command line?
Yikes, have the script kiddies taken over or something?!
I have no trouble creating the .tgz; The trouble for me is creating the tarball in a separate directory without removing the original, and a checksum would be nice too, I just want to make sure everything went ok before I remove the files I want to send. Google has indexed and linked me here and though interesting I still think I should consult the man page because I just started picturing doing something with the pipe operator and I am confused on how James /\ sent anything like that without creating a namedpipe, Just baffled right now, and my e2fsck and fsck repair today, brought everything back that I can remember and it seemed more organized all numbered in the lost+found because I am sure I destroyed the file table but seeing as I know the physical layout of my flash, it wasn’t too difficult, now in this sleepy state I say personal buttler tgz directly to another drive without removing the originals or trying to make a local copy first because space is scarce.. Or it would be done already.. and now I just inspired to create my first named pipe for mostly just the fun of it and hey why not I just did my first fsck recovery.. and it was easy.. and I didn’t know ncat could do that.. that tool is handy.. Thanks for the read guyz.
TBH, i cant remember the command, so this article is my goto when i need to tar and gzip something
You really want a mind bender, how’s this for fun:
Had to copy hundreds of thousands of small files from a Linux server to a Mac over the LAN. A normal cp operation is slow because it never gets a chance to increase the network bandwidth as it resets for each individual file. Watching a performance graph would show it peaking and falling for every individual file. So the solution would be to tar gzip the files into one huge file and then copy that file. Trouble was, there was not enough free disk space to handle the huge file.
Netcat to the rescue! Netcat is a very powerful tool it can open a raw network port and pass data through that port and it can listen for a raw data stream on the other end. So the trick is to tar gzip the files and pipe the output (no filename) into nc directing nc to a network port number of choice. Then on the receiving computer you listen with nc and pipe it’s data to untar and ungzip the files on the receiving end.
To give you an idea of how effective something like that is; the attempted copy operation over an SMB share ran for 5 hours and the Finder was still just calculating the number of files which at that point was well over 500,000 files! i.e. nothing had actually started to be copied! I tried using the cp command from terminal and it was only about a third of the way through the copy process having run overnight. I aborted the copy process and setup nc to listen on a particular port and piped it’s output to a tar gz command that would untar and ungzip the files to the required path. Then on the sending system I created a tar gzip command and piped it’s output to nc directing to the IP address of the receiving computer and the same network port. The copy operation finished in 2 hours and looking at the network activity the Gigabit Ethernet adapter was almost completely saturated at 100%. The performance graph rapidly peaked and stayed completely peaked the entire time the copy process ran.
So essentially, the sending system executed tar and gzip operations storing the data in RAM while it pushed that data over netcat to a waiting netcat listening on a pre-determined network port where the files were pushed to a tar gzip command that decompressed the files. Since there was a large continuous amount of data pumping through the network port, the amount of bandwidth increased exponentially until it maxed out the Ethernet card. This allowed it to go as fast as it possibly could have run.
The mind blowing part? These tools are built in to OS X and every Unix system but they have been around for more than 20 years. The whole Unix concept is small tools that do one thing very well and you connect the tools to one another via the pipe command.
The funny part? I’ve been around the block for years and Windows cannot do this at all. I don’t even know of a single third party application that comes close to the way I was able to use tar gzip and netcat to speed up copying an enormous amount of data. But I can boot a Windows box with a Linux USB flash drive and do it!
Let’s have a few more articles about interesting things you can do with the Unix pipe and some little known command line programs!
Disclaimer: The sending system was Linux running a newer GNU version of netcat while OS X includes the older FreeBSD version. I had to use homebrew to install the GNU version of netcat on OS X to get it to work with the Linux system. The command parameters vary a bit between the two netcat programs and I was unable to get the built-in OS X version of netcat to play nice with the Linux GNU version.
Homebrew is a way to install Linux tools on OS X it’s really simple and easy. http://mxcl.github.com/homebrew/ – for example OS X includes the curl command but maybe you want the wget command which is similar but maybe you are more familiar with wget. Homebrew installs the add-on tools into a location that won’t interfere with the normal OS X tools and if their names are the same, it will use the Homebrew one first. Homebrew will not mess up your Mac, but it might confuse someone else trying to work on your Mac.
You can use the xzvf switch when untarring to avoid needing to use unzip (or gzip).
e.g.
tar xzvf myTarFile.tar.gz
also you may find tarred/gzip files called .tgz
The file extension doesn’t actually matter on these, but your readers should know this lil’ factoid.
Источник


