- Open or quit Terminal on Mac
- Open Terminal
- Quit Terminal
- Quit a shell session
- 7 simple ways to open Terminal on Mac
- Open Terminal using Spotlight Search
- Open Terminal using Finder
- Open Terminal using the Applications folder
- Open Terminal using Launchpad
- Open Terminal using Siri
- Create a Terminal shortcut
- Terminal commands and tips
- Wrapping it up
- How to Launch Terminal in the Current Folder Location on Mac
- Launching a Terminal Window in the Current Folder on a Mac
- Conclusion
- Open Current Folder in Finder from Terminal of Mac OS X
- How to Open the Current Directory in a Finder Window from Terminal on a Mac
- Mac OSX Terminal (command-line tips and tricks)
- Open Terminal (several ways)
- Bash shell invocations
- User Mask for permissions
- Within Text Editors/IDEs
- Text wrapping
- Hyper terminal app
- iTerm2 for split pane
- Alphabetical Commands list
- Shutdown
- Text Command Line Bash Shortcuts
- Environment Variables
- Default editor
- Switch among programs
- Command history
- Foreground processes and background jobs
- PID given process name
- background jobs
- Suspend control+Z
- List open files
- Folders accessed by developers
- vs. /etc in Linux
- Terminal File Listing Home Folder
- List files and folders
- List files and folders
- Show Hidden Invisible Files in Finder
- Create Terminal Aliases
- Wireless up and down
- tree alias or brew install
- Cursor to Screen Hot Corners
- Hosts file
- Terminal Ping Host
- SSH tunnel
- DNS Configuration with NameBench
- Clear DNS Cache
- Bash Profile Configuration
- Operating System Kernel
- Setup Your Mac Like a Pro
- PS1 terminal prompt setting
- Root user for sudo commands
- Create Windows-like shortcuts with parameters using text editor
- Mount .dmg files using hdiutil tool
- IPv6 compatibility with Curl command line apps
- Largest files taking up disk space
- Empty Trash
- Ulimit Too Many Files
- Disable System Integrity Protection
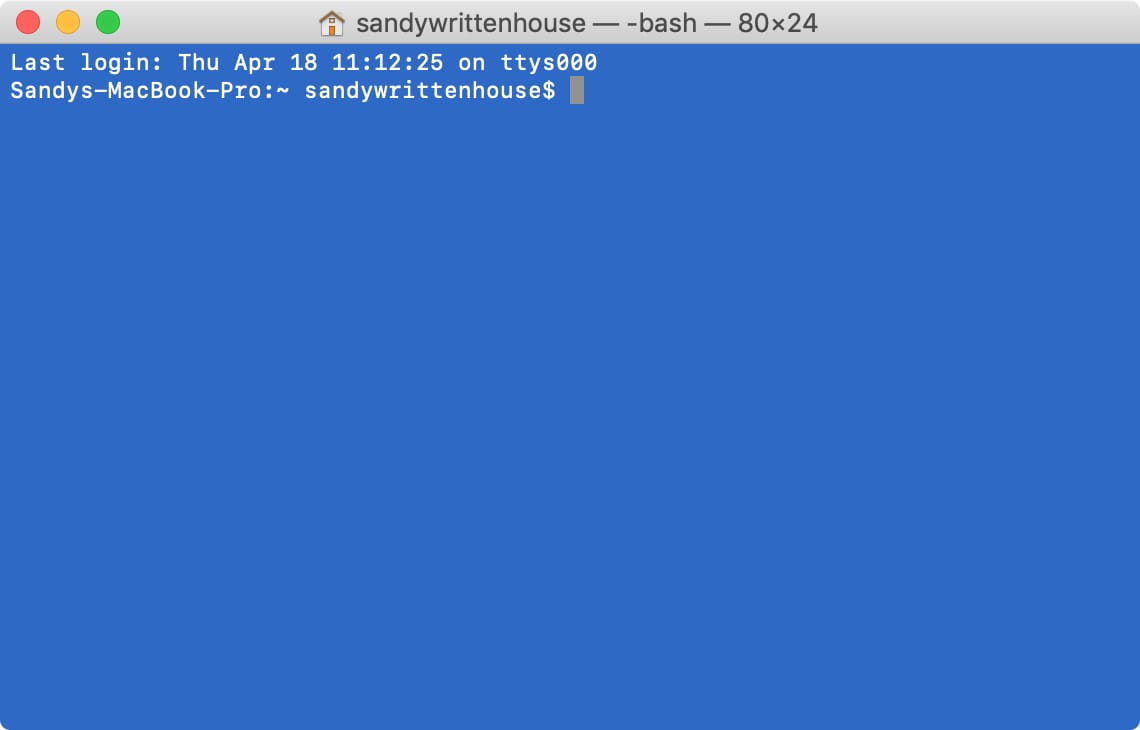
Open or quit Terminal on Mac
Each window in Terminal represents an instance of a shell process. The window contains a prompt that indicates you can enter a command. The prompt you see depends on your Terminal and shell preferences, but it often includes the name of the host you’re logged in to, your current working folder, your username and a prompt symbol. For example, if a user named michael is using the default zsh shell, the prompt appears as:
This indicates that the user named michael is logged in to a computer named MacBook-Pro, and the current folder is his home folder, indicated by the tilde (
Open Terminal
On your Mac, do one of the following:
Click the Launchpad icon  in the Dock, type Terminal in the search field, then click Terminal.
In the Finder  , open the /Applications/Utilities folder, then double-click Terminal.
Quit Terminal
In the Terminal app  on your Mac, choose Terminal > Quit Terminal.
Quit a shell session
In the Terminal app on your Mac, in the window running the shell process you want to quit, type exit , then press Return.
This ensures that commands actively running in the shell are closed. If anything’s still in progress, a dialogue appears.
If you want to change the shell exit behaviour, see Change Profiles Shell preferences.
Источник
7 simple ways to open Terminal on Mac
Terminal is a handy tool for giving your Mac commands although many may be intimidated by it. After all, it’s not as easy as just typing in a sentence and your Mac responding. We have some articles listed below that can help you with common commands if you’re interested in learning to use Terminal or if you just want to enter a command or two.
Either way, before you can use it, you have to open it, right? There are various methods for opening it; here are seven simple ways to open Terminal on Mac.
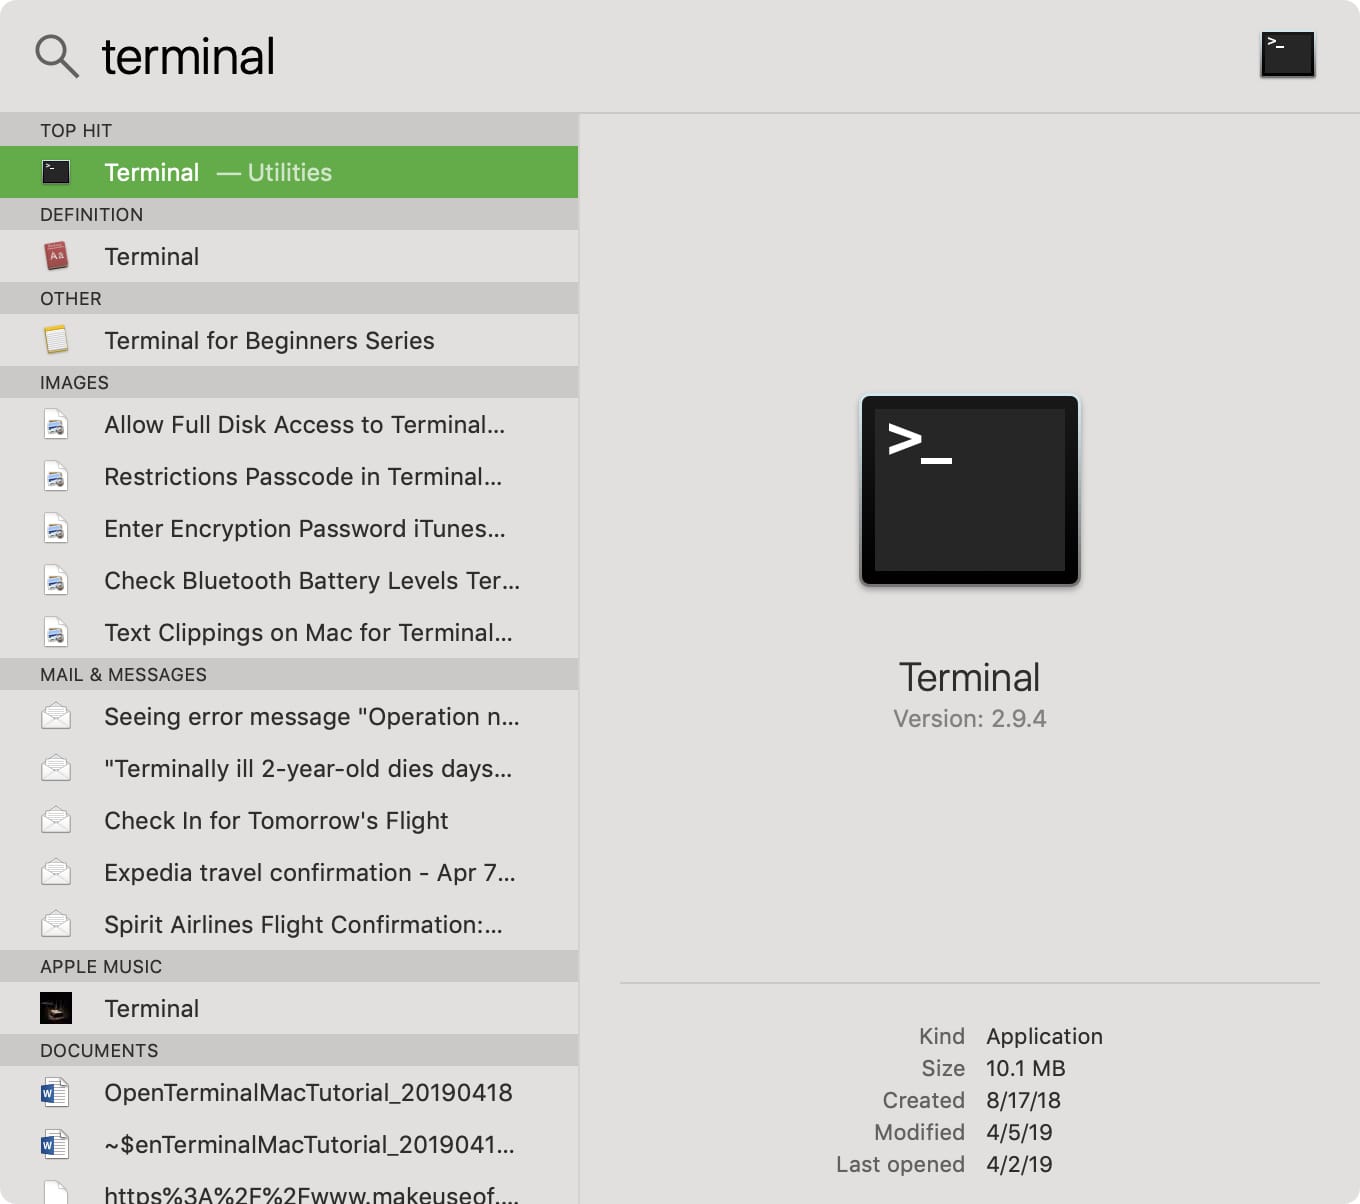
Open Terminal using Spotlight Search
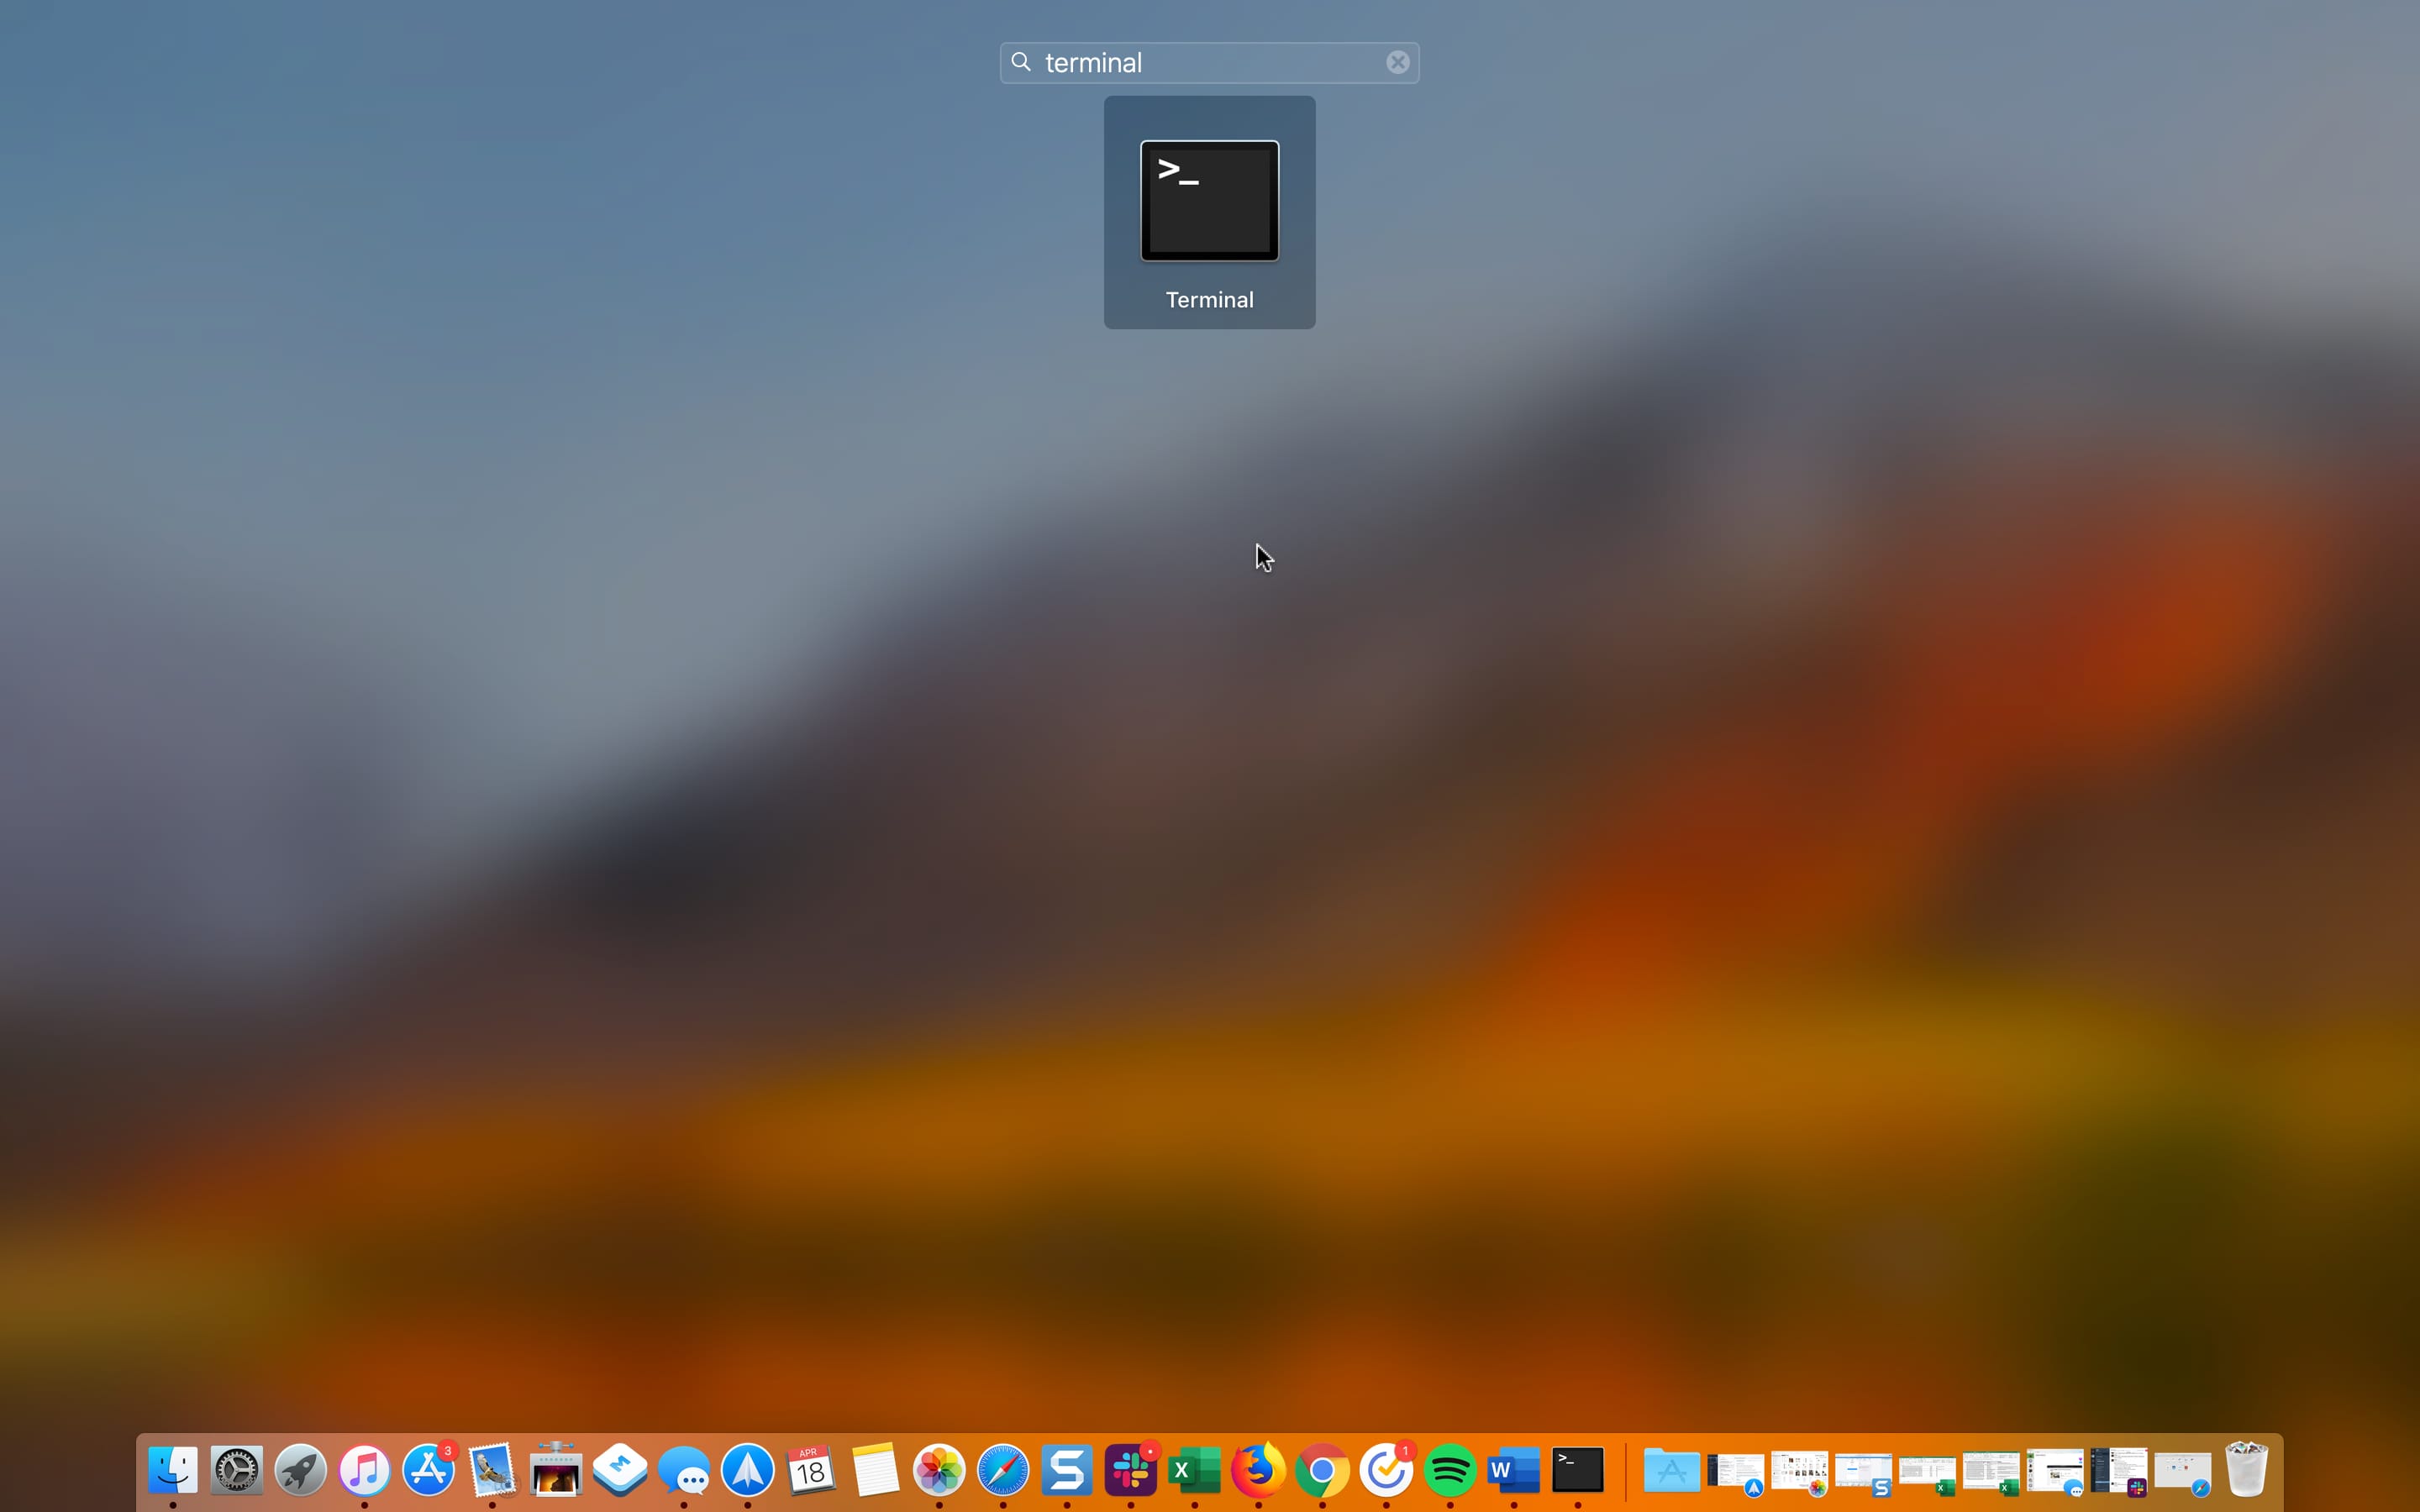
One of the quickest and easiest ways to open Terminal on Mac is with Spotlight Search.
1) If you have the Spotlight Search button in your menu bar, click it. Otherwise, you can use the keyboard shortcut Command + Space.
2) Type in “Terminal”.
3) You should see the Terminal application under Top Hit at the top of your results. Double-click it and Terminal will open.
Open Terminal using Finder
Open Finder or make sure that your menu bar is using Finder and not another application.
1) Click Go > Utilities from the menu bar.
2) In the Utilities folder that opens, double-click Terminal.

Open Terminal using the Applications folder
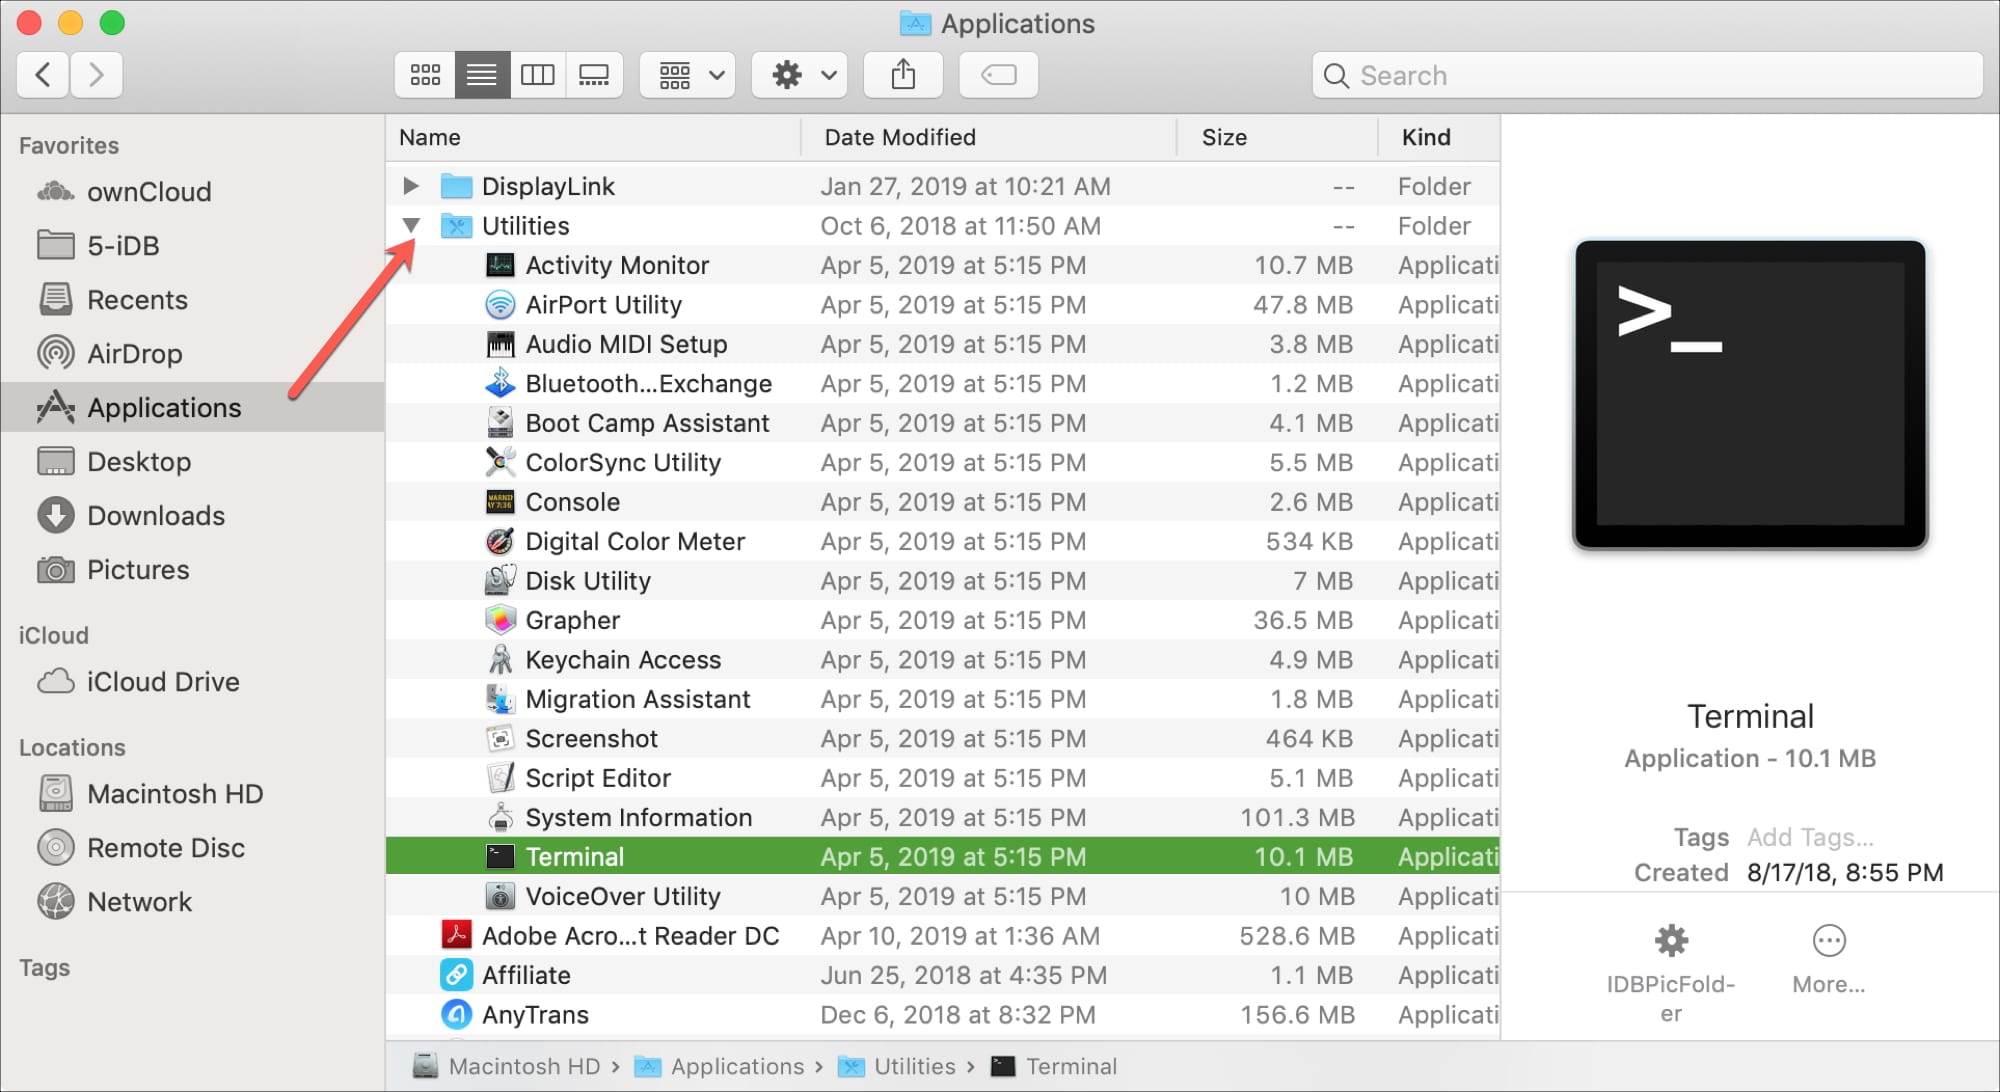
If you have a Finder window open, you can access Terminal from the Applications folder.
1) Select Applications from the left side.
2) Click the arrow to expand the Utilities folder.
3) Double-click Terminal.
If you have the Applications folder in your Dock like I do, you can open Terminal from there too.
1) Click Applications in your dock.
2) Select Utilities.
3) Choose Terminal.
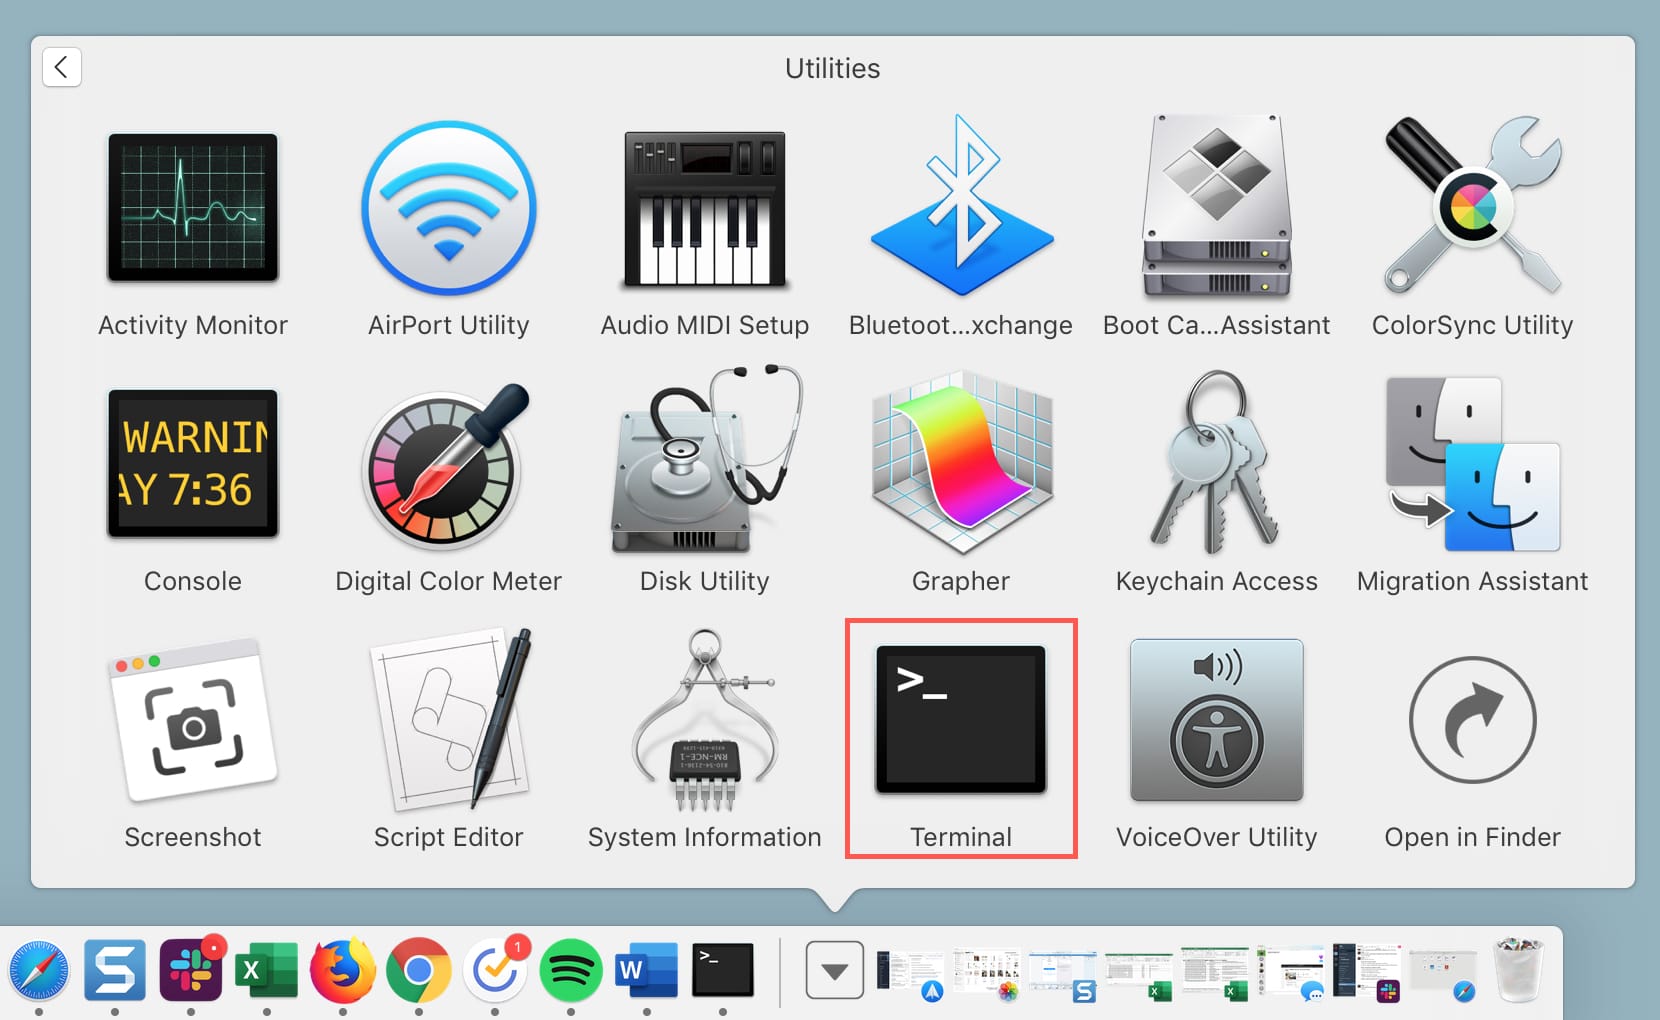
Open Terminal using Launchpad
You can open Terminal using Launchpad two ways, depending on if you have organized Launchpad a different way or not.
By default, Launchpad contains a folder labeled Other that contains Terminal.
1) Open Launchpad from your Dock or with the keyboard shortcut Fn + F4.
2) Locate the Other folder and click.
3) Choose Terminal.
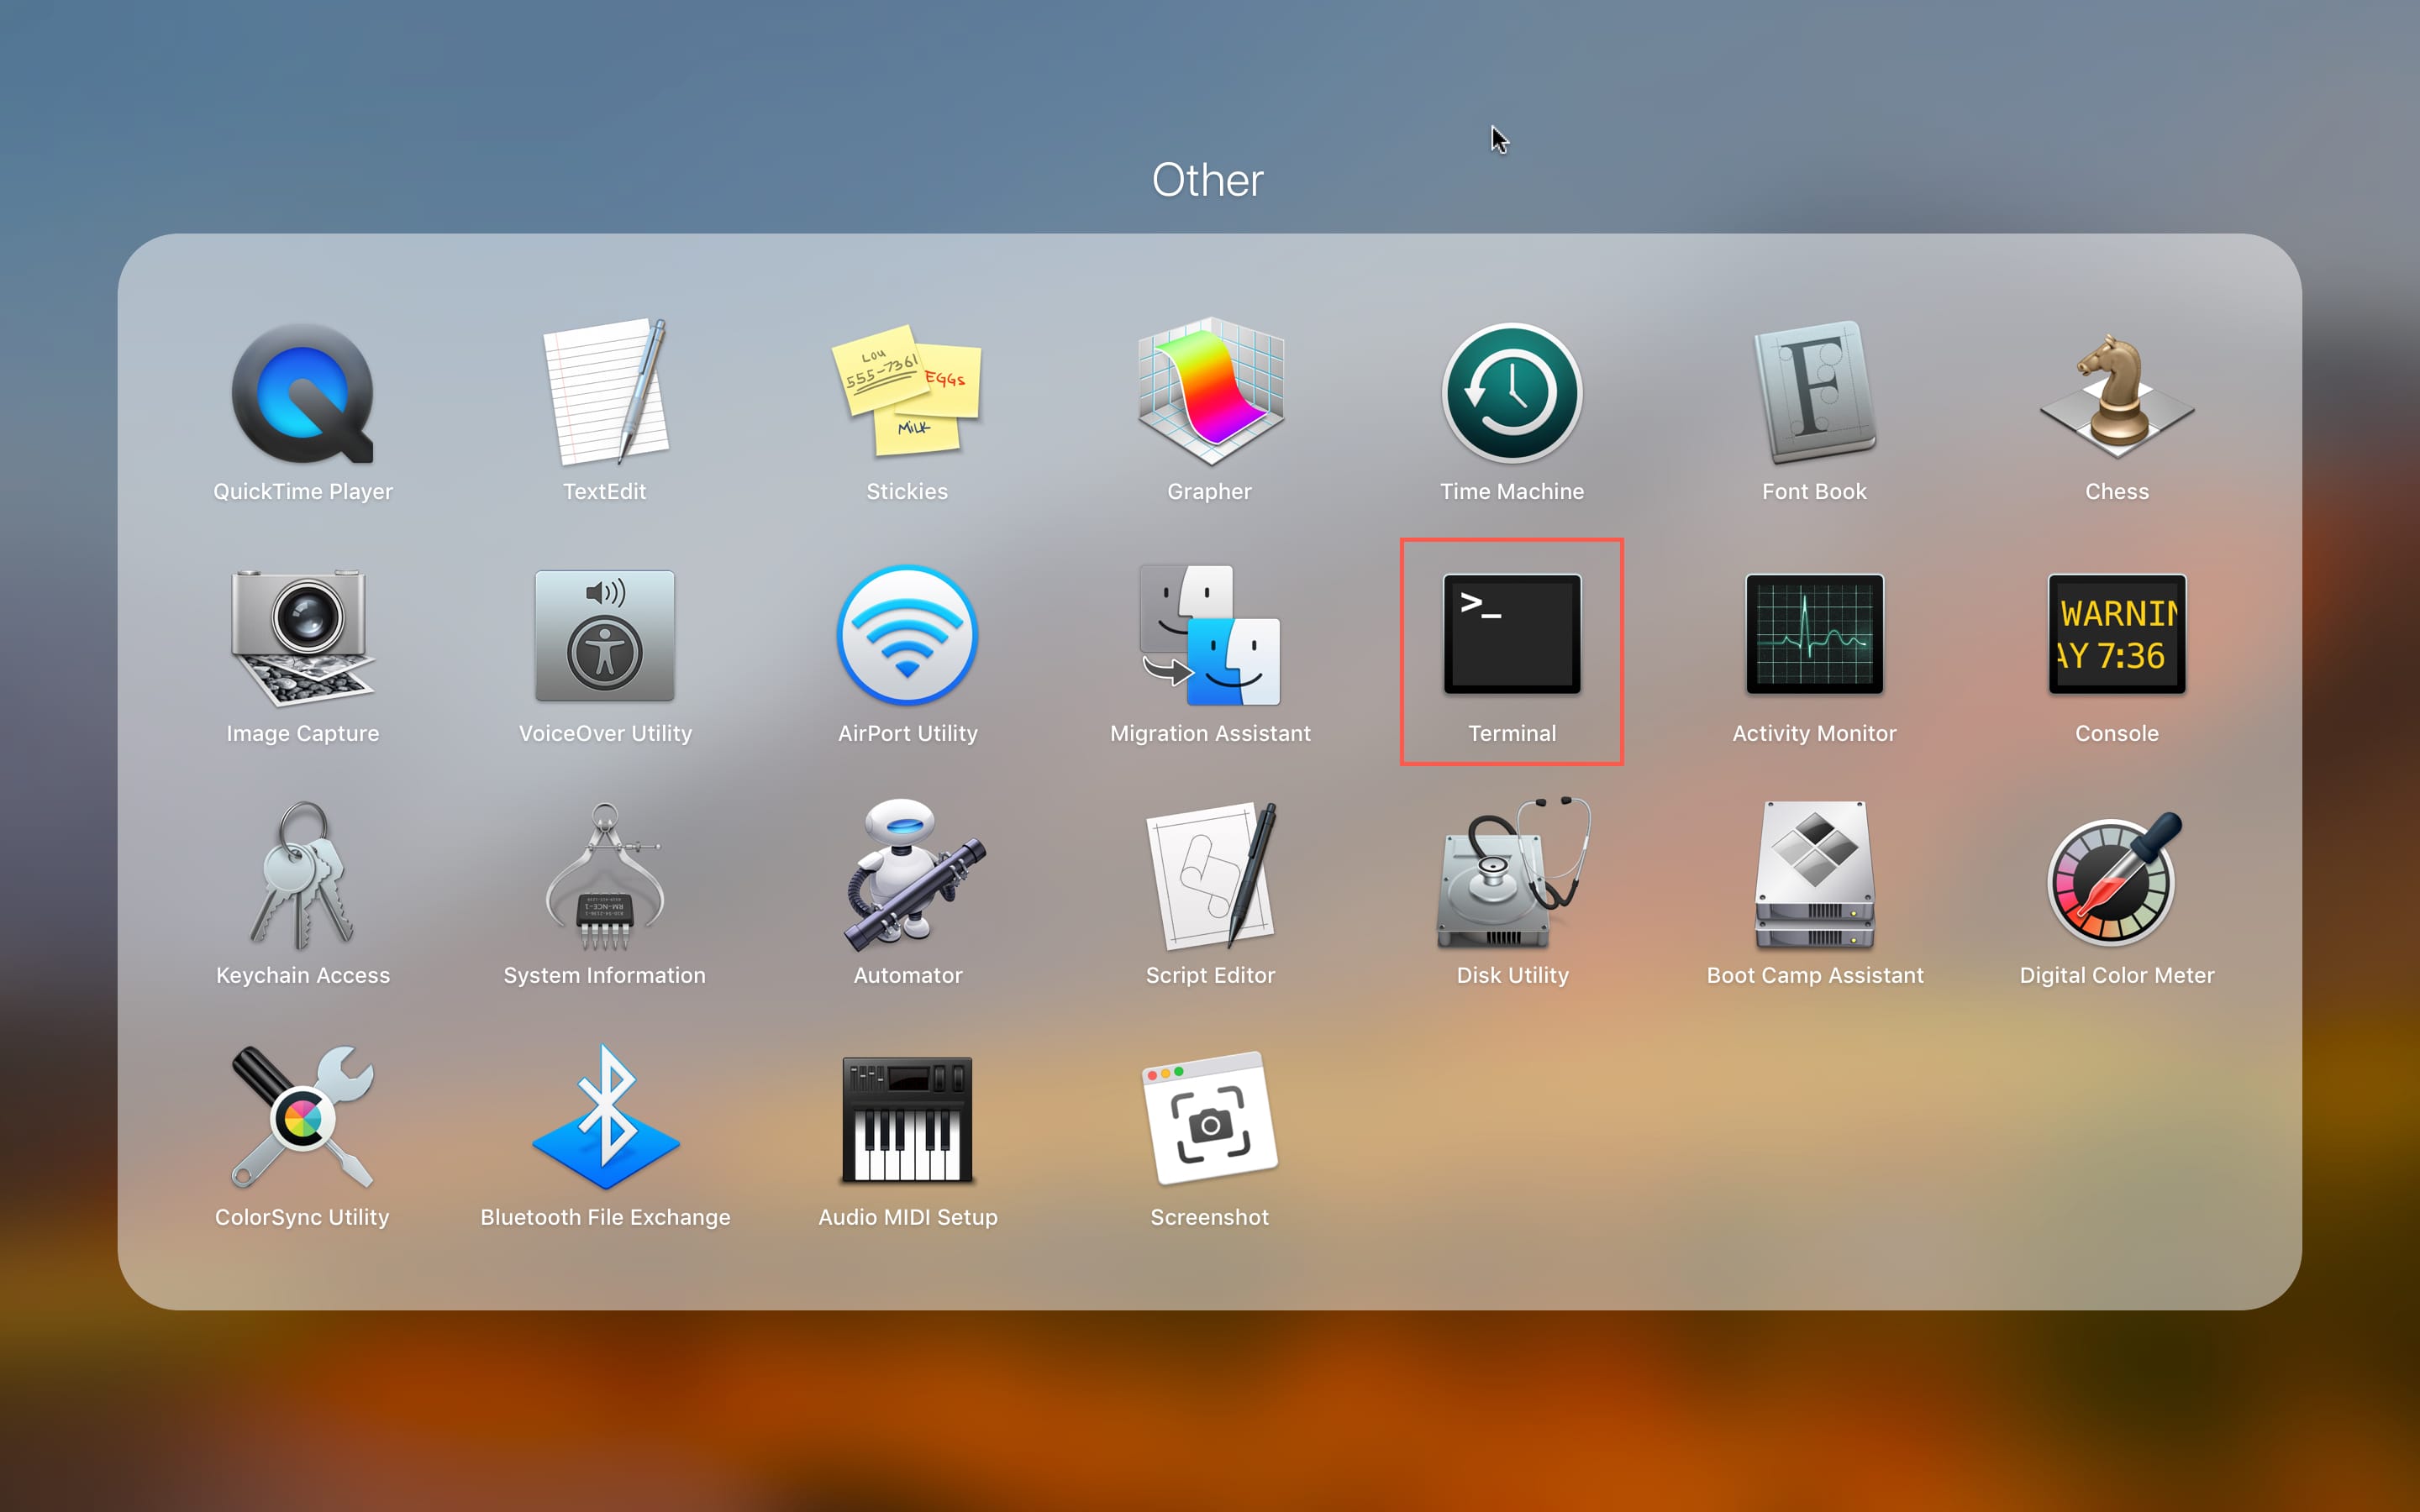
If you have arranged your Launchpad items differently and removed the Other folder, you can still find Terminal easily.
1) Open Launchpad from your Dock or with the keyboard shortcut Fn + F4.
2) Type “Terminal” into the search box at the top.
3) When the Terminal icon displays, click it.
Open Terminal using Siri
Thanks to a helpful comment from one of our readers, there is one more super simple to way to open Terminal on Mac; using Siri.
1) Click the Siri button from your menu bar or open Siri from your Applications folder.
2) Using your microphone, simply say “Open Terminal.”

Create a Terminal shortcut
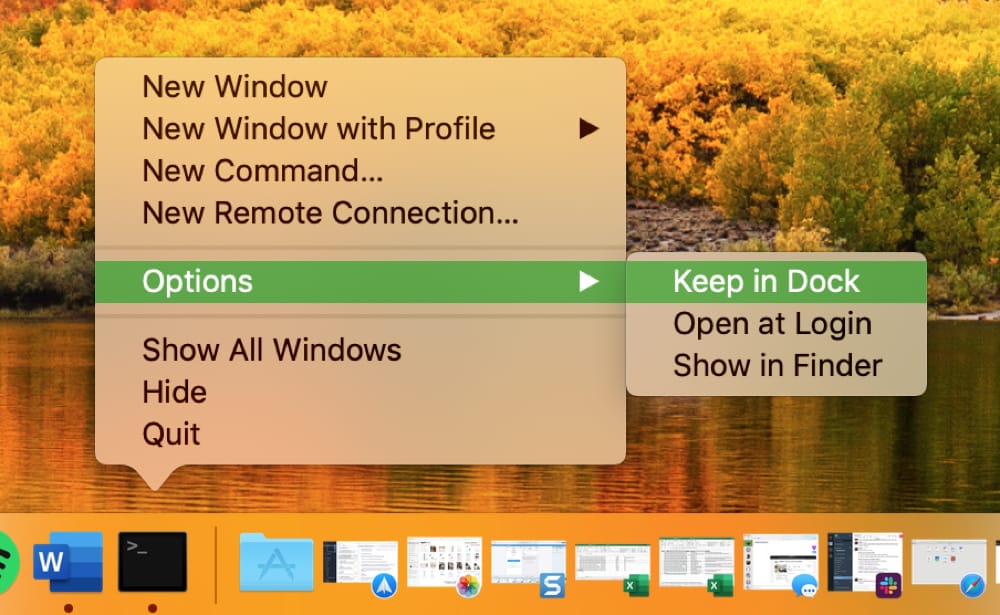
If you decide that you want to start using Terminal more often, creating a shortcut for it in your Dock is convenient.
With the Terminal icon in your Dock already, from recently opening it, do the following.
1) Hold Control and click the Terminal icon in the Dock or right-click it.
2) Mouse over Options in the pop-up menu.
3) Click Keep in Dock.
Terminal commands and tips
As mentioned above, here are some of our articles with commands you can use for Terminal that may come in handy.
You can also head to the Terminal section of our website for additional tips and tutorials for Terminal.
Wrapping it up
Terminal is a terrific tool for doing things quickly on your Mac. And once you get the hang of it, and bookmark some useful commands, it’s not as intimidating anymore.
Have you tried to use Terminal yet or are you interested in learning more about it so that you can use it? Let us know your thoughts below and if you have any tips you’d like to share with our readers for using Terminal, feel free to comment!
Источник
How to Launch Terminal in the Current Folder Location on Mac

Often while working with local files you may need to open a Terminal window in your current folder location. While doing that is as easy as pressing a button and clicking an option in Windows, things are different on a Mac. You are required to first enable an option in your Preferences panel, and then you will have the option to launch an instance of Terminal in any folder of your choice on your Mac.
A local instance of Terminal lets you execute commands while keeping the files in that folder in mind. It lets you work with the files right there in that folder.
Here’s how you can launch Terminal in the current folder location on your Mac.
Launching a Terminal Window in the Current Folder on a Mac
You do not need a third-party app to get the job done. All you need to do is visit the Preferences panel, tweak a few settings here and there, and you will be all set.
1. Click on the Apple logo in the top-left corner on your Mac, and select “System Preferences…” You will be taken to the Preferences panel on your Mac.

2. Click on “Keyboard” in the Preferences panel.

3. Once in the Keyboard panel, click on the “Shortcuts” tab.

4. In the Shortcuts panel, click on “Services” in the left-hand menu. Scroll down in the right-hand menu, and select the options that say “New Terminal at Folder” and “New Terminal Tab at Folder.” These options should be next to each other.
Click on “none” next to “New Terminal at Folder,” and press a key combination on your keyboard to assign a new shortcut key to the feature. That way you will be able to launch a Terminal window using a shortcut key instead of pulling up the menu and selecting the option to launch one.

5. Once you have enabled the options and assigned a keyboard shortcut, you can close the Preferences panel.
6. Open the parent directory where your folder is located. Then single-click on the folder where you wish to launch a Terminal window, click on “Finder” followed by “Services,” and select “New Terminal at Folder.” Or you can simply press the keyboard shortcut that you assigned before.

7. A new Terminal window should launch in the current folder location allowing you to play around with the local files in that folder.

Launching a local instance of Terminal should now be easy for you. Should you ever wish to disable the feature, you can do so from the Preferences panel by just unchecking the boxes that you selected in the above steps.
Conclusion
If your work revolves around working with local files using Terminal, and you do not want to go through the hassle of providing full paths to the files, you can simply use the above workaround to have Terminal launched keeping your current folder as its current working directory.
Mahesh Makvana is a freelance tech writer who’s written thousands of posts about various tech topics on various sites. He specializes in writing about Windows, Mac, iOS, and Android tech posts. He’s been into the field for last eight years and hasn’t spent a single day without tinkering around his devices.
Источник
Open Current Folder in Finder from Terminal of Mac OS X
 Want to open a Finder window from the current directory location in Terminal? Mac OS makes this easy!
From the Mac Terminal, you can immediately open whatever folder or directory you are working within into the Finder of MacOS and Mac OS X by simply typing the a short command string and executing it. To try this out yourself, you’ll want to use the following command:
How to Open the Current Directory in a Finder Window from Terminal on a Mac
Assuming you’re already in the Terminal application, found in /Applications/Utilities/ the command to type is as follows:
Hitting return and executing “open .” (yes that is a period, and yes it is required) will open the present working directory (PWD in the world of UNIX acronyms) in the Terminal / Command line into the Finder of the Mac – you know, the visual file system.
You can do this from anywhere in the command line as long as you’re in a local path, but it doesn’t matter if it’s system files or user files, you can launch it into the Finder. This can actually be a really helpful way to modify and adjust buried system files if you found them through the command line but now need to interact with them in the Finder.
For example if you’re digging around in /Library/Preferences/Mozilla/ and type open . that folder will be opened in the Finder. Or if your CWD is /etc/ and you want to access that directory immediately in Finder, type ‘open .’ to access it.
The screenshot above shows this in action while the PWD within the Terminal is the /Applications directory, thus the Applications folder is opened in the Finder.
This is useful for many reasons that I’m sure you can think of, and it’s one of those must-know tricks for command line users in Mac OS X.
By the way, you can also set this up to go the other way, from Finder to Terminal, if you’d like.
This isn’t the only option to open the present working directory from Terminal into a new Finder window on the Mac, you can also use the ‘open’ command like so:
Note that those are not quotation marks but the tilde press instead. As mentioned before, pwd stands for present working directory, and this launches into that in a new Finder window the same way ‘open .’ does.
Use whichever approach works for your needs. And if you have any similar tips or tricks for opening Finder windows from the command line of Mac OS, share them in the comments below!
Источник
Mac OSX Terminal (command-line tips and tricks)
Make things happen quickly without touching the mouse
This tutorial describes how to make use of the macOS Terminal to make your life easier and less frustrating.
What Apple calls the Terminal is what Linux people call the shell console (more specifically, the Bash shell). It’s also called a command-line terminal, abbreviated as CLI.
Information here is often used in interview questions.
Open Terminal (several ways)
On the Mac, the Terminal app is kinda buried, probably perhaps because those who use a MacOS laptop just for social media probably won’t need a Terminal.
But if you’re a developer, it’s hard to get away from using a CLI.
There are different ways to open a Terminal command line.
My preferrence is a way that doesn’t require reaching for a mouse and using the least number of keystrokes:
- Press command+space keys (at the same time) to bring up Apple’s Spotlight universial search, then
- Type “termin” so “Terminal.app” appears.
- Press the space bar to select it.
Alternately, if you prefer moving your mouse:
- Click the Finder icon on the app bar.
- Click Applications on the left pane.
- Click Utilities.
- Click Terminal.
PROTIP: If you are at the Finder program (since Yosemite) you can open a Terminal to a folder listed within Finder by pointing your mouse on it, then tapping with two fingers on the touchpad/mousepad. To enable that:
- Click the Apple icon, System Preferences.
- Press K and select Keyboard.
- Click Shortcuts, Services.
- Scroll to the Files and Folders section.
- Check on New Terminal at Folder.
- Close the dialog by clicking the red dot at the upper left corner.
Bash shell invocations
I put in an echo in the various files that macOS executes upon user login, when a new terminal is opened, and when a bash shell is invoked:
When macOS logs in a user, it executes file /etc/profile. That file’s code:
echo $ resolves to /usr/local/bin/bash.
The /etc/bashrc file contains:
The above defines the $PS1 variable which sets the Terminal’s prompt to the left of the cursor.
NOTE: On Ubuntu, instead of /etc/bashrc, the file is /etc/bash.bashrc.
RedHat also executes /etc/profile.d if the shell invoked is an “Interactive Shell” (aka Login Shell) where a user can interact with the shell, i.e. your Terminal bash prompt.
Thus, whatever is specified in /etc/profile is NOT invoked for “non-interactive” shells invoked when a user cannot manually interact with it, i.e. a Bash script execution.
PROTIP: One can change those files, but since operating system version upgrades can replace them without notice, it’s better to create a file that is not supplied by the vendor, and within each user’s $HOME folder:
In other words, file /etc/profile is the system wide version of
/.bash_profile for all users.
Examples of custom settings include:
export HISTSIZE=1000 # sets the size of .bash_history lines of command history (500 by default)
User Mask for permissions
Wikipedia says umask controls how file permissions are set for newly created files. Please read it for the whole story on this.
To identify the User Mask for permissions:
Since the default is “0022”: -S shows the symbolic equivalent to “0022” for u=user, g=group, o=others :
r is for readable, x is for eXecutable by the user.
To set the User Mask for permissions:
Within Text Editors/IDEs
Many prefer the terminals built into VS Code and other editors/IDEs.
Text wrapping
This page contains notes for system administrators and developers, who need to control Macs below the UI level, which require typing commands into a command-line terminal screen.
- To avoid text wrapping, cursor on the right edge to expand the screen width.
Hyper terminal app
Get the .dmg installer from the website https://hyper.is. It’s used by tutorials author Wes Bos.
Unlike Apple’s Terminal, which is closed-source, Hyper is an open-source and extensible terminal emulator. It is available on MacOS, Windows, and Linux because it’s built using Electron (the same platform that powers Atom, Slack, and Brave). So it can be slow.
To customize Hyper, add the name of many packages to its config file
iTerm2 for split pane
Many prefer to install and use iTerm2 instead of the built-in Terminal program. Install iTerm2 using Homebrew:
Terminal does not support but iTerm2 does support dividing the CLI into several rectangular “panes”, each of which is a different terminal session:
- split window vertically with Command+D
- split window horizontally with Command+Shift+D
- Navigate among panes with command-opt-arrow or cmd+[ and cmd+]
- Temporarily toggle maximize the current pane (hiding all others) with command-shift-enter
- Exit out a pane by typing exit in that pane
Pressing the shortcut again restores the hidden panes.
On Linux, there is the screen command.
See Iterm2 Cheat Sheet of iTerm2 keyboard shortcuts. https://github.com/nobitagit/iterm-cheat-sheet/blob/master/README.md
Alphabetical Commands list
A list of all commands native to macOS is listed alphabetically at https://ss64.com/osx.
To exit from the Terminal shell:
Get back in for the remainder of this tutorial.
Shutdown
CAUTION: To kill all apps and shutdown a Mac right away (with no warning and no dialog):
sudo shutdown -h now
Text Command Line Bash Shortcuts
These come from the bash terminal on Linux machines here: Press control with your pinkie, then …
- control + C = Close processing
- control + L = cLear screen
Environment Variables
A big reason to use a command-line terminal is to set environment variables.
Like on PCs, the PATH system environment variable stores where the operating system should look to find a particular program to execute.
To see what is already defined:
The listing such as this, which declares the “XPC_FLAGS” system variable:
declare -x XPC_FLAGS=”0x0”
This talks about setting launchd.conf and rebooting. This applies to all users.
To see what is defined:
PROTIP: $PATH must be upper case.
The response I’m getting includes:
Notice colon (:) separator used in Mac and Linux vs. semicolons used in Windows PATH.
Default editor
The command to invoke the default editor is defined by a variable:
By default, it’s TextMate:
If you want to change it to nano or other editor, see My tutorial on text editors.
On Terminal session, copy what has been typed and open the default text editor so you can edit the command:
Alternately, (which also works in Linux) while holding down the control key, press X and E together:
control + X + E
Make changes, then copy all, switch or exit to the Terminal, then paste.
Switch among programs
To switch among programs already running in macOS, hold down the command key while pressing tab multiple times until the program you want is highlighted (with its name) in the pop-up list. This is equivalent to the Windows control+Esc key combo.
Command history
List previous command history:
This is the same as:
PROTIP: History does not display commands entered with a leading space.
Cursor up and press Enter to re-execute.
Press control + R to begins a “reverse incremental search” through your command history, then type, it retrieves the most recent command that contains all the text you enter. Much better than something like:
Press control + S to reverse the mode.
The clear command does not clear history.
Clear the terminal history:
clear
Foreground processes and background jobs
List the first process (with Parent process ID of 0) launched (into user space) at boot by the system kernel:
f adds columns for status of the command (CMD) to invoke the process:
By contrast, on Linux system, the first CMD is /lib/systemd/systemd.
To list all processes, don’t specify 1
PID given process name
To list the process ID given a process name such as “firefox”:
This can be generalized in a shell program containing:
Alternately, Linux has a command which returns the PID associated with a process name. But it’s not avaiable on macOS, so:
To emulate a long-running process in the foreground:
No additional commands can be accepted.
To kill the current process, press control + C.
background jobs
Run a program in the background with the &:
List jobs (processes) running in the background:
Suspend control+Z
To suspend the process, press control + Z. The response is like:
Internally, this sends a “20) SIGTSTP” signal to the process.
To have the process continue (internally sending a “18) SIGCONT”:
Copy the PID (Process Identifier) number for use in the kill command, such as:
There are many ways to kill a process:
To kill a specific process, ee need to specify its PID (Process Identifier):
Some applications are written to receive a sigterm so that it can take steps to gracefully cleanup and exit.
The key ones, in order of aggressiveness:
kill 289 # sends sigterm
kill -15 289 # sends sigterm
kill -2 289 # sends sigint
kill -1 289 # sends sighup
kill -9 289 # sends sigkill signal to the kernel without notifying the app, a “dirty shutdown” used when the app is misbehaving.
List open files
To list process id’s and port (such as 8080), use the “list open files” command:
PROTIP: Use grep to filter because the response is usually too many lines.
(You’ll need to provide your password).
The right-most column heading «NAME» shows the port (either TCP or UDP).
Folders accessed by developers
In Finder, select from the left panel the first item under the Devices list.
Click on Macintosh HD.
- Applications hold apps installed.
- Incompatible Software hold apps which cannot be installed, such as Amazon Kindle, which competes with Apple’s iBooks. This occured during upgrade to Yosemite.
- Library/Library holds Apple internal apps.
- System hold apps installed.
- Users hold data for each user defined, as well as a Shared folder accessible by all users.
Click on your username (wilsonmar in my case).
This action is the same as clicking on the last default item under the Favorites list.
Many WordPress developers prefer to add a folder named Sites which holds the wordpress folder expanded from download.
vs. /etc in Linux
VIDEO: On both Mac and Linux, the “et-see” folder contains system and program configuration files, for both default system and programs you install (such as “teamviewer”, etc.)
/bin contains system
/sbin are for system administrators such as ping, fdisk, mount, umount, etc.
Terminal File Listing Home Folder
By default, the Terminal shows the hard drive and lowest level file folder name, in white letters over black.
To show the present (current) working directory (folder):
The response for me is:
You will of course have a different machine user name than wilsonmar.
Note the pwd command is built internally to the Bash shell:
pwd is a shell builtin
To get back to the home folder:
Alternately, use the $OLDPWD environment variable that MacOS automatically maintains to remember the previous working directory so that you can switch back to it:
List files and folders
List all file names (without any metadata):
Folders available by default include Documents, Downloads, Pictures, Desktop, Music, Movies.
Note the ls command is an external command added to the Bash shell:
The response lists where ls is defined:
ls is hashed (/bin/ls)
Dive into a folder type:
Nothing happens because upper case letters are important.
Press delete to remove the mu and type:
Press Enter for the Music folder.
Go back up a level:
Create a Projects folder to hold projects downloaded from Github:
-p specifies creating the parent folder if it doesn’t exist.
This only needs to be done once.
List files and folders
List all files with their permission settings:
Notice that no hidden files are listed.
List all hidden files with permission settings, piping the listing to more instead of having results flying by:
A colon appears at the bottom if there is more to show.
Cancel the listing, press control + C.
Notice the .bashrc on the first page, something like:
If a file is not listed, create it with:
To make it rw r r:
List only hidden files in the current folder:
Show Hidden Invisible Files in Finder
By default, the Mac’s Finder does not show hidden files.
Close all Finder folders.
Enter this in Terminal before typing Return:
This causes all Finder windows to be reset.
To make invisible files visible again:
A description of each keyword:
defaults — OSX’s command to change defaults, apple’s low-level preference system.
write — tells defaults you want to change a preference, or write it
com.apple.finder — defaults that the application’s preferences you want to change is Finder, specified by the application’s bundle identifier.
AppleShowAllFiles — specifies which preference you want to change within the application.
TRUE or FALSE — the value you want to set the preference to. In this case, it is a boolean, so the values must be TRUE or FALSE. I think you might be able to use YES or NO, but I’m not sure.
&& — a terminal operator to run whatever’s after this if the command to its left is successful.
killall — kills processes or closes applications.
Finder — specifies the process or application to close.
For more on this, see this.
Create Terminal Aliases
Wireless up and down
Most developers leave files un-hidden.
To set wireless (device en0 ) up or down without clicking on the icon at the top:
ifconfig en0 down
This command requires sudo permissions.
Set alias command to just type showFiles and hideFiles to show and hide Mac OS X’s hidden files, consider this article to create such terminal aliases in the
tree alias or brew install
OSX does not come with the tree command that many other Linux distributions provide. So add it using:
If you don’t want to install a program, add an alias for a tree command by adding this in the
Alternately, add it by installing a command using brew:
Active Terminal sessions need to be closed so new Terminal | Shell | New Window | Shell has this activated.
See list of parameters:
List only 2 levels deep with human-readable file size kilobytes and sort by last modified date:
Cursor to Screen Hot Corners
By default, if you move the mouse to one of the corners of the screen, stuff happens. It can be annoying.
- Click the Apple menu at the upper left corner.
- Select System Preferences.
- Select Desktop & Screen Saver.
- Select the “Screen Saver” tab.
- Click “Hot Corners” at the lower-right corner.
Select actions for each of the corners.

PROTIP: Disable each by selecting the dash (last choice) so they don’t show up when you’re just trying to navigate to something near the edge.
Press Esc to bring the screen back.
PROTIP: NOT having a quick way to “Put display to sleep” is considered a security vulnerability by CIS. The lower-left corner is less popular location on Mac than Windows.
Hosts file
Mac, Windows, and Linux systems have a hosts file that locally does the work of the public DNS – translating host names (typed on browser address field) to IP address numbers.
Show text file contents to the Terminal console:
The default contents:
PROTIP: fe80:: is a block of IPV6 addresses reserved for link-local addresses used for packets sent only to directly connected devices (not routed). The network discovery protocol (NDP), which replaces ARP and DHCP in IPv4, is the biggest user of link-local addresses (NDP sorta .
fe80::1 is like 127.0.0.1 for IPV4, but actually IP address 169.254.. in IPV4, an address not often used.
Each IPV6 interface has a different link-local address starting with fe80:: and (typically) ending with a modified version the interface’s MAC address (EUI-64 format) to ensure a unique address on a segment.
Programs such as OpenVPN add to the bottom of the file:
BLAH: The Linux tac command to list backward is not in Mac:
Show a file in -reverse (bottom-up):
Change n2 to a different number of lines to show.
PROTIP: This command is useful to see the lastest entries appended to the end of a large log file.
Expose spaces at end of lines by showing at end of every line $ end-of-line characters that are otherwise not shown. For example, in a file on every macOS:
Edit the hosts file on a Mac using the Atom text editor:
Terminal Ping Host
Find the IP address of a website host name:
SSH tunnel
To access a remote server through a port that is not open to the public:
VIDEO: Bind local port 3337 to remote host 127.0.0.1 port 6379 using user root in emkc.org
BTW 6379 is the default port for a Redis instance.
DNS Configuration with NameBench
Analysis at one time showed this ranking by speed:
- UltraDNS at 156.154.70.1
- Google at 8.8.4.4, 8.8.8.8
- OpenDNS at 208.67.222.222, 208.67.220.220, 208.67.222.220
Google Namebench tries the speed of various DNS servers from YOUR machine (which takes some time) and pops up in your browser this:
Clear DNS Cache
Flush the DNS cache (since OSX 10.9):
sudo dscacheutil -flushcache
dscacheutil is the Directory Service cache utility used to Gather information, statistics, initiate queries, flush the cache:
BTW, the equivalent for Ubuntu is
sudo service network-manager restart while other Linux flavors uses
sudo /etc/init.d/nscd restart .
Windows uses
ipconfig /flushdns .
Different commands are needed for different versions of OS. OSX 10.10 added requirement for sudo when using the built-in discoveryutil:
sudo discoveryutil udnsflushcaches
Bash Profile Configuration
The profile file is run during boot-up to configure the terminal to define file path, shims, and autocompletion handlers.
This is the single biggest frustration with people using Linux on Mac.
One of the earliest articles on bash here shows shell variables, environment variables, and aliases.
Each operating system has its own file name for its profile:
- With Ubuntu: Modify
/.profile instead of
/.bash_profile.
With Zsh: Modify
/.zshrc file instead of
/.bash_profile.
With Fish: Modify `
/.conf/fish/config.sh` to append.
PROTIP: If there is both a .bash_profile and a .profile file, boot-up only executes the first one it finds.
On my Yosemite Mac, open a terminal and:
View the file using the vi editor that comes with OSX:
According to the bash man page, .bash_profile is executed during login before the command prompt, while .bashrc is executed for interactive non-login shells such as when you start a new bash instance by typing /bin/bash in a terminal.
Here’s what my profile file begins:
Exit vi by typing :q
Some installers request that adding a $PATH using a command such as:
To execute profile with the changes:
Alternately, to install GHC copy and paste into
To run a Bash script while avoiding the confirmation prompt:
set -- -f; source bootstrap.sh
Operating System Kernel
I can use Linux commands in my version of the operating system:
uname -a (a for all) or uname -rvm
14.3.0 Darwin Kernel Version 14.3.0: Mon Mar 23 11:59:05 PDT 2015; root:xnu-2782.20.48
which is a combination of:
uname -r for release number,
uname -v for kernel version,
uname -m for model:
x86_64 for Intel or AMD 64-bit or
i*86 for 32-bit.
For more information about Darwin operating system developed at Apple, see:
- http://www.wikiwand.com/en/XNU and
- https://www.wikiwand.com/en/Comparison_of_operating_system_kernels
NOTE: lsb_release -a which works on Debian, RHEL 6.6, and Ubuntu is not recognized on Gentoo nor CentOS 6, which has no folder /etc/lsb-release.
See Distriwatch.com, which describes releases of different Linux distributions.
Setup Your Mac Like a Pro
Paul Irish is one of top pros among developers, and now a Google Evangelist. He put his Mac configuration settings on github.com/paulirish/dotfiles. But he recommends cloning github.com/mathiasbynens/dotfiles/.
On the Git page notice that he has established an industry convention of using Projects folder we defined earlier.
On the Git page I clicked on Clone in Desktop.
The library is called dotfiles because that’s what hidden files are called, and most configuration files are hidden.
PS1 terminal prompt setting
By default, if you have a long file name, it would leave little room to type in commands before it wraps to the next line.
To redefine what appears in the prompt, edit this file using the vi editor that comes with each Mac: vi .bashrc Copy this and paste to the bottom of the .bashrc file:
The command above uses global parameters $USER and $PWD, plus colors from this list.
Root user for sudo commands
If you try a command that responds about “permissions denied”, you need to execute as a root user.
The root user has the ability to relocate or remove required system files and to introduce new files in locations that are protected from other users. A root user has the ability to access other users’ files.
Any user with an administrator account can become the root user or reset the root password.
Under a *nix system like MacOS you must have “root” (administrative) privileges to start IP-services using ports smaller than 1024.
After MacOS install, the root or superuser account is not enabled. While it is possible to enable the root account, once enabled, if forgetten, you’ll have to reboot from the installer drive (a hassle).
The easiest way it to have the last command (in history) automatically retrieved so you don’t have to retype it to
execute again under root:
It is safer and easier to use the sudo command to gain temporary root access to the system rather than logging out and logging in using root credentials.
Alternately, this command only reads the $SHELL variable and executes the content:
sudo -s
You would be prompted for a password.
- To determine whether you’re in sudo:
whoami
The response “root” says you’re still in sudo rather than your user name.
PROTIP: There are several ways to invoke sudo *
This command is my preferred way to get into root for awhile because it keeps the environment variables intact:
sudo /bin/bash
The command above uses a non-login shell, and reads just the .bashrc of the calling user. Not all dot-files are executed.
If you want environment variables specific to root and be in the root home directory (rather than your user’s $HOME directory), this command executes \/etc/profile, .profile, and .bashrc which defines them:
sudo su -s
If you switch between Zsh and Bash, this command runs the shell specified by the password database entry of the target user as a login shell:
sudo -i
If you switch between Zsh and Bash, this command runs the shell specified by the password database entry of the target user as the login shell, then executes login-specific resource files .profile, .bashrc (or .login):
sudo -s
NOTE: The folders that bash looks into are in bin:
On a fresh Yosemite, that would contain:
Each additional app adds to the front of the list:
Separating the folders between colon separator:
- /Library/Frameworks/Python.framework/Versions/3.4/bin
- /opt/local/bin
- /opt/local/sbin
- /Applications/MAMP/bin/php5/bin
- /Applications/MAMP/Library/bin
- /Applications/Adobe AIR SDK/bin
- /usr/local/bin
- /usr/bin
- /bin
- /usr/sbin
- /sbin
New folders are added to the front of the PATH using a command such as:
export PATH=<new folders>:$PATH
Depending on how you’re setup, file
/.bash_login contains the path echo’d.
Or your PATH may be set in /etc/profile for all users
Create Windows-like shortcuts with parameters using text editor
Mac OSX doesn’t allow you to create shortcuts like Windows. OSX alias don’t allow parameters (ex. create a Screen Sharing shortcut that connects to a specific computer).
Jessie suggests this to create a Windows like shortcut with parameters in the Comments field.
Another alternative is to use a text editor to create URL shortcut files like the ones Windows Internet Explorer stores its bookmarks. Apple Safari recognizes them when clicked within Finder. So they are cross-platform.
- Copy the URL to the clipboard by pressing Command+C.
- From within a text editor, open a new text file.
- Type at the top of the file: [InternetShortcut]
URL= - Paste from clipboard by pressing Command+V
- Press enter/return to add a blank line under the URL line.
- Save the file with a .url file extension.
- From within Finder, click on the file to see it display by Safari.
Mount .dmg files using hdiutil tool
Mount a .dmg (Disk Image) file (substituting for /path/to/diskimage):
The response is like:
Note the disk from the message above to unmount (detatch):
The same utility can mount .iso images:
IPv6 compatibility with Curl command line apps
curl http://localhost:3000
Previously, when invoked on Mac OS 10.10 (Yosemite), you needed to add a parameter to make the request use IPv4:
curl http://localhost:3000 –ipv4
Otherwise, even if the URL loads fine in a browser, you will see an error message such as:
curl: (7) Failed to connect to localhost port 3000: Connection refused
This occurs because curl, under Yosemite, uses IPv6 by default but some apps, such as LoopBack.io, by default uses IP v4.
See if you see IP v6 entries in your hosts file (::1 localhost, fe80::1%lo0 localhost). If they are there it is likely that curl is making requests using IP v6.
You can make your LoopBack app use IPv6 by specifying an IPv6 address as shown below:
Largest files taking up disk space
Linux has a ncdu (NCurses Disk Usage) utility to list files in order of how much space they occupied.
It’s not in macOS by default, so:
Now list files within a folder by space used:
The command takes up the whole screen (like top), so press control+C to exit.
To get the directory utilitization size of the current directory:
The response is like:
The dot means the current folder.
You can specify a sub-folder named, for example, “code”:
Empty Trash
When files or folders are moved to Trash, they are sent to folder
means it is at your user HOME folder.
Count the number files in the folder by piping to the “word count” utility:
(The -al includes hidden files and folders)
(The find . includes files nested within folders as well)
The above command is aliased as cf in my
To recover disk space taken up by files which have been moved to Trash, there are several ways:

Switch to the Finder and click the Finder menu to expose the menu:
You can click on “Empty Trash” or press the Keyboard sequence shift + command + delete.
If you rather not use a mouse within Finder, switch to Terminal and type this AppleScript command (which will take a while to run if there are a lot of files):
NOTE: How to put the above command is aliased as empty in my
Ulimit Too Many Files
By default, operating systems limit how many file descriptors to allow. Each operating system version has a different approach.
Linux operating systems have this command:
ulimit -a
On my Sierra the response was:
Check how many file descriptors you have:
launchctl limit maxfiles
On Sierra the response was:
The first number is the “soft” number, the second one is the “hard” number.
After fixing, the numbers I now see are:
Such numbers were set with a command such as:
sudo launchctl limit maxfiles 10240 10240
The maximum setting is 12288?
NOTE: To change maxfiles on Sierra, define a plist. TODO: verify
Due to security, OSX Lion removed the “unlimited” option and now requires a number to be specified.
PROTIP: launchctl is a rough equivalent to the systemctl command used in Linux systems. launchctl interfaces with launchd to load, unload daemons/agents and generally control launchd.
Disable System Integrity Protection
Some programs make calls to the operating system which OSX began to see as a threat, beginning with El Capitan.
Apple says System Integrity Protection blocks code injection (and many other things).
But what about useful programs (such as XtraFinder) which works by injecting its code into Finder and other application processes?
- For example, OpenVPN issues a JSONDialog Error “DynamicClientBase: JSONDialog: Error running jsondialog”.
To get around this, you need to partially disable System Integrity Protection in OS X El Capitan. See Apple’s article on how:
- Run a full backup to an external USB drive.
- Shut down all apps, then the operating system (from the Apple icon).
This is needed because System Integrity Protection settings are stored in NVRAM on each individual Mac. So it can only be modified from the recovery environment running in NVRAM.
When the OS X Utilities screen appears, pull down the Utilities menu at the top of the screen.
Type the following command into the terminal before hitting the return key.
Источник


