- Question: Q: How to restore documents from trash
- All replies
- Question: Q: How to get trash folder in finder?
- Helpful answers
- Where Is The Trash on Mac? Find and Empty Your Trash!
- Part 1. Where is the Trash on Mac?
- Where is The Trash Folder on My Mac?
- To Open Trash Folder
- Part 2. How Do I Permanently Delete Trash on My Mac?
- To Empty Trash Folder
- To Restore Files from Trash
- Part 3. How to Force Empty Trash Using Terminal?
- Part 4. How to Delete Files on Mac that Won’t Delete?
- Part 5. Summary
- Trash directories on mac — How to find them and how to properly clear them
- 1 Answer 1
- Mac’s Trash won’t empty? Here’s how to fix it
- Before we start
- How to empty Trash on Mac?
- 1. Restart your Mac
- 2. Clear Trash using CleanMyMac X
- 3. Use Safe mode
- 4. Force empty Trash on Mac using Terminal
- 5. Use the Option key to empty the Trash
- 6. Repair Disk Permissions
- Or use Shredder
- 7. Remove files bypassing Trash
- Check if your files are locked
Question: Q: How to restore documents from trash
I was doing my school notes when I didn’t realized that the folder my notes was saved in is in the trash, so when I emptied it, everything ‘s gone.
So I am really in need if someone knows how to restore documents from empty trash. Thank you and I will really appreciate your time.
MacBook Pro, iOS 6
Posted on Oct 3, 2012 7:45 PM
All replies
Loading page content
Page content loaded
Basics of File Recovery
Files in Trash
If you simply put files in the Trash you can restore them by opening the Trash (left-click on the Trash icon) and drag the files from the Trash to your Desktop or other desired location. OS X also provides a short-cut to undo the last item moved to the Trash -press COMMAND-Z.
If you empty the Trash the files are gone. If a program does an immediate delete rather than moving files to the Trash, then the files are gone. Recovery is possible but you must not allow any additional writes to the hard drive — shut it down. When files are deleted only the directory entries, not the files themselves, is modified. The space occupied by the files has been returned to the system as available for storage, but the files are still on the drive. Writing to the drive will then eventually overwrite the space once occupied by the deleted files in which case the files are lost permanently. Also if you save a file over an existing file of the same name, then the old file is overwritten and cannot be recovered.
General File Recovery
If you stop using the drive it’s possible to recover deleted files that have not been overwritten by using recovery software such as Data Rescue II , File Salvage or TechTool Pro . Each of the preceding come on bootable CDs to enable usage without risk of writing more data to the hard drive. Two free alternatives are Disk Drill and TestDisk. Look for them and demos at MacUpdate or CNET Downloads .
The longer the hard drive remains in use and data are written to it, the greater the risk your deleted files will be overwritten.
Also visit The XLab FAQs and read the FAQ on Data Recovery.
Источник
Question: Q: How to get trash folder in finder?
How to get trash folder in finder?
MacBook Pro, Mac OS X (10.7.4)
Posted on Jul 18, 2012 1:27 AM
Helpful answers
Choose Go to Folder from the Finder’s Go menu and provide
/.Trash as the path. For the Trash on other drives, open them in the Finder and provide .Trashes/501 as the path; the number may vary, but will always be the same for a given Mac OS X user account.
Jul 18, 2012 8:55 AM
After you use goto, you can go to File > Add to Sidebar and have «Trash» there. You can’t get the icon though this way
Aug 11, 2015 8:13 AM
Isn’t it in your Dock? I don’t think you can move Trash to the Sidebar (I could be wrong)?
Jul 18, 2012 2:01 AM
There’s more to the conversation
Loading page content
Page content loaded
Isn’t it in your Dock? I don’t think you can move Trash to the Sidebar (I could be wrong)?
Jul 18, 2012 2:01 AM
Choose Go to Folder from the Finder’s Go menu and provide
/.Trash as the path. For the Trash on other drives, open them in the Finder and provide .Trashes/501 as the path; the number may vary, but will always be the same for a given Mac OS X user account.
Jul 18, 2012 8:55 AM
Here’s a challenging adjunct to the physical location of trash question above. I moved home folder of my login to a different partition (data only) which all worked fine. Then I trashed the original home folder which was on the Boot OSX partition (just to be tidy as it was not needed any longer) now the MBA says «cannot logon to this user for the time being». So I clearly need to return the original home directory back from trash to my logon folder (eve though it is not really used).
However, how can I access my original logon user directory in trash when I am unable to logon? Logged on to the root directory and using your go to folder solution above I have found the trash for root but I am unable to find the trash for my actual logon (which contains the trashed home directory)!
Any thoughts sir? Thanks for your help.
Jan 8, 2014 1:33 AM
After you use goto, you can go to File > Add to Sidebar and have «Trash» there. You can’t get the icon though this way
Aug 11, 2015 8:13 AM
Thanks for that tip. Trash should be in Finder just on principle. It’s where you typically put things in the trash and from where you empty the trash. Sometimes in doing those things, you want to inspect the trash. Having it in the Dock is non-intuitive.
Источник
Where Is The Trash on Mac? Find and Empty Your Trash!

Written By Pamela Garcia Last updated: August 24, 2021
Technical Writing Expert who is good at writing troubleshoot to any Mac issue and have helped lots of readers rescue their Macs.
The Trash folder in macOS is similar to the Recycle bin in Windows computers. This folder is assigned to contain all the least important files including documents, photos, music, videos, and more. Can’t find the Trash folder on Mac? Find out where is the trash on Mac and how to conveniently empty and manage it in this brand new post. There are also ways you can do to release full storage on your Mac.
Part 1. Where is the Trash on Mac?
Usually, when we no longer need some files in our system we erase them to free some space and clear up the Mac purgeable space. The trash folder holds all the deleted contents whether documents, photos, videos, music, and more.
While these deleted files are stored inside the trash folder, you can get the chance to restore in case you still need the contents. You can also empty the trash to free up more space on the system. Just because you deleted content doesn’t mean it’s totally gone.
The trash folder still holds up space on the computer which may also affect performance later on. This is why it is recommended that you clear or empty the trash folder at any time. However, for those using macOS Sierra, all files stored in the trash folder more than 30 days are automatically deleted; permanently.
Where is The Trash Folder on My Mac?
Previous Mac versions put the trash folder on the desktop but eventually, things have changed and upgraded. Since then, many people wondered, where is the trash on Mac? Finding the trash bin on your Mac is easy and can be done in many ways. The bin is located on the Mac dock where you can simply drag and drop the files no longer needed.
To Open Trash Folder
- Click the trash icon in the Dock and a Finder window opens up with all the file it contains.
Tip: Do you know where are your photos located? This guide will give you a shoot!

Part 2. How Do I Permanently Delete Trash on My Mac?
A secret keyboard shortcut keyboard and few more tips on how to delete Trash files on Mac are so easy to learn and remember. Here are some:
- Use Command+Delete to move file/s to the trash folder
- Drag and drop the file to the trash bin
- Right click on the file and choose Move to Trash
- Use Option/Alt + Command + Delete to delete file/s immediately
To Empty Trash Folder
Cleaning the trash folder is also easy. Try these:
- Click on the Trash icon from the Dock and select Empty Trash. Confirm action.
- Use keyboard shortcut: Command+Shift+Delete . Click on Empty Trash button to confirm the request
To Restore Files from Trash
Retrieving file/s out of the trash folder can also be done quickly;
- Simply drag out the file/s you need out of the folder
Part 3. How to Force Empty Trash Using Terminal?
After knowing where is the Trash on Mac and how to delete your Trash folders, you should learn how to force empty your Trash Bin. Because in some occasions, there might be issues with the trash folder and it won’t allow you to do any process just like emptying it. However, the terminal is the best way you lean on in times like these. Sometimes you will get an error “item still in use” or the folder is locked. Whatever scenario you are in, follow these steps on how to navigate and force empty trash via terminal:
- Open Terminal on Mac. You may use the Spotlight search
- Type in the command: sudo rm –R without pressing Enter . Note that there a space after the letter R otherwise it will not work
- Press Control + Click on the Trash icon to open
- Highlight all the files inside the Trash folder
- Drag all the files into the terminal window and press Enter
- Provide the administrator password and hit Enter
- Wait until the process is completed
It might take a while for the terminal to complete the action.
![]()
Part 4. How to Delete Files on Mac that Won’t Delete?
If you are wondering how to effectively clear out the files that won’t delete, we got you covered. You don’t have to spend all day asking “where is the trash on Mac” rather you can just remove the clutters in just a few clicks.
Junk files are actually least important files you store inside your Mac. They accumulate and pile up and later on causes issues of poor performance, latency, and slowness. To avoid experiencing any of these, why not use iMyMac PowerMyMac program? It is a powerful tool with complete and comprehensive options to boost and clean up Mac.
Among the cleaning tools offered by PowerMyMac is the Master Scan where it seamlessly removes all the junks saved inside your system. It only takes a few steps to get rid of these clutters! Here is how to use PowerMyMac to delete files on Mac:
- Download, install and launch PowerMyMac
- Select the Master Scan module on the left side toolbar
- Click Scan to allow the program to search through your entire system. After a few moments, all the junk files will be displayed on your screen
- The files are sorted and listed per categories such as Application Cache, Photo Cache, System Cache, System Logs, and more
- Click Clean to delete all the selected junks
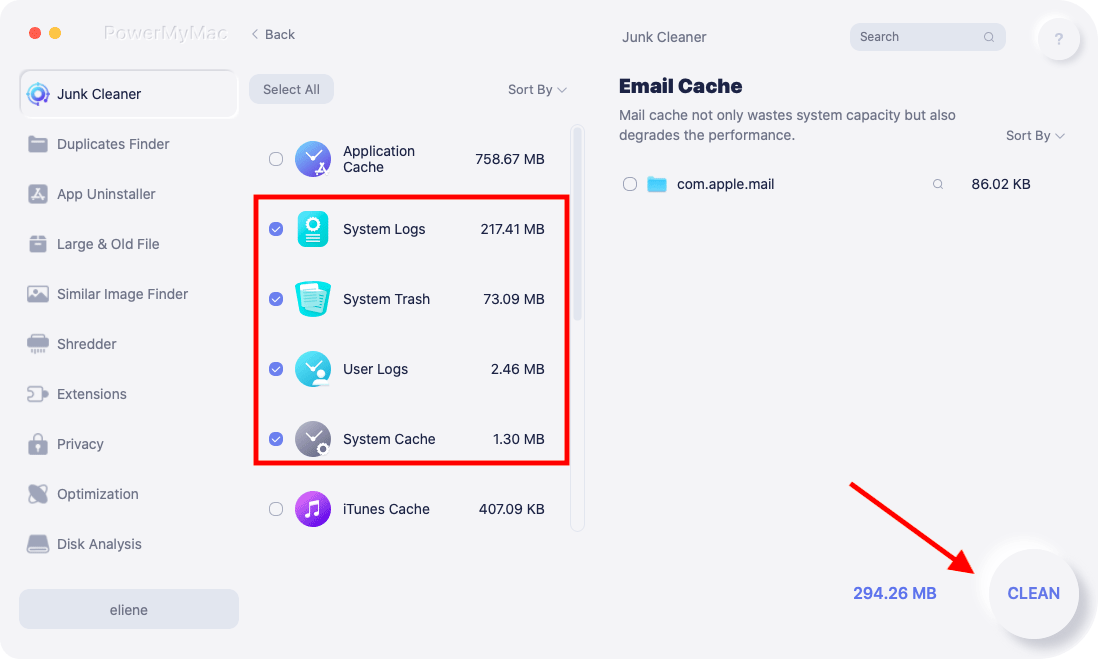
Similar steps apply to other modules including Clutter and large and old Files. You can now see that your junk files were gone and have 0KB left. Using PowerMyMac gives you the freedom to enjoy more and do more important things than to explore and wander inside your device searching for manual ways of deleting the trash and junk files.
Part 5. Summary
Now you won’t ask «where is the trash on Mac» because we have shown you where to find the trash folder on your Mac. We also included necessary steps on how to delete a file, restore, and even force emptying the bin in case you get error messages.
Regularly maintaining your device helps it perform faster, and work better. So in order to let your device be on its maximum performance daily, use a program called iMyMac PowerMyMac, it offers powerful toolkits that are essential in maintaining and keeping your Mac, safe, secure, and well-performing.
Have you tried other options to keep your Mac in good conditions? Share it with us in the comments below!
Excellent Thanks for your rating.
Источник
Trash directories on mac — How to find them and how to properly clear them
So, I am writing a little piece of software in Go. It is a library that allows clearing the trashbin and moving files into the trashbin. However besides
/.Trash there are other trash folders per drive. What would be the most correct way of clearing those?
Is it just iterating over /Volumes and deleting the .Trashes on every volume and recreating it afterwards?
Is there official documentation on it, if so I couldn’t find it.


1 Answer 1
Spotlight can locate folders with a specific name on all mounted and indexed volumes (but it’s not going to be the answer — bear with me):
This will show you that the kMDItemFSName is «.Trash» so you might try mdfind to do a spotlight search
Sadly, this won’t find the trashes since Apple has made them invisible and probably excluded them entirely from the spotlight indexing. But, this is the best Apple way to search for general files.
So now, you need to crawl the filesystem:
This will throw filesystem errors, so you’ll need to engage root — be careful with sudo — you can ruin a system so you can’t boot if you move or delete files (which is what you’re about to do — find things and then delete them)
Even without the sudo you’ll find most of the trashes since your user should be able to write to Trash to store files there.
Now, there is a tool faster than find (it may take tens of minutes or perhaps hours if it starts crawling remote or connected drives)
The locate database won’t likely be built when you ask for it, so follow the instructions it prints if you don’t have a pre-made locate database to consult. Happy scripting. Feel free to ask a follow on question on how to delete if you need that help too, but this answers how to find files specifically hidden system ones like the various trash files.
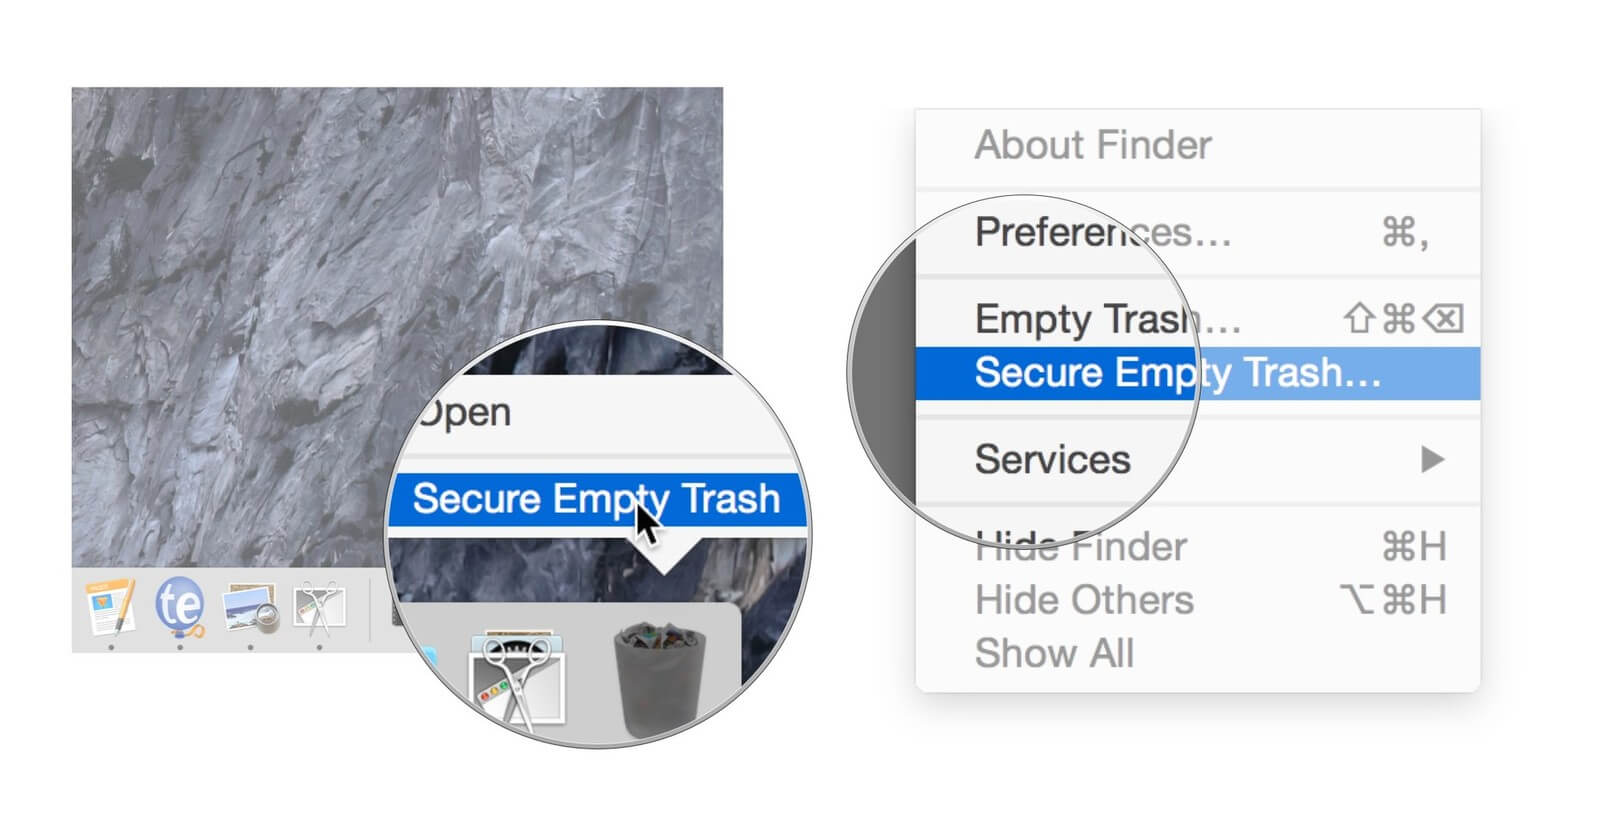
Or, you know — just tell Finder to empty the trash from the command line:
Boom, now you’re done super fast no matter where or how the folders are named.
Источник
Mac’s Trash won’t empty? Here’s how to fix it

Before we start
Having spent some years coding applications for macOS we’ve created a tool that everybody can use. The all-round problem fixer for Mac.

So here’s a tip for you: Download CleanMyMac to quickly solve some of the issues mentioned in this article. But to help you do it all by yourself, we’ve gathered our best ideas and solutions below.
Features described in this article refer to the MacPaw site version of CleanMyMac X.
Deleting anything on your Mac is never risky — you can go back to the Trash and recover any document that you’ve removed. But, sometimes, you want some files trashed forever. Then, you can just empty the Trash and delete your data forever.
Fun fact: Since 2020 there is officially no Trash on Mac. On macOS Big Sur, the junk storage has been renamed into Bin.
What if Mac’s Trash won’t empty? Due to some system errors, the Trash folder may not empty itself. So, today I’m going to address this problem and help you clear Trash on Mac.
How to empty Trash on Mac?
Sometimes the first reason why some of the system applications don’t run smoothly is an outdated OS. So, if you can’t empty Trash on Mac, make sure your macOS is up-to-date.
If your Mac’s running the latest version of the OS but Trash still misbehaves, try the following fixes.
1. Restart your Mac
The reason why Trash won’t empty on your Mac may be that something that’s in Trash is still being used. It can be some file or part of the application. To fix it, you need to terminate every active process on your Mac. The simple restart of your MacBook should help you out.
- Go to the Apple icon in the top menu.
- Click Restart to reboot your Mac.
This way, it will force close any apps that are still running. Now try to empty the Trash.
2. Clear Trash using CleanMyMac X
There are a number of additional ways that involve a decent amount of Mac technical knowledge. To avoid that, and the time it takes to make some of them work, there is a quicker way: using a problem-fixer tool for Mac.
There is more than just one Trash folder on your Mac. Many apps also create their own «trashes» somewhere deep in system folders. Such trash bins may take up a significant amount of disk space.
How to clear all your trash bins:
- Download CleanMyMac X (get a free version here)
- Select Trash Bins from the sidebar.
Not only will this empty your main Trash, but it will also clear out all other invisible Trash bins on your Mac.

3. Use Safe mode
Safe mode allows your Mac not to load specific software, such as login items, system extensions not required by macOS, during startup. Using Safe mode, you can check whether some app or software interferes with normal Trash functioning.
- Go to the Apple icon in the top menu.
- Click Restart.
- As your Mac reboots, hold down the Shift key.
- Release the key when the Apple logo and progress bar appears. «Safe Boot» should appear in the upper-right corner of your screen.
- Now you’ve entered your Mac in Safe Mode, which means that no third-party applications or startup items will load.
- You should be able to empty Trash as you normally would and then Restart your Mac again to get back to the normal mode.
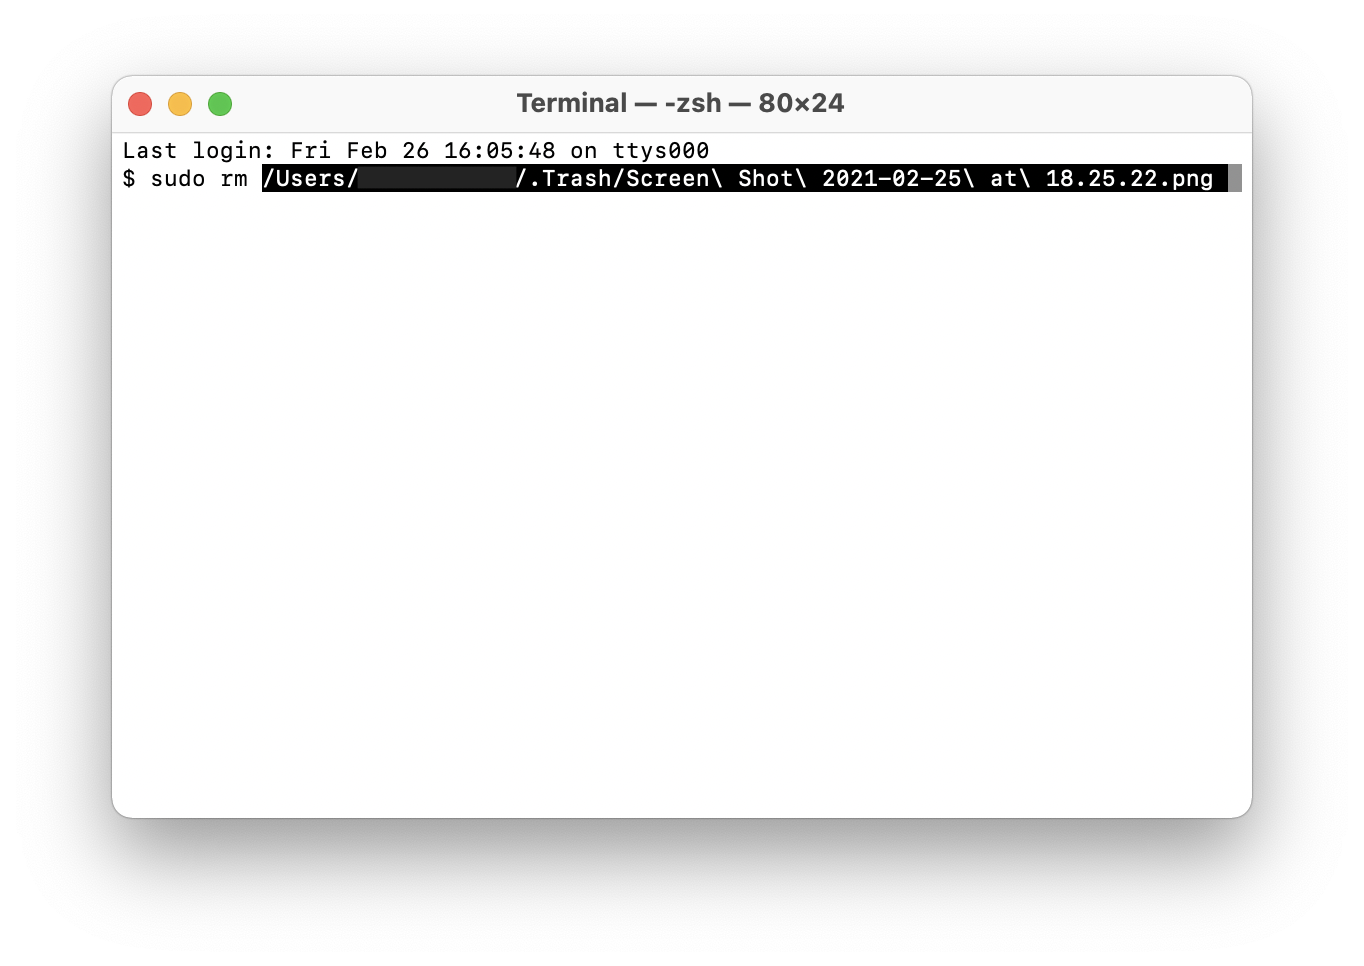
4. Force empty Trash on Mac using Terminal
With this option, you need to be careful. Entering the wrong command could clear out a lot more than the Trash on a Mac.
- Open Terminal — you should be able to find this using Spotlight Search or in Utilities > Terminal.
- Once Terminal is open, type in sudo rm followed by a space and don’t hit Enter after (it’s important).
- Now open Trash in the Dock and drag and drop files currently in the Trash into the Terminal window.

- Now press Enter.
- Enter your password to confirm and press Enter once again.
- Now hit the Enter button to empty the Trash.
And finally, another way to empty the Trash is to repair disk permissions. This could be why you aren’t able to empty it in the first place.
5. Use the Option key to empty the Trash
In case you can’t open the Trash to delete all that’s inside, there is a way to do it from the Dock. Using the Option key, you can initiate options and clear the Trash without opening the folder.
Here’s how to do that:
- Find the Trash icon in Dock.
- Hold the Option key (or Option-Shift) and double-click the Trash icon.
- Click Empty Bin.
- Confirm when the pop-up window appears.

Hope that did help to empty the Trash. If not, let’s move on to the next solutions.
6. Repair Disk Permissions
As mentioned in this article, CleanMyMac X is an app that can work wonders for Macs. It comes with a whole suite of tools that solves Mac problems, such as Trash not emptying when it should.
For various reasons, certain permissions on your Mac may be broken. As a result, you lose the ability to do some basic tasks on your Mac, like emptying Trash.
- Download CleanMyMac X (get a free version here)
- Select the Maintenance tab from the sidebar.
- Now tick «Repair Disk Permissions» and press Run.

It should be working again. CleanMyMac X can also remove piles of digital junk that can stay hidden for months, if not years. It’s a versatile tool that every Mac user would benefit from. So give it a try.
Or use Shredder
This app also has a Shredder tool, which is completely free, by the way. You can use it to completely erase any file or folder on your Mac. Just drag and drop any folder onto the Shredder pane, and it’s gone for good.

7. Remove files bypassing Trash
Used to dragging files to Trash? Wait, this is not the only option. Here’s a shortcut to quickly delete unwanted files on Mac, bypassing Trash.
Command + Option + Delete
Caution: there’s no way back! Use Command + Option + Delete if you want to completely remove a file. It won’t go to Trash, so you won’t be able to restore it later.
Check if your files are locked
If you can’t empty the Trash, or Bin, how it’s now called, maybe, it’s because your files are locked from deletion.
_1617720748.png)
The option to lock files on Mac is found under the Get info menu if you Control + click on any file.
- So open the Bin and look for files that won’t be deleted.
- Control + click on the file and choose Get info
- Now, uncheck the Lock checkbox.
Try if the Trash empties this time.
Now you are fully equipped with knowledge about Trash on Mac. Hope this article was helpful. Stay tuned for more tips & tricks!
Источник


