- OpenVPN Tunnelblick перестал работать в macOS Big Sur и как это исправить
- Как заставить работать OpenVPN Tunnelblick с Tap устройствами в macOS Big Sur?
- Installing System Extensions
- Installing Kexts on an M1 Mac Running macOS Big Sur 11.1
- Installing Kexts on an Intel Mac running macOS Big Sur
- Connects to the VPN, but doesn’t work
- If OpenVPN is connected to the server but you can’t access the Internet
- How to check your DNS settings
- How to use a different DNS server
- Use a different DNS server whether or not a VPN is active
- Use a different DNS server only when the VPN is active
- If OpenVPN is connected to the server but your IP address does not change
- How to test your IP address
- DNS issues on macOS 10.12.2 [Update: but caused by pfSense 2.3.2 configuration changes] #351
- Comments
- AniX commented Jan 4, 2017
- jkbullard commented Jan 4, 2017
- AniX commented Jan 4, 2017 •
- rippiedoos commented Jan 10, 2017
- jkbullard commented Jan 10, 2017
- AniX commented Jan 12, 2017
OpenVPN Tunnelblick перестал работать в macOS Big Sur и как это исправить

Каждая новая версия macOS всё сильнее ужесточает правила безопасности и затрудняет загрузку системных расширений. Я довольно давно пользуюсь OpenVPN туннелями и до macOS Sierra включительно, Tunneblick мог автоматически загружать свои системные расширения без лишних вопросов.
В High Sierra, Mojave или Catalina для подключения к VPN нужно было подтвердить разрешение на загрузку системных расширений Tunneblick в системных настройках macOS в разделе «Безопасность и конфиденциальность».
Дело в том, что Tunnelblick использует специальный драйвер для работы Tap VPN, так как в macOS нет встроенного драйвера устройства Tap. Для Tun подключений загружать свой собственный драйвер, как правило не требуется, так как в системе уже имеется встроенный драйвер устройства «utun» и большинство конфигурационных файлов OpenVPN с ним прекрасно работают.
С выходом macOS Big Sur нельзя разрешить загрузку сторонних системных расширений, в том числе и загрузку драйвера Tap Tunneblick, а без этого данный тип подключений не работает.
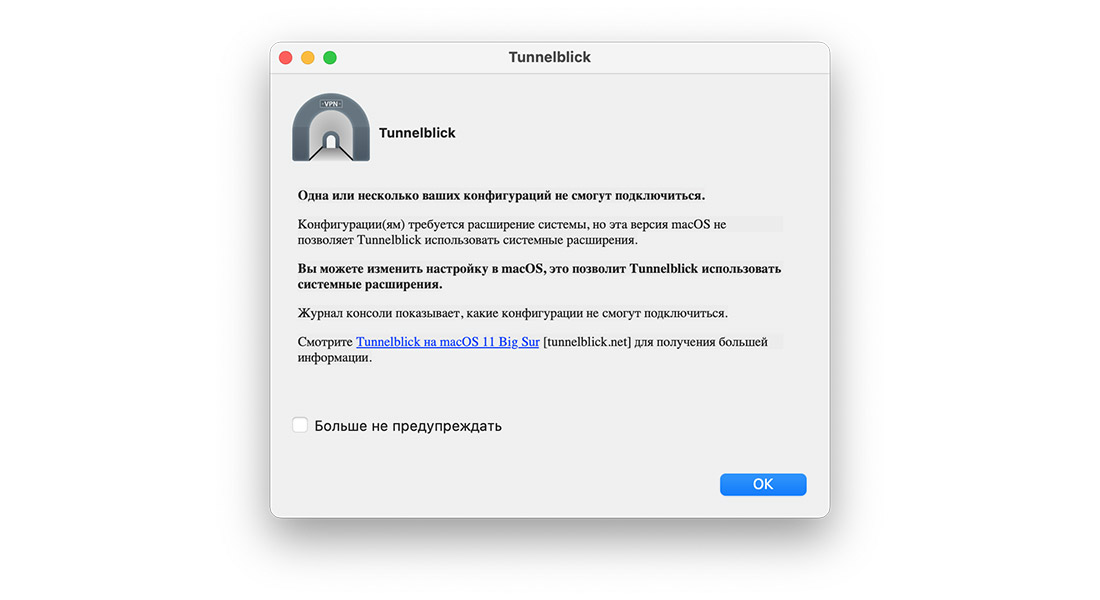
На сайте разработчика написано как можно обойти данное ограничение системы, но потребуется отключить функцию защиты целостности системы System Integrity Protection (SIP).
Что касается меня, то было решено перенастроить работу OpenVPN сервера на работу через Tun, тут главное разобраться с маршрутизацией трафика, однако у подобного изменения есть и свои недостатки по сравнению с мостом (Tap интерфейс). Подробнее о настройке OpenVPN сервера в режиме Tun расскажу в следующей статье.
Как заставить работать OpenVPN Tunnelblick с Tap устройствами в macOS Big Sur?
Сразу оговорюсь, что отключение защиты целостности системы SIP macOS Big Sur делает ваш компьютер менее безопасным и Tap OpenVPN будет работать только на Intel Mac. Для новых компьютеров Apple с чипом M1 нужно ждать следующих обновлений от разработчиков Tunnelblick.
Итак, проверить активирована ли функция защиты целостности в вашей системе можно следующей командой:
$ csrutil status
System Integrity Protection status: enabled.
Чтобы её отключить, перезагружаем компьютер в режиме восстановления (Command + R), запускаем Терминал и пишем следующую команду:
После чего перезагружаем компьютер в обычном режиме и Tunnelblick должен начать работать. Включить обратно функцию защиты целостности системы можно командой csrutil enable, загрузившись снова в режим восстановления.
Если считаете статью полезной,
не ленитесь ставить лайки и делиться с друзьями.
Источник
Installing System Extensions
Important: See The Future of Tun and Tap VPNs on macOS for information about changes to future versions of macOS.
IMPORTANT: You only need to install Tunnelblick’s system extensions if you are
- Running on macOS Big Sur; and
- Using to a «Tap» VPN.
The process of installing Tunnelblick’s system extensions on recent versions of macOS requires one or more restarts of your computer.
The following describes the process when using Tunnelblick 3.8.5 beta03 (build 5630) and higher:
Installing Kexts on an M1 Mac Running macOS Big Sur 11.1
On an Apple Silicon (M1) Mac, the process of installing Tunnelblick’s system extensions requires three restarts of your computer.
- Use the button on Tunnelblick’s «Utilities» panel to install Tunnelblick’s Tun and Tap system extensions.
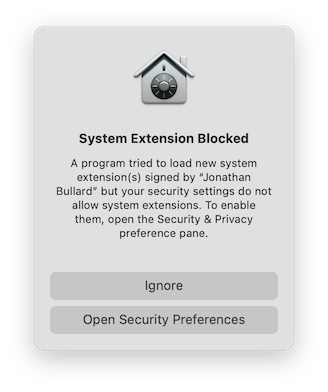
- After authorizing Tunnelblick to install the kexts, you will be prompted by macOS to open the Security & Privacy preference pane to allow the kexts to be loaded:
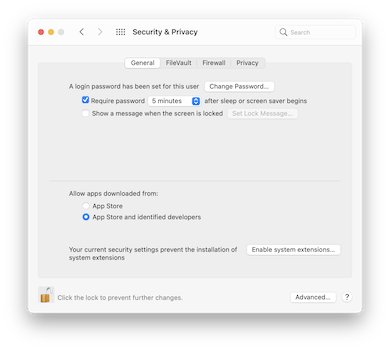
After opening the Security & Privacy preference pane, click the «Enable system extensions…» button:
You’ll see the following instructions:
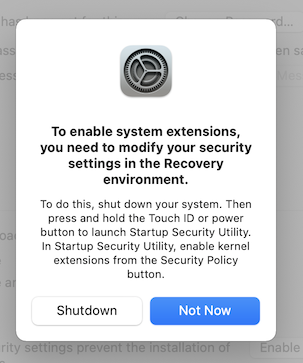
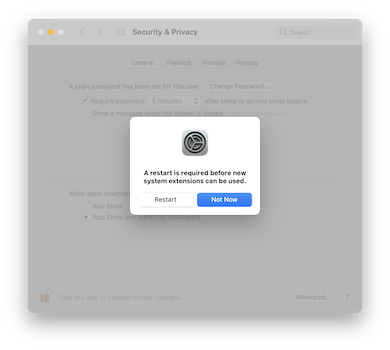
After authorizing the software, you will be prompted to restart your computer to be able to use the new system extensions:
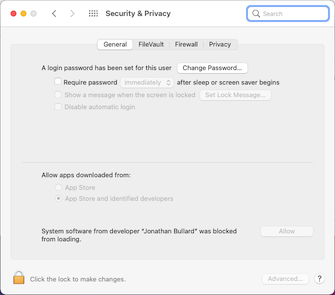
Installing Kexts on an Intel Mac running macOS Big Sur
On an Intel Mac, the process of installing Tunnelblick’s system extensions requires one restart of your computer.
- Use the button on Tunnelblick’s «Utilities» panel to install Tunnelblick’s Tun and Tap system extensions.
- After authorizing Tunnelblick to install the kexts, you will be prompted by macOS to open the Security & Privacy preference pane to allow the kexts to be loaded:
After opening the Security & Privacy preference pane, click the «Allow» button:
After authorizing the software, you will be prompted to restart your computer to be able to use the new system extensions:
Источник
Connects to the VPN, but doesn’t work
Troubleshooting this problem could be very simple: try connecting the VPN with and without «Set nameserver» selected. If one way or the other solves your problem, you’re done!
OpenVPN is such a powerful tool with so many options, and computer configurations are so varied, that it is impossible to have an exhaustive troubleshooting guide. This guide is meant for the most common setups, so if it doesn’t apply to your situation, or doesn’t help, see the Support page for guidance.
This page assumes that you are successfully connected to a VPN server. If not, or if you aren’t sure, look at Common Problems.
If OpenVPN is connected to the server but you can’t access the Internet
After connecting, if you can’t reach the Internet, it’s likely that your setup has
- A DNS problem and/or
- A routing problem and/or
- A problem with the VPN server
Tunnelblick includes the ability to diagnose some DNS problems and will warn you about some common configuration problems.
Check for a DNS problem:
If OpenVPN connected to the server properly, but you are having trouble connecting to websites, the first thing to find out is if there is a DNS problem. To check that, try to access a website by using its IP address instead of its name. If the IP address works, but the name doesn’t, there is a DNS problem. (Consider the IP address to be «working» if any of the webpage loads.)
If you don’t have a DNS problem then there is something else going on. See the Support page for guidance.
If you have a DNS problem:
See if your network settings manually specify a DNS server. If they do, that server will be used even when the VPN is active unless you put a check in «Allow changes to manually-set network settings» on Tunnelblick’s «Advanced» settings page. If the manual DNS server is your ISP’s DNS server, it is probably set up to ignore queries that come from outside the network. When you are connected to the VPN, your queries come from the VPN server, which is probably outside the ISP’s network, so the ISP’s DNS server will ignore your request. You should set up your computer to use a free public DNS server (see How to use a different DNS server, below) while the VPN is active.
- If the DNS settings are the same, try setting up your computer to use a free public DNS server (see How to use a different DNS server, below).
- If the DNS settings are different, the VPN is using a DNS server specified by the VPN setup. Contact the person who maintains your VPN server to find out why that DNS server is not functioning properly.
How to check your DNS settings
- Launch System Preferences,
- Click «Network»
Your DNS server list is one of the entries on the right. It is a list of IP addresses, separated by commas. macOS will use the first one unless it fails to respond to requests, in which case it will try the second, then the third, etc.
Note: If the DNS server list is dimmed (grayed out), it was set via DHCP, not manually.
How to use a different DNS server
There are two ways to set up a different DNS server:
Use a different DNS server whether or not a VPN is active
You can set your computer up to use a different DNS server all the time. Google Public DNS is free, and OpenDNS has a free version. There are lots of others. To use such a DNS server all the time (whether or not a VPN is connected):
- Launch System Preferences,
- Click «Network»
- Copy/paste the following » 8.8.8.8,8.8.4.4,208.67.222.222,208.67.220.220 » (without the quotation marks) into the box to the right of «DNS Server»
This will set up your computer to always (whether or not you are connected to the VPN) use two Google DNS servers and two OpenDNS servers (in that order). Substitute the addresses for the DNS provider of your choice if you want.
Use a different DNS server only when the VPN is active
Note: This will only work if you specify «Set nameserver» in Tunnelblick’s settings for the configuration.
Add a line to your OpenVPN configuration file for each DNS server: » dhcp-option DNS address» (substitute the DNS server’s IP address for address). (To add two servers, add two lines to the OpenVPN configuration file, one for each server.)
If OpenVPN is connected to the server but your IP address does not change
If you have a check in the «Check if the apparent public IP address changed after connecting» checkbox on the «Settings» tab of Tunnelblick’s «VPN Details» window, and your IP address doesn’t change after connecting, a window will pop up to notify you.
If OpenVPN connects to the server properly but your IP address does not change, your OpenVPN setup needs to include the «—redirect-gateway» option. By default, OpenVPN only sends some traffic through the VPN — traffic that is specifically destined for the VPN network itself. The «—redirect-gateway» option tells OpenVPN to send all IPv4 traffic through the VPN.
There are three ways the option can be added; you need only use one:
- Put a check in the «Route all Ipv4 traffic through the VPN» checkbox on the «Settings» tab of Tunnelblick’s «VPN Details» window.
- Add this: redirect-gateway def1 as a separate line in your client’s OpenVPN configuration file.
- Add this: push «redirect-gateway def1» as a separate line in your server’s OpenVPN configuration file.
(The «—» at the start of an OpenVPN option is omitted when the option appears in a configuration file.)
How to test your IP address
You can find out what IP address your computer is using by going to https://tunnelblick.net/ipinfo.
The first number shown is your apparent public IP address:

Note: tunnelblick.net does not use Javascript, other client-side scripting, plugins, trackers, beacons, or web bugs, and it does not carry advertising. It does not store cookies or any other data on your computer (except as noted in the tunnelblick.net privacy policy).
If you have checked «Check if the apparent public IP address changed after connecting», the IP address will be displayed in the Tunnelblick menu while you are connected:
Источник
DNS issues on macOS 10.12.2 [Update: but caused by pfSense 2.3.2 configuration changes] #351
Comments
AniX commented Jan 4, 2017
Last time I know that my configuration worked was under 10.11.5 with Tunnelblick 3.8 a few weeks ago. Not sure if I had to use Tunnelblick after upgrading to 10.12.
However, now after upgrading to 10.12.2, I still can connect to the VPN server, but my DNS seems to be broken as soon as I connect to the VPN.
I can ping public IP addresses and IP addresses in the remote VPN network, I’m connected to. But I cannot resolve any host names (e.g. nslookup, normal browser address), no matter if public hosts or hosts in the remote VPN network.
Soon after connecting, Tunnelblick shows a warning:
«After connecting to office new, DNS does not appear to be working. This may mean that your VPN is not configured correctly.»
Under macOS > System Settings > Network > WiFi > Advanced > DNS:
Original values (before connecting):
DNS Servers: 192.168.178.1 (I cannot delete it, just add others; set via DHCP by router at home)
Search Domains: fritz.box (I cannot delete it, just add others; set via DHCP by router at home)
After connection values will change to:
DNS Servers: 192.168.1.31 (seems correct, it’s the VPN server that also works as DHCP and DNS server; I cannot delete it, just add others)
Search Domains: openvpn (I don’t know, probably also pushed from the VPN server; I cannot delete it, just add others)
The text was updated successfully, but these errors were encountered:
jkbullard commented Jan 4, 2017
Everything looks OK to me. Perhaps 192.168.1.31 isn’t responding.
AniX commented Jan 4, 2017 •
192.168.1.31 is also the VPN server and DHCP server. After connecting the DHCP server is pushing the DNS server entry 192.168.1.31, so this is as expected. I also can ping 192.168.1.31 while connected.
I also don’t think this is a general issue with 192.168.1.31, because I have no problem reports from other clients using the same server and configs.
rippiedoos commented Jan 10, 2017
I also had this issue on 10.12.2 and in my case, I had multiple USB Ethernet Devices in my list and was connecting over USB Ethernet (I use multiple adapters at home an at work).
I resolved it by removing ALL USB Ethernet Devices in the list of devices in Settings -> Network and replugging my USB-device. After that it worked as before, also with my colleague. I have ticked the box ‘Set DNS after routes are set’ and ‘Reset the primary interface after disconnecting’.
So I don’t know if this is a macOS Sierra or Tunnelblick issues but I’m willing to help figure this out.
jkbullard commented Jan 10, 2017
@rippiedoos — Thanks for your comment.
That sounds like a Sierra problem — Tunnelblick has nothing to do with the Ethernet drivers.
AniX commented Jan 12, 2017
I have been able to solve the issue. The same issue has occurred on a Mac that was still on 10.11.6 and has used OpenVPN all the time with no config changes or updates in the client.
I also learned that other existing OpenVPN clients (Android, Windows) had no issue. However, we use pfSense as OpenVPN server and have recently also updated to pfSense 2.3.2. It seems that the new version behaves a little different or has modified the existing configuration.
So, the problem is not a bug in Tunnelblick (or Sierra) and for this reason, I will close this issue.
In case someone with similar issues finds this, here our solution:
Under OpenVPN Advanced Client Settings:
Activated Provide a default domain name to clients and set the domain name (else it was «openvpn»). Also push DNS servers entries by activating Provide a DNS server list to clients, where first, we added the DNS Server in the VPN subnet, and also added to public DNS servers (e.g. 8.8.8.8, 8.8.4.4). However, this didn’t help in our case. We also had to change Client Settings > Topology from net30 — isolated /30 network per client to Subnet — One IP address per client in a common subnet.
The pfSense help gets more specific regarding Topology setting: «Specifies the method used to supply a virtual adapter IP address to clients when using TUN mode on IPv4.
Some clients may require this be set to «subnet» even for IPv6, such as OpenVPN Connect (iOS/Android). Older versions of OpenVPN (before 2.0.9) or clients such as Yealink phones may require «net30″.»
So, with «net30», it worked for all clients but Mac/Tunnelblick. After switching to «subnet», it worked just fine for everyone.
Источник


