- How to create a bootable installer for macOS
- What you need to create a bootable installer
- Download macOS
- Use the ‘createinstallmedia’ command in Terminal
- netzverweigerer / How-to-create-bootable-USB-stick-on-OSX
- SDB:Create a Live USB stick using macOS
- Contents
- Using Etcher
- Using Command Lines
- Find Block Device
- Unmount USB Stick
- Write ISO to USB
- Mac os usb stick
- Apple hardware considerations
- 2. Requirements
- 3. Prepare the USB stick
- 4. Install and run Etcher
- 5. Etcher configuration
- 6. Write to device
- 7. Boot your Mac
- Finding help
- Create bootable USB stick from ISO in Mac OS X
- Convert the ISO to UDRW format
- Prepare the USB stick
- Copy the image to the USB stick
How to create a bootable installer for macOS
You can use an external drive or secondary volume as a startup disk from which to install the Mac operating system.
These advanced steps are primarily for system administrators and others who are familiar with the command line. You don’t need a bootable installer to upgrade macOS or reinstall macOS, but it can be useful when you want to install on multiple computers without downloading the installer each time.
What you need to create a bootable installer
- A USB flash drive or other secondary volume formatted as Mac OS Extended, with at least 14GB of available storage
- A downloaded installer for macOS Big Sur, Catalina, Mojave, High Sierra, or El Capitan
Download macOS
- Download: macOS Big Sur, macOS Catalina, macOS Mojave, or macOS High Sierra
These download to your Applications folder as an app named Install macOS [ version name ]. If the installer opens after downloading, quit it without continuing installation. To get the correct installer, download from a Mac that is using macOS Sierra 10.12.5 or later, or El Capitan 10.11.6. Enterprise administrators, please download from Apple, not a locally hosted software-update server. - Download: OS X El Capitan
This downloads as a disk image named InstallMacOSX.dmg. On a Mac that is compatible with El Capitan, open the disk image and run the installer within, named InstallMacOSX.pkg. It installs an app named Install OS X El Capitan into your Applications folder. You will create the bootable installer from this app, not from the disk image or .pkg installer.
Use the ‘createinstallmedia’ command in Terminal
- Connect the USB flash drive or other volume that you’re using for the bootable installer.
- Open Terminal, which is in the Utilities folder of your Applications folder.
- Type or paste one of the following commands in Terminal. These assume that the installer is in your Applications folder, and MyVolume is the name of the USB flash drive or other volume you’re using. If it has a different name, replace MyVolume in these commands with the name of your volume.
Big Sur:*
Catalina:*
Mojave:*
High Sierra:*
El Capitan:
* If your Mac is using macOS Sierra or earlier, include the —applicationpath argument and installer path, similar to the way this is done in the command for El Capitan.
After typing the command:
- Press Return to enter the command.
- When prompted, type your administrator password and press Return again. Terminal doesn’t show any characters as you type your password.
- When prompted, type Y to confirm that you want to erase the volume, then press Return. Terminal shows the progress as the volume is erased.
- After the volume is erased, you may see an alert that Terminal would like to access files on a removable volume. Click OK to allow the copy to proceed.
- When Terminal says that it’s done, the volume will have the same name as the installer you downloaded, such as Install macOS Big Sur. You can now quit Terminal and eject the volume.


Источник
netzverweigerer / How-to-create-bootable-USB-stick-on-OSX
| How-To: create bootable USB-stick from ISO image: |
| ================================================= |
| 1. Download ISO image file: |
| wget -o |
/Desktop/mini.iso http://ftp.nl.debian.org/debian/dists/wheezy/main/installer-amd64/current/images/netboot/mini.iso
You can’t perform that action at this time.
You signed in with another tab or window. Reload to refresh your session. You signed out in another tab or window. Reload to refresh your session.
Источник
SDB:Create a Live USB stick using macOS
Version: 12.2+ This applies to openSUSE 12.2 and above.
Contents
Using Etcher
- Download the current ISO image of openSUSE Leap or Tumbleweed. The filename ends with «.iso».
- Download, install and start Etcher
- Select the openSUSE .iso file you just downloaded using the «Select Image» button.
- Plug a USB drive into you computer, if it’s the only drive connected to your computer, it will be automatically selected. If not, select it.
Using Command Lines
Find Block Device
Plug-in your USB stick and find what «/dev/diskN» it is mapped to by opening Terminal (where «N» stands for «disk0», «disk1», «disk2» etc). To do so, please execute:
This will print out the list of currently mapped devices/partitions. Find the USB using «NAME» column. Then note the corresponding /dev/diskN, where «N» is for index of your disk. For example:
In this case «/dev/disk2» is the one we want.
Unmount USB Stick
Unmount the USB stick
Where /dev/diskN is the one you have found in previous step as per our example it would be «/dev/disk2».
Write ISO to USB
Write the content of the ISO file:
/dev/rdiskN is the same disk you have found previously, with an r in front. r is for raw disk, as writing to /dev/rdisk2 is much faster than writing to /dev/disk2. You will be prompted for the administrator’s password.
No progress is shown while writing this way. If you have Homebrew or MacPorts, you can get a progress bar by installing the «pv» command and using that instead of «cat».
Источник
Mac os usb stick
With a bootable Ubuntu USB stick, you can:
- Install or upgrade Ubuntu, even on a Mac
- Test out the Ubuntu desktop experience without touching your PC configuration
- Boot into Ubuntu on a borrowed machine or from an internet cafe
- Use tools installed by default on the USB stick to repair or fix a broken configuration
Creating a bootable USB stick is very simple, especially if you’re going to use the USB stick with a generic Windows or Linux PC. We’re going to cover the process in the next few steps.
Apple hardware considerations
There are a few additional considerations when booting the USB stick on Apple hardware. This is because Apple’s ‘Startup Manager’, summoned by holding the Option/alt (⌥) key when booting, won’t detect the USB stick without a specific partition table and layout. We’ll cover this in a later step.
2. Requirements
- A 2GB or larger USB stick/flash drive
- An Apple computer or laptop running macOS
- An Ubuntu ISO file. See Get Ubuntu for download links
3. Prepare the USB stick
To ensure maximum compatibility with Apple hardware, we’re going to first blank and reformat the USB stick using Apple’s ‘Disk Utility’. But this step can be skipped if you intend to use the USB stick with only generic PC hardware.
- Launch Disk Utility from Applications>Utilities or Spotlight search
- Insert your USB stick and observe the new device added to Disk Utility
- Select the USB stick device (you may need to enable the option View>Show All Devices) and select Erase from the tool bar (or right-click menu)
- Set the format to MS-DOS (FAT) and the scheme to GUID Partition Map
- Check you’ve chosen the correct device and click Erase

Warning: Disk Utility needs to be used with caution as selecting the wrong device or partition can result in data loss.
4. Install and run Etcher
To write the ISO file to the USB stick, we’re going to use a free and open source application called Etcher. After downloading this and clicking to mount the package, Etcher can either be run in-place or dragged into your Applications folder.
By default, recent versions of macOS block the running of applications from unidentified developers. To side-step this issue, enable ‘App Store and identified developers’ in the ‘Security & Privacy’ pane of System Preferences. If you are still warned against running the application, click ‘Open Anyway’ in the same pane.

5. Etcher configuration
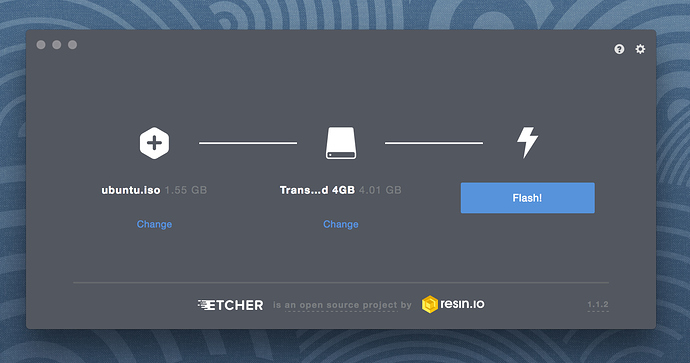
Etcher will configure and write to your USB device in three stages, each of which needs to be selected in turn:
Select image will open a file requester from which should navigate to and select the ISO file downloaded previously. By default, the ISO file will be in your Downloads folder.
Select drive, replaced by the name of your USB device if one is already attached, lets you select your target device. You will be warned if the storage space is too small for your selected ISO.
Flash! will activate when both the image and the drive have been selected. As with Disk Utility, Etcher needs low-level access to your storage hardware and will ask for your password after selection.
6. Write to device
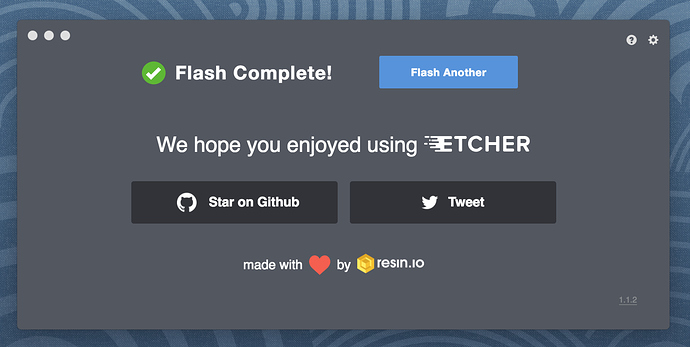
After entering your password, Etcher will start writing the ISO file to your USB device.
The Flash stage of the process will show progress, writing speed and an estimated duration until completion. This will be followed by a validation stage that will ensure the contents of the USB device are identical to the source image.
When everything has finished, Etcher will declare the process a success.
Congratulations! You now have Ubuntu on a USB stick, bootable and ready to go.
Warning: After the write process has completed, macOS may inform you that ‘The disk you inserted was not readable by this computer’. Don’t select Initialise. Instead, select Eject and remove the USB device.
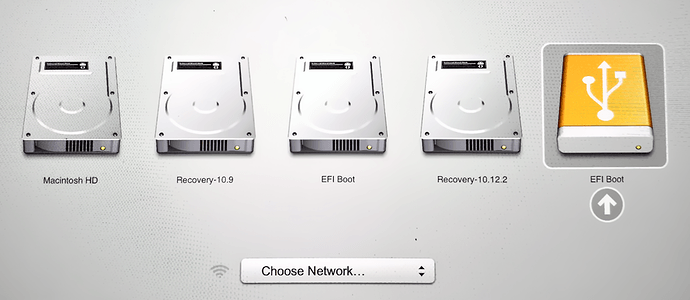
7. Boot your Mac
If you want to use your USB stick with an Apple Mac, you will need to restart or power-on the Mac with the USB stick inserted while the Option/alt (⌥) key is pressed.
This will launch Apple’s ‘Startup Manager’ which shows bootable devices connected to the machine. Your USB stick should appear as gold/yellow and labelled ‘EFI Boot’. Selecting this will lead you to the standard Ubuntu boot menu.
Finding help
If your Mac still refuses to boot off your USB stick you may find it easier to boot and install off an Ubuntu DVD instead. See our How to burn a DVD on macOS for further details.
Alternatively, if you feel confident using the macOS command line, see the community documentation on How to install Ubuntu on MacBook using USB Stick for a more manual approach.
If you want to install Ubuntu, follow our install Ubuntu desktop tutorial.
Finally, if you get stuck, help is always at hand:
Источник
Create bootable USB stick from ISO in Mac OS X
Booting from a USB stick is nowadays more and more important. More and more PCs (and servers) are delivered by default without a CD/DVD drive. To install the OS of your choice, USB sticks provide you the easiest possibility. In fact, it can even work out cheaper than burning a CD or DVD that you just throw away once the version is outdated.
For most Linux distributions the ISO for burning a CD/DVD is available freely on the internet. In this post I’ll assume you have already downloaded the bootable ISO image for the OS of your choice, but how to get the ISO image onto the USB stick?
The ISO file you have downloaded contains an image of the entire media. It includes all the files necessary to boot your PC/server. This image format is sadly not directly usable to copy onto the USB stick. We first need to convert the image from an ISO to a UDRW (Read/Write Universal Disk Image Format) which we can copy to the USB stick.
Some of the steps to create a bootable USB stick could be done in the GUI as well, but as some of them can’t and you have to go to the shell anyway, I decided to do all of the steps in the shell.
Convert the ISO to UDRW format
Mac OS X provides all the tools needed to convert the ISO image to UDRW. The following command will convert the ISO image to the UDRW format.
You will notice that the destination_file.img from the command will create the file destination_file.img.dmg really. This is because the hdiutil program automatically adds the dmg file extension. This is not a problem as the file extension won’t affect the format of the image.
Prepare the USB stick
Check your USB stick and make a backup if there is any important data on it, as the next steps are going to delete everything on it.
To prepare the USb stick we are going to delete all the partitions on the stick and create an empty partition. To do this we need to know the device name of the USB stick. Open a terminal and execute the following command:
You will see a list of disks and partitions. The goal is to identify the USB stick in this output. Depending on your system configuration your output might look different from this one. This appears to show 3 physical discs but it does not. The /dev/disk1 is a virtual disk created because of the partition encryption (FileVault 2) I enabled in Mac OS X.
As shown in the output above, the connected USB stick is a small 2.0 GB drive with a FAT partition on it. We are now going to remove this partition in the next step. For the following steps we will need the name of the disk which in this case is “/dev/disk2”.
With the following command the data on the disk (your USB stick) will be deleted!
With this command the USB stick was re-partitioned to have 1 partition without formatting and 100% of the size of the stick. If you check it again with “diskutil list” you will see the changes already, also the USB stick will no longer be shown in the Finder.
Copy the image to the USB stick
Now we can copy the disk image we created to the USB stick. This is done via the dd(1) command. This command will copy the image to the disk (substitute the appropriate disk name for your USB stick here, as with the re-partitioning command):
The dd command does not show any output before it has finished the copy process, so be patient and wait for it to complete.
To eject the USB stick, use the above command. After this is done, the bootable USB stick is ready to be used.
Источник


