- VLC for Mac OS X
- Devices and Mac OS X version
- Web browser plugin for Mac OS X
- Older versions of Mac OS X and VLC media player
- Mac OS X 10.6 Snow Leopard
- Mac OS X 10.5 Leopard
- Mac OS X 10.4 Tiger
- Mac OS X 10.3 Panther
- VLC for Mac OS X
- Devices and Mac OS X version
- Web browser plugin for Mac OS X
- Older versions of Mac OS X and VLC media player
- Mac OS X 10.6 Snow Leopard
- Mac OS X 10.5 Leopard
- Mac OS X 10.4 Tiger
- Mac OS X 10.3 Panther
- VLC for Mac OS X
- Devices and Mac OS X version
- Web browser plugin for Mac OS X
- Older versions of Mac OS X and VLC media player
- Mac OS X 10.6 Snow Leopard
- Mac OS X 10.5 Leopard
- Mac OS X 10.4 Tiger
- Mac OS X 10.3 Panther
- VLC HowTo/Make VLC the default player
- Contents
- Windows
- Vista, 7, 8
- Linux
- Fedora
- GNOME
- Documentation:Interface
- Contents
- General Interface Description
- Windows and GNU/Linux (Qt)
- Mac OS X
- Starting VLC Media Player in Windows
- Stopping VLC Media Player
- Notification Area Icon
- Main Interface
- Opening media
- Streaming Media Files
- Converting and Saving a Media File Format
VLC for Mac OS X
Devices and Mac OS X version
VLC media player requires Mac OS X 10.7.5 or later. It runs on any Mac with a 64-bit Intel processor or an Apple Silicon chip. Previous devices are supported by older releases.
Note that the first generation of Intel-based Macs equipped with Core Solo or Core Duo processors is no longer supported. Please use version 2.0.10 linked below.
If you need help in finding the correct package matching your Mac’s processor architecture, please see this official support document by Apple. You can also choose to install a Universal Binary.
Web browser plugin for Mac OS X
Support for NPAPI plugins was removed from all modern web browsers, so VLC’s plugin is no longer maintained. The last version is 3.0.4 and can be found here. It will not receive any further updates.
Older versions of Mac OS X and VLC media player
We provide older releases for users who wish to deploy our software on legacy releases of Mac OS X. You can find recommendations for the respective operating system version below. Note that support ended for all releases listed below and hence they won’t receive any further updates.
Mac OS X 10.6 Snow Leopard
Use VLC 2.2.8. Get it here.
Mac OS X 10.5 Leopard
Use VLC 2.0.10. Get it for PowerPC or 32bit Intel.
Mac OS X 10.4 Tiger
Mac OS X 10.4.7 or later is required
Use VLC 0.9.10. Get it for PowerPC or Intel.
Mac OS X 10.3 Panther
QuickTime 6.5.2 or later is required
Источник
VLC HowTo/Make VLC the default player
| This page describes how to make VLC the default media player. | Other «how to» pages |
Contents
Windows
The simplest way to set VLC as the default media player for Windows is during installation of VLC. During set-up, VLC will ask you if you want to associate certain media file types (such as .mp3, .flv, .wav) with VLC; for each «association» chosen opening that file type will launch it in VLC. By default, all are selected, though you might (or might not) want to un-check file types you’d like to open with another programme.
If you’ve missed this chance at making it the default media player during set-up, perhaps the easiest way is to un-install it and then install it again.
A word of caution regarding re-installation—be sure to un-check the box that deletes your preferences and cache, or all your customisations will be gone!
Vista, 7, 8
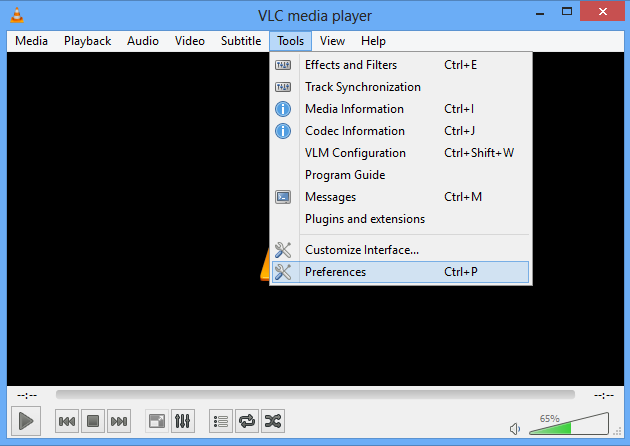
Open VLC player, click on Tools in the menu, and from there select Preferences.
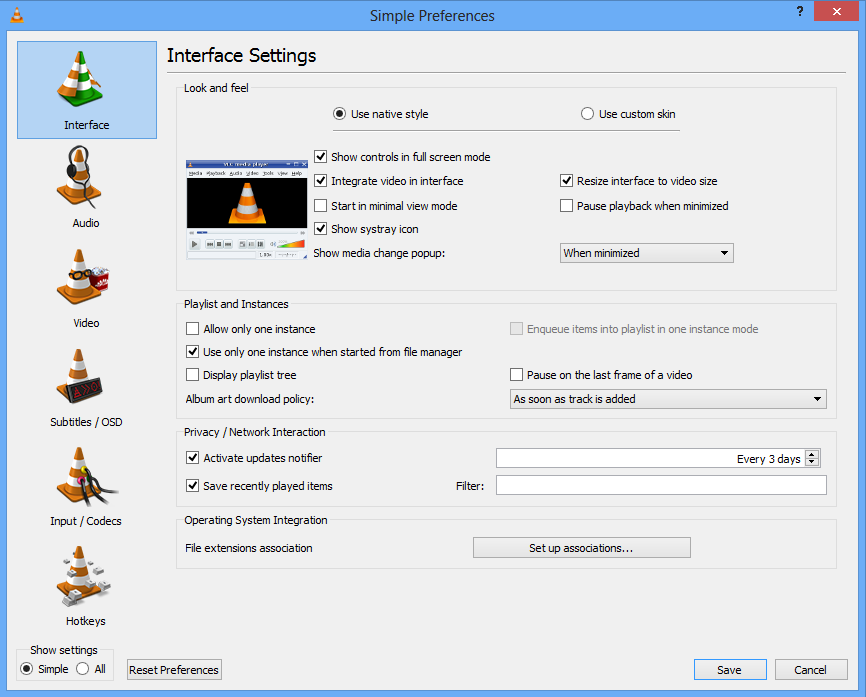
Click on the Interface button on the left panel and then click on Set up associations. (it’s close to the bottom).
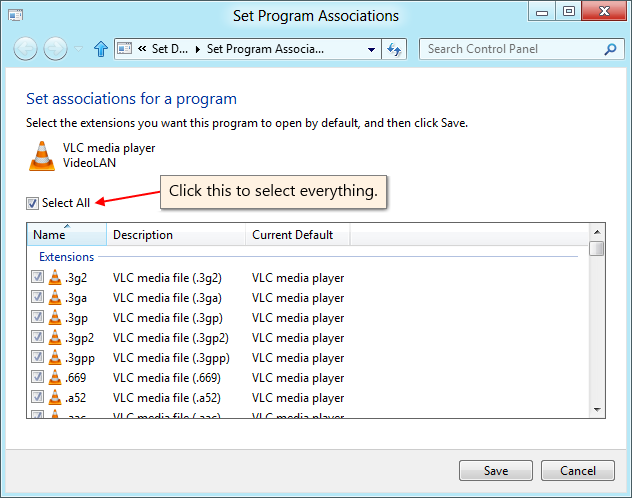
Select types of files from the list that appears. Check any file types for which you want VLC to be the default player, or just check the select all option.
Right-click on the type of file you want to always open with VLC. Click ‘Get Info’. In the ‘Open With’ section, select VLC from the drop-down menu. To apply this change to all files of this type, click the ‘Change All’ button.
For optical media, like CDs or DVDs, go to Apple -> System Preferences and choose «CDs/DVDs» in the Hardware section. Choose «Other Application» from the respective popup menu button. The list is alphabetical, so VLC should be near the bottom of the list.
Linux
Fedora
GNOME
Gnome uses two lists (located at /usr/share/applications/) – mimeinfo.cache and defaults.list – to register applications to file types.
You can either edit these manually or use the tools that GNOME has for this.
Instructions on how to do it in GNOME
Changing the default application for videos using menus (the easy way):
Using Nautilus 2.30.1, from the top menu bar choose «Places», then Home Folder -> Edit menu -> Preferences -> choose Media tab -> and in the drop-down list next to «DVD Video» choose «Open VLC media player».
Voilà.
Alternatively, try: System -> Preferences -> Personal -> Preferred Applications -> Multimedia -> Custom -> Type this: vlc %U
(P.S.: this alternative hasn’t been tested yet).
Changing the default application for videos using menus (the not-so-easy way):
|

- In the tab Open With just choose VLC as your player for that type of file.
Just remember that you will have to do this for each and every type of video/audio file (e.g., mpg, avi, rm, mkv, ogg, mp3, etc.)

- If the VLC icon doesn’t show up on the Open With tab, click on the add button in the lower corner to the right of the window
that has a plus sign, and locate VLC on the window that pops up that is called Add Application.

Changing the default application for videos manually (the hard way):
In Fedora 10 the path /usr/share/applications/ will take you to these 2 files that configure what application opens a type of file.
P.S.: Both files will point to a Desktop Entry file ([name of the file].desktop) that is inside the applications folder, and the 2 important things inside that file are the configurations for what MIME Types the application can handle, and how to launch the application.
A Desktop Entry file is a data file that provides information about an item in a menu. The desktop entry specification describes desktop entries as files describing information about an application such as the name, MIME Types it handles, icon, and description. These files are used for application launchers and for creating menus of applications that can be launched.
If you don’t have the VLC Desktop Entry file, or it disappears for some reason you will have to make one. Look here for some pointers.
You only need to modify mimeinfo.cache, I hope. It works for me. If it doesn’t work for you, please edit this!
So what you have to do is:
- Open mimeinfo.cache as root.
- Search for the MIME Types for video.
- Change all of them to use VLC.
For example:
Registry of MIME Type (video/quicktime) in mimeinfo.cache to use VLC.
The format is:
[MIME Type]=[Name of the Desktop Entry file]
Note: You can put more than one Desktop Entry, but they need to be separated by a semi-colon (;), see the example above.
Those extra entries will appear as options when you right-click on the video file and go to the Open With submenu.
Tip: Nautilus don’t show the real names of the Desktop Entry files. Either drag and drop it on gedit so you see the name on the tab, or use ls to list the files on the command line.
Источник
Documentation:Interface
|
Contents
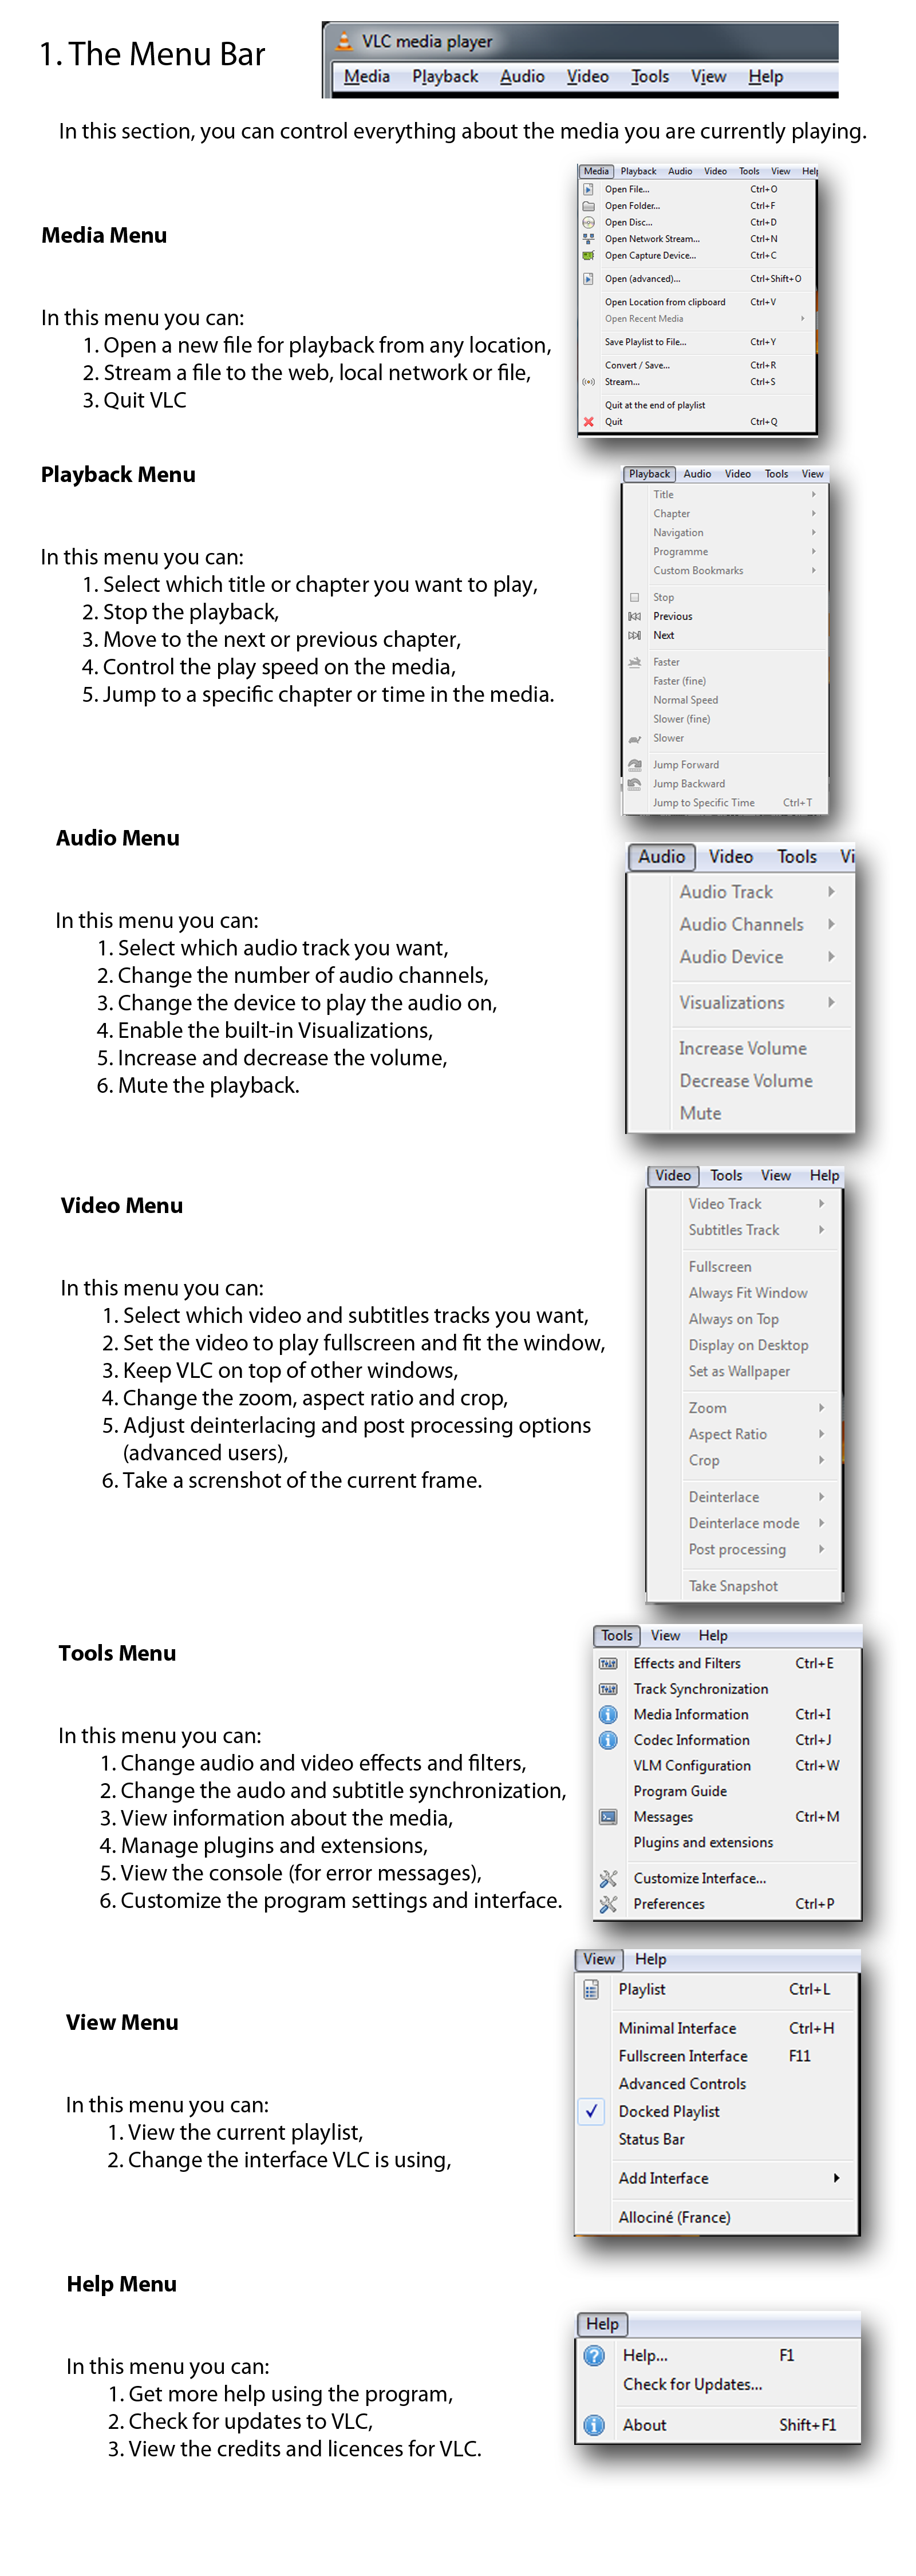
General Interface Description
VLC has several interfaces:
- A cross-platform interface for Windows and GNU/Linux, which is called Qt.
- A native Mac OS X interface.
- An interface that supports skins for both Windows and GNU/Linux.
The operation of VLC is essentially the same in all the interfaces.
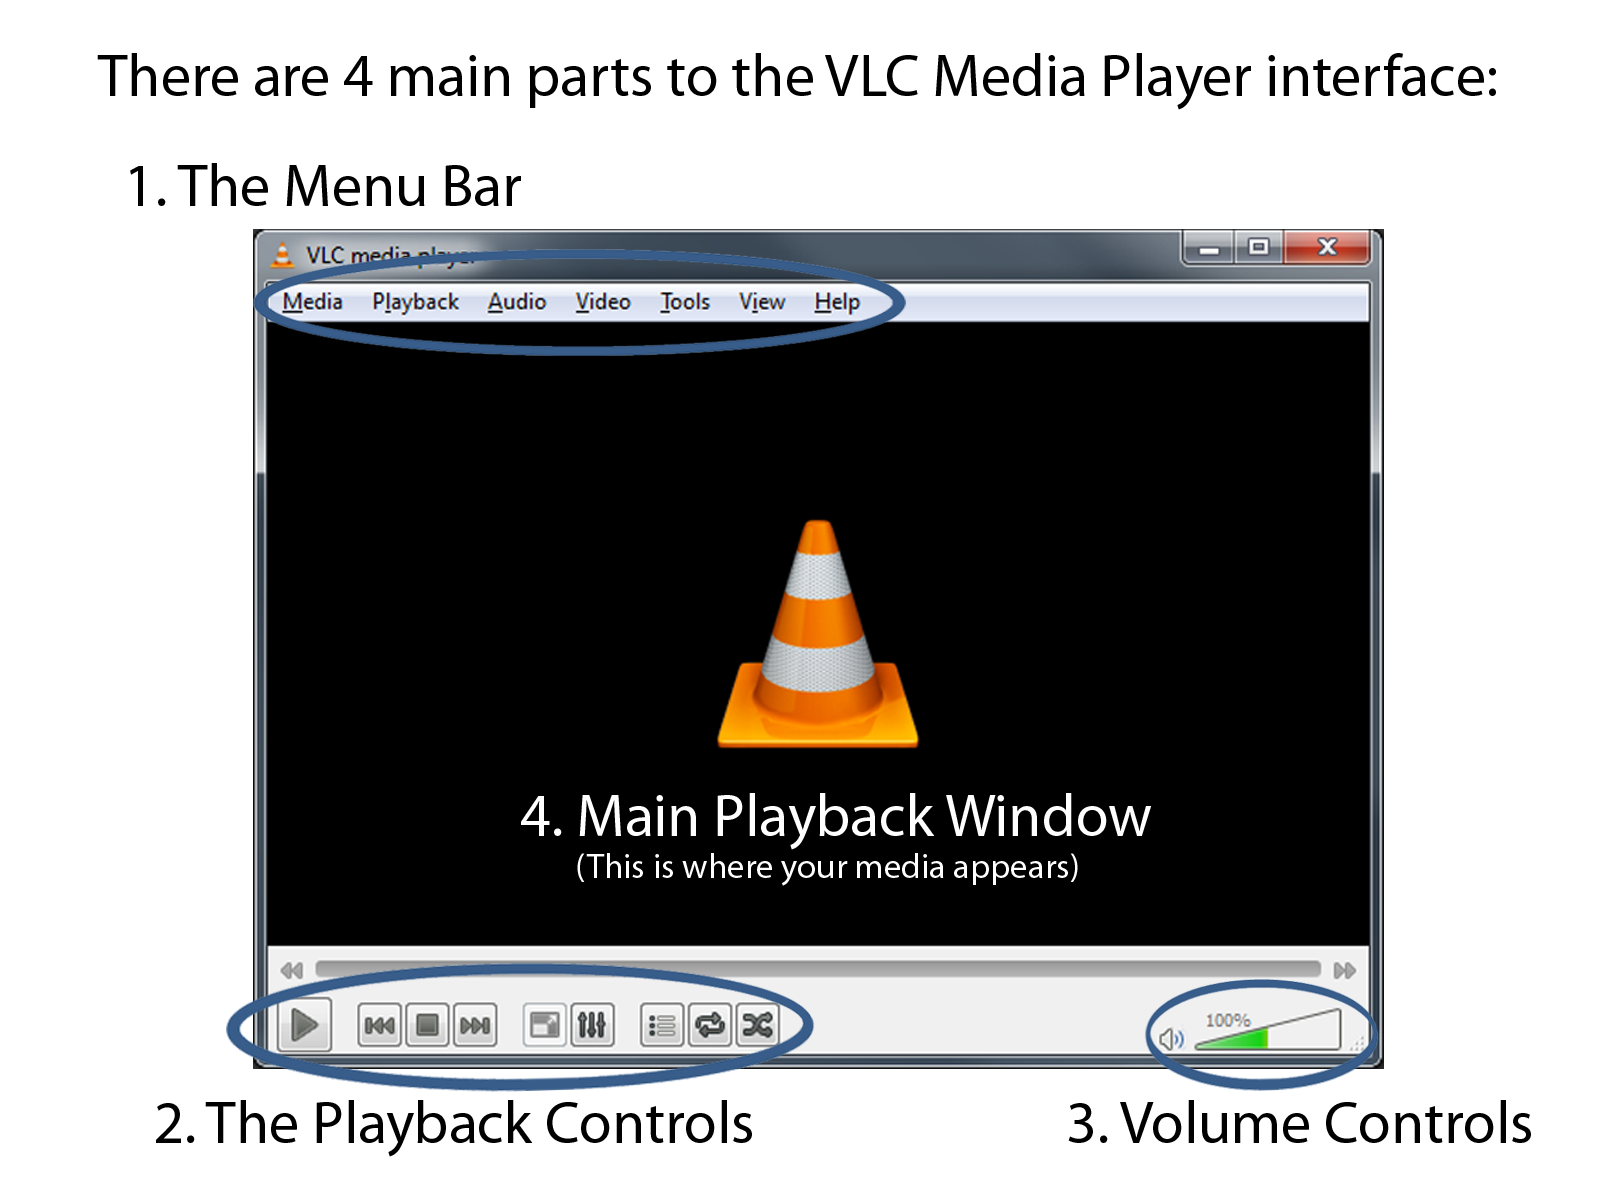
Windows and GNU/Linux (Qt)
The screenshot below shows the default interface in VLC 2.0. More features can be displayed by selecting them in the View menu.
Mac OS X
This screenshot shows the default interface that VLC had on Mac OS X until version 1.1:

Since version 2.0 the interface has been redesigned. See OSX 2.0 interface.
Starting VLC Media Player in Windows
In Windows XP: Click Start -> Programs -> VideoLAN -> VLC media player.
In Windows 7: Click Start -> All Programs -> VideoLAN -> VLC media player.
VLC is shown on the screen and a small icon  is shown in the system tray.
Stopping VLC Media Player
There are three ways to quit VLC:
- Right click the VLC icon (
 ) in the tray and select Quit (Alt-F4).
 - Click the Close button in the main interface of the application.
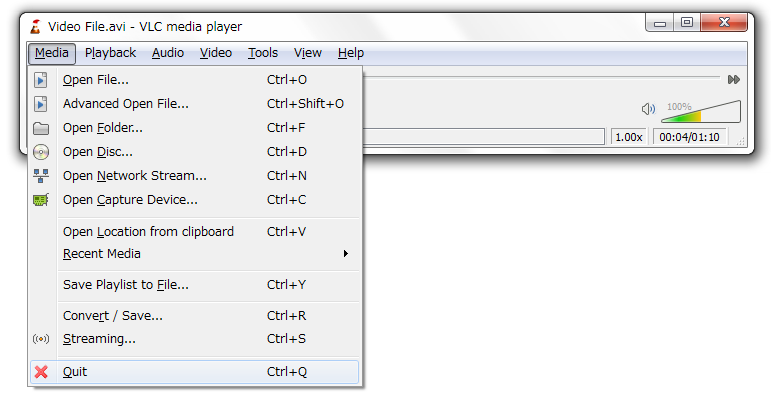
- In the Media menu, select Quit (Ctrl-Q).
Notification Area Icon
Clicking this icon shows or hides the VLC interface. Hiding VLC does not exit the application. VLC keeps running in the background when it is hidden. Right clicking the icon in the notification area shows a menu with basic operations, such as opening, playing, stopping, or changing a media file.
Main Interface
The main interface has the following areas:
- Menu bar.
- Track slider — The track slider is below the menu bar. It shows the playing progress of the media file. You can drag the track slider left to rewind or right to forward the track being played. When a video file is played, the video is shown between the menu bar and the track slider.
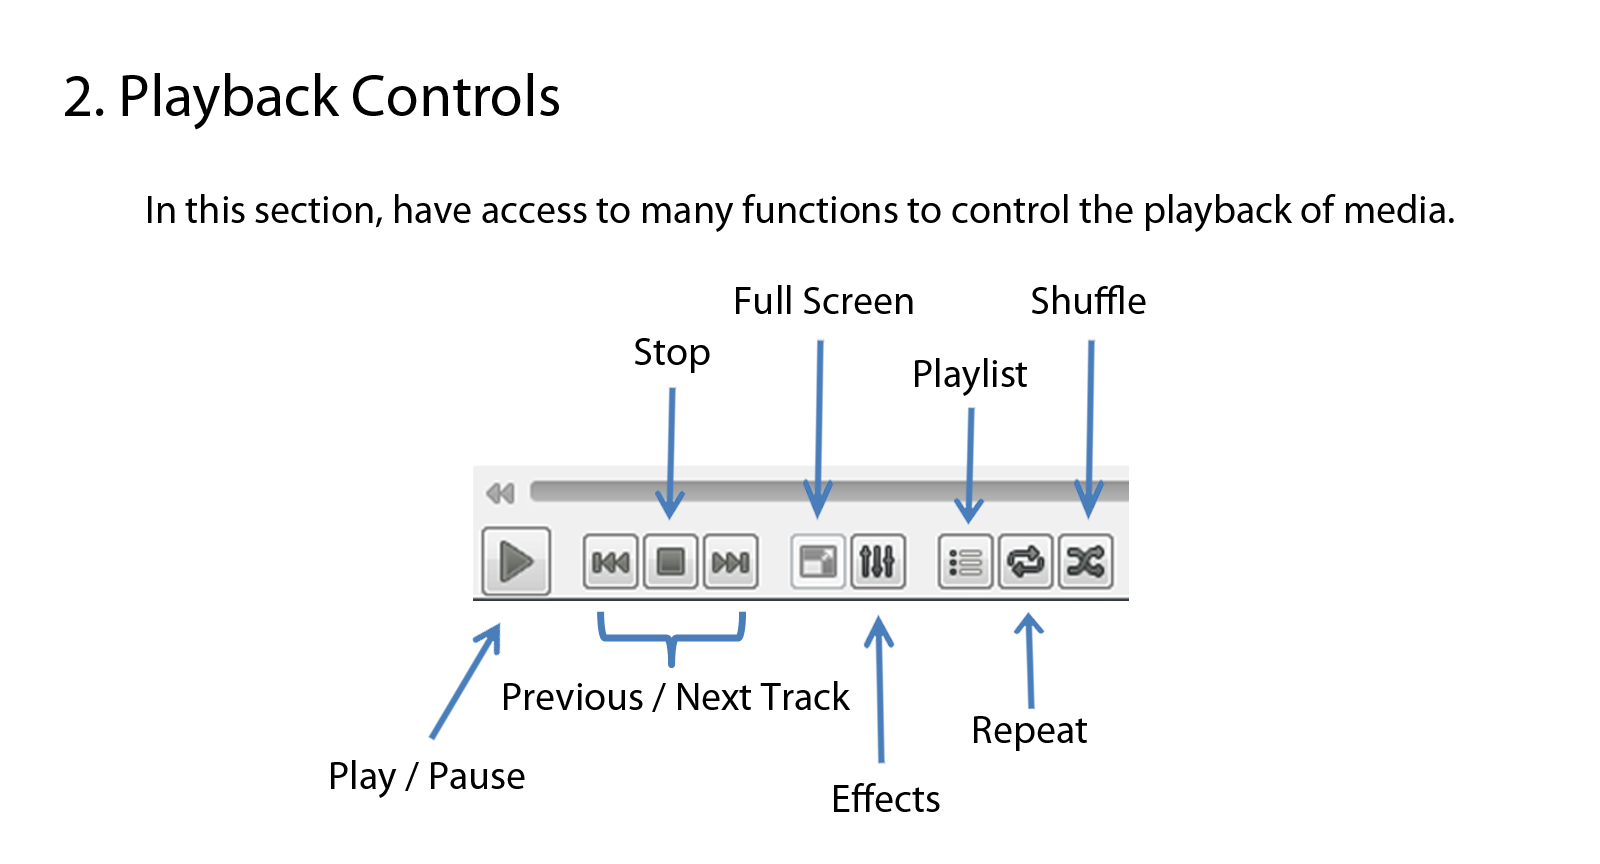
Note: When a media file is streamed, the track slider does not move because VLC cannot know the total duration. - Control Buttons — The buttons below the track slider cover all the basic playback features.
Opening media
Streaming Media Files
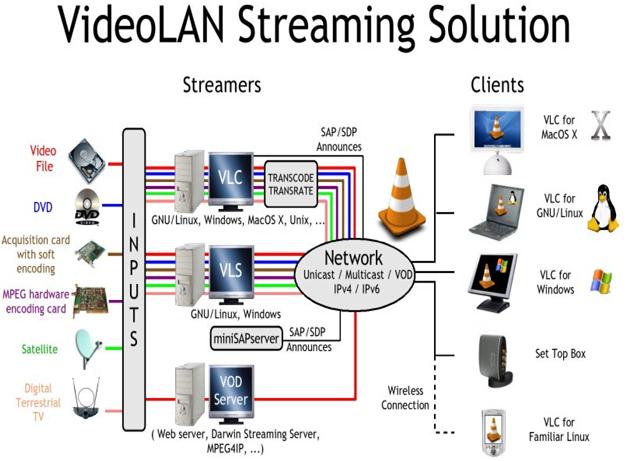
Streaming is a method of delivering audio or video content across a network without the need to download the media file before it is played. You can view or listen to the content as it arrives. It has the advantage that you don’t need to wait for large media files to finish downloading before playing them.
VideoLan is designed to stream MPEG videos on high bandwidth networks. VLC can be used as a server to stream MPEG-1, MPEG-2 and MPEG-4 files, DVDs and live videos on the network in unicast or multicast. Unicast is a process where media files are sent to a single system through the network. Multicast is a process where media files are sent to multiple systems through the network.
VLC is also used as a client to receive, decode and display MPEG streams. MPEG-1, MPEG-2 and MPEG-4 streams received from the network or an external device can be sent to one machine or a group of machines.
To stream a file:
- From the Media menu, select Open Network Stream. The Open Media dialog box loads with the Network tab selected.
- In the Please enter a network URL text box, Type the network URL.
- Click Play.
Note: When VLC plays a stream, the track slider shows the progress of the playback.

Converting and Saving a Media File Format
VLC can convert media files from one format to another.
To convert a media file:
- From the Media menu, select Convert/Save. The Open media dialog window appears.
- Click Add. . A file selection dialog window appears.
- Select the file you want to convert and click Open. The Convert dialog window appears.
- In the Destination file text box, indicate the path and file name where you want to store the converted file.
- From the Profile drop-down, select a conversion profile.
- Click Start.
Источник


