- Как изменить разрешение экрана macOS VMWare?
- Как сделать на весь экран виртуальную машину VMware?
- Как изменить разрешение экрана Macos VirtualBox?
- Как изменить разрешение экрана в виртуальной машине?
- Как в VirtualBox Ubuntu сделать на весь экран?
- Как изменить разрешение экрана в Hyper V?
- Как выйти из режима масштабирования в VirtualBox?
- Как изменить разрешение экрана на Mac OS?
- Как запустить виртуальную машину на весь экран?
- Как изменить разрешение экрана в Ubuntu?
- Как сделать полноэкранный режим в виртуал бокс?
- Разрешение экрана macOS в Vmware не изменяется! (960*540 hiDPI)
- Устанавливаем необходимое разрешение экрана macOS в Vmware
- Fix macOS Big Sur Screen Resolution on VMware
- Steps to Fix macOS Big Sur Screen Resolution on VMware
- Fix macOS Big Screen Resolution on VMware
- Step 1: Attach VMware Tools ISO to macOS Big Sur
- Step 2: Install the VMware tools
- Step 3: Allow VMware Tools through macOS Big Sur Security Settings
- Step 4: Reinstall VMware Tool if required
- Fix macOS Mojave Screen Resolution(HiDPI) on VMware
- Summary
- How to Fix macOS Catalina Screen Resolution on VMware
- Step One: Start VMware Tools From VMware
- Step Two: Install VMware Tools on macOS Catalina
- Step Three: Allow VMware Tools From System Preferences
- Step Four: Reboot Your Mac
- Step Six: Allow VMware Tools From System Preferences Again
- Step Seven: Reinstall VMware Tools
- Install macOS Monterey On Vmware On Windows Using ISO: Easy Guide
- macOS Monterey Download ISO (v12 beta 4) | Direct Links
- Fix Network Connection on macOS Monterey on VMware: 5 Step Easy Guide
- 12 COMMENTS
Как изменить разрешение экрана macOS VMWare?
Как сделать на весь экран виртуальную машину VMware?
Виртуальную машину необходимо развернуть на весь экран. Для этого на панели инструментов VMware Workstation предусмотрена специальная кнопка. Также для переключения на полноэкранный режим можно использовать клавиши Ctrl + Alt + Enter .
Как изменить разрешение экрана Macos VirtualBox?
Смена разрешение экрана на Mac OS в VirtualBox
- Откройте «Командную строку». ( нажмите Win + x и выберите «Командная строка»)
- Перейдите в папку VirtualBox, в которой находится «VBoxManage.exe». cd C: Program Files Oracle VirtualBox.
- Установите разрешение, введя команду ниже. …
- Запустите ВМ
Как изменить разрешение экрана в виртуальной машине?
В левом верхнем углу жмем «Файл» — «Настройки» — «Дисплей». В этом окне в поле «Максимальное разрешение» устанавливаем «Любое». Жмем «Ок». В левой части окна выбираем интересующую нас виртуальную машину и жмем шестеренку «Настроить» вверху окна.
Как в VirtualBox Ubuntu сделать на весь экран?
Вам необходимо установить гостевые дополнения, перейти в меню устройств> выбрать «установить гостевые дополнения», после установки перезагрузить виртуальную систему, теперь выбрать меню просмотра и нажать «переключиться в полноэкранный режим».
Как изменить разрешение экрана в Hyper V?
- Открыть терминал
- sudo nano /etc/default/grub. ищем строку, которая начинается с GRUB_CMDLINE_LINUX_DEFAULT и добавляем video=hyperv_fb:[разрешение экрана, которое нужно]. …
- Сохраняем и закрываем редактор.
- sudo update-grub.
- Перезагрузка виртуальной машины.
Как выйти из режима масштабирования в VirtualBox?
Если вы не переназначали host-клавишу, то выход из режима масштабирования — «Ctrl + c». Если переназначали, то «Host + c».
Как изменить разрешение экрана на Mac OS?
Изменение разрешения дисплея
- Откройте меню Apple () > «Системные настройки».
- Щелкните «Мониторы».
- Выберите «Масштабированное», затем выберите любое из четырех или пяти масштабированных разрешений, в зависимости от модели компьютера Mac.
Как запустить виртуальную машину на весь экран?
По умолчанию в VirtualBox используются следующие комбинации клавиш:
- Right Ctrl-F – открыть виртуальную машину на весь экран.
- Right Ctrl-L – открыть режим интеграции экрана.
- Right Ctrl-F – открыть режим масштабирования экрана.
Как изменить разрешение экрана в Ubuntu?
Смена разрешения экрана в Ubuntu 20.04
- Откройте меню Ubuntu, Нажав на правом верхнем углу экрана:
- В появившемся окне нажимаем на «Настройки»:
- В окне настроек Ubuntu 20.04 нажимаем на пункт «Настройка экранов»:
- Справа на экране откроются настройки, в которых можно изменить ориентацию и разрешение экрана:
Как сделать полноэкранный режим в виртуал бокс?
Наводим указатель мыши по середине панели задач, чтобы отобразилось меню программы VirtualBox. И выбираем в меню «Вид» полноэкранный режим. Все, операционная система во весь экран. При последующих запусках надо будет выполнять последние два действия (1 — режим интеграции, 2 — полноэкранный) для растягивания ОС.
Источник
Разрешение экрана macOS в Vmware не изменяется! (960*540 hiDPI)
Установили виртуальную машину macOS в Vmware, но возникли проблемы с установкой необходимого разрешения экрана? Тогда эта статья для вас!
Если вы воспользовались нашей инструкцией по установке macOS в Vmware, то возможно у вас могла возникнуть одна небольшая проблема…
Дело в том, что после попытки установки необходимого разрешения экрана, macOS автоматически возвращает в 960*540 (hiDPI)! Внятного, четкого ответа в сети интернет не было найдено, поэтому было решено написать данный материал!
Устанавливаем необходимое разрешение экрана
macOS в Vmware
- Для начала выключите виртуальную машину macOS в Vmware
- Откройте меню настроек машины и перейдите к «экрану»
- Установите необходимое разрешение экрана, и увеличьте немного видеопамяти
- Запустите macOS в Vmware
- Установите дополнение Vmware Tools, для этого кликните по меню VMware Player виртуальной машины — > Manage -> Install VmWare Tool. Кликните по Install VmWare Tool, введите пароль, после чего произойдет установка дополнений.
- Перезагрузите виртуальную машину
- Откройте файловый менеджер Finder и наберите комбинацию клавиш «Win» + «Shift» + «G», если у вас ПК клавиатура, «CMD» + «Shift» + «G» и перейдите в папку
/Library/Preferences
sudo ./vmware-resolutionSet 1920 1080
Вместо 1920 1080, укажите необходимое разрешение
У вас остались еще дополнительные вопросы? Пишите их в комментариях, о том что у вас получилось или наоборот!
Вот и все! Больше полезных статей и инструкций читайте в разделе Статьи и Хаки IOS и macOS. Оставайтесь вместе с сайтом Android +1, дальше будет еще интересней!
Источник
Fix macOS Big Sur Screen Resolution on VMware
In this article, I am going to show you how to fix macOS Big Sur Screen Resolution on VMware. If you want to make macOS Big Sur responsive, work fast, enable the drag & drop feature and fix macOS Big Sur Screen resolution on VMware. There is a tool created by VMware called VMware tools. It makes Virtual Machines work smoothly and have all the benefits of macOS as a VM. Sometimes the VMware tools don’t work when you install, so If the VMware tools didn’t work, then you need to reinstall it, to make it work. So follow the steps below.
Steps to Fix macOS Big Sur Screen Resolution on VMware
- Fix macOS Big Sur Screen Resolution on VMware
- Attach VMware Tools ISO to macOS Big Sur
- Install the VMware tools
- Allow VMware tools from macOS Security Settings
- Reinstall the VMware tools if required
- Fix macOS Mojave Screen Resolution(HiDPI) on VMware (Optional)
Fix macOS Big Screen Resolution on VMware
You should have macOS big Sur installed on VMware if not then follow this guide to install macOS Big Sur on VMware on Windows.
Step 1: Attach VMware Tools ISO to macOS Big Sur
In this guide, I will use the default VMware tools provided by VMware. Right-click on macOS Big Sur Tab/Window then click Install VMware Tools.
Attach VMware tools to macOS
Attach VMware tools to macOS
Alternatively, if that didn’t work for you then download the VMware tools for macOS Big Sur from the link below then follow these steps:
- Download VMware Tools for macOS Big Sur (Direct Link)
- Go to your macOS Big Sur Virtual Machine Settings >CD/DVD (SATA) > Use ISO image file > Browse > locate & select the VMware Tools you downloaded from the link above and click Open.
- Once you have selected the VMware tools.iso, then make sure the device status is Connected and Connectat Power On and click OK.
Use VMware tools ISO Image
» data-medium-file=»https://www.wikigain.com/wp-content/uploads/2020/06/Use-VMware-tools-ISO-Image-300×293.png» data-large-file=»https://www.wikigain.com/wp-content/uploads/2020/06/Use-VMware-tools-ISO-Image.png»/> Use VMware tools ISO Image  Connect the VMware tools ISO to macOS
Connect the VMware tools ISO to macOS
Step 2: Install the VMware tools
#1. The VMware tools will automatically appear on your desktop. Double-click on Install VMware tools.
Install VMware Tools on macOS Big Sur
Install VMware Tools on macOS Big Sur
#3. On the Welcome to VMware tools Installer page, click Continue.
#4. Click on the Install button.
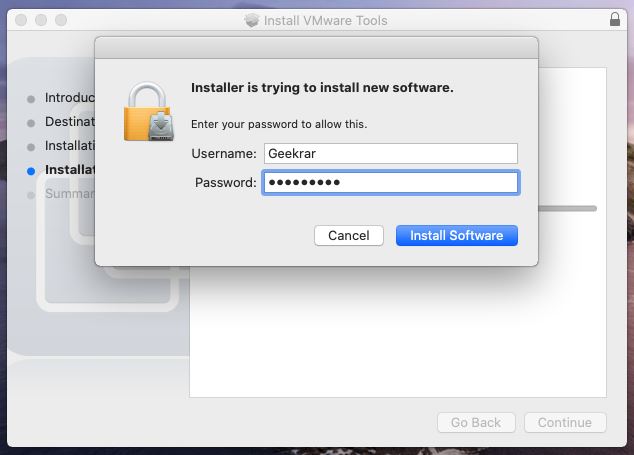
#5. Type your username and password then click Install Software.
Click Install Software
Click Install Software
Step 3: Allow VMware Tools through macOS Big Sur Security Settings
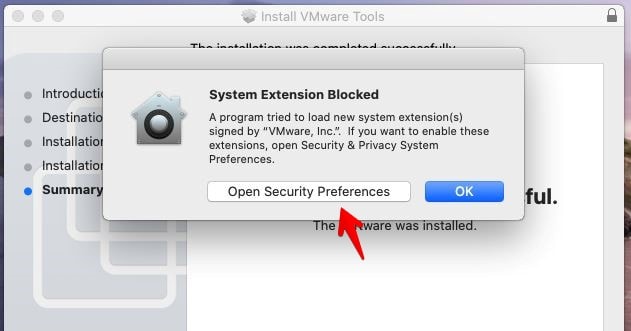
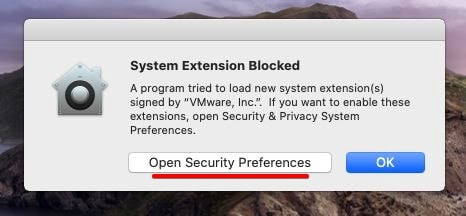
#1. When System Extension Blocked appears, click Open Security Preferences.
Open Security Preferences
Open Security Preferences
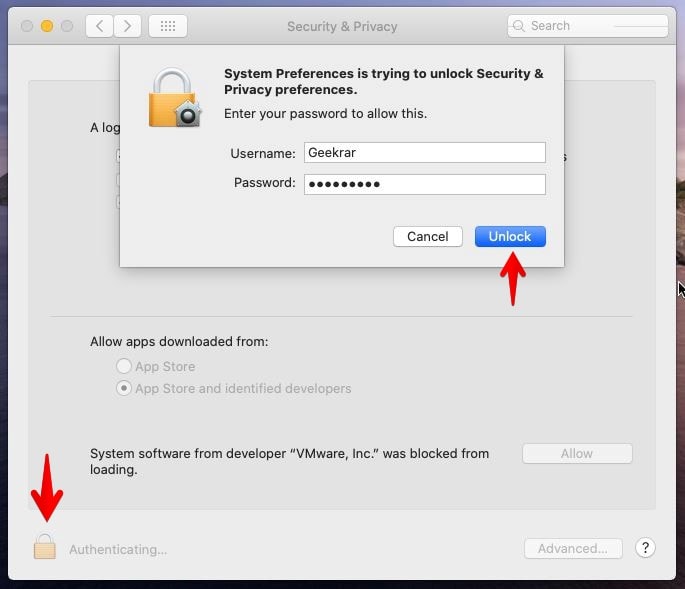
#2. Click on the Padlock icon. Type your password then click Unlock. It allows you to make changes.
Unlock Security and Privact Preferences
Unlock Security and Privacy Preferences
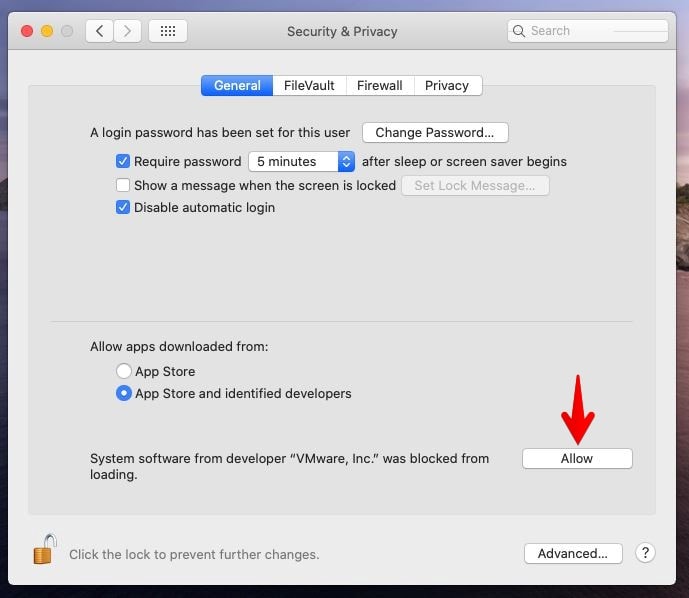
#3. Click Allow next to some system software was blocked from loading.
#4. Then select VMware, Inc and click OK to enable the VMware tools extension to be installed from the security & privacy window.
Select VMware Inc and click OK
Select VMware Inc and click OK
#5. On this Pop-up window click Not Now then close Security & Privacy window.
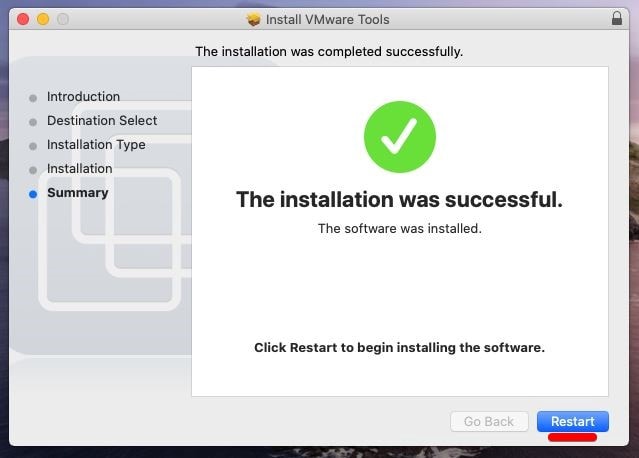
#6. Click the Restart button on The installation was successful window.
#7. macOS Big Sur VM will restart and after the restart login with your Username and Password. Test the enhanced features should be working.
VMware Tools installed on macOS Big Sur
VMware Tools installed on macOS Big Sur
Step 4: Reinstall VMware Tool if required
Sometimes the VMware tools don’t work when you install it the first time, so If the VMware tools didn’t work, then you need to reinstall it, to make it work. So follow the steps below.
- Attach VMware tools.
- Click on Install VMware Tools.
- Click on Continue.
- Click on Continue Installation.
- Type your Username and Password and click Install Software.
- Click Restart.
- Login to macOS Big Sur.
- Fullscreen your macOS Big Sur to make sure it’s work properly.
Fix macOS Mojave Screen Resolution(HiDPI) on VMware
- Open the Terminal and type the following code then restart the VM.
Summary
That’s all about how to fix macOS Big Sur Screen Resolution on VMware. We covered the following:
- Fix macOS Big Sur Screen Resolution on VMware
- Attach VMware Tools ISO to macOS Big Sur
- Install the VMware tools
- Allow VMware tools from macOS Security Settings
- Reinstall the VMware tools if required
- Fix macOS Mojave Screen Resolution(HiDPI) on VMware (Optional)
If I left out something and didn’t mention please let me know by commenting down below this post. We have lots of new posts related to macOS Big Sur so stay up to date with us.
Источник
How to Fix macOS Catalina Screen Resolution on VMware
Step One: Start VMware Tools From VMware
Since the VMware Tools is already in VMware, we’ll only need to start it up.
In order to install VMware Tools, open VMware Workstation Player and select the macOS Catalina virtual machine. Click on Power on this virtual machine.
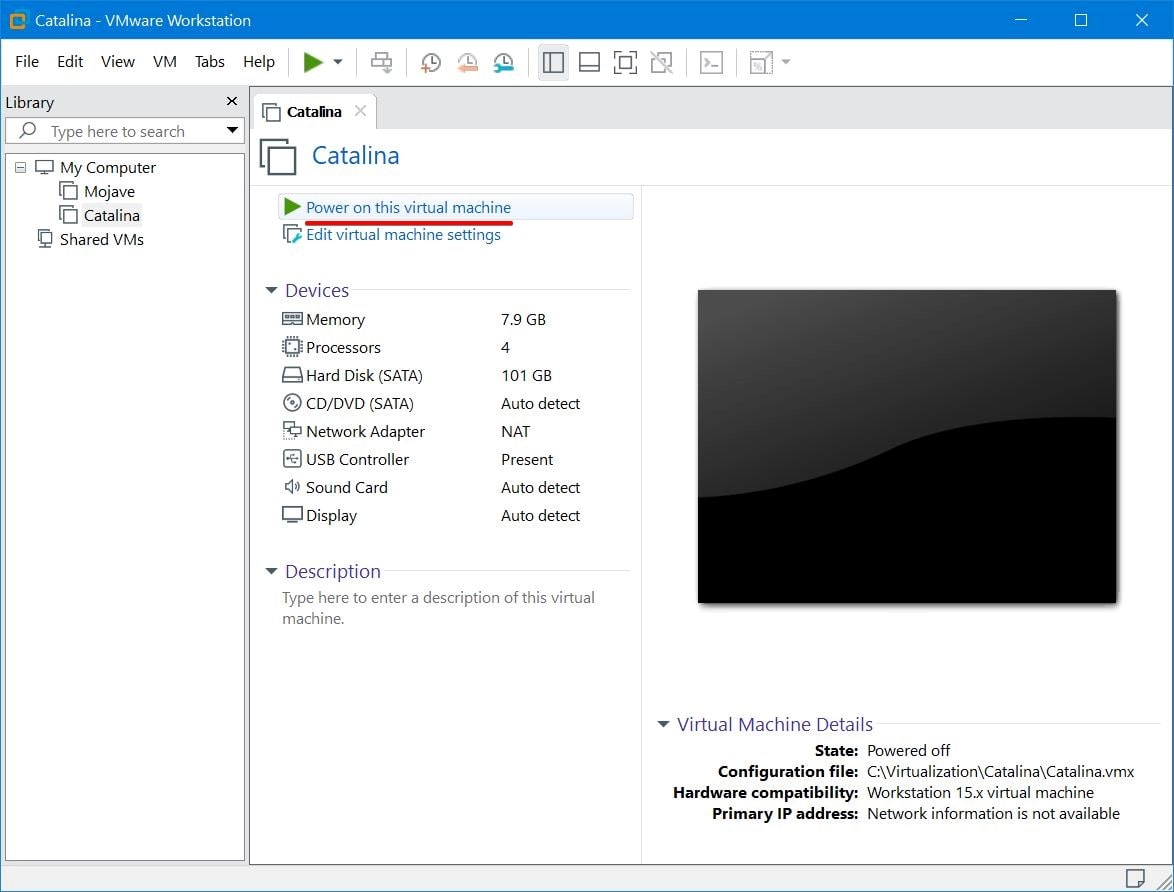 Power on This Virtual Machine
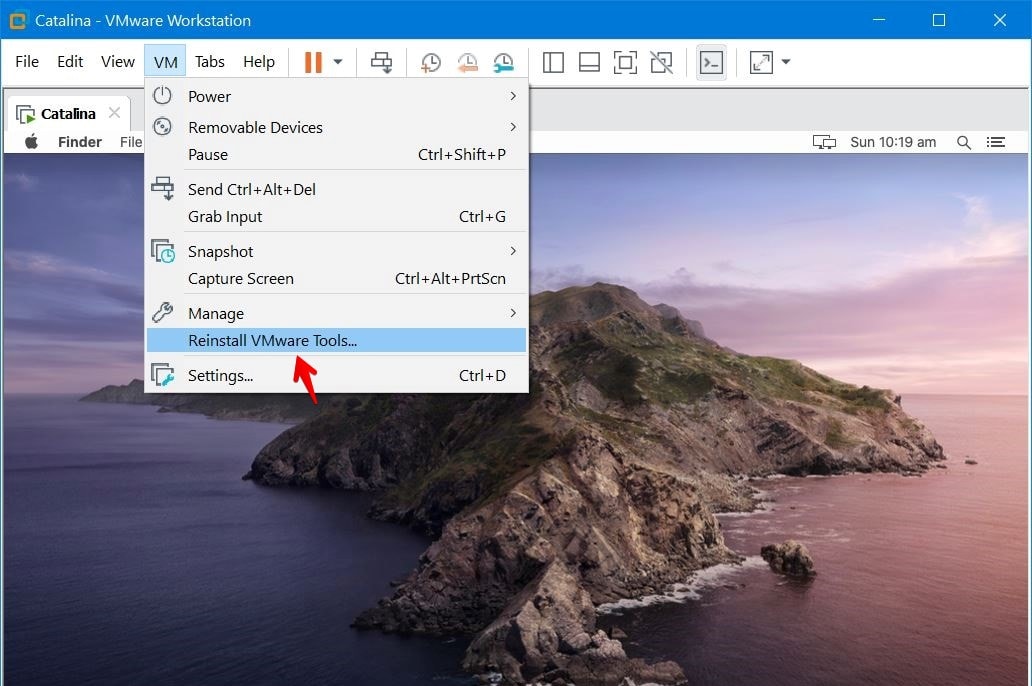
Once the machine boots, sign into and from the menu, click on VM > Install VMware Tools.
 VM – Install VMware Tools
The VMware Tools window will pop up, double-click on Install VMware Tools. When you’re asked for permission, click Allow.
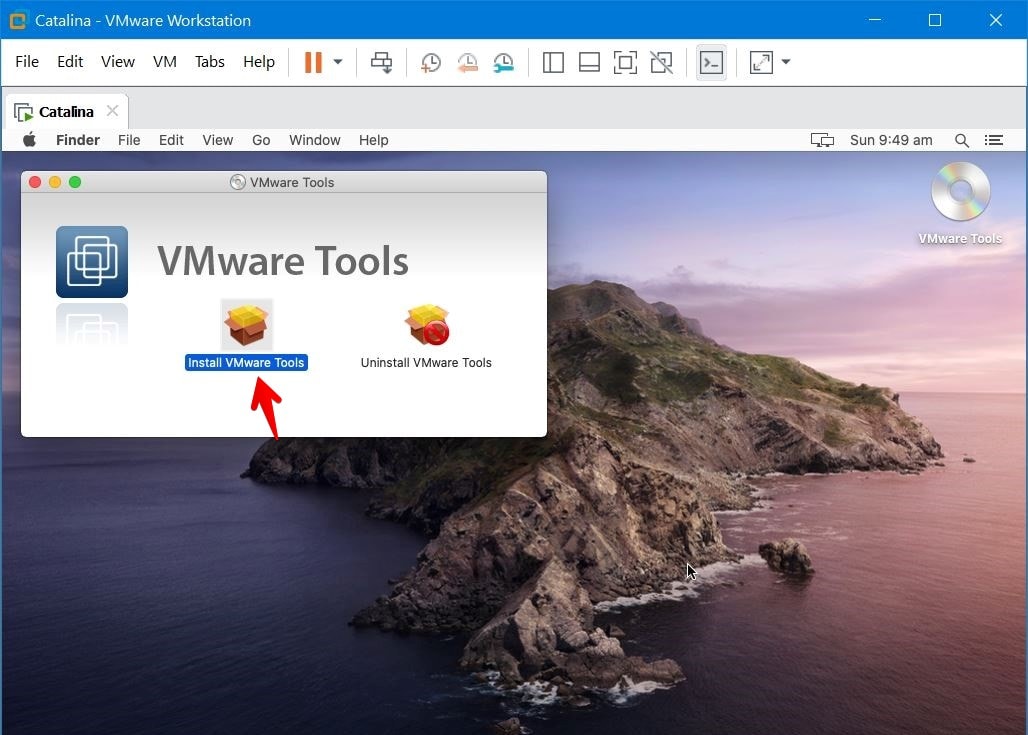 Install VMware Tools
Step Two: Install VMware Tools on macOS Catalina
On the wizard that appears, Continue with the introduction.
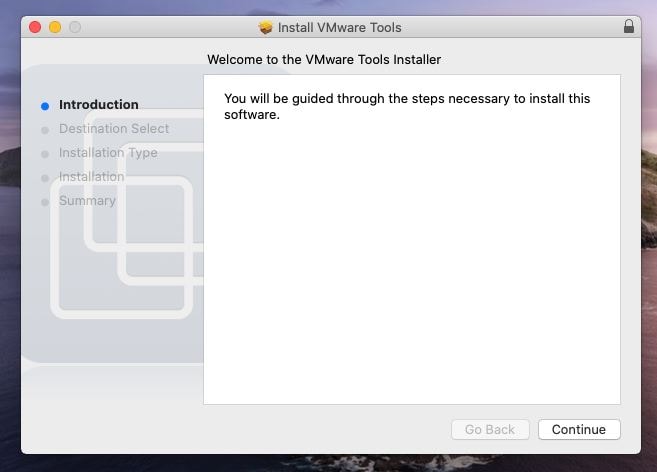 Install VMware Tools Wizard
This window specifies the installation for all the users, click Continue.
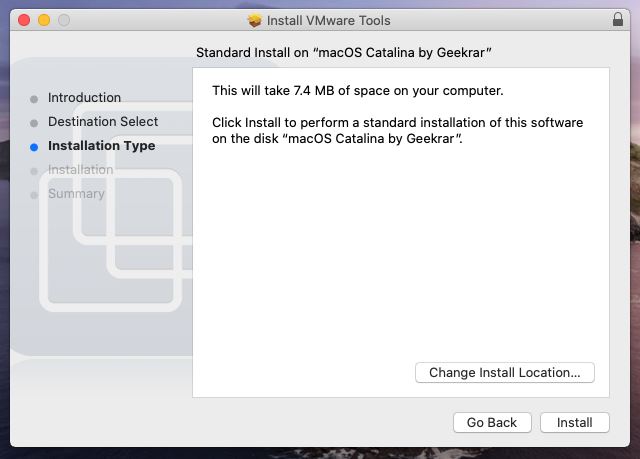 Installation Type
The installation process will begin with your permission, enter your credential and let it install.
 Credential
The installation won’t take long, it will be no more than five minutes the most.
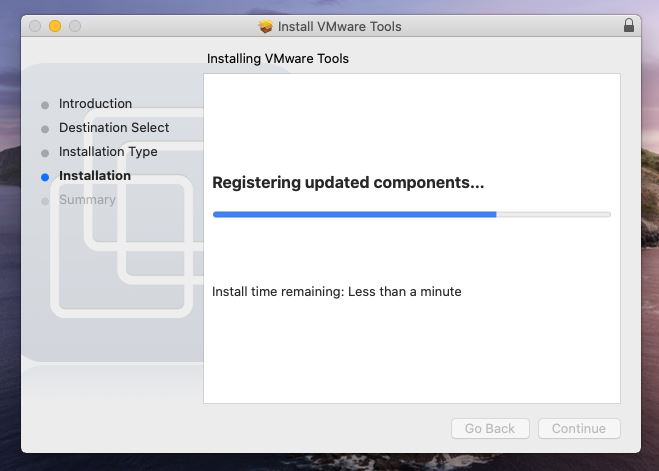 Installing Vmware Tools
Step Three: Allow VMware Tools From System Preferences
When it’s done, you’ll see the System Extension Blocked, click on Open Security Preferences.
 System Extension Blocked
Next, in order to make changes, you’ll need to enter your password, then click Unlock.
 Authenticate
The important part but easy is to Allow the extension from VMware which is blocked.
 Security & Privacy
Step Four: Reboot Your Mac
For making this change, you’ll be prompted to reboot, click on Restart and wait until it completely boots up.
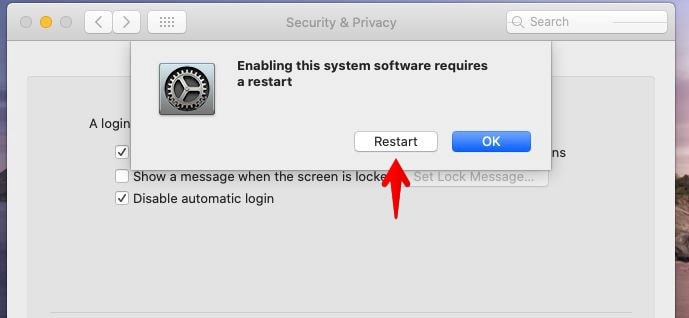 Restart
Now click Cancel.
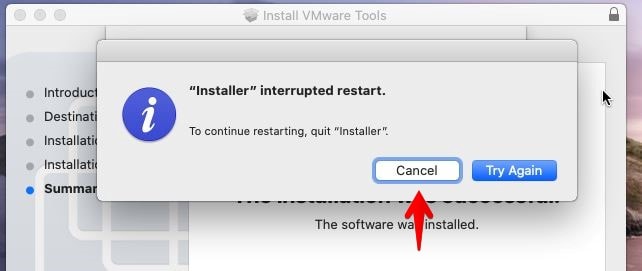 Restart
Then click OK on the installer and click Restart. This will straightly reboot your Mac.
 Restart Completely
Step Six: Allow VMware Tools From System Preferences Again
When it’s up, you’ll likely see the unpleasant System Extension Blocked error again, click on Open Security Preferences to allow this app from the Gatekeeper.
 System Extension Blocked
It will take you to Security and Privacy where you should Allow again.
Security & Privacy
Step Seven: Reinstall VMware Tools
Now once again, start with VMware Tools and proceed with the installation from the beginning.
 Reinstall VMware Tools
When you’re completely done, click on Restart.
Restart Completely
After the restart, the VMware Tools will be installed successfully without an error. So you can take a taste of full-screen resolution which I like the most.
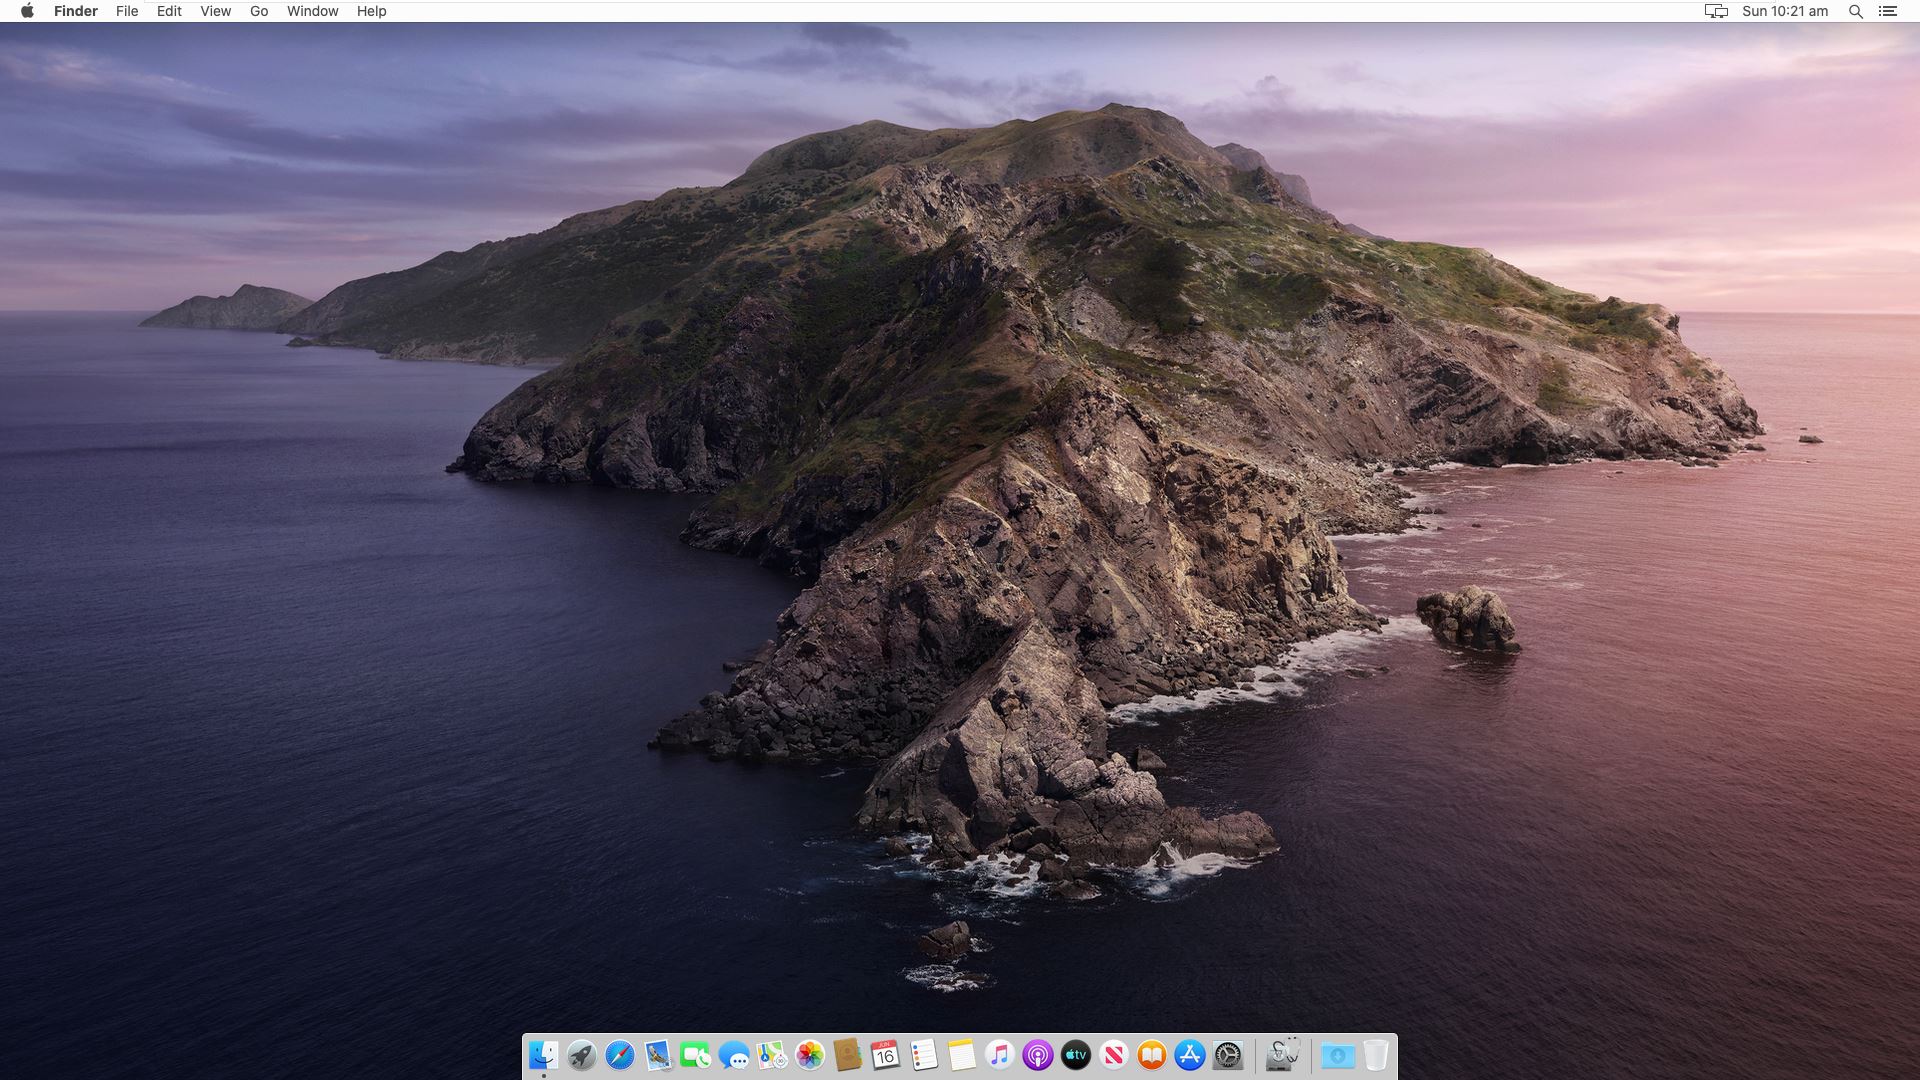 VMware Tools Installed
That’s all to it. If there’s something you’d like to let me know, I’m happy to know it.
Install macOS Monterey On Vmware On Windows Using ISO: Easy Guide
macOS Monterey Download ISO (v12 beta 4) | Direct Links
Fix Network Connection on macOS Monterey on VMware: 5 Step Easy Guide
12 COMMENTS
Thank you @mahmood2395, you deserve a cookie.
Vmware-resolutionSet does the trick. I can change the resolution to any I want but I’m experiencing really slow typing when the resolution is larger than 1024×768. For example on 1024×768 I can smoothly type down my password on login screen. If the resolution goes higher (1280×1024) then typing password on login screen is very slow. No idea why.
So this might work on VMware Workstation… but it doesn’t seem to be working with Catalina on ESXi 6.7
Hi,
When trying Install VMware Tools, the following error message shows: “This operation cannot proceed because your Mac OS guest is using the CD/DVD. Dismiss this message, eject the disc from inside the guest, and retry this operation”.
Please advise.
Thanks
I was able to change the resolution with the VMWare tools but for me it caps out at indicated 2728×1534. I can’t reallly understand why that is. I have reinstalled the VMWare tools multiple times to no avail. With the resolution utility I can set any resolution below that, eg. 1920×1080 but nothing above.
I have checked the VMWare settings multiple times, trying “use host settings” or “specify monitor settings” or “Display scaling” none of which worked…
Can’t be a catalina problem (I think) as it was possible in Virtualbox (which in turn had abysmal performance on my high-ish end system)
Anyone know something else I could try?
In Step 1, there was an error message when selecting “Install VMware Tools” from the menu. It said “Mac OS guest is using the CD/DVD”. Had to right-click on the DVD icon at the top right of the desktop within Catalina, then select Eject.
Now running smoothly at full resolution. Thank you so much for the guides!
thank you very much
I search many method can’t solve problem.your solution is perfect.
i finally found a way to set the desired resolution,
for this you have to open the terminal in path”/Library/Application Support/VMware Tools/”
and run this command “sudo ./vmware-resolutionSet 1920 1080” and the resolution changes
For anyone who can’t get it working with Catalina. Make sure to use the latest VMWare tools which is as of writing 11.0.5
https://my.vmware.com/group/vmware/details?downloadGroup=VMTOOLS1105&productId=742
Mount the darwin.iso and first uninstall the current vmware tools installation. Then reinstall and reboot. Then after a couple of minutes after login vmware-tools-daemon asks for Accessibility permissions. If it doesn’t happen go to Settings > Security & Privacy > Privacy and scroll to Accessibility and unlock the padlock. If vmware-tools-daemon isn’t there in the list on the right hand side add it manually by clicking on the + sign. The path is /Library/Application Support/VMware Tools/vmware-tools-daemon. Then give it permission by clicking the toggle.
Once you’ve done that reboot and the display should have the right resolution. If not click the “Stretch and keep display aspect ratio” button of VMware on and off to see if it snaps to the right resolution
I’ve reinstalled about 10 times with 3 different sources for VMWare Tools, the installation doesn’t seem to be sticking, and when I try to manually uninstalling, nothing is in the Application Support folder for VMWare… Any suggestions?
Hey, I’m going on about my 10th reinstall of my 3rd source for VMWare tools and although the fullscreen works, I’m still locked at 1024×768 res. I tried updating VMWare Workstation Pro to 15.5.1 but that bricked my entire system, so I rolled back to 15.1.0. The VM is running in compatibility for 10.x. Other than the resolution, everything is working fine, but I would love to at least up it to 1920×1080. I have a High Sierra VM that VM Tools works properly on, but for the life of me, cant get it going on Catalina. Any advice?
Источник


