- How to reinstall macOS
- Start up from macOS Recovery
- Apple silicon
- Intel processor
- Reinstall macOS
- Other macOS installation options
- What is “Other” Storage Space on Mac & How to Clear It Up
- How to Check “Other” Storage in Mac OS X
- What Exactly is “Other” Storage on Mac?
- How to Clean Up “Other” Storage on a Mac
- What About “Other” Bloated System Caches, Temp, and System Files?
- Freeing Up Additional Disk Space on Mac
- Other Storage problem on Mac: Here are 7 tricks to free up that space
- Before we start the cleanup
- What is Other on Mac Storage?
- How to check Mac disk space usage
- Where is Other Storage on a Mac
- How to delete Other Storage on Mac
- 1. Remove documents from Other Storage space
- 2. Clean up Other space of the system and temporary files
- Let’s inspect your Library folder
- 3. Delete cache files from the Other data section
- 4. Remove app plugins and extensions from Other storage
- To remove extensions from Safari:
- To remove extensions from Chrome browser:
- To remove extensions from Firefox:
- 5. Clear Other space of disk images and archives
- 6. Get rid of everything else from Other disk space
- 7. Remove application logs and support files
- How much can you expect to delete from Other storage on Mac?
How to reinstall macOS
Use macOS Recovery to reinstall the Mac operating system.
Start up from macOS Recovery
Apple silicon
Turn on your Mac and continue to press and hold the power button until you see the startup options window. Click the gear icon labeled Options, then click Continue.
Intel processor
Make sure that your Mac has a connection to the internet. Then turn on your Mac and immediately press and hold Command (⌘)-R until you see an Apple logo or other image.
If you’re asked to select a user you know the password for, select the user, click Next, then enter their administrator password.
Reinstall macOS
Select Reinstall macOS from the utilities window in macOS Recovery, then click Continue and follow the onscreen instructions.
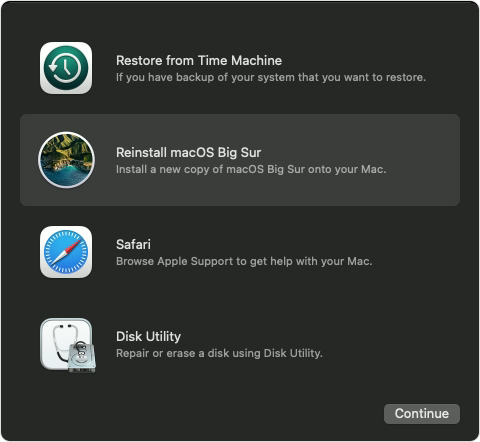
Follow these guidelines during installation:
- If the installer asks to unlock your disk, enter the password you use to log in to your Mac.
- If the installer doesn’t see your disk, or it says that it can’t install on your computer or volume, you might need to erase your disk first.
- If the installer offers you the choice between installing on Macintosh HD or Macintosh HD — Data, choose Macintosh HD.
- Allow installation to complete without putting your Mac to sleep or closing its lid. Your Mac might restart and show a progress bar several times, and the screen might be empty for minutes at a time.
After installation is complete, your Mac might restart to a setup assistant. If you’re selling, trading in, or giving away your Mac, press Command-Q to quit the assistant without completing setup. Then click Shut Down. When the new owner starts up the Mac, they can use their own information to complete setup.
Other macOS installation options
When you install macOS from Recovery, you get the current version of the most recently installed macOS, with some exceptions:
- On an Intel-based Mac: If you use Shift-Option-Command-R during startup, you’re offered the macOS that came with your Mac, or the closest version still available. If you use Option-Command-R during startup, in most cases you’re offered the latest macOS that is compatible with your Mac. Otherwise you’re offered the macOS that came with your Mac, or the closest version still available.
- If the Mac logic board was just replaced, you may be offered only the latest macOS that is compatible with your Mac. If you just erased your entire startup disk, you may be offered only the macOS that came with your Mac, or the closest version still available.
You can also use these methods to install macOS, if the macOS is compatible with your Mac:
- Use the App Store to download and install the latest macOS.
- Use the App Store or a web browser to download and install an earlier macOS.
- Use a USB flash drive or other secondary volume to create a bootable installer.
Источник
What is “Other” Storage Space on Mac & How to Clear It Up

Many Mac users check the About This Mac Storage tab to get a quick overview of their disk space usage, and many will see a rather large “Other” storage space taking up disk capacity on their drives. If this sounds familiar, it’s probably because iOS often has a rather large Other storage space, but that’s largely where the similarities end, and in Mac OS it’s much easier to track down exactly what “Other” is. This is basically because the Mac has a user accessible file system and system directories, where as those corresponding elements in iOS are largely hidden from the user.
Let’s take a moment to check the Storage space on any Mac, and then learn a bit more about the Other space in Mac OS X, what it is, and how you could reduce the size of “Other” storage on a Mac if the computer is running low on available disk space.
How to Check “Other” Storage in Mac OS X
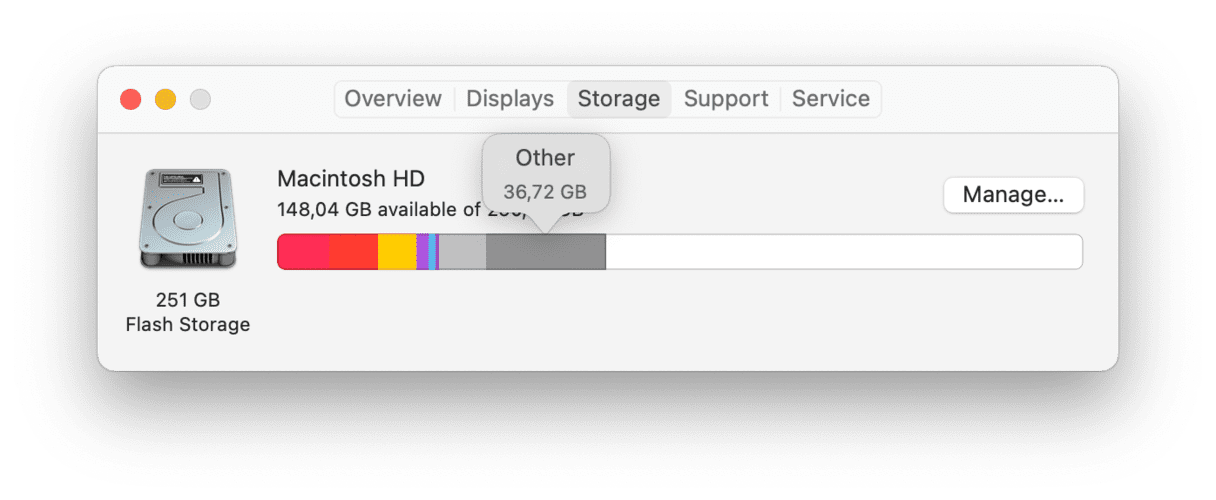
If you’re curious to see how many files and items on a Mac drive are classified by MacOS and Mac OS X as “Other” storage consumed, you can check through the About This Mac window panel:
- Click the Apple menu and choose “About This Mac”
- Look under “Storage” tab to find the Other data on the Mac drive
The Other storage is the blue item in new versions of OS X, and the yellow item in the graph on prior versions of Mac OS X, regardless, Other is visible in any modern version of Mac OS X.
In versions prior to Mac OS X 10.10 you will need to click on “More Info” in the About This Mac screen to see the Storage tab, otherwise everything else is the same.
The size of Other is often quite large in Mac OS X and it varies considerably as you can see in the various screen shots here, but again, this is not something to overly concern yourself with as it could be in the iOS world. Nonetheless, it can be valuable to know what that other stuff is, particularly in the event you are running low on disk space.
What Exactly is “Other” Storage on Mac?
Perhaps Other is taking up a ton of space, so what exactly is that “Other” storage on a Mac? Essentially it’s anything that Mac OS does not allocate to the listed specified storage types of applications, backups, audio, movies, backups, and photos. That means a very broad list of items will be considered as Other, including things like the following:
- Documents and file types, including PDF, doc, PSD, etc
- Archives and disk images, including zips, dmg, iso, etc
- Various types of personal and user data
- Anything in the system folders of Mac OS X, ranging from temporary files, swap, voices, etc
- User library items like Application Support, iCloud files, screen savers, etc
- User caches and system caches, including things like browser caches and locally stored message media files
- Fonts, app accessories, application plugins, and app extensions
- Various file and file types not recognized by Spotlight, for example a virtual machine hard drive, Windows Boot Camp partitions, etc
As you can see, this is not unnecessary junk or clutter. Basically, anything that is not one of the media types that the Storage tab specifies will be shown as “Other”.
This makes the Mac OS X “Other” storage quite a bit different from the same label applied to iOS storage, and while there can be some bloated caches and other junk, the Other storage on a Mac is more likely to make sense. This is often in contrast to the sometimes opaque and peculiar Other storage capacity in iOS, which can be anything from mishandled caches to data that is not being properly removed when apps or media is deleted, or even misallocated labels, if you happen to run into a bloated Other space on your mobile devices, you can typically reclaim and remove the Other iOS storage by deleting bloated apps, their data, and then restoring an iPhone or iPad from a backup as described here.
How to Clean Up “Other” Storage on a Mac
Generally speaking, the Other storage on a Mac is not something to overly concern yourself with unless you’re running low on disk space. If you do want to try and clean up the Other storage capacity in Mac OS, you’ll want to look in the following locations for data and files you no longer need.
/Library/Caches/
User Documents folders
Going further, you can apply some broader techniques to free up disk storage and the Other space. These articles will undoubtedly prove invaluable if you’re attempting to locate large files on a Mac and recover disk capacity on any Mac OS X machine:
As usual with deleting things in Mac OS X, always back up your Mac with Time Machine before getting started, and do not remove items you are not uncertain of.
While system files and caches are included in “Other”, you almost certainly do not want to modify the /System directory or any other root directory or system folder.
What About “Other” Bloated System Caches, Temp, and System Files?
To clear out Mac OS X system level caches, temp files, virtual memory files, sleep images, and other things that could potentially count against Other storage, rebooting the Mac is often sufficient. Do not attempt to modify anything in the system folder unless you’re an expert user who knows exactly what they’re doing and why, you will otherwise almost certainly break something. If you want to, you can also use third party tools like Onyx to clear out caches safely, though it’s rarely necessary.
Finally, do note that Boot Camp partitions of Windows and Linux will also show as Other, and they are not reducible without removing those drives. This is demonstrated with Windows 10 and Mac OS X 10.11 on the same drive with dual booting partitions:
Freeing Up Additional Disk Space on Mac
The “Other” space may be a bit of a mystery at first glance, but sometimes different types of files and data on the Mac is what is causing storage space to disappear. Here are some general tips to free up additional disk space on a Mac:
- Fixing the “Startup disk almost full” error message on a Mac by rooting out space hogging files and conquering drive waste
- Delete old iTunes backups of iPhone & iPad devices – Usually things like local iPhone and iPad backups will be shown as the ‘backups’ list and not under “Other”, but nonetheless removing unwanted iOS backups offer an easy way to recover hard disk space
- Additional easy tips to free up disk space on Mac OS X are here
Have any tricks of your own to free up the Other storage on the Mac or recover disk capacity in MacOS and Mac OS X? Let us know in the comments.
Источник
Other Storage problem on Mac: Here are 7 tricks to free up that space

Before we start the cleanup
Searching for what to delete takes hours. Here at MacPaw we created an app that automatically searches for garbage files on your Mac.

So here’s a tip for you: Download CleanMyMac to quickly regain control of your storage. This app is notarized by Apple on macOS Big Sur. You can even build an interactive map of your drive to find items that waste space. For manual solutions, see our ideas below.
Features described in this article refer to the MacPaw site version of CleanMyMac X.
MacBook storage issue is still a relevant one in 2021. The promised 1 TB of storage — which is the capacity of the MacBook Air 2020 — will still be not enough for many. We generate more and more content on our devices and use apps that are bursting with cache files. This is what creates the cryptic category of “Other” storage on Mac.
On recent macOS versions, this storage category is labeled “other volumes in container.” Which, of course, doesn’t make it any less cryptic. This category contains junk files as well as important ones. That’s why you have to learn to check the storage on Mac properly.
So let’s figure out what Other Storage is and how to remove Other from your Mac.
What is Other on Mac Storage?
Simply, Other storage on Mac consists of files that do not easily fall into the clearer category labels like «Audio.» The types of «Other» files would include:
- Documents like PDF, .psd, .doc, etc.
- macOS system and temporary files.
- Cache files like user cache, browser cache, and system cache.
- Disk images and archives like .zip and .dmg.
- App plugins and extensions.
- Everything else that doesn’t fit into the main macOS categories.

What’s this? A song? An unknown archive? Why on Earth does it weigh 200 MB?
How to check Mac disk space usage
A few years back, Apple introduced “Optimized Storage,” a great feature for finding out how your disk space is structured. This is how to check the storage on Mac.
- Open the Apple menu (top right corner)
- Now, click About this Mac > Storage
Is your disk approaching full capacity? Now, click “Manage.” The sidebar to the left is really enlightening. This is the only place where on your Mac, it shows the size of your apps, books, and documents in gigabytes.
Where is Other Storage on a Mac
To show you where it is, let’s look at your Library. This is where your macOS keeps application components, widgets, and various cache archives. This part of your Mac is hidden from view for a reason. Messing up a few folders here may break your Mac. But let’s take a look:
Click on Finder > Go (in the top menu).
Now paste in:
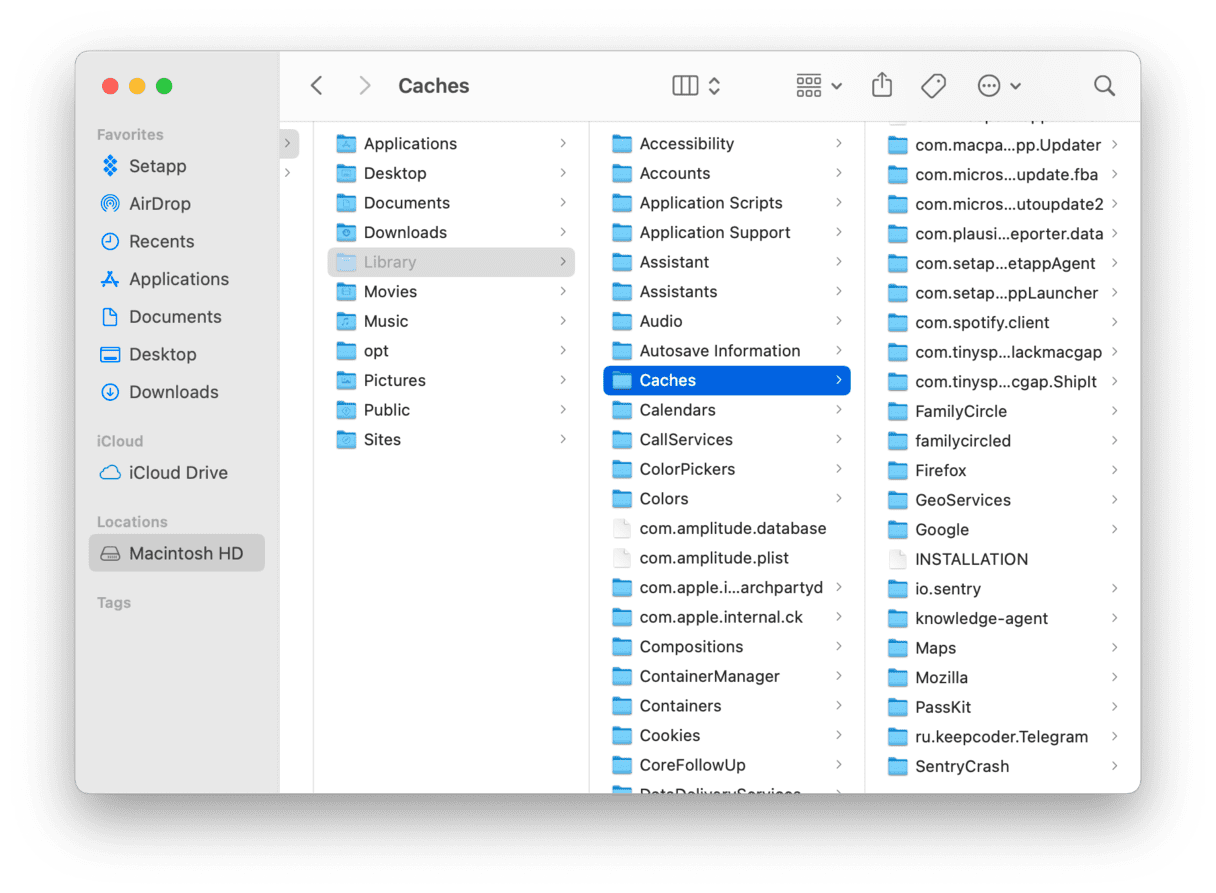
See those small folders? This is where your “Other” storage is. You’ve found it. Now, we’ll see what’s possible to delete.
How to delete Other Storage on Mac
You can’t entirely get rid of Other on Mac, but you can reduce how much storage space it takes up. We’re now going to look at each of the six types of Other files and show you how to clean up your Mac. We’re going to walk you through deleting useless documents, junk system files, system slowing cache files, old backups, and all sorts of other junk.
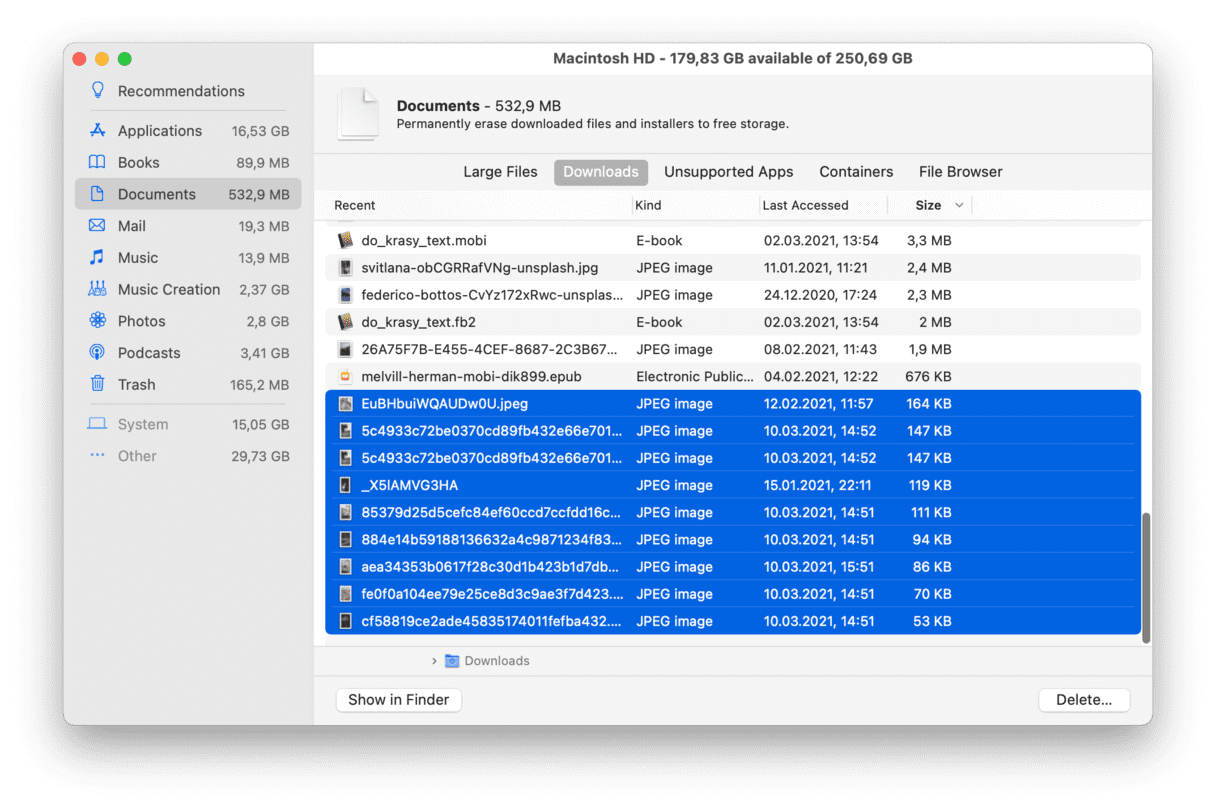
1. Remove documents from Other Storage space
You might not think that pure text documents take up a lot of space, but you may be surprised at the size of some .pages and .csv files. And that’s before you start adding images, downloading ebooks, and creating big presentations. Soon your Other documents can start to get out of hand.
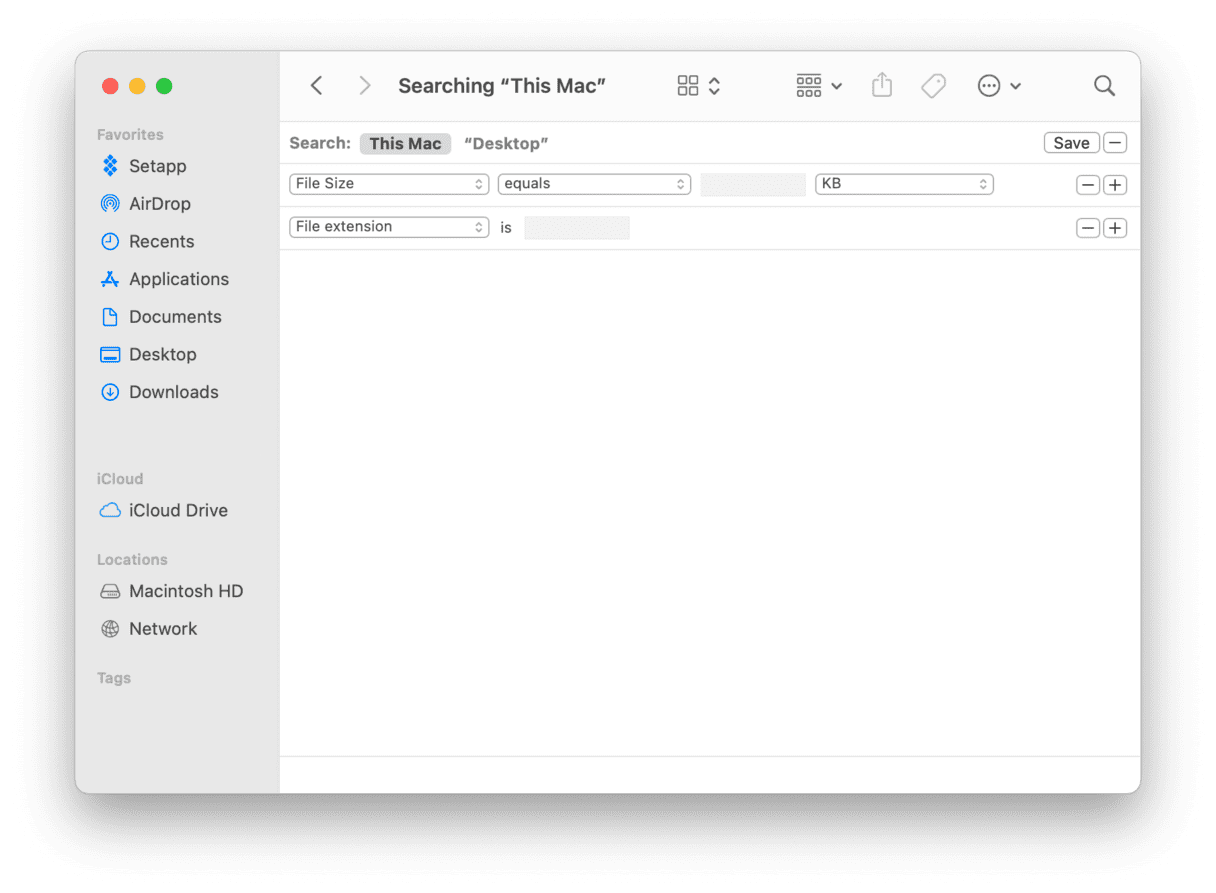
To find and remove large and unneeded documents from Other Storage manually:
- From your desktop, press Command-F.
- Click This Mac.
- Click the first dropdown menu field and select Other.
- From the Search Attributes window, tick File Size and File Extension.
- Now you can input different document file types (.pdf, .pages, etc.) and file sizes to find large documents.
- Review the items and then delete as needed.
Luckily, there’s a much quicker and more thorough way. By using a CleanMyMac X you are presented with a clear view of all the massive files occupying your Other space.
To locate large hidden files in all folders with CleanMyMac:
- Download CleanMyMac X and click the Large & Old Files tab.
- Click the big Scan button to start the search.
- Now, review the results broken down into different categories: archives, documents, movies, etc.
- Look through your files and delete the ones you no longer need.
What’s great about this method is that you can sort the files by their size and thus free up space most effectively. And there’s a special category for Other files that don’t fit into either category. CleanMyMac X also locates .DMG files and archives the Other storage often comprise. These files can be moved to another folder/separate disk or could be removed securely.

Now, try it and see how it helps you slim down Other storage on Mac. Deleting your old files alone can recover you tons of space, but there are more space hoggers that fall under the Other data category.
2. Clean up Other space of the system and temporary files
Every second your Mac is on, the macOS creates and piles up system files — logs, for example. At some point, the system needs these files, but they quickly become outdated and just sit there, wasting your disk space. And guess what, they are in the Other Mac storage category, too.
These files are mostly temporary, but they never actually go away unless you do something about it. The difficulty is that Apple hasn’t made it easy to clear out system files. There’s a good reason for this – people often delete things they shouldn’t.
Let’s inspect your Library folder
To manually find where a majority of apps temporary files live, navigate to
/Users/User/Library/Application Support/ . In this folder, you will find your applications, and some searching will reveal a lot of space being taken up. For example, you may have gigabytes worth of old iOS backups in
You could delete these manually, but a much safer and faster method is to use a specialist cleaning app like CleanMyMac X. It has a System Junk module that specifically looks for useless system files and knows what’s safe to delete.
Here’s how to easily remove system files from Other Storage:
- Go to System Junk in CleanMyMac X.
- Hit Scan.
- Hit Clean.
That’s pretty much it. Seriously. If this is the first time you ever cleaned your Mac, you’ll see that the OS X Other storage tab has shrunk considerably after the system junk cleanup.

Using this method, I also deleted 16.69 GB of «System Junk» from my MacBook.
3. Delete cache files from the Other data section
Cache files are not just another invisible storage hog. They are often one of the worst offenders, often taking up gigabytes of precious space. The three main types of cache are – browser, user, and system. Cache files are meant to help your system work faster, but they get bigger and bigger over time, eventually slowing your system down.
To manually clear cache files on Mac:
- Navigate to Go > Go To Folder.
- Type in
/Library/Caches and click Go.
Follow the same steps for /Library/Caches (without the “
/Library/Logs. Cache files sit in numerous folders, and with a little patience, you can clean them out manually (read more detailed instructions on clearing cache).
4. Remove app plugins and extensions from Other storage
Another cool way to manage storage on Mac.
While apps are, unsurprisingly, categorized as Apps on the Storage bar, their add-ons are under the Other storage category. Compared to some types of files, app plugins and extensions probably won’t take up as much of your Mac’s Other space. Still, every bit counts. Since extensions can sometimes cause other problems on your Mac, why not remove the ones you don’t use to be safe and free up some extra Other storage space at the same time?
Tracking down all your add-ons can be a hassle. Some you’ve forgotten you had (like that nCage extension for Chrome), others you didn’t know of in the first place.
Here’s how to manually remove extensions from Chrome, Firefox, and Safari.
To remove extensions from Safari:
- Open Safari browser.
- Go to the Safari menu and click Preferences.
- Select the Extensions tab.
- Select the extension you want to remove and click “Uninstall.”
To remove extensions from Chrome browser:
- Open Chrome.
- Click the three-dot icon in the top-right corner.
- Click More tools > Extensions.
- Disable or remove as you choose.
To remove extensions from Firefox:
- Open Mozilla Firefox browser.
- Click on the burger menu in the top-right corner.
- Choose Add-ons.
- From the Extensions and Plugins tabs, disable and remove whatever you want.
Important! If you’re not sure what a plugin does, don’t rush to remove it. Try disabling it first and see if your apps and your system work as expected. You can always remove that add-on later. Also, note that Chrome extensions can’t be deleted automatically. But if you’d like to get rid of them, we’ll list these extensions for you and tell you how to do that manually.
![]()
5. Clear Other space of disk images and archives
Normally, archives and images are files you keep for a reason. However, if you think you might have accumulated some useless .zip and .dmg files on your Mac, then you should definitely clear them out as well.
You can find these files using Spotlight search:
- Open Finder.
- Type DMG/ZIP in the search field.
- Select Search: This Mac.
- Sort the results by Size.
Finder will show you all files of the format you’ve specified, sorted by size. You can clean out those you don’t need.
To safely and easily remove all your old unused disk images, CleanMyMac X has a dedicated tool within the System Junk module. Everything is categorized, so you have a better understanding of what you’re removing.
- Go to the System Junk module in CleanMyMac X.
- Click Scan and when it’s done, click Review Details.

Now you get a detailed overview of some ultra-specific categories of files that are normally invisible to you. Among those, you’ll see Unused Disk Images (another name for DMG installations). Then, there’s Old Updates — you would like to remove those too. Old Updates are past versions of update packages that you already got installed.
Do you often use graphic editors like Photoshop or Sketch? Then, you’ll probably be fascinated by the Document Versions feature. If you click on the Document Versions tab (System Junk > Scan > Review Details), you’ll be able to see how much of your space is taken by large document re-edits. Imagine a 60 MB Photoshop file cloned 10 times with just slight differences. In CleanMyMac X, you can delete these intermediate revisions. And, handy enough, the program keeps just the original file and its final revision on the drive.
6. Get rid of everything else from Other disk space
Even Other storage space has its own “other” files, and no, the irony of that statement is not lost on us.
Other storage on Mac can also include:
- Files in your user library (screen savers, for example).
- Files Spotlight search doesn’t recognize.
Typically, they won’t be as big of a share of Other data on your Mac as cache files and other items we’ve cleared out. However, if you’re determined to clean out as much Other Mac storage as possible, here’s how you can delete screensavers:
- Open Finder.
- In the Menu bar, select Go > Go to Folder.
- Type this: /System/Library/Screen Savers/ and click Go.

You’ll see the screen saver files now — they are lightweight, but for the sake of being thorough, you can trash them as well.
As for files, Spotlight doesn’t recognize, they are rare. They could include files like Windows Boot Camp partitions or virtual machine hard drives. If you don’t recall putting anything like that on your Mac, you probably have nothing to look for.
7. Remove application logs and support files
Apps on your Mac generate and store lots of files, which are mainly logs and support files. After you delete the application, those files lay still on your hard drive occupying space and doing nothing. So it’s a good idea to remove those.
- Open Finder.
- Press Command-Shift-G and go to
Look for the folders that have the same name as the app you’ve deleted. You can safely move those to Trash.
Then, go to the following locations to delete other app-related files:
And it’s done! Hopefully, you managed to free up some GBs in the Other storage section.
How much can you expect to delete from Other storage on Mac?
You’ll never remove the Other data section from Mac entirely, nor should you want to. It’s perfectly fine to have space taken up by necessary files, whatever category label they have. What is not okay is valuable storage space being wasted. Having a monthly cleanup can help you remove old, unneeded files and keep your hard drive organized.
Источник


