- Сжатие и распаковка файловых архивов с помощью Терминала на Mac
- Создание сжатого tar-архива
- Распаковка архива tar
- Unzipping Files Using Terminal- Mac Only
- Step 1- Move .zip File to the Desktop
- Step 2- Open Terminal
- Step 3- Change Directory to Desktop
- Step 4- Unzip File
- How to Zip Files in Mac OS X
- How to Make a Zip Archive in Mac OS X
- Extracting Zip Archives
- How to Create a Zip from the Command Line on Mac
- Секреты Терминала. Часть 20: Упаковка и распаковка архивов различных форматов
- GNU Zip
- how to zip a directory with its files using Terminal on Mac
- 2 Answers 2
- Not the answer you’re looking for? Browse other questions tagged terminal zip or ask your own question.
- Related
- Hot Network Questions
- Subscribe to RSS
Сжатие и распаковка файловых архивов с помощью Терминала на Mac
При передаче папок и нескольких файлов между компьютерами может быть полезно сжать их в один архив. Это экономит место, позволяет передавать всего один объект вместо множества объектов и упрощает возобновление передачи, если задача будет по какой-либо причине приостановлена.
В Терминале можно использовать команду GNU tar для сжатия и распаковки файловых архивов. Стандартным расширением файла для сжатого архива tar является .tgz, но иногда имена файлов имеют расширение .tar.gz. Если архив не сжат, его имя оканчивается просто на .tar.
Совет. Создавать и распаковывать архивы легче в Finder (команду tar в Терминале рекомендуется использовать только в том случае, если нужно создать именно архив tar). См. Сжатие и распаковка файлов и папок.
Создание сжатого tar-архива
В приложении «Терминал»  на Mac введите команду tar и нажмите клавишу Return.
Для простого сжатия папки с именем, например LotsOfFiles, можно ввести:
Флаг z указывает на то, что архив сжимается и объединяется в один файл. Этот параметр обычно используется, но он не обязателен.
Если папка имеет большой размер, можно добавить флаг v и следить за процессом сжатия:
Распаковка архива tar
Чтобы распаковать tar-архив на Mac, выполните одно из следующих действий.
В приложении «Терминал» на Mac введите команду tar с флагом x , затем нажмите клавишу Return. Для просмотра сообщений о ходе сжатия также используйте флаг v . Например:
В Finder  на Mac дважды нажмите файл tar.
Источник
Unzipping Files Using Terminal- Mac Only
Terminal is an application that provides provides text-based access to the operating system, in contrast to the mostly graphical nature of the user experience of OS X, by providing a command lined interface to the operating system. It is located in the Utilities folder within the Applications folder. You can also access it by searching for Terminal in OSX’s search function, located in the top right part of the screen within the Finder.
Windows/PC users: Try WinRAR should a workaround be needed to unzip a folder!
Step 1- Move .zip File to the Desktop
Move your desired .zip file to the desktop, it will make it easier to find your .zip file.
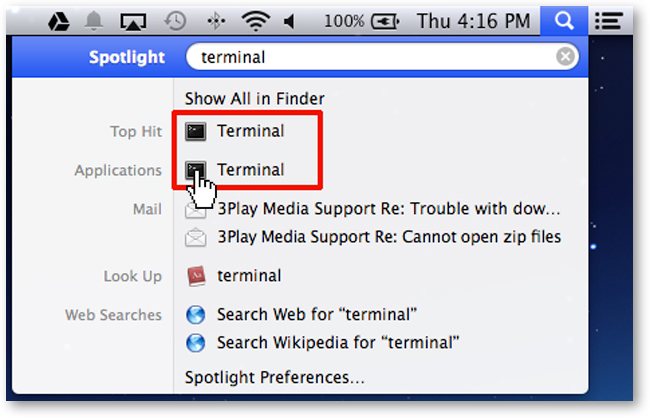
Step 2- Open Terminal
You can either search for Terminal in upper right corner or locate it in the Utilities folder, which is in the Applications folder.

Step 3- Change Directory to Desktop
When you have terminal open, type in the following commands-
Last login: Wed Jan 28 13:47:29 on console
joshuaerickson$ cd desktop
(Commands to type are in BOLD)
This means to Change Directory to Desktop.
Step 4- Unzip File
unzip <name of your zipped file>.zip
Last login: Wed Jan 28 13:47:29 on console
joshuaerickson$ cd desktop
Joshuas-MacBook-Pro-2:desktop joshuaerickson$ unzip test.zip
Terminal will then spit out a few lines of code indicating that your zip file has been unzipped and the files within the folder should now be available on your desktop.
Источник
How to Zip Files in Mac OS X
 Ever wondered how to make a zip file in Mac OS X? We recently demonstrated how to password protect zip archives, but in the comments a reader asked a more simple yet completely valid question: “what about just making a standard zip file?”
Well, making a zip archive on a Mac is easy, and with the compression tools built directly into Mac OS X there is no need to download additional software or add-ons to quickly create zips and compress either a single file, a group of files, or an entire folder. If you’re unfamiliar with creating zips on the Mac, here is exactly how to do it, and quickly.
How to Make a Zip Archive in Mac OS X
You can use this to create zip files of files, folders, or both:
- Locate the items to zip in the Mac Finder (file system)
- Right-click on a file, folder, or files you want to zip
- Select “Compress Items”
- Find the newly created .zip archive in the same directory
If a single file is being zipped, the zip archive will maintain the standard file name but append the .zip extension.
If more than one file is being zipped, the archive will be named “Archive.zip”, and if multiple archives are created, they will be named successively “Archive 2.zip” and so on.
This works in all versions of Mac OS X, and you can access the compress item option from a right-click with a mouse, control-click with keyboard, or two-finger click on a trackpad from the Mac.
Extracting Zip Archives
Opening zip files is even easier, all you need to do is just double-click on the archive and it will expand automatically with Archive Utility in the same folder the archive is stored in.
For example, if you’re extracting an archive named “ZippedSample.zip” in the
/Downloads/ directory, the resulting extracted folder would be named “ZippedSample” within that same
How to Create a Zip from the Command Line on Mac
Not interested in using the standard Finder and file system approach? Zip archives can also be created from the command line by using the terminal command ‘zip’ with the following syntax:
zip archive.zip file.txt
Another simple way to create an archive from the command line is to use the Terminal’s drag & drop support, type out ‘zip’ as usual but then drop in the file(s) to compress into the Terminal window.
Unzipping from the command line is also very simple, with the easy ‘unzip’ command:
You can specify paths and other details if interested, but if all you’re looking to do is extract a file there isn’t much more to do than the simple unzip command.
While it’s good to know the command line alternatives, most users are best served using the friendlier Mac Finder based approaches, either with zipping from the right-click method described above, or unzipping by just opening the file directly.
Источник
Секреты Терминала. Часть 20: Упаковка и распаковка архивов различных форматов
Вот мы и дошли уже до 20-той темы фирменного цикла «Секреты Терминала«. Этот материал мы хотели бы посвятить созданию архивов популярных и не очень форматов, а также извлечению из них файлов. Давайте сразу к делу.
Терминал по умолчанию поддерживает следующие популярные форматы: zip, gzip, bzip и tar.
Если не вдаваться в тонкости, то можно моментально выдать читателям две команды: compress и uncompress. Первая упаковывает, а вторая распаковывает файлы, вот только на выходе мы получает стандартный Unix-овский формат сжатия Lempel Ziv и суффикс Z там, где привыкли видеть более обыденные расширения. Поэтому разумнее использовать описанные выше архиваторы (файл «index.txt» был выбран в качестве примера и может быть заменён на что угодно).
Zip — пожалуй, самый распространённый формат, поэтому рассмотрим его первым. Zip, кстати, единственный, кто не удаляет оригинальные файлы/архивы и работает с несколькими файлами.
Для упаковки одного файла:
zip index.zip index.txt
Для упаковки нескольких файлов:
zip index.zip index1.txt index2.txt index3.txt
GNU Zip
Упаковка GNU Zip (оригинальный файл удаляется, создаётся архив с суффикcом .gz):
Распаковка (здесь удаляется уже распакованный архив):
Упаковка BZip аналогична (оригинальный файл удаляется, создаётся архив с суффикcом .bz2):
Распаковка BZip (здесь удаляется уже распакованный архив):
Остался tar. Tar предназначен для архивации не только файлов, но и целых директорий, чтобы потом, например, сохранить их в качестве бэкапа или отправить по почте. Этот метод благополучно работает с GNU Zip, BZip и Zip. Родное расширение .TAR обычно не используется и в ход идёт тройка тех самых архиваторов. Команда для упаковки (GNU Zip):
tar -czvf Hello.tar.gz /Users/Wandarnem/Desktop/ololo
После нажатия «Enter» папка, находящаяся по адресу «/Users/Wandarnem/Desktop/ololo» сожмётся в архив «Hello.tar.gz». «-czvf» — дежурная комбинация, служащая для вывода дополнительных атрибутов команды. Она будет меняться в зависимости от типа выбранного архиватора:
- GNU Zip — «-czvf«
- BZip — «-cjvf«
- Zip — «-cZvf«
Само собой, суффикс «.gz» сменится на «.bz2» и «.Z» соответственно.
Для распаковки воспользуйтесь соответствующими командами (для GNU Zip, BZip и Zip соответственно):
tar -xfvf Hello.tar.bz2
tar -xZvf Hello.tar.Z
А ещё возьмите на заметку полезнейшую фишку tar’а по упаковке файлов определённого формата в конкретной директории. Например, если вам нужно сжать только изображения расширения .JPG, введите следующее:
Источник
how to zip a directory with its files using Terminal on Mac
i am trying to zip a folder with files in terminal using
zip -r myzipfile.zip myDir
but this doesn’t include the files What should i do ?
2 Answers 2
You can just use *; there is no need for .. File extensions are not special on Unix. * matches zero or more characters—including a dot. So it matches foo.png, because that’s zero or more characters (seven, to be exact).
Note that * by default doesn’t match files beginning with a dot (neither does .). This is often what you want. If not, in bash, if you shopt -s dotglob it will (but will still exclude . and ..). Other shells have different ways (or none at all) of including dotfiles.
You can use two commands: zip or ditto.
Using the zip command:
or using the ditto command:

Not the answer you’re looking for? Browse other questions tagged terminal zip or ask your own question.
Related
Hot Network Questions
Subscribe to RSS
To subscribe to this RSS feed, copy and paste this URL into your RSS reader.
site design / logo © 2021 Stack Exchange Inc; user contributions licensed under cc by-sa. rev 2021.10.8.40416
By clicking “Accept all cookies”, you agree Stack Exchange can store cookies on your device and disclose information in accordance with our Cookie Policy.
Источник


