- How to reinstall macOS
- Start up from macOS Recovery
- Apple silicon
- Intel processor
- Reinstall macOS
- Other macOS installation options
- Restart your Mac in macOS or Windows
- How to start up in macOS from Windows
- How to start up in Windows from macOS
- Learn more
- Revive or restore a Mac with Apple silicon with Apple Configurator 2
- What a revive does
- What a restore does
- Requirements
- Revive or restore processes
- Step 1: Set up the Mac with Apple Configurator 2 and connect the USB-C cable
- Step 2: Prepare the Mac mini
- Step 2: Prepare the Apple notebook computer
- Step 3: Revive the firmware and install the latest recoveryOS
- Step 3: Restore the firmware, erase all data and reinstall the latest version of recoveryOS and macOS
- Restore your Mac from a backup
- Use Migration Assistant
How to reinstall macOS
Use macOS Recovery to reinstall the Mac operating system.
Start up from macOS Recovery
Apple silicon
Turn on your Mac and continue to press and hold the power button until you see the startup options window. Click the gear icon labeled Options, then click Continue.
Intel processor
Make sure that your Mac has a connection to the internet. Then turn on your Mac and immediately press and hold Command (⌘)-R until you see an Apple logo or other image.
If you’re asked to select a user you know the password for, select the user, click Next, then enter their administrator password.
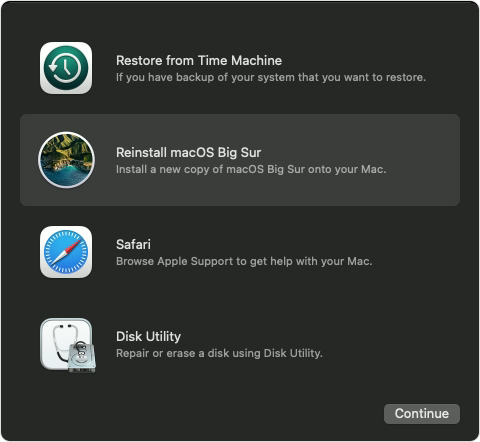
Reinstall macOS
Select Reinstall macOS from the utilities window in macOS Recovery, then click Continue and follow the onscreen instructions.
Follow these guidelines during installation:
- If the installer asks to unlock your disk, enter the password you use to log in to your Mac.
- If the installer doesn’t see your disk, or it says that it can’t install on your computer or volume, you might need to erase your disk first.
- If the installer offers you the choice between installing on Macintosh HD or Macintosh HD — Data, choose Macintosh HD.
- Allow installation to complete without putting your Mac to sleep or closing its lid. Your Mac might restart and show a progress bar several times, and the screen might be empty for minutes at a time.
After installation is complete, your Mac might restart to a setup assistant. If you’re selling, trading in, or giving away your Mac, press Command-Q to quit the assistant without completing setup. Then click Shut Down. When the new owner starts up the Mac, they can use their own information to complete setup.
Other macOS installation options
When you install macOS from Recovery, you get the current version of the most recently installed macOS, with some exceptions:
- On an Intel-based Mac: If you use Shift-Option-Command-R during startup, you’re offered the macOS that came with your Mac, or the closest version still available. If you use Option-Command-R during startup, in most cases you’re offered the latest macOS that is compatible with your Mac. Otherwise you’re offered the macOS that came with your Mac, or the closest version still available.
- If the Mac logic board was just replaced, you may be offered only the latest macOS that is compatible with your Mac. If you just erased your entire startup disk, you may be offered only the macOS that came with your Mac, or the closest version still available.
You can also use these methods to install macOS, if the macOS is compatible with your Mac:
- Use the App Store to download and install the latest macOS.
- Use the App Store or a web browser to download and install an earlier macOS.
- Use a USB flash drive or other secondary volume to create a bootable installer.
Restart your Mac in macOS or Windows
After installing Microsoft Windows on your Mac, you can choose whether your Mac starts up in macOS or Windows.
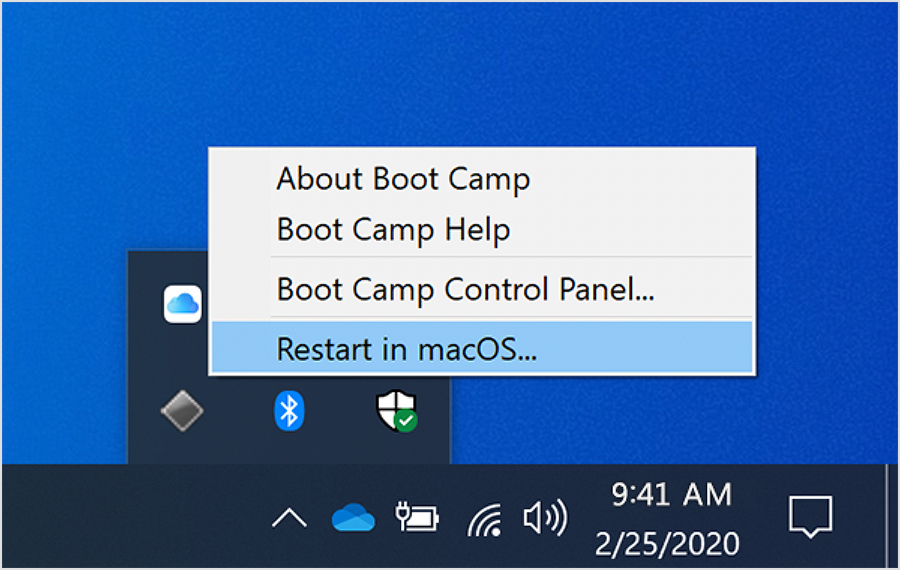
How to start up in macOS from Windows
- From the notification area on the right side of the Windows taskbar, click to show hidden icons.
- Click the Boot Camp icon .
- From the menu shown, choose Restart in macOS.
If you haven’t installed the latest Boot Camp updates, you might get the message ”Could not locate the OS X boot volume.»
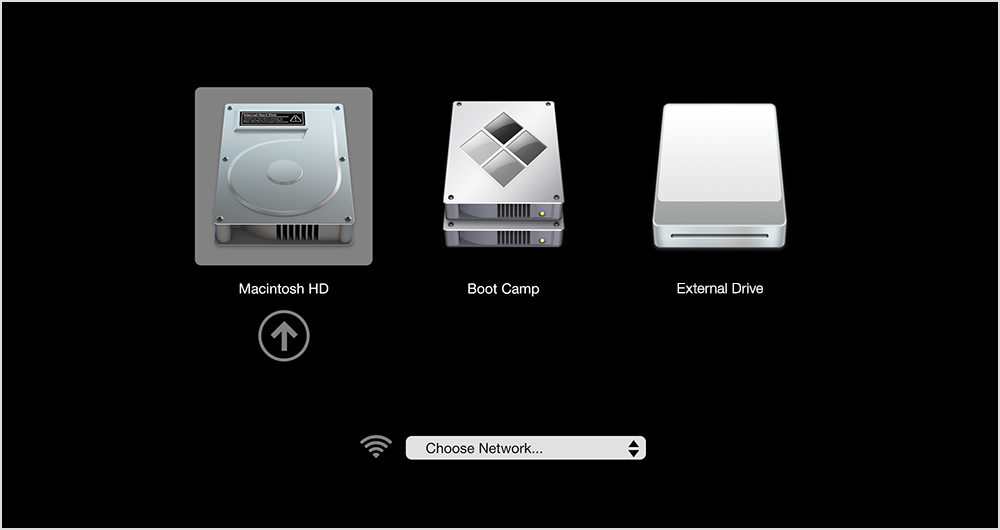
Or use Startup Manager as your Mac starts up:
- Restart your Mac from the Start menu in Windows.
- Press and hold the Option (or Alt) ⌥ key as your Mac begins to restart.
- Select your Mac startup volume (Macintosh HD) in the Startup Manager window, then press Return or click the up arrow:
How to start up in Windows from macOS
- Use Startup Manager to choose your Windows (Boot Camp) volume during startup.
- Or select your Boot Camp volume in Startup Disk preferences, then restart.
Learn more
- If you’re having difficulty using VoiceOver or another screen reader to complete these steps, please contact Apple Support.
- Learn how to install Windows 10 on your Mac.
Information about products not manufactured by Apple, or independent websites not controlled or tested by Apple, is provided without recommendation or endorsement. Apple assumes no responsibility with regard to the selection, performance, or use of third-party websites or products. Apple makes no representations regarding third-party website accuracy or reliability. Contact the vendor for additional information.
Revive or restore a Mac with Apple silicon with Apple Configurator 2
What a revive does
In very rare circumstances, such as a power failure during a macOS upgrade, a Mac may become unresponsive and so the firmware must be revived. A revive updates the firmware and updates recoveryOS to the latest version. A revive is designed to not make any changes to the startup volume, the user’s data volume, or any other volumes.
What a restore does
You must restore the firmware and erase the internal flash storage if:
You can’t start the Mac from the startup volume or the recoveryOS
Reviving the firmware is unsuccessful
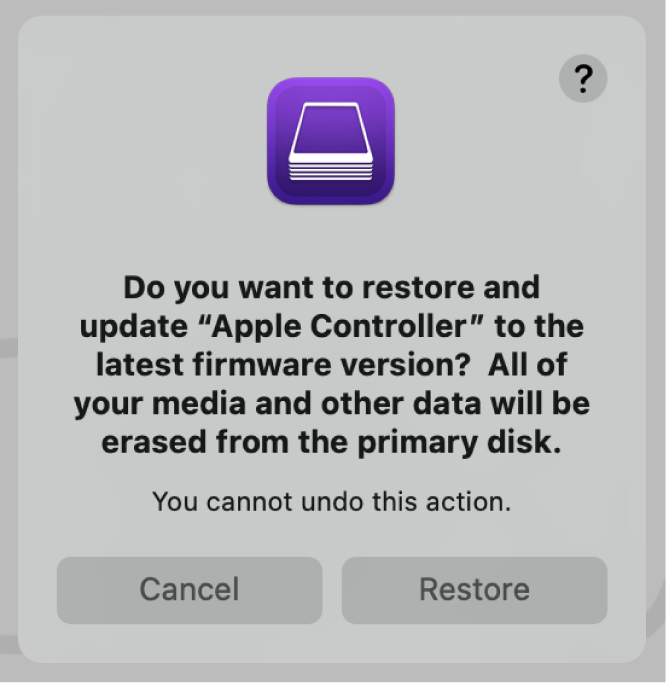
WARNING: Back up your data before you restore your Mac. When you restore a Mac, you are restoring the firmware, updating recoveryOS to the latest version, and erasing and installing the latest version of macOS on your internal storage. When this process is complete, any data on any internal volumes is unrecoverable.
This task covers the following Mac computers with Apple silicon:
Mac mini (M1, 2020)
MacBook Pro (13-inch, M1, 2020)
MacBook Air (M1, 2020)
Requirements
To perform this process, you must have:
The latest version of Apple Configurator 2 installed on a Mac and have internet access
You may need to configure your web proxy or firewall ports to allow all network traffic from Apple devices to Apple’s network 17.0.0.0/8. For more information on the ports used by Apple products, see the Apple Support article Use Apple products on enterprise networks.
A supported USB-C to USB-C charge cable, such as the one sold by Apple (may not be available in all countries or regions)
A supported USB-A to USB-C cable
The USB-C cable must support both power and data. Thunderbolt 3 cables aren’t supported.
Revive or restore processes
The revive or restore processes involve the following steps:
1. Launching Apple Configurator 2 on the second Mac and connecting the Mac computers
2. Restarting the Mac using a special key sequence
3. Using Apple Configurator 2 to do one of the following:
Revive the firmware and reinstall the latest version of recoveryOS.
Restore the firmware, erase all data, and reinstall the latest version of recoveryOS and macOS.
Step 1: Set up the Mac with Apple Configurator 2 and connect the USB-C cable
You have the latest version of Apple Configurator 2 installed
The Mac is plugged into a power source
You can connect to the internet
Plug in (along with any adapters needed) the USB-C cable.
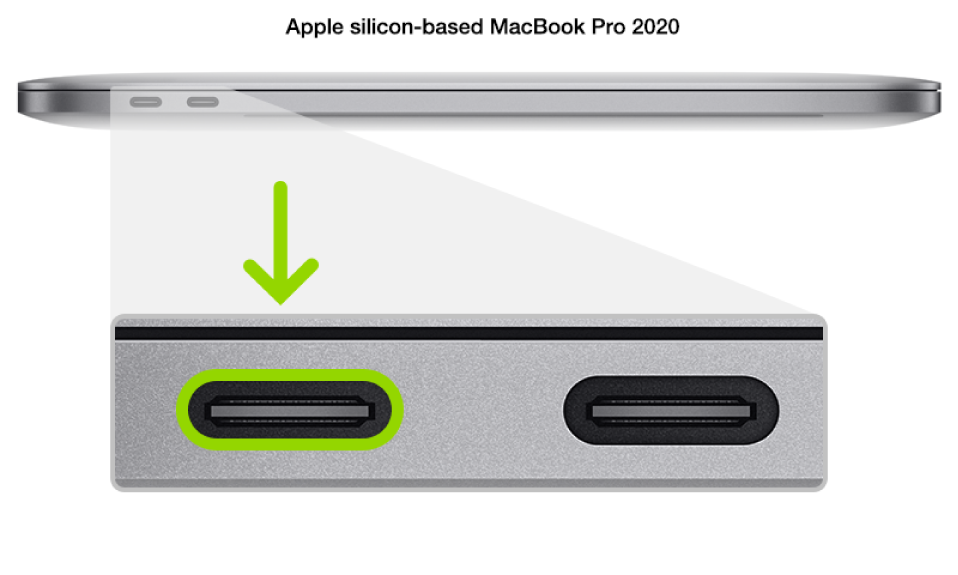
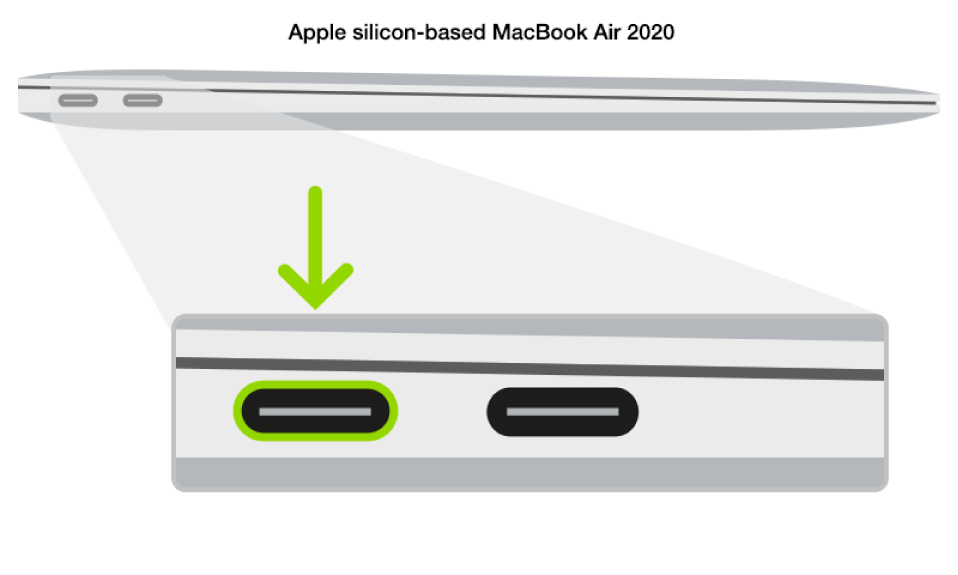
Launch Apple Configurator 2  .
.
Step 2: Prepare the Mac mini
Plug in a monitor so you can see when the process is complete.
Disconnect the Mac mini from power for at least 10 seconds.
Press and hold the power button.
Reconnect power while still holding the power button.
Release the power button.
The status indicator light should be amber in color.
Note: You won’t see any screen activity from the Mac mini .
Step 2: Prepare the Apple notebook computer
Press the power button.
While holding down the power button, at the same time press all three of the following keys for about 10 seconds:
The right Shift key
The left Option key
The left Control key
After 10 seconds, immediately release the three keys but continue to hold down the power button until it appears in Apple Configurator 2 .
Note: You won’t see any screen activity from the Apple notebook computer.
Step 3: Revive the firmware and install the latest recoveryOS
In the Apple Configurator 2 device window, select the Mac whose chip firmware you want to revive and whose recoveryOS you want updated to the latest version.
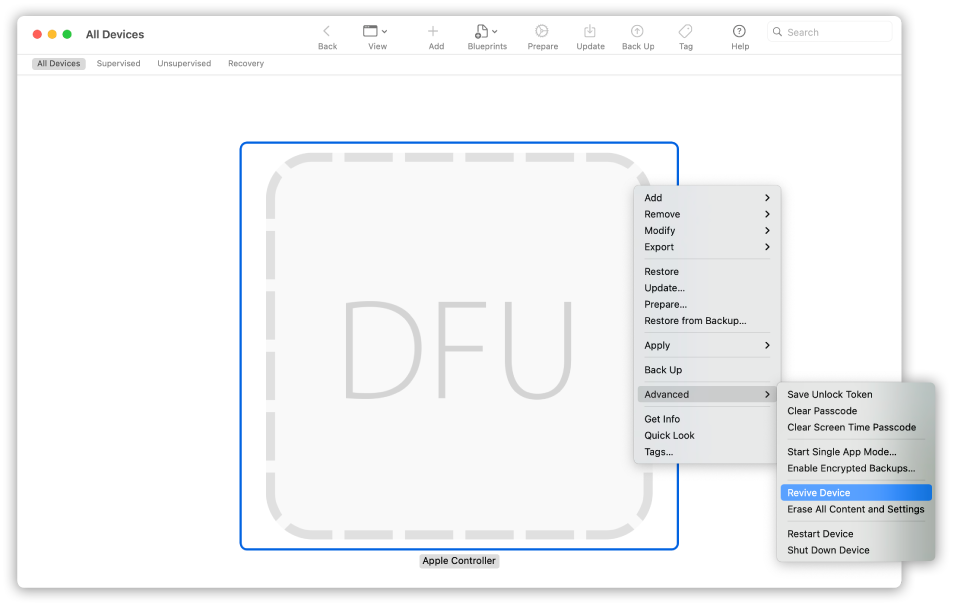
Do one of the following:
Choose Actions > Advanced > Revive Device, then click Revive.
Control-click the selected device, then choose Advanced > Revive Device, then click Revive.
Note: If you lose power to either Mac during this process, begin the revive process again.
Wait for the process to complete. During this process, an Apple logo will appear and disappear.
After the process completes, your Mac will reboot.
Important: When you revive the firmware, you must verify that the process was successful because Apple Configurator 2 may not alert you.
Quit Apple Configurator 2 , then unplug any adapters and cables.
Step 3: Restore the firmware, erase all data and reinstall the latest version of recoveryOS and macOS
In the Apple Configurator 2 device window, select the Mac to be restored.
Do one of the following:
Choose Actions > Restore, then click Restore.
Control-click the selected device, then choose Actions > Restore, then click Restore.
Note: If you lose power to either Mac during this process, begin the restore process again.
Wait for the process to complete. During this process, an Apple logo will appear and disappear.
After the process completes, your Mac will restart.
Important: When you restore the Mac, you must verify that the process was successful because Apple Configurator 2 may not alert you.
If the process was successful, you’re presented with the macOS Setup Assistant.
Quit Apple Configurator 2 and unplug any adapters and cables.
Restore your Mac from a backup
Use Migration Assistant to transfer files from your Time Machine backup to your Mac.
If you made a Time Machine backup of your Mac, Migration Assistant can use that backup to restore your personal files, including apps and everything in your user account.
If you prefer to restore just a few files or earlier versions of those files, learn how to use Time Machine to restore specific files.
Use Migration Assistant
- If you need to reinstall macOS, do that before continuing. For example, if your Mac starts up to a flashing question mark, you need to first reinstall macOS.
- Make sure that your Time Machine backup disk is connected to your Mac and turned on.
- Open Migration Assistant on your Mac. It’s in the Utilities folder of your Applications folder.
If your Mac starts up to a setup assistant, which asks for details like your country and network, continue to the next step, because the setup assistant includes a migration assistant. - When asked how you want to transfer your information, select the option to transfer from a Mac, Time Machine backup, or startup disk. Then click Continue.
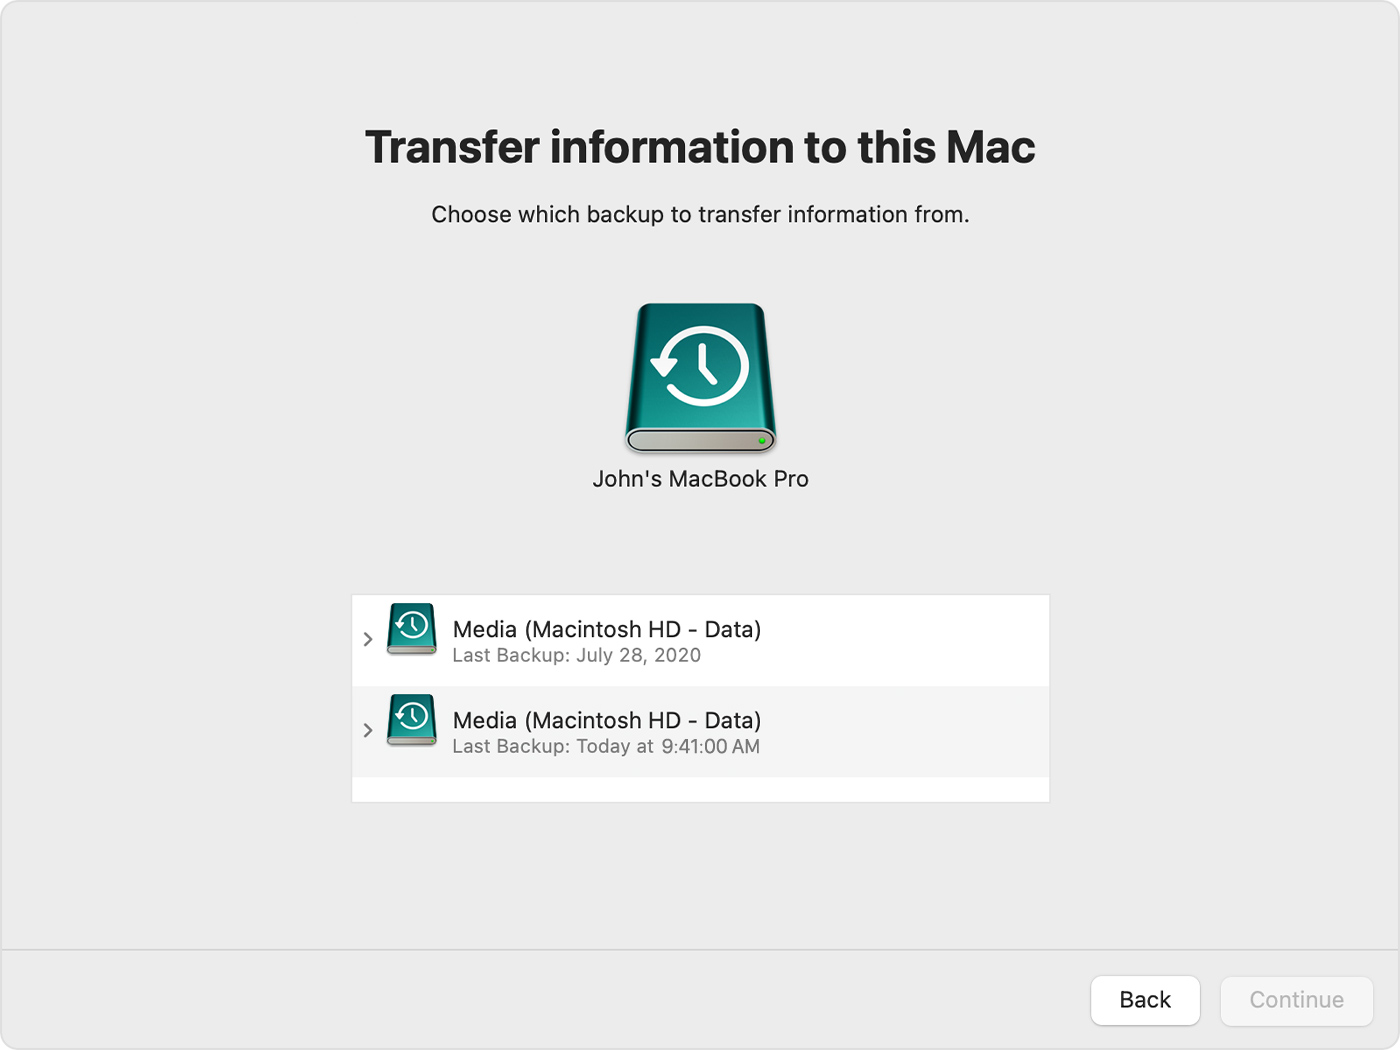
- Select your Time Machine backup, then click Continue.
- Choose a backup and click Continue.
- Select the information to transfer.
In this example, John Appleseed is a macOS user account. If it has the same name as an account already on your Mac, you’re prompted to either rename the old account or replace the one on your Mac. If you rename, the old account will appear as a separate user on your Mac, with a separate home folder and login. If you replace, the old account will delete and then replace the account on your Mac, including everything in its home folder. ![]()


