- Fix macOS Catalina Stuck on Apple Logo When Installing on VMware
- Fix macOS Catalina Stuck on Apple Logo When Installing on VMware
- Change Guest OS To Windows 10 x64
- Fix macOS Catalina Stuck on Apple Logo on VMware Fusion
- MacBook Pro/Air or iMac Stuck on Login Screen
- #Tip 1: Create a New User Account in Single User Mode
- #Tip 2: Reset your Mac’s SMC and PRAM
- #Tip 3: Press Shift Button When Log in
- #Tip 4: Boot In Safe Mode
- #Tip 5: Delete Razer Plugin
- #Tip 6: Rename Plist Files
- #Tip 7: Reinstall macOS
- #Tip 8: Erase and Reinstall macOS
- How To Fix A Mac Stuck On Apple Logo At Startup
- Perform a Complete Shut Down
- Boot to Safe Mode aka Safe Boot
- Reset NVRAM and SMC
- Boot to Verbose Mode
- Boot to Recovery Mode
- Boot To Internet Recovery
- Final Thoughts
Fix macOS Catalina Stuck on Apple Logo When Installing on VMware

In this post, I’ll show how to fix macOS Catalina Stuck on Apple Logo when installing. Every installation requires some files and besides that, it also requires some necessary steps to take. Once it’s there, you can start the installation process through the step by step particularly those who are new. Going through steps even carefully will take you to a minor or small problem. Here’s how to Fix macOS Catalina Stuck Apple Logo when installing on VMware.
Now every installation differs and that’s how every problem differs from each other. Now what happens is, you would probably look into and take a few steps back to identify what’s wrong. But even with thorough look, you wouldn’t detect any problem. It’s a common thing that happens with most new users and even old users. The same happened, happens and will be happening with the users who are trying to install macOS or other operating systems from our tutorials or other.
The same is the case here. If you’ve tried to install macOS Catalina, install macOS Mojave or other versions on VMware, you might have encountered with macOS Catalina Stuck on Apple Logo. As every problem differs from each other, we’ve done the previous problems, we’ll put the links below. If you’ve encountered one of those problem which is from the links below, simply click the link and start fixing it. Other than those, if you’ve encounter macOS Catalina Stuck on Apple Logo when installing on VMware, you may continue reading and we’ll show how to fix it in a moment.
Table of Contents
Fix macOS Catalina Stuck on Apple Logo When Installing on VMware
When installing macOS Catalina on VMware, we need some required files such as macOS Catalina ISO or macOS Catalina VMDK. Second, we need VMware Workstation, and third, we need Unlocker for VMware Patch Tool. The files are easy to get so once they are with you, you can install macOS Catalina on VMware. But that isn’t as easy as it seems like. From the steps, it looks pretty easy but when it comes in actual, it makes users struggle. Meanwhile the process, we need to change the OS to Windows instead of macOS which most users forget. Most commonly users encounter one of the common and similar problems we’ve already made the fix. The list is below. In this post, I’ll show how to fix macOS Catalina Stuck on Apple Logo when installing on VMware.
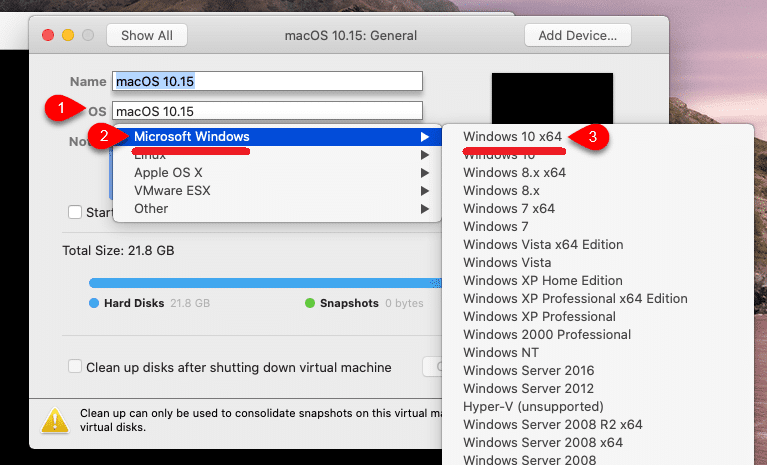
Change Guest OS To Windows 10 x64
Whatever the cause of the problem, the fix is probably with us. The first and most effective solution to this problem is changing the Guest OS to Windows x64 bit. As most users forget about this, they can’t realize what they are lacking so in this case, we’ll check and we suspect the problem is due to this and it can be solved with this trick. Go ahead and fix it.
It’s worth knowing that this method also works for fixing macOS Catalina and other versions stuck on the Apple logo on VMware Workstation and VMware Fusion.
First off, switch off the machine from VMware Workstation or VMware Fusion.
From the top, click on the close button and select Shut down the Machine.
 Shut Down
When the machine is off completely, click on the edit virtual machine settings.
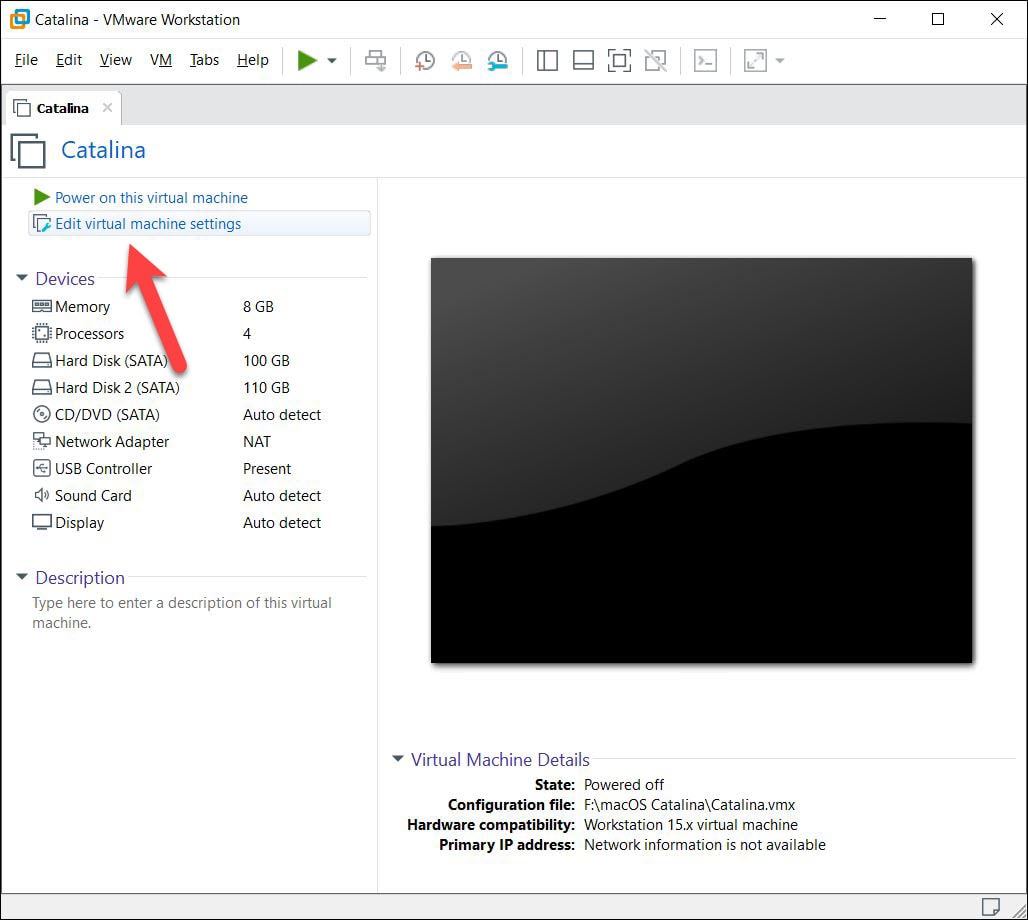
Edit Virtual Machine Settings
In this step, head over to the options tab and select Microsoft Windows in the Guest OS section and then select Windows x64 bit for the version and at last click on OK. If it’s already on Microsoft Windows 10 x64 then change it back to Apple MacOSX 10.15.
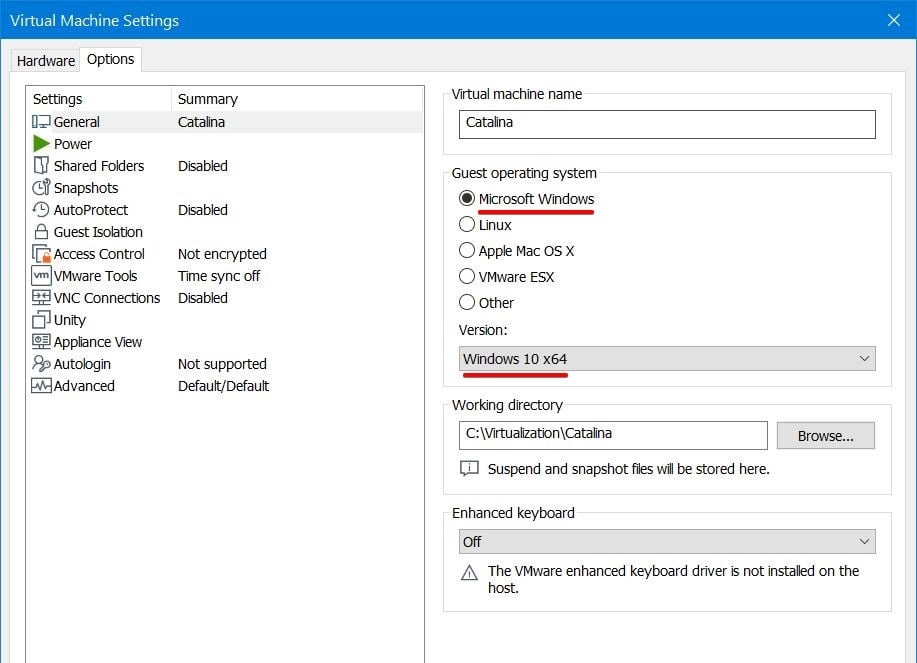 Set Up Virtual Machine Settings
So that’s done now. Start the machine from the switch button and it will continue installation.
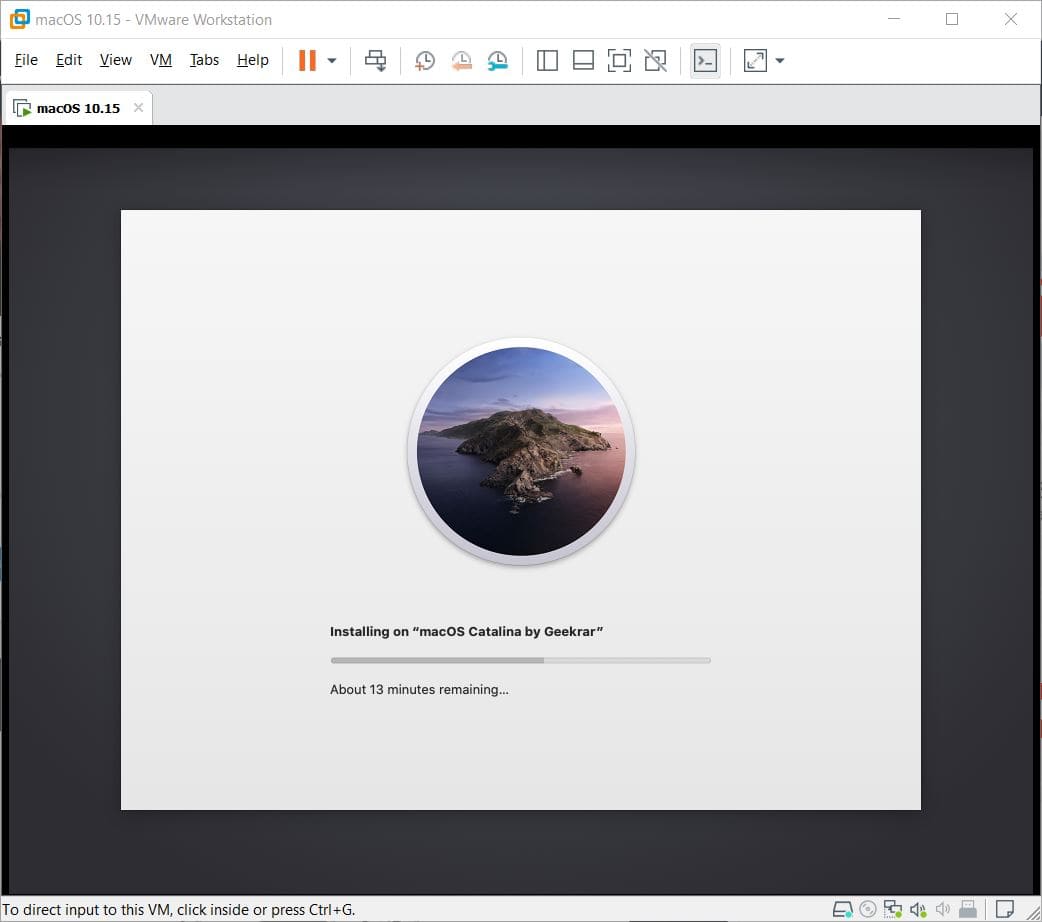
macOS Catalina Installing
Fix macOS Catalina Stuck on Apple Logo on VMware Fusion
Similar to VMware Workstation, VMware Fusion has also the options to change the OS even it’s easier than that. We’ll instructe to the fix.
To power off the machine, click on Virtual Machine from the top and select Shut Down.
Once the machine is off, click on the settings icon.
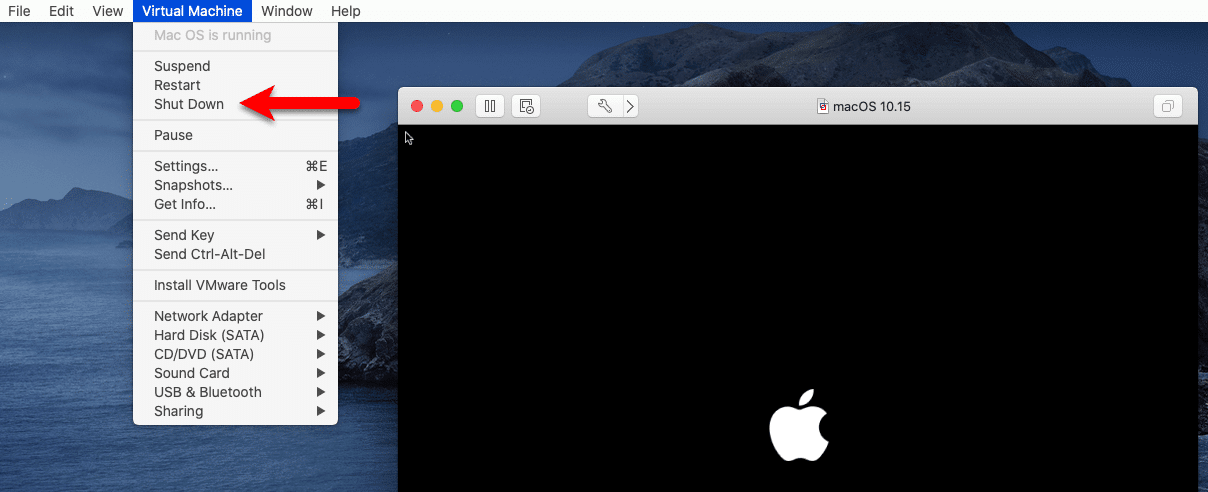
Shut Down Machine
On the settings window, from the General section, change the Guest OS to Microsoft Windows x64 bit. If you see it’s on Microsoft Windows 10 x64 beforehand, change it to MacOS X 64-bit.
Fix macOS Catalina Stuck on Apple Logo When Installing on VMware
With that done, you’re on the right track. Simply switch on the machine and start with the installation like following the track. Follow the steps that we’ve provided and you’ll reach to your destination soon. That’s a little to no gap between you and your destination.
Track these steps and when you’re done, let us know in the comments down below. In between, if there’s some problem, you can definitely let us know and we’ll try our best to help you.
MacBook Pro/Air or iMac Stuck on Login Screen
Recently, some Apple users have reported that they CANNOT log in their MacBooks and the screen is just stuck on the login screen and the loading bar freezes. After entering the password, the MacBook or iMac is just stuck on the loading screen or goes back to the login screen, which usually appears after installing newly released macOS Mojave. Here I provide 8 troubleshooting tips for you to log in your MacBook. You should try each, one at a time, then test to see if the problem is fixed before going on to the next. Be sure to backup your files before proceeding if possible.

Recommendations:
#Tip 1: Create a New User Account in Single User Mode
If you have previously created a spare Admin account for accidents, then it’s time to try it. If you haven’t, you have to follow the below steps to create a new one since you are locked out.
Step 1: Turn off your Mac if it’s not. Press and hold [Command]+[S] to enter Single User Mode after tapping the power button.
Step 2: After lines of codes scroll up, a command prompt will appear with a line: :/ root#
Step 3: This step helps you to access your files in your Mac: Type or copy the below line into the prompt and hit [Enter]: /sbin/mount -uw /
Step 4: This step will remove a file so that your Mac will think it’s your first time to log in: Type or copy the below line into the prompt and hit [Enter]: rm /var/db/.applesetupdone
Step 5: Type in: Reboot and tap [Enter]. Then you can create a new account just like the first time you start your MacBook.

#Tip 2: Reset your Mac’s SMC and PRAM
This tip helps your MacBook Pro/Air to reset its settings and parameters so you may log in under the original settings. Learn more: How to Reset the PRAM & SMC on Your Mac.
#Tip 3: Press Shift Button When Log in
This method can bypass any login item in your user profile.
- Start your MacBook normally.
- On the Login page, enter your password, but DON’T click on Log in immediately.
- Press and hold the SHIFT key, and then, click on the Login button.
#Tip 4: Boot In Safe Mode
Safe mode is designed to protect MacBook’s starting from third-party files and apps. It will automatically check your starting disk and even repair directory issues if needed. Meanwhile, it can block the automatic running of startup items which may affect login process and only load required kernel extensions. Therefore it might help you isolate the cause which makes your MacBook stuck on login page. The method of prompting safe mode is shown below:
- Make sure your MacBook Air is off.
- Press the power button and immediately press & hold [Shift] button until the Apple logo appears on the screen.
- Release the key when you see the login window. You may be asked to log in twice if startup disk is encrypted with FileVault.

#Tip 5: Delete Razer Plugin
Some users find they can enter into their MacBook Pro/Air successfully after deleting razor plugin. You can try this method too.
- Hold down [Command]+[R] while booting to enter into Recovery mode.
- Start a Utilities>Terminal
- Go to /Volumes/Macintosh HD/Library/Audio/Plug-Ins/HAL/ and remove every Razer Plugin.

#Tip 6: Rename Plist Files
Boot computer in safe mode(Refer to Tip 4), and log in using the problematic account.
- Open Finder, click Go in menu bar, press option to choose Library.
- Launch Terminal. Type in sudo mv , and drag the Preferences folder from Library folder to terminal window.
- Change the Preference folder to a different name and/or directory, for example: sudo mv /Users/yourname/Library/Preferences /Users/yourname/Documents/Preferences-Old
- Reboot.

#Tip 7: Reinstall macOS
- Hold down [Command]+[R] while booting
- After seeing Utility Menu, Select Reinstall OS X(X is the version code).
- Click on the [Continue] button.

#Tip 8: Erase and Reinstall macOS
This method adds a step to erase macOS compared to Tip 7.
- Put the Mac into Recovery Mode: Press [Command]+[R] while the Mac is booting.
- Click Disk Utility > [Continue] button.
- Click on the Erase icon, set the Format type to Mac OS Extended(Journaled.). And click Apply.
- Then you can go back to Utility menu and click Reinstall OS X.
How To Fix A Mac Stuck On Apple Logo At Startup
If you’ve found this article, it is probably because your Mac won’t boot up and is stuck at the Apple Logo screen with the loading/progress bar and never goes any farther. Luckily, there are a few steps you can try yourself before making an appointment at the Apple Genius Bar. There are a few reasons why your Mac might get stuck on the Apple logo screen during startup, so it’ll take some patience to try each of these troubleshooting steps to determine which one will fix your issue. If you’ve recently done a macOS upgrade, the upgrade may not have completed successfully. There could be third party kernel extensions (kext’s) or drivers that aren’t compatible. It could also be related to file system corruption or low disk space.
Perform a Complete Shut Down
The first step is to perform a full shut down of your Mac and disconnect all external devices. Hold down the power button for 10-15 seconds to fully shutdown your Mac. Disconnect all external devices such as USB drives, printers, docks, etc. If you’re not using a Macbook, you can keep your keyboard and mouse plugged in. Now power on your Mac and if it starts successfully then it is one of your peripheral devices. You can plug them back in one-by-one and restart until you find the culprit.
Boot to Safe Mode aka Safe Boot
Similar to Windows, macOS has a Safe Boot mode which will actually attempt to fix issues while starting. You can boot to Safe Boot by holding down the Shift key while pressing the power button. The startup process may take a little longer than usual, so be patient. Depending on your issue, your Mac could get stuck at the Apple Logo while booting to Safe Mode. If that’s the case, move on to the next troubleshooting step. If you’re able to get into Safe Boot, check your free disk space, try updating all software and drivers, and try the steps below to remove all third party kernel extensions.
Reset NVRAM and SMC
Next, you can try to Reset the Mac NVRAM and SMC by following this guide. NVRAM is non-volatile random-access memory which stores information such as Speaker volume, Screen resolution, Startup disk selection, and Recent kernel panic information. The SMC is the System Management Controller which is how the Mac interfaces with some of the hardware components.
Boot to Verbose Mode
To see what’s going on in the background during the boot process, you can try to boot using Verbose Mode by powering on your Mac and holding down the Command (⌘) and V buttons. This mode won’t fix anything, but it will let you see where the Mac is getting stuck, which might give you more ideas as to what’s going on.
Boot to Recovery Mode
The next few troubleshooting steps will all be performed in Recovery Mode. You can boot to Recovery Mode by holding down Command (⌘) and R while powering on your Mac. You’ll probably be asked to select your language before you get to the recovery options.
Disk Utility
Our first stop in Recovery Mode will be to select Disk Utility and click Continue. Click on your Internal Macintosh HD (or the name of your boot disk if you renamed it) on the left side.
Next, you’ll want to click on the First Aid button in the Disk Utility window, then click Run. This will check the disk for errors and repair them. Depending on the size of your hard drive, this process could take a few minutes.
Check your Free Space. You’ll usually want 10+ GB free. If you don’t have over 10GB free, you’ll need to free up some storage. Close the Disk Utility then click on the Utilities menu then Terminal.
You may need to disable SIP before you can delete or move some of these files. While in the Terminal, type csrutil disable and press Enter.
- Type ls /Volumes to get a list of your disks. You’ll want to work on your primary hard drive, which is usually called “Macintosh HD”.
- Type cd /Volumes/»Macintosh HD»/Library/
- Type these two commands to clear your cache and logs folders:
rm -rf Logs/*
rm -rf Caches/* - Click Terminal then Quit Terminal and you can go back into the Disk Utility to check your free space again
Remove Incompatible Kernel Extensions
While in Terminal, run these commands:
mount -rw / (Mounts your drive as writable)
cd /Volumes/Macintosh\ HD/Library/Extensions/
mkdir Unsupported
mv *.kext Unsupported
You can also clear your BootCache by running rm /private/var/db/BootCache*
Now try to restart your Mac and see if it’ll boot past the Apple Logo.
Restore From Time Machine Backup or Reinstall macOS
If none of the previous methods have worked, you have two more options in Recovery Mode. You can either Restore From Time Machine Backup if you have a recent backup, or you can Reinstall macOS.
Boot To Internet Recovery
- Hold the Option Command R keys while powering on your Mac and also have your Mac connected to power
- Select your Wifi network unless you’re connected with an ethernet cable
- Follow the rest of the on-screen instructions
Final Thoughts
If your Mac was stuck at the Apple Screen at startup, which of these options worked for you? If you’ve tried all of these troubleshooting steps, you can leave a comment below and we can try to help. Your last resort may be to schedule an Apple Genius Bar appointment.


