- Как запустить OS X на PC. Самый простой способ
- Загрузка, установка и настройка дистрибутива
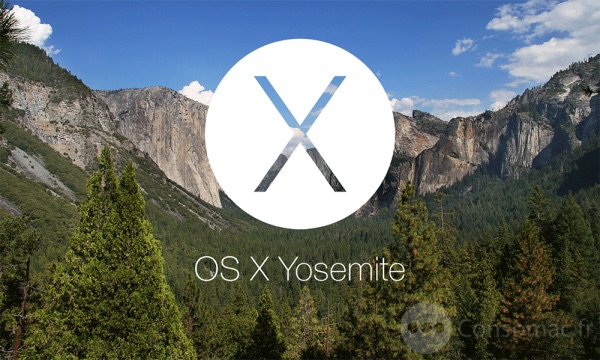
- Установка и запуск OS X Yosemite
- Артём Баусов
- Run a Windows Virtual Machine on your Mac
- What is a virtual machine?
- Can I run a virtual machine on my Mac?
- Best virtual machine software for Mac
- Parallels Desktop 13
- VMWare Fusion
- Best free virtual machine software for Mac
- Alternatives to a virtual machine
- How to make space for a virtual machine on your Mac
Как запустить OS X на PC. Самый простой способ
Mac, как и вся продукция Apple, отличается безупречным качеством исполнения. За это её чтят и любят, но есть люди, которые сомневаются в покупке данного аппарата. Безусловно, каждый может зайти в любой «реселлерский» магазин и посмотреть в живую на технику Apple, но не всем хватает на это времени. Именно для них (да и просто для любознательных) создана эта инструкция.
Познакомимся с операционной системой с OS X Yosemite через ваш домашний ПК посредством виртуальной машины. Не считая времени загрузки, процесс установки и настройки займет у вас не более получаса!
Внимание: исходя из политики Apple, данная операционная система не устанавливается на продукцию других компаний. Поэтому нам придется использовать сторонний образ ОС, созданный на основе оригинального. Всё, что вы делаете, вы делаете на свой страх и риск.

Лучшая виртуальная машина для нашей задачи – VirtualBox. Она достаточно мощная, имеет простой интерфейс, да и бесплатная.
Для работы данного метода убедитесь в том, что ваш процессор поддерживает технологию виртуализации (этот параметр включается в БИОСЕ).
Загрузка, установка и настройка дистрибутива
1. Загружаем дистрибутив с официального сайта. Нам нужна VirtualBox 4.3.26 for Windows hosts.

2. Во время установки программа вас оповестит о том, что ей требуется установить некоторые патчи для сети, чтобы интернет мог работать на виртуальной машине. Нажимаем “Yes” и ждём окончания установки утилиты.
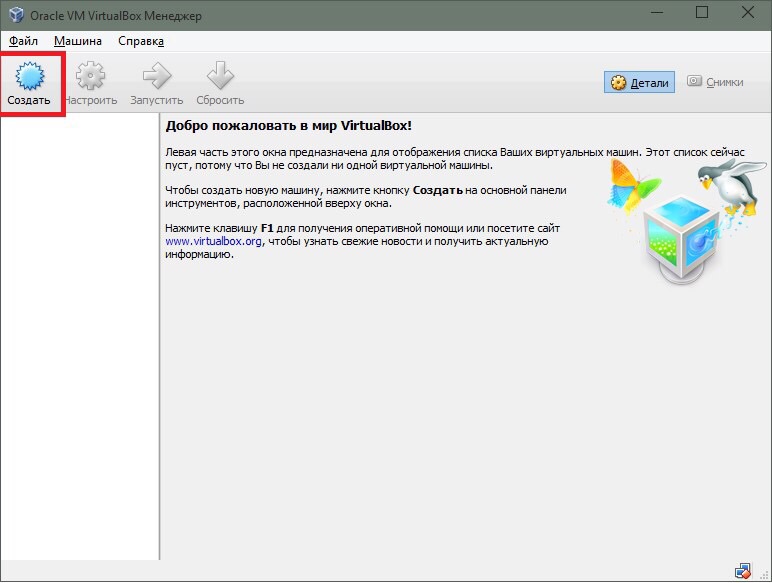
3. После установки открываем программу и мы видим окно приветствия. Нажимаем кнопку «Создать». Перед нами появляется окошко первоначальной настройки будущей операционной системы.
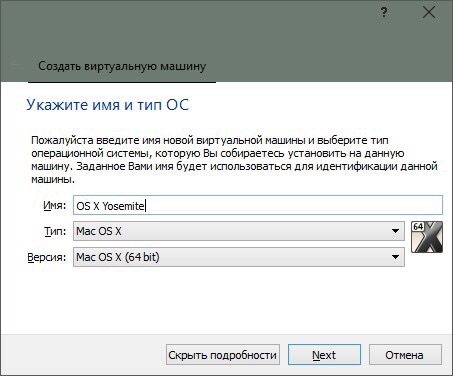
4. Называем нашу виртуальную машину и указываем тип OS X (32 bit/64 bit на выбор).
Памятка: если вам нужна будет «ось» для дальнейшего пользования и у вас 64-битный процессор, то не выставляйте настройки под 32-битную систему для 64-битных приложений. 64-битная ось медленнее запускает 32-битные приложения (OS X Yosemite работает исключительно на х64 процессорах).
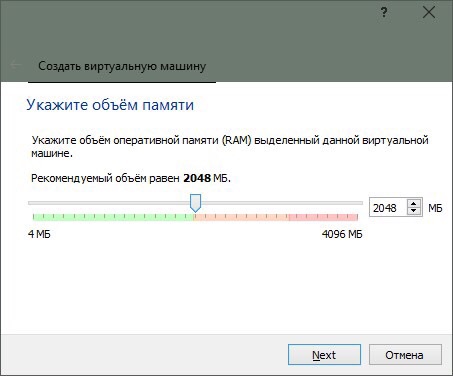
5. Указываем, сколько требуется оперативной памяти для системы. По-хорошему, ей нужно не более 4ГБ ОЗУ, но можно и больше, в зависимости от ресурсов вашего ПК. Я задал 4 ГБ.
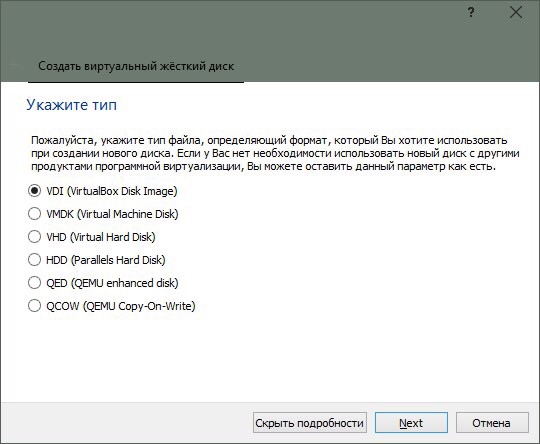
6. Нам также потребуется создать виртуальный жёсткий диск для нашей будущей машины. Именно на нём будут храниться все файлы ОС и всё то, что вы на ней будете создавать. Он берёт от физического «харда» лишь часть, размер которой вы задаёте сами. Выбираем первый пункт и идём дальше.
7. После этого заходим в раздел «Настройки->Система» и отключаем там EFI.
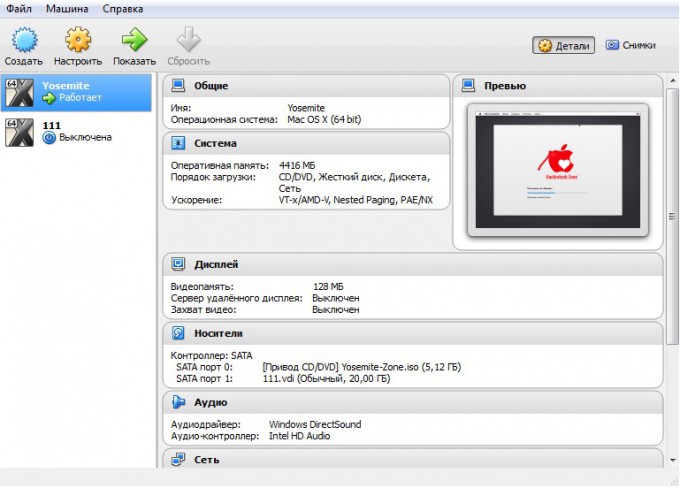
8. Теперь остается лишь запустить на ней OS X Yosemite. Нажимаем «Запустить» и в открывшемся диалоговом окне выбираем необходимый образ.
Памятка: для пущей верности можно задать для программы эмуляцию ноутбука от Apple. Открываем командную строку Windows (cmd.exe) и вставить:
1. cd C:\Program Files(x86)\Oracle\Virtualbox\ (стандартный путь установки)
2. VBoxManage setextradata *название_вашей_виртуальной_машины* VBoxInternal2/SmcDeviceKey “ourhardworkbythesewordsguardedpleasedontsteal(c)AppleComputerInc”
Установка и запуск OS X Yosemite
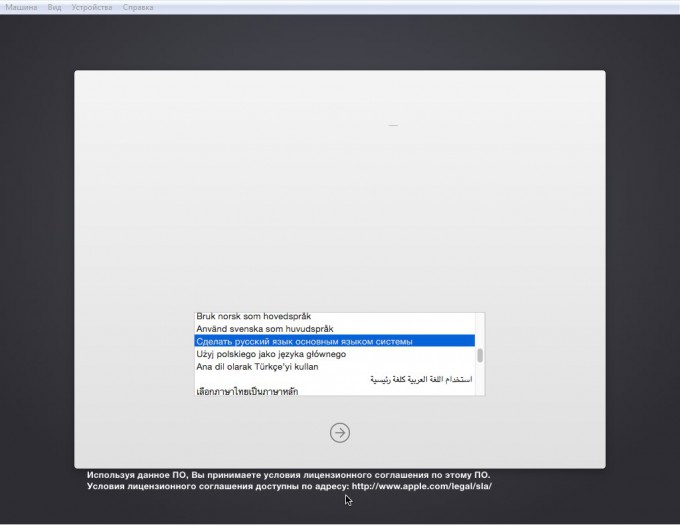
Итак, наша система загружается.
1. Выбираем русский язык и переходим к следующему шагу – настройке жёсткого диска для «операционки». Так как он создается изначально в файловой системе NTFS (которая не работает с OS X), нам придется немного «пошаманить».
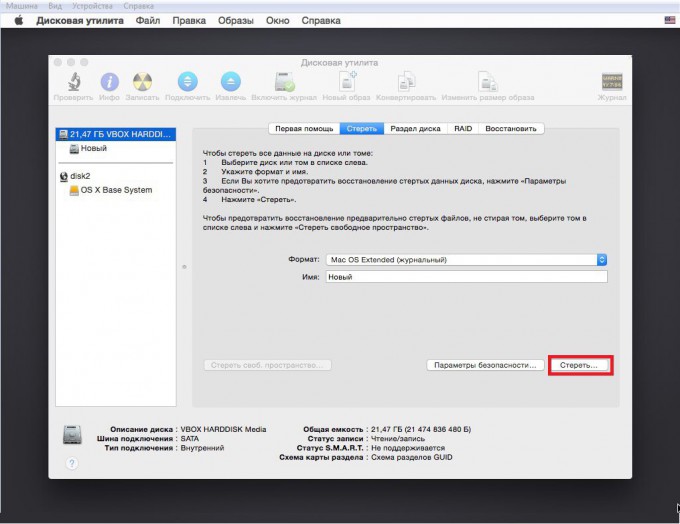
2. В верхней панели заходим в «Утилиты->Дисковая утилита». В левом крае экрана выбираем наш новоиспечённый жёсткий диск, на который будет производиться установка, затем в правой части окна открываем вкладку «Стереть» и стираем диск. После этого в нём будет создан чистый раздел под ОС.
3. Переходим в верхнем «тулбаре» обратно в установщик (нажимаем на «Дисковая утилита» и выбираем «OS X Installer») указываем только что отформатированный под наши нужды «хард», жмём «Продолжить» и ожидаем окончания установки.
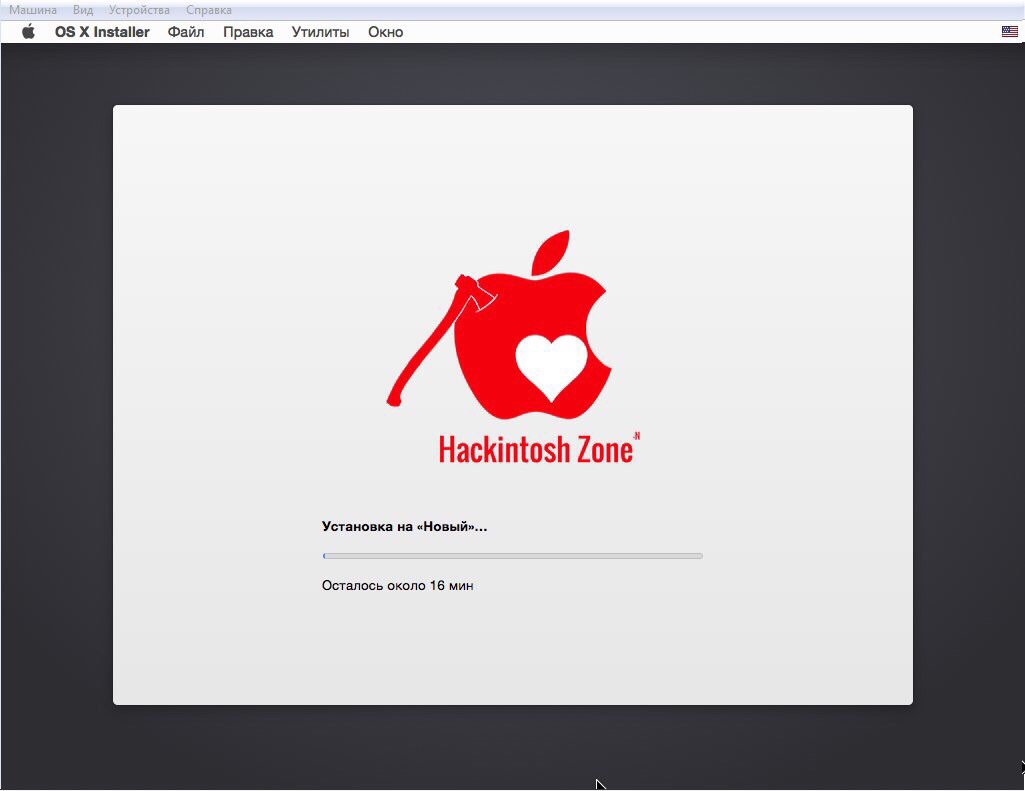
4. И вот, момент истины – OS X Yosemite готова к работе!
Пропускаем этап авторизации через iCloud, задаём логин/пароль для пользователя и, пожалуй, на этом всё.
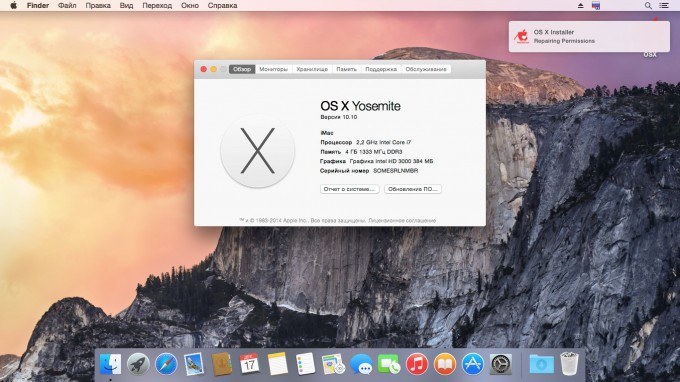
Вот и всё! Добро пожаловать в дивный новый мир OS X. Делитесь вашим опытом работы с ОС от Apple в комментариях 😉
![]()
Артём Баусов
Главный по новостям, кликбейту и опечаткам. Люблю электротехнику и занимаюсь огненной магией. Telegram: @TemaBausov
Run a Windows Virtual Machine on your Mac

If you want to run Windows on your Mac there are two ways to do it. One is to partition your main drive using the built-in Bootcamp Assistant and then install Windows on the partition that doesn’t house macOS. You can then boot into whichever operating system you choose.
While that method means running Windows natively and so is optimal in terms of performance, it means you have to reboot every time you want to move between operating systems and you can’t, for example, copy and paste between macOS and Windows. If you want to run Windows and macOS side by side, you’ll need to create a Windows virtual machine for Mac.

What is a virtual machine?
A virtual machine (VM) is a computer that’s created in software and looks and feels just like a real PC. But it runs inside a Mac application. The whole virtual machine, with the operating system and all its applications, is stored inside one big file on your Mac. That means you can have multiple virtual machines on the same Mac. Once you launch it and ‘boot’ the virtual PC, Windows VM on Mac behaves like any other Windows machine, except that it’s running inside a window on your Mac.
If you have two screens connected to your Mac, you can have macOS on one and Windows on the other. Or you can use Mission Control to swipe between them. A virtual machine can share accessories like printers and external storage with your Mac, and you can copy and paste between the two operating systems. You can even set up the virtual machine to use Mac keyboard shortcuts instead of their Windows equivalents.
Can I run a virtual machine on my Mac?
As long as your Mac has an Intel processor (and it will have unless it’s more than 12 years old), in theory it can run a virtual machine. However, running a virtual machine alongside macOS needs lots of memory (at least 8GB in total, and more if you want to run more than one virtual machine) and at least two processor cores. You’ll also need at least 16-20GB of hard drive space, and that’s before you start installing applications and saving files. Most modern Macs should run any of the virtual machine applications described here without a problem.
The other thing you’ll need is a copy of Windows. Virtual machine applications don’t come with Windows installers, so you’ll need to supply your own, along with a licence key.

Best virtual machine software for Mac
There are three contenders here: Parallels Desktop, VMWare Fusion, and VirtualBox. We’ll discuss Virtual Box in the next section.
Parallels Desktop 13
The latest version of Parallels Desktop has support for features in the latest Macs, like the MacBook Pro’s Touch Bar. It also allows you to make the Windows desktop ‘invisible’ when you’re running apps, so it looks like you’re just running Windows apps in macOS. Or, if you prefer, you can shrink Windows desktop down to a thumbnail preview, so it doesn’t get in the way but you can keep an eye on what it’s doing.
Of course, virtual machines aren’t just about running Windows on your Mac. Parallels Desktop allows you to install Linux, or a different version of macOS, say a beta of the next version if you don’t want to install it on your Mac. If you’ve previously installed Windows on a Boot Camp partition, you can use that partition as a virtual machine, allowing you to boot into it from within Parallels without re-booting your Mac.
Touch Bar support includes functions in Microsoft Office apps, as well as Windows Task Bar.
When it comes to performance, Parallels Desktop is about as good as it gets for virtual machines. That means you can run most applications just fine, but demanding 3D graphics-intensive games, and other apps that place lots of demands on the CPU and GPU are still a bit of a struggle. If you want to run those in Windows, you’re still better off using Boot Camp.
VMWare Fusion
The other main contender when it comes to running a virtual machine on your Mac is VMWare Fusion. It comes in two versions, Fusion 10, which costs about the same as Parallels Desktop, and Fusion 10 Pro, which is more expensive but adds feature aimed at enterprise customers, such as support for managing virtual servers.
In terms of features, there’s little to choose between Parallels Desktop and Fusion. Like its rival, Fusion allows you to choose between running Windows inside a window on your Mac (or full-screen if you prefer) and in what it calls Unity mode, where the operating system disappears and Windows apps look like they’re running natively on the Mac. That means you can run Windows and Mac apps alongside each other and switch between them seamlessly. You can also copy and paste between Mac and Windows, share peripherals, and map Mac keyboard shortcuts in Windows.
Support for OpenGL and DX10, as well as Apple’s Metal technology means that playing resource-hungry games is theoretically possible. But, as with Parallels, performance in the latest games lags behind Boot Camp and may prove frustrating.
The latest version of Fusion adds support for the MacBook Pro’s Touch Bar.
Choosing between Parallels Desktop and VMWare Fusion may be as much a matter of a preference for one or the other’s user interface. They have very similar features, and cost almost the same. Fortunately, both offer free trials — Parallels for 14 days and Fusion for 30 days — so you can download each one and try them out before making a decision on which to buy.
Best free virtual machine software for Mac
If you want to run a virtual machine on your Mac but can’t stretch to the $70 for Parallels or Fusion, there is a third option — VirtualBox. Owned by Oracle and made available as open-source software for personal or educational use, VirtualBox won’t cost you a penny if you fall into either of those two categories.
That’s the good news. The bad news is that VirtualBox, because it’s open source and free lacks all of the polish of Parallels Desktop and VMWare Fusion. While it does the basics competently, it’s much less user friendly and much less easy to use than the other two. And while there is help available online from other users, there’s no official support if you run into problems. And remember, while VirtualBox itself is free, you’ll still need to supply your own copy of Windows. Alternatively, you could use VirtualBox to run Linux on your Mac, instead of Windows.

Alternatives to a virtual machine
As we mentioned earlier, the alternative to running a virtual machine on your Mac is to partition your main drive using the built-in Boot Camp Assistant (it’s in the Utilities folder). You can then install Windows or Linux, or another version on macOS, on the other partition.
Boot Camp Assistant is very easy to use and once you’ve set it up, booting into, say, Windows, is just like using it natively on a PC. That means, of course, that you won’t be able to copy and paste between Mac and Windows, and you won’t be able to use external storage that’s formatted in APFS or Mac OS Extended, but Windows will run faster than it does on a virtual machine.
If you plan to use Boot Camp Assistant to partition your main drive, remember to back it up first. Partitioning a drive is not quite major surgery, but it definitely carries the risk of losing data.

How to make space for a virtual machine on your Mac
Depending on how many applications you plan to install on your virtual machine and what you plan to use it for, you may need tens of gigabytes of free space on your Mac. If space is tight, don’t worry, there’s plenty you can do to make room. As a first step, we recommend installing CleanMyMac X. It scans your Mac and looks for files that can be safely deleted. These include “junk” system files like cache files and other temporary files that are still hanging around, as well as language support files, and data in Photos and iTunes you may not need. Once it’s scanned your Mac and found all those files, you can delete them all with a click, or review the results of the scan and decide for yourself what you want to trash.
CleanMyMac can also uninstall files completely, getting rid of all the files that are left if you just drag and app to the Trash, and highlight large and old files that you haven’t opened for a while. Best of all, you can download it free here and give it a try. You’ll be surprised about how much space you can free up.

Virtual machines are the most convenient way of running a second operating system on your Mac. The ones we have highlighted here are the best VMs for Mac, so download one and give it a go.


