- Install Hyper-V on Windows 10
- Check Requirements
- Enable Hyper-V using PowerShell
- Enable Hyper-V with CMD and DISM
- Enable the Hyper-V role through Settings
- 9 Ways to Open Computer Management Windows 10 [MiniTool News]
- Summary :
- What Is Computer Management
- #1. How to Open Computer Management in Windows 10 from Start Menu
- #2. Access Windows 10 Computer Management App through Search Box
- #3. Open Computer Management in Windows 10 with Windows + X
- #4. Use Control Panel to Open Windows 10 Computer Management
- #5. Find Computer Management from Start Menu
- #6. Use Cortana to Open Computer Management in Windows 10
- #7. Open Computer Management Tool through Run Window
- #8. Using Computer Management Command/CMD
- #9. Enter Computer Management through Windows PowerShell
- Bottom Line
- ABOUT THE AUTHOR
- Установка Hyper-V в Windows 10 Install Hyper-V on Windows 10
- Проверьте следующие требования Check Requirements
- Включение Hyper-V с помощью PowerShell Enable Hyper-V using PowerShell
- Включение Hyper-V с помощью CMD и DISM Enable Hyper-V with CMD and DISM
- Включение роли Hyper-V с помощью раздела «Параметры» Enable the Hyper-V role through Settings
- What is co-management?
- Paths to co-management
- Benefits
- Prerequisites
- Licensing
- Configuration Manager
- Azure AD
- Intune
- Windows 10
- Permissions and roles
- Workloads
- Monitor co-management
Install Hyper-V on Windows 10
Enable Hyper-V to create virtual machines on Windows 10.
Hyper-V can be enabled in many ways including using the Windows 10 control panel, PowerShell or using the Deployment Imaging Servicing and Management tool (DISM). This documents walks through each option.
Note: Hyper-V is built into Windows as an optional feature — there is no Hyper-V download.
Check Requirements
- Windows 10 Enterprise, Pro, or Education
- 64-bit Processor with Second Level Address Translation (SLAT).
- CPU support for VM Monitor Mode Extension (VT-c on Intel CPUs).
- Minimum of 4 GB memory.
The Hyper-V role cannot be installed on Windows 10 Home.
Upgrade from Windows 10 Home edition to Windows 10 Pro by opening up Settings > Update and Security > Activation.
For more information and troubleshooting, see Windows 10 Hyper-V System Requirements.
Enable Hyper-V using PowerShell
Open a PowerShell console as Administrator.
Run the following command:
If the command couldn’t be found, make sure you’re running PowerShell as Administrator.
When the installation has completed, reboot.
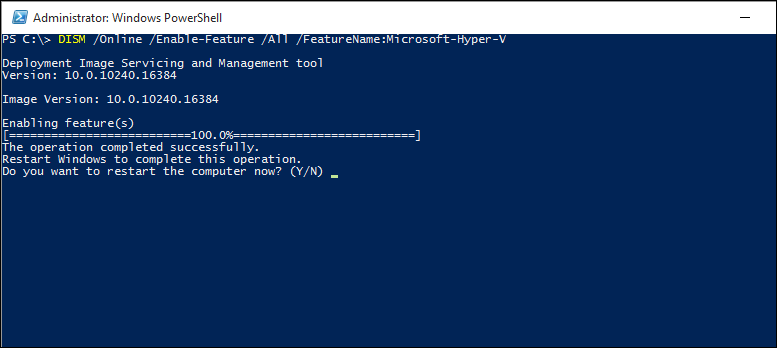
Enable Hyper-V with CMD and DISM
The Deployment Image Servicing and Management tool (DISM) helps configure Windows and Windows images. Among its many applications, DISM can enable Windows features while the operating system is running.
To enable the Hyper-V role using DISM:
Open up a PowerShell or CMD session as Administrator.
Type the following command:
For more information about DISM, see the DISM Technical Reference.
Enable the Hyper-V role through Settings
Right click on the Windows button and select вЂApps and Features’.
Select Programs and Features on the right under related settings.
Select Turn Windows Features on or off.
Select Hyper-V and click OK.
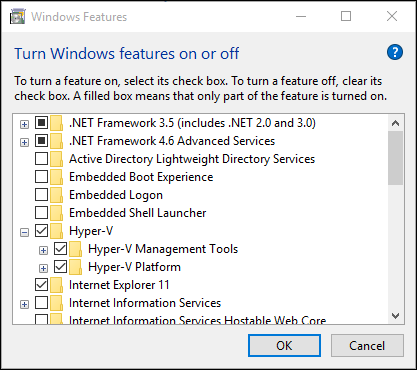
When the installation has completed you are prompted to restart your computer.
9 Ways to Open Computer Management Windows 10 [MiniTool News]
By Alisa | Follow | Last Updated March 05, 2021
Summary :
Windows provides a set of computer management tools for users to manage computer’s tasks and performance. Check the 9 ways in this post for how to open Computer Management in Windows 10.
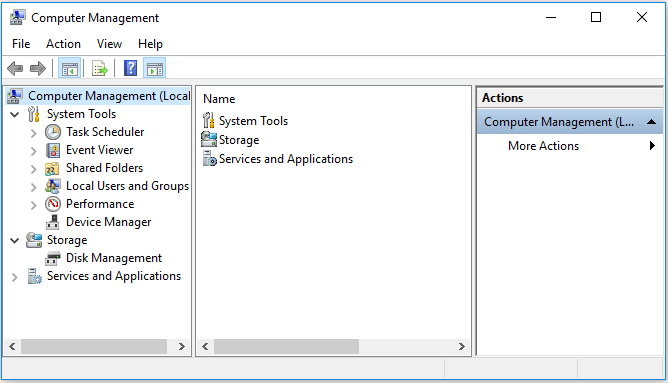
What Is Computer Management
If you need to open Computer Management in Windows 10 to manage, monitor or optimize a computer system for better performance, security or other improvement, you can check the 9 ways below to easily open Windows 10 Computer Management.
Related MiniTool free software you may like: MiniTool Partition Wizard, MiniTool Power Data Recovery, MiniTool ShadowMaker, MiniTool Movie Maker, and more.
#1. How to Open Computer Management in Windows 10 from Start Menu
The quickest way to open Computer Management in Windows 10 is using Start menu.
- You can click Start icon at the bottom-left corner on Window 10 computer screen.
- Then type msc and choose the top result Computer Management to open this app.
#2. Access Windows 10 Computer Management App through Search Box
- You can also directly click the Search Box next to Start.
- Type msc, and hit Enter to open Computer Management in Windows 10.
#3. Open Computer Management in Windows 10 with Windows + X
- You can press Windows + X keys on the keyboard at the same time to open the Quick Access menu.
- Choose Computer Management from the list to open this app.

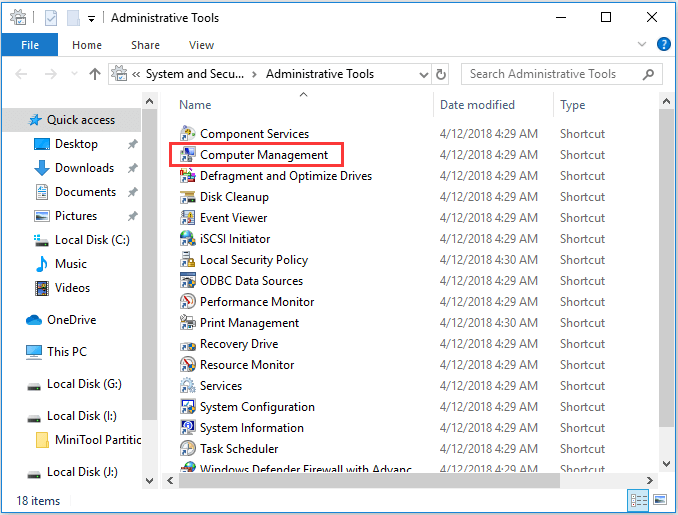
#4. Use Control Panel to Open Windows 10 Computer Management
- Press Windows + R on the keyboard, and type control panel in the Run window. Hit Enter to open Control Panel Windows 10.
- Click System and Security -> Administrative Tools.
- Double-click Computer Management to open it.
#5. Find Computer Management from Start Menu
- You can click Windows Start menu, scroll down the list of apps and find Windows Administrative Tools.
- Click Windows Administrative Tools to expand it. Find Computer Management app and open it.
#6. Use Cortana to Open Computer Management in Windows 10
You can click the microphone icon at the taskbar to make Cortana listen to you. Then you can say Open Computer Management or Launch Computer Management to Cortana, and it will open Computer Management tool for you.
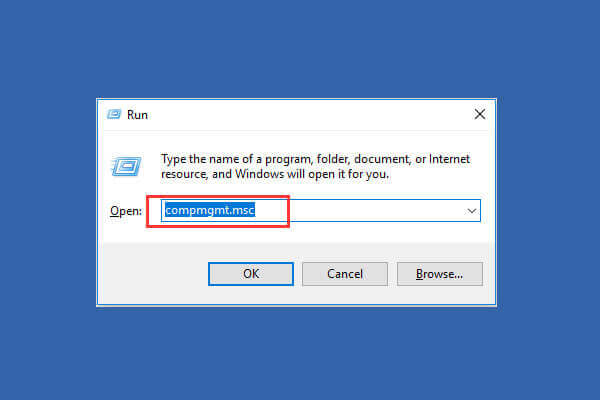
#7. Open Computer Management Tool through Run Window
- You can press Windows + R keys simultaneously to open Windows Run.
- Input msc, and hit Enter to open it.
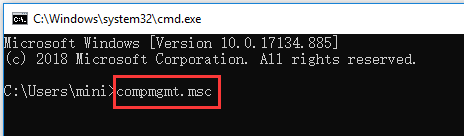
#8. Using Computer Management Command/CMD
You can open Command Prompt and open Computer Management through Command Prompt.
You can press Windows + R keys on the keyboard, and type cmd and hit Enter to open Windows Command Prompt window.
Then you can type this command line: compmgmt.msc, and hit Enter to open Computer Management.
#9. Enter Computer Management through Windows PowerShell
- You can right-click Start button in Windows 10, and choose Windows PowerShell to open Windows PowerShell utility.
- Next type msc and hit Enter to open Computer Management in Windows 10.
Bottom Line
This tutorial provides 9 ways to help you open Windows 10 Computer Management app. You can choose either way to easily access Computer Management tool, and access Disk Management, Device Manager, Event Viewer, Local users and groups, etc.
ABOUT THE AUTHOR

Position: Columnist
Alisa is a professional English editor with 4-year experience. She loves writing and focuses on sharing detailed solutions and thoughts for computer problems, data recovery & backup, digital gadgets, tech news, etc. Through her articles, users can always easily get related problems solved and find what they want. In spare time, she likes basketball, badminton, tennis, cycling, running, and singing. She is very funny and energetic in life, and always brings friends lots of laughs.
Установка Hyper-V в Windows 10 Install Hyper-V on Windows 10
Включение Hyper-V для создания виртуальных машин в Windows 10. Enable Hyper-V to create virtual machines on Windows 10.
Hyper-V можно включить разными способами, в том числе используя панель управления Windows 10, PowerShell или с помощью средства обслуживания образов развертывания и управления ими (DISM). Hyper-V can be enabled in many ways including using the Windows 10 control panel, PowerShell or using the Deployment Imaging Servicing and Management tool (DISM). В этом документе последовательно описан каждый из указанных способов. This documents walks through each option.
Примечание. Механизм Hyper-V встроен в Windows в качестве дополнительной функции. Скачать Hyper-V нельзя. Note: Hyper-V is built into Windows as an optional feature — there is no Hyper-V download.
Проверьте следующие требования Check Requirements
- Windows 10 Корпоративная, Pro или для образовательных учреждений Windows 10 Enterprise, Pro, or Education
- 64-разрядный процессор с поддержкой преобразования адресов второго уровня (SLAT). 64-bit Processor with Second Level Address Translation (SLAT).
- Поддержка расширения режима мониторинга виртуальной машины (технология VT-c на компьютерах с процессорами Intel). CPU support for VM Monitor Mode Extension (VT-c on Intel CPUs).
- Не менее 4 ГБ оперативной памяти. Minimum of 4 GB memory.
Роль Hyper-V невозможно установить в Windows 10 Домашняя. The Hyper-V role cannot be installed on Windows 10 Home.
Выполните обновление с выпуска Windows 10 Домашняя до выпуска Windows 10 Pro, открыв раздел Параметры > Обновление и безопасность > Активация. Upgrade from Windows 10 Home edition to Windows 10 Pro by opening up Settings > Update and Security > Activation.
Дополнительные сведения и советы по устранению неполадок см. в статье Требования к системе для Hyper-V в Windows 10. For more information and troubleshooting, see Windows 10 Hyper-V System Requirements.
Включение Hyper-V с помощью PowerShell Enable Hyper-V using PowerShell
Откройте консоль PowerShell от имени администратора. Open a PowerShell console as Administrator.
Выполните следующую команду. Run the following command:
Если не удается найти команду, убедитесь, что вы используете PowerShell от имени администратора. If the command couldn’t be found, make sure you’re running PowerShell as Administrator.
По завершения установки выполните перезагрузку. When the installation has completed, reboot.
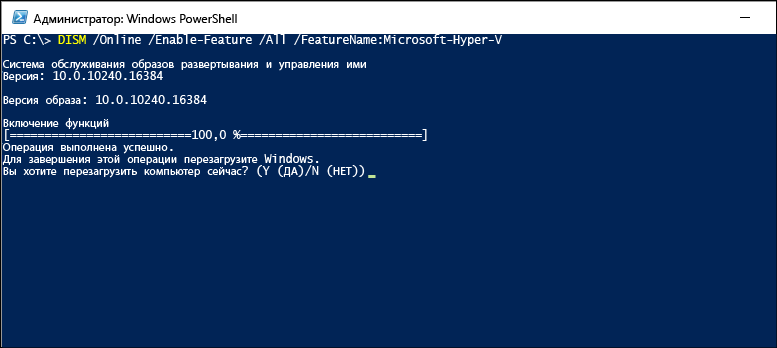
Включение Hyper-V с помощью CMD и DISM Enable Hyper-V with CMD and DISM
Система обслуживания образов развертывания и управления ими (DISM) позволяет настраивать ОС Windows и образы Windows. The Deployment Image Servicing and Management tool (DISM) helps configure Windows and Windows images. Помимо всего прочего? средство DISM может включать функции Windows во время выполнения операционной системы. Among its many applications, DISM can enable Windows features while the operating system is running.
Чтобы включить роль Hyper-V с помощью DISM, выполните указанные ниже действия. To enable the Hyper-V role using DISM:
Запустите PowerShell или сеанс CMD от имени администратора. Open up a PowerShell or CMD session as Administrator.
Введите следующую команду: Type the following command:
Дополнительные сведения о DISM см. в разделе Техническое руководство по DISM. For more information about DISM, see the DISM Technical Reference.
Включение роли Hyper-V с помощью раздела «Параметры» Enable the Hyper-V role through Settings
Щелкните правой кнопкой мыши кнопку Windows и выберите пункт «Приложения и компоненты». Right click on the Windows button and select ‘Apps and Features’.
Выберите Программы и компоненты справа в разделе связанные параметры. Select Programs and Features on the right under related settings.
Выберите пункт Включение или отключение компонентов Windows. Select Turn Windows Features on or off.
Выберите Hyper-V и нажмите кнопку ОК. Select Hyper-V and click OK.

После завершения установки вам будет предложено перезапустить компьютер. When the installation has completed you are prompted to restart your computer.
What is co-management?
Co-management is one of the primary ways to attach your existing Configuration Manager deployment to the Microsoft 365 cloud. It helps you unlock additional cloud-powered capabilities like conditional access.
Co-management enables you to concurrently manage Windows 10 devices by using both Configuration Manager and Microsoft Intune. It lets you cloud-attach your existing investment in Configuration Manager by adding new functionality. By using co-management, you have the flexibility to use the technology solution that works best for your organization.
When a Windows 10 device has the Configuration Manager client and is enrolled to Intune, you get the benefits of both services. You control which workloads, if any, you switch the authority from Configuration Manager to Intune. Configuration Manager continues to manage all other workloads, including those workloads that you don’t switch to Intune, and all other features of Configuration Manager that co-management doesn’t support.
You’re also able to pilot a workload with a separate collection of devices. Piloting allows you to test the Intune functionality with a subset of devices before switching a larger group.

When you concurrently manage Windows 10 devices with both Configuration Manager and Microsoft Intune, this configuration is called co-management. When you manage devices with Configuration Manager and enroll to a third-party MDM service, this configuration is called coexistence. Having two management authorities for a single device can be challenging if not properly orchestrated between the two. With co-management, Configuration Manager and Intune balance the workloads to make sure there are no conflicts. This interaction doesn’t exist with third-party services, so there are limitations with the management capabilities of coexistence. For more information, see Third-party MDM coexistence with Configuration Manager.
Paths to co-management
There are two main paths to reach to co-management:
Existing Configuration Manager clients: You have Windows 10 devices that are already Configuration Manager clients. You set up hybrid Azure AD, and enroll them into Intune.
New internet-based devices: You have new Windows 10 devices that join Azure AD and automatically enroll to Intune. You install the Configuration Manager client to reach a co-management state.
For more information on the paths, see Paths to co-management.
Benefits
When you enroll existing Configuration Manager clients in co-management, you gain the following immediate value:
Conditional access with device compliance
Intune-based remote actions, for example: restart, remote control, or factory reset
Centralized visibility of device health
Link users, devices, and apps with Azure Active Directory (Azure AD)
Modern provisioning with Windows Autopilot
For more information on this immediate value from co-management, see the quickstarts series to Cloud connect with co-management.
Co-management also enables you to orchestrate with Intune for several workloads. For more information, see the Workloads section.
Prerequisites
Co-management has these prerequisites in the following areas:
Licensing
Azure AD Premium
An Enterprise Mobility + Security (EMS) subscription includes both Azure Active Directory Premium and Microsoft Intune.
At least one Intune license for you as the administrator to access the Intune portal.
Make sure you assign an Intune license to the account that you use to sign in to your tenant. Otherwise, sign in fails with the error message «User not recognized».
You may not need to purchase and assign individual Intune or EMS licenses to your users. For more information, see the Product and licensing FAQ.
Configuration Manager
Co-management requires Configuration Manager version 1710 or later.
Starting in Configuration Manager version 1806, you can connect multiple Configuration Manager instances to a single Intune tenant.
Enabling co-management itself doesn’t require that you onboard your site with Azure AD. For the second path scenario, internet-based Configuration Manager clients require the cloud management gateway (CMG). The CMG requires the site is onboarded to Azure AD for cloud management.
Azure AD
Windows 10 devices must be connected to Azure AD. They can be either of the following types:
Hybrid Azure AD-joined, where the device is joined to your on-premises Active Directory and registered with your Azure Active Directory.
Azure AD-joined only. (This type is sometimes referred to as «cloud domain-joined»)
As we talk with our customers that are using Microsoft Endpoint Manager to deploy, manage, and secure their client devices, we often get questions regarding co-managing devices and hybrid Azure Active Directory (Azure AD) joined devices. Many customers confuse these two topics. Co-management is a management option, while Azure AD is an identity option. For more information, see Understanding hybrid Azure AD and co-management scenarios. This blog post aims to clarify hybrid Azure AD join and co-management, how they work together, but aren’t the same thing.
Intune
Windows 10
Upgrade your devices to Windows 10, version 1709 or later. For more information, see Adopting Windows as a service.
Windows 10 mobile devices don’t support co-management.
Permissions and roles
| Action | Role needed |
|---|---|
| Set up a cloud management gateway in Configuration Manager | Azure Subscription Manager |
| Create Azure AD apps from Configuration Manager | Azure AD Global Administrator |
| Import Azure apps in Configuration Manager | Configuration Manager Full Administrator No additional Azure roles needed |
| Enable co-management in Configuration Manager | An Azure AD user Configuration Manager Full Administrator with All scope rights. |
For more information about Azure roles, see Understand the different roles.
For more information about Configuration Manager roles, see Fundamentals of role-based administration.
Workloads
You don’t have to switch the workloads, or you can do them individually when you’re ready. Configuration Manager continues to manage all other workloads, including those workloads that you don’t switch to Intune, and all other features of Configuration Manager that co-management doesn’t support.
Co-management supports the following workloads:
Windows Update policies
Resource access policies
Office Click-to-Run apps
For more information, see Workloads.
Monitor co-management
The co-management dashboard helps you review machines that are co-managed in your environment. The graphs can help identify devices that might need attention.


