- Windows Machine Learning
- Overview
- Get Started
- In-box vs NuGet WinML solutions
- Other machine learning solutions from Microsoft
- How to Create a Virtual Machine from Your Existing Windows 10 PC
- Converting your Windows 10 to Virtual Machine
- Running the virtual machine
- Create a Virtual Machine with Hyper-V
- Windows 10 Fall Creators Update (Windows 10 version 1709)
- Windows 10 Creators Update (Windows 10 version 1703)
- Before Windows 10 Creators Update (Windows 10 version 1607 and earlier)
Windows Machine Learning
Implement Machine Learning in your Windows apps using Windows ML — a high-performance, reliable API for deploying hardware-accelerated ML inferences on Windows devices.

Overview
Windows ML is built into the latest versions of Windows 10 and Windows Server 2019, and is also available as a NuGet package for down-level reach to Windows 8.1. Windows ML provides developers with the following advantages:
Ease of development: With Windows ML built into the latest versions of Windows 10 and Windows Server 2019, all you need is Visual Studio and a trained ONNX model, which can be distributed along with the Windows application. Also, if you need to deliver your AI-based features to older versions of Windows (down to 8.1), Windows ML is also available as a NuGet package that you can distribute with your application.
Broad hardware support: Windows ML allows you to write your ML workload once and automatically get highly optimized performance across different hardware vendors and silicon types, such as CPUs, GPUs, and AI accelerators. In addition, Windows ML guarantees consistent behavior across the range of supported hardware.
Low latency, real-time results: ML models can be evaluated using the processing capabilities of the Windows device, enabling local, real-time analysis of large data volumes, such as images and video. Results are available quickly and efficiently for use in performance-intensive workloads like game engines, or background tasks such as indexing for search.
Increased flexibility: The option to evaluate ML models locally on Windows devices lets you address a broader range of scenarios. For example, evaluation of ML models can run while the device is offline, or when faced with intermittent connectivity. This also lets you address scenarios where not all data can be sent to the cloud due to privacy or data sovereignty issues.
Reduced operational costs: Training ML models in the cloud and then evaluating them locally on Windows devices can deliver significant savings in bandwidth costs, with only minimal data sent to the cloud—as might be needed for continual improvement of your ML model. Moreover, when deploying the ML model in a server scenario, developers can leverage Windows ML hardware acceleration to speed-up model serving, reducing the number of machines needed in order to handle the workload.
Get Started
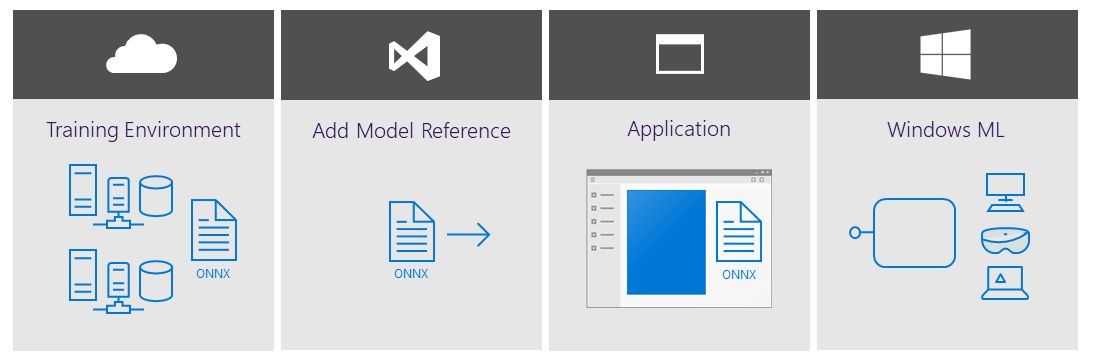
The process of incorporating trained ML models into your application code is simple, requiring just a few straightforward steps:
Get a trained Open Neural Network Exchange (ONNX) model, or convert models trained in other ML frameworks into ONNX with WinMLTools.
Add the ONNX model file to your application, or make it available in some other way on the target device.
Integrate the model into your application code, then build and deploy the application.
To start with the in-box Windows ML, go to Integrate a model into your app with Windows ML. You can also try out the sample apps in the Windows-Machine-Learning repo on GitHub.
If you want to use the NuGet package, please see Tutorial: Port an Existing WinML App to NuGet Package.
For the latest Windows ML features and fixes, see our release notes.
In-box vs NuGet WinML solutions
The table below highlights the availability, distribution, language support, servicing, and forward compatibility aspects of the In-Box and NuGet package for Windows ML.
| In-Box | NuGet | |
|---|---|---|
| Availability | Windows 10 version 1809 or higher | Windows 8.1 or higher |
| Distribution | Built into the Windows SDK | Package and distribute as part of your application |
| Servicing | Microsoft-driven (customers benefit automatically) | Developer-driven |
| Forward compatibility | Automatically rolls forward with new features | Developer needs to update package manually |
When your application runs with the in-box solution, the Windows ML runtime (which contains the ONNX Model Inference Engine) evaluates the trained model on the Windows 10 device (or Windows Server 2019 if targeting a server deployment). Windows ML handles the hardware abstraction, allowing developers to target a broad range of silicon—including CPUs, GPUs, and, in the future, AI accelerators. Windows ML hardware acceleration is built on top of DirectML, a high-performance, low-level API for running ML inferences that is part of the DirectX family.


For the NuGet package, these layers appear as binaries shown in the diagram below. Windows ML is built into the Microsoft.ai.machinelearning.dll. It does not contain an embedded ONNX runtime, instead the ONNX runtime is built into the file: onnxruntime.dll. The version included in the WindowsAI NuGet packages contains a DirectML EP embedded inside of it. The final binary, DirectML.dll, is the actual platform code as DirectML and is built on top of the Direct 3D and compute drivers that are built into Windows. All three of these binaries are included in the NuGet releases for you to distribute along with your applications.
Direct access to the onnxruntime.dll also allows you to target cross-platform scenarios while getting the same hardware agnostic acceleration that scales across all Windows devices.
Other machine learning solutions from Microsoft
Microsoft offers a variety of machine learning solutions to suit your needs. These solutions run in the cloud, on-premises, and locally on the device. See What are the machine learning product options from Microsoft? for more information.
Use the following resources for help with Windows ML:
- To ask or answer technical questions about Windows ML, please use the windows-machine-learning tag on Stack Overflow.
- To report a bug, please file an issue on our GitHub.
- To request a feature, please head over to Windows Developer Feedback.
How to Create a Virtual Machine from Your Existing Windows 10 PC

It can be handy for any number of reasons to create a virtual machine from your existing Windows 10 setup. A virtual machine allows you to quickly set up a replication of your current Windows 10 installation. It also allows you to test software that you wouldn’t otherwise be able to install on your PC. You will be able to safely test out tweaks or registry edits you want to make to the OS.
You can do this using various software (including Microsoft Hyper-V, which is integrated into Windows 10 Pro). But we found VMWare’s vCenter Converter to be simple and universally available, so we’ll be using that.
Learn how you can create a virtual machine from your existing Windows 10 installation.
Converting your Windows 10 to Virtual Machine
First, download VMware vCenter Converter. After clicking the Download link, you’ll need to register and create a “My VMware” account. This is a quick process and just requires an email and password.
After the download, install VMWare vCenter Converter in your Windows 10 PC.
Once installed, open vCenter Converter, then click “Convert machine.”

Next, select “Powered on” for the source type, click the drop-down menu and select “This local machine.” Click Next.

On the next screen, you can edit and specify which drives from your OS you want to virtualize: the devices, networks, and so on. In this tutorial, the total size of Windows 10 OS exceeds the capacity of where we want to save it. For this reason, the huge “D:” drive will be removed.

To do this, we clicked the “Data to copy” entry, then in the pane on the right, deselected drives to virtualize using the check boxes. In the pane on the left, you can change the system services you want to transfer to your virtual PC, network adapters and so on. We recommend keeping these as they are if you want the most accurate virtualization of your Windows 10 PC.

When you’re ready, click Next, choose where you want to save your virtual machine (you can put it straight onto an external hard drive if you would like), then let the conversion process begin. This can take a few hours, depending on the size of the Windows volumes you’re converting.
Once the conversion is done, you have successfully created a virtual machine from your existing Windows 10 PC. The next thing is to run it.
Note: If you want to run the virtual machine on another PC, go to its directory and copy it to an external hard drive. You may want to compress it using compression software like 7-Zip, WinZIP or WinRAR to save some space. Again, depending on the size of your VM, this may take a while. Plug the external drive into the other PC where you want to run the virtual machine. Transfer the file over and unzip it.
Running the virtual machine
On the computer where you want to run your virtual machine (which can be the same PC you’ve been using in this guide), you’ll need VMware’s free virtualization software VMware Workstation Player.
Once installed, open Workstation Player, click “Open a Virtual Machine,” then navigate to your newly created VM and click Open.

Before opening the VM, you can go to “Edit virtual machine settings” and change things like how much memory to allocate to it. When you’re ready to open it, click “Play virtual machine,” and you’re good to go!
Now that you have learned how to create a virtual machine from an existing Windows 10 setup, If you are further interested in VMs, take a look at our list of the best free virtualization software for Windows 10. You’ll need a lot of hard drive space for some VMs, so it’s also worth checking the health of your hard drives in Windows 10.
Related:
Content Manager at Make Tech Easier. Enjoys Android, Windows, and tinkering with retro console emulation to breaking point.
Create a Virtual Machine with Hyper-V
Create a virtual machine and install its operating system.
We’ve been building new tools for creating virtual machines so the instructions have changed significantly over the past three releases.
Pick your operating system for the right set of instructions:
Let’s get started.
Windows 10 Fall Creators Update (Windows 10 version 1709)
In Fall Creators Update, Quick Create expanded to include a virtual machine gallery that can be launched independently from Hyper-V Manager.
To create a new virtual machine in Fall Creators Update:
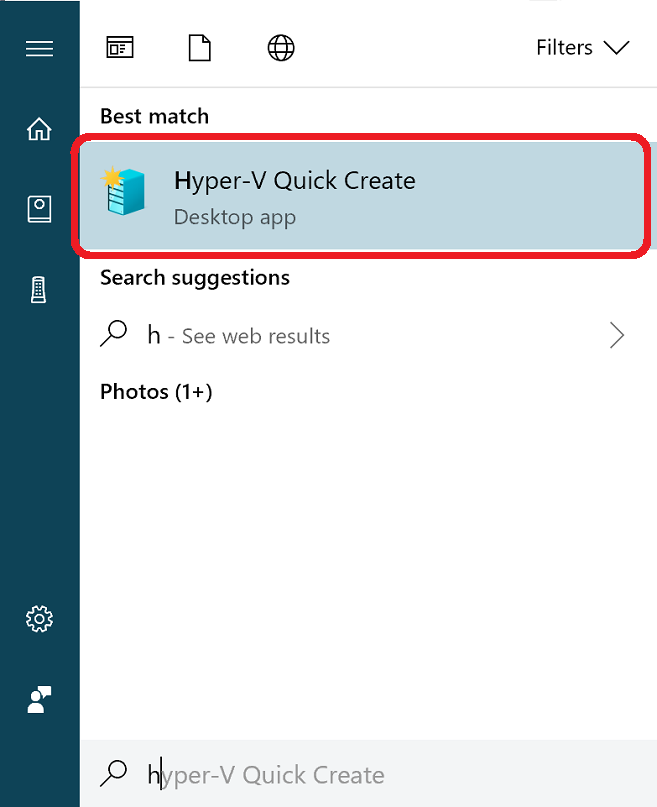
Open Hyper-V Quick Create from the start menu.
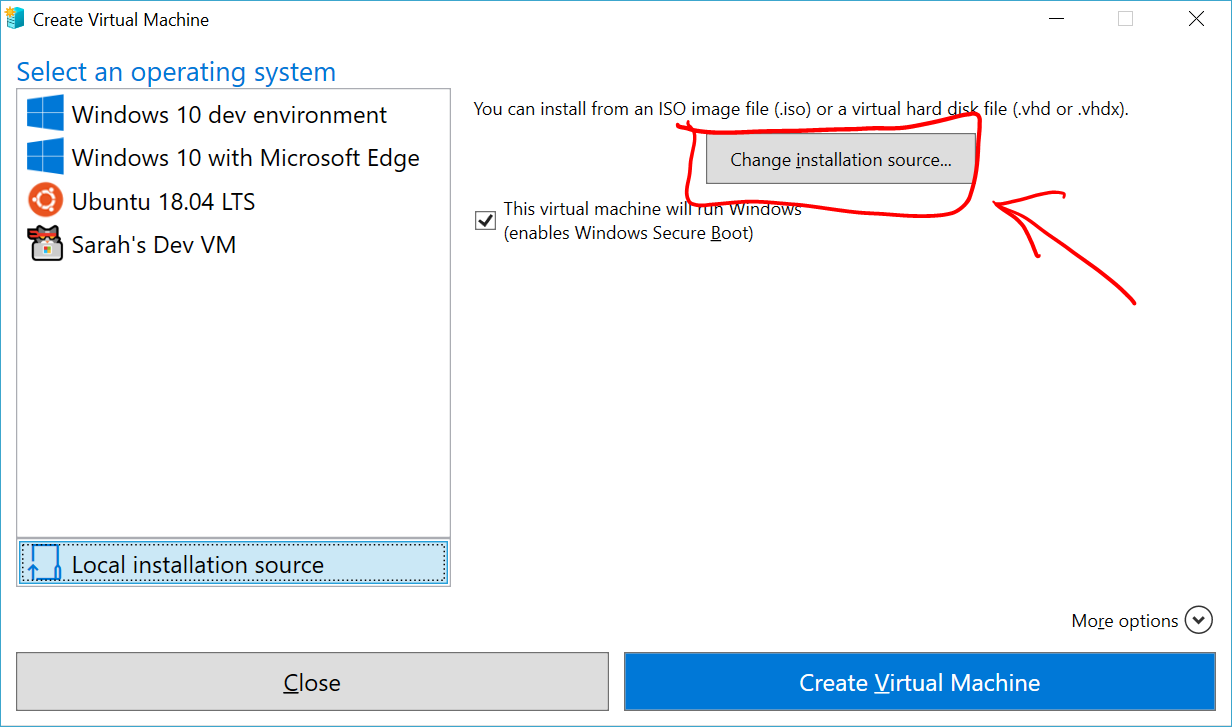
Select an operating system or choose your own by using a local installation source.

- If you want to use your own image to create the virtual machine, select Local Installation Source.
- Select Change Installation Source.

- Pick the .iso or .vhdx that you want to turn into a new virtual machine.
- If the image is a Linux image, deselect the Secure Boot option.
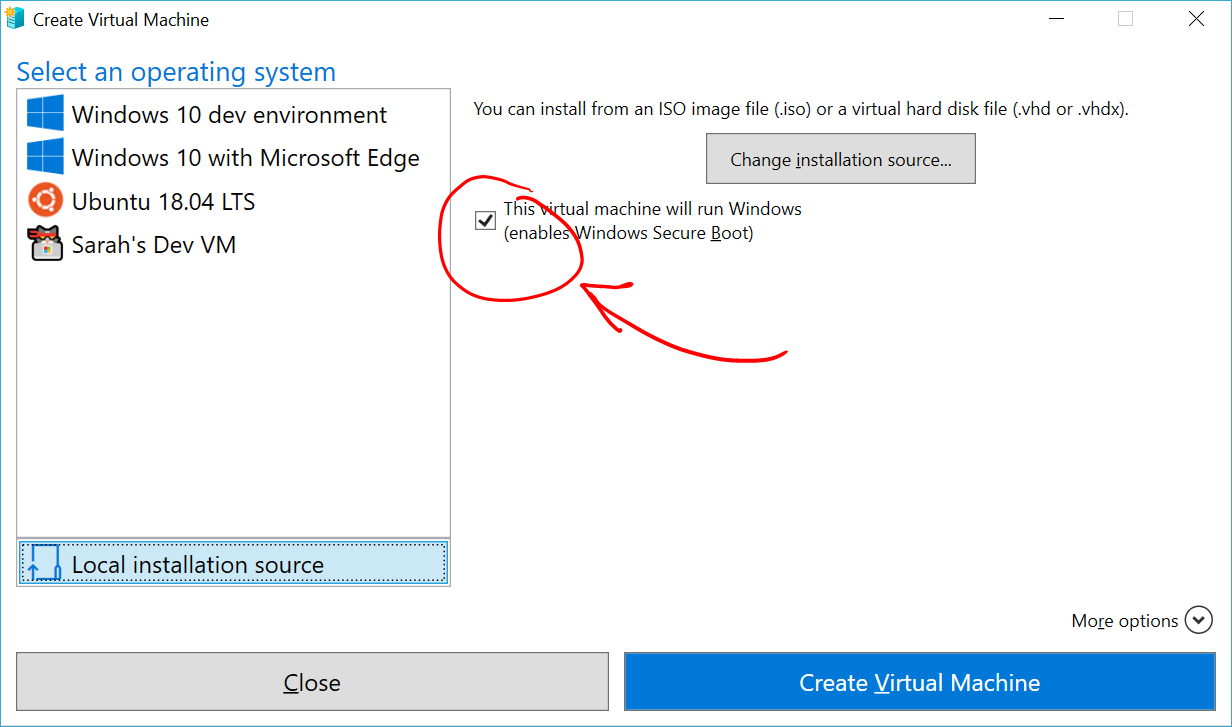
Select «Create Virtual Machine»
That’s it! Quick Create will take care of the rest.
Windows 10 Creators Update (Windows 10 version 1703)
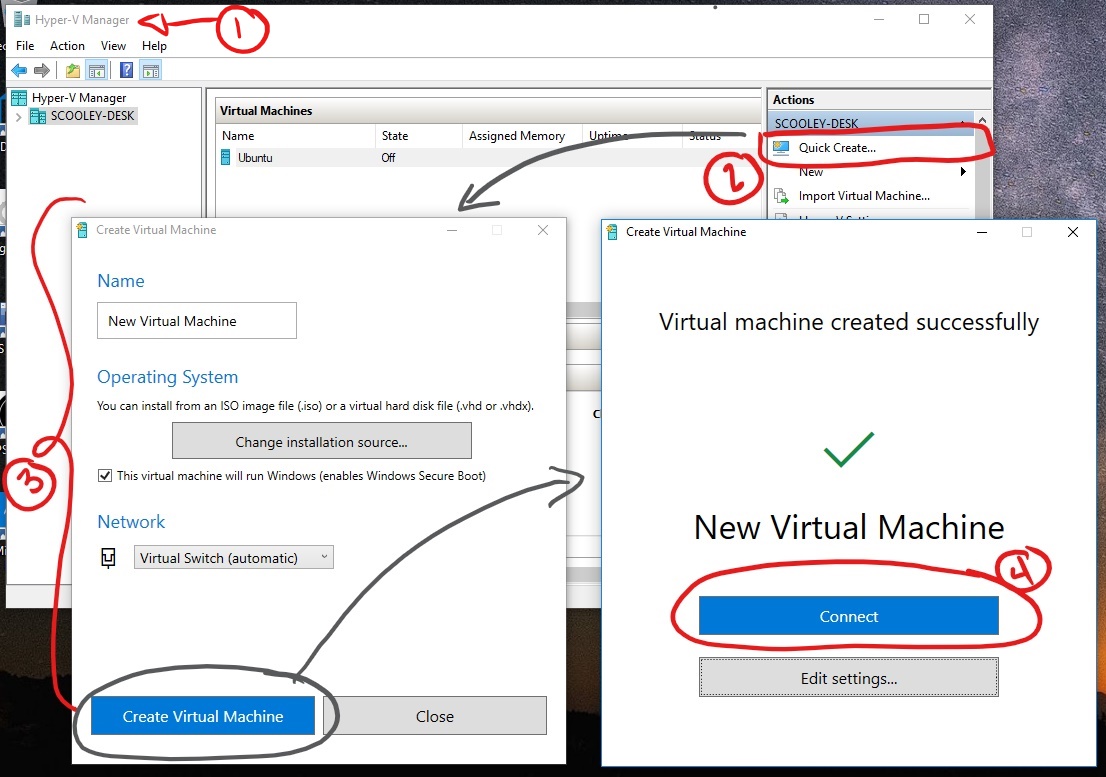
Open Hyper-V Manager from the start menu.
In Hyper-V Manager, Find Quick Create in the right hand Actions menu.
Customize your virtual machine.
- (optional) Give the virtual machine a name.
- Select the installation media for the virtual machine. You can install from a .iso or .vhdx file. If you are installing Windows in the virtual machine, you can enable Windows Secure Boot. Otherwise leave it unselected.
- Set up network. If you have an existing virtual switch, you can select in the network dropdown. If you have no existing switch, you will see a button to set up an automatic network, which will automatically configure a virtual network.
Click Connect to start your virtual machine. Don’t worry about editing the settings, you can go back and change them any time.
You may be prompted to вЂPress any key to boot from CD or DVD’. Go ahead and do so. As far as it knows, you’re installing from a CD.
Congratulations, you have a new virtual machine. Now you’re ready to install the operating system.
Your virtual machine should look something like this:

Note: Unless you’re running a volume-licensed version of Windows, you need a separate license for Windows running inside a virtual machine. The virtual machine’s operating system is independent of the host operating system.
Before Windows 10 Creators Update (Windows 10 version 1607 and earlier)
If you aren’t running Windows 10 Creators Update or later, follow these instructions using New Virtual Machine Wizard instead:


