- Turn on notifications for accounts and pinned folders in Windows Mail
- Turn on notifications for your email accounts in the Windows Mail app
- Turn on notifications for pinned folders in the Windows Mail app
- How to add a Folder in Windows 10 Mail App
- Replies (13)
- Mail folder in windows mail
- Users who read this also read:
Turn on notifications for accounts and pinned folders in Windows Mail
To enable notifications for your email accounts and pinned folders in the Windows Mail app you’ll need to do the following:
Turn on notifications for your email accounts in the Windows Mail app
Turn on the main Windows notification setting:
Open Settings from the Windows Start menu.
Choose System > Notifications and actions.
Under Notifications, turn on Get notifications from apps and other senders.
Next, you’ll want to turn notifications on for Mail in the Windows settings:
In the same Notifications & actions page, under Get notifications for these senders, choose Mail.
Turn Notifications on.
Turn on any other notification option, such as Show notification banners, Show notifications in action center, or Play a sound when a notification arrives. You can also specify the Number of notifications visible in action center and choose the Priority of notifications in action center.
Once you’ve enabled the notification settings you want in the Windows settings, you’ll need to turn on notifications for your email accounts in the Mail app settings:
Open the Windows Mail app and choose Settings.
Under Settings, choose Notifications.
Under Select an account, choose the account to enable notifications for. If you want to enable notifications for all your email accounts, check the box next to Apply to all accounts.
Turn on Show notifications in action center.
Choose any or all of these notification methods:
Show a notification banner
Show notifications for folders pinned to Start
Note: At least one folder from your email account needs to be pinned to the Start menu in order for this option to work.
Turn on notifications for pinned folders in the Windows Mail app
Before you pin folders and enable notifications for those folders, please ensure the latest operating system and Mail app updates are installed on your PC. Once that’s done, open the Windows Mail app to pin the folder and turn on notifications:
Open the Windows Mail app and right-click a folder you want pinned. If the Pin to Start option is available, choose it and then click Yes when a dialog window appears asking Do you want to pin this tile to Start? If you see an Unpin to Start option instead, the folder is already pinned.
In the Windows Mail app, choose Settings.
Under Settings, choose Notifications.
Under Select an account, choose the account to enable notifications for. This account must be the one that the folder you just pinned belongs to. If you want to enable notifications for all your email accounts, check the box next to Apply to all accounts.
Turn on Show notifications in action center.
Turn on Show notifications for folder pinned to Start. You can also choose to turn on any or all of these other notification methods:
Show a notification banner
Send yourself an email to the account and pinned folder, before moving to the next section.
Next, you’ll have to turn on notifications in the Windows settings:
Open Settings from the Windows Start menu.
Choose System > Notifications and actions.
Under Notifications, turn on Get notifications from apps and other senders.
Next, you’ll want to turn notifications on for Mail in the Windows settings:
In the same Notifications & actions page, under Get notifications for these senders, choose Mail.
Turn Notifications on.
Turn on any other notification option, such as Show notification banners, Show notifications in action center, or Play a sound when a notification arrives. You can also specify the Number of notifications visible in action center and choose the Priority of notifications in action center.
Scroll to the bottom of the page and verify that your email account is turned on under Group notifications.
If your Windows 10 version is 1607 or older, notifications for the pinned folder will be located in the Notifications & actions page, instead of being displayed at the bottom of the Mail page.
How to add a Folder in Windows 10 Mail App
Original Title: Email problems in windows 10
Hi I have a couple of questions. First — I want to create a folder with in my email. What I mean is other than the inbox, outbox, junk box and so on I want to create a specific file so that I can put all my emails from this one place into the same file. I was able to do this with windows 8 & 8.1 but can’t do it with windows 10 Is there a way to do this? Second question I was always able to open attachments from my brother but now I can’t. Is there a setting that I need to change? What can I do to fix this?
Replies (13)
* Please try a lower page number.
* Please enter only numbers.
* Please try a lower page number.
* Please enter only numbers.
![]()
Thank you for posting your query on Microsoft Community.
I would inform you that in Windows 10 Mail App you cannot create Folders, however, you can create a folder from Outlook.com (if your email account is Outlook.com) website, which will automatically get synced with your Mail App.
Kindly follow the steps below:
1. Open Outlook.com and sign in to your Outlook.com account.
2. Once you have successfully signed in to your account, right-click on Inbox and select New Subfolder.
3. Type you new folder name and click Enter.
4. Your folder will automatically get synced with Mail App.
5. Open Mail App and click on Folders, you will be able to see your newly created folder.
6. If you cannot, then click on the Refresh icon.
7. Let all your changes get stored in Mail App and then click on Folders again.
Hope this helps. Please respond if you have further related queries.
4 people found this reply helpful
Was this reply helpful?
Sorry this didn’t help.
Great! Thanks for your feedback.
How satisfied are you with this reply?
Thanks for your feedback, it helps us improve the site.
How satisfied are you with this reply?
Thanks for your feedback.
Thank you for posting your query on Microsoft Community.
I would inform you that in Windows 10 Mail App you cannot create Folders, however, you can create a folder from Outlook.com (if your email account is Outlook.com) website, which will automatically get synced with your Mail App.
Kindly follow the steps below:
1. Open Outlook.com and sign in to your Outlook.com account.
2. Once you have successfully signed in to your account, right-click on Inbox and select New Subfolder.
3. Type you new folder name and click Enter.
4. Your folder will automatically get synced with Mail App.
5. Open Mail App and click on Folders, you will be able to see your newly created folder.
6. If you cannot, then click on the Refresh icon.
7. Let all your changes get stored in Mail App and then click on Folders again.
Hope this helps. Please respond if you have further related queries.
Just one more reason that I don’t like this upgrade to Windows 10. All I want to do is create new file folders in Mail. I don’t used Outlook.com for my e-mail. I use a pop server from Charter.net. Then, using Windows Live Mail, I would gain access to my account at Charter. My folders are in Windows Live Mail. I’ve used this system for years. Now, I’m being told to go to Outlook and re-create all of my folders just so this ‘new’ improved system can access the folders.
How about if Microsoft get’s it together and finally makes a system that is user friendly.
I am disgusted with this so-called upgrade. I will be reverting back to Windows 7. I’m very grateful that the upgrade was free. I’d be raising holy-**** if I had paid for this garbage.
*** Email address is removed for privacy ***
Mail folder in windows mail
If your C: drive starts to run out of space, one of the most frustrating experiences can be figuring out what can be deleted or moved to another drive in order to free up storage. This is especially true with modern computers that are commonly configured with small SSD drives as their C: drive, which can easily run out of space due to their smaller storage capacity. If you are using Windows Live Mail it will store your email by default on your C: drive. If you are like me and save almost all of your email, then your Live Mail mail store can grow to a very large size. Thankfully, the program provides the ability to easily change the location where your mail is stored so that you can you move it to another drive that may have more free space available. This tutorial will walk you through changing where your Windows Live Mail e-mail is stored.
The first step in moving your mail store is to start Windows Live Mail. Once the program has started click on the on the program’s menu, which is found in the upper left hand corner of the program as shown below.

Once the menu is open click on the Options section and then click on the Mail menu option. This will open the General tab of the Mail options screen. Please click on the Advanced tab and you will be shown a screen similar to the one below.
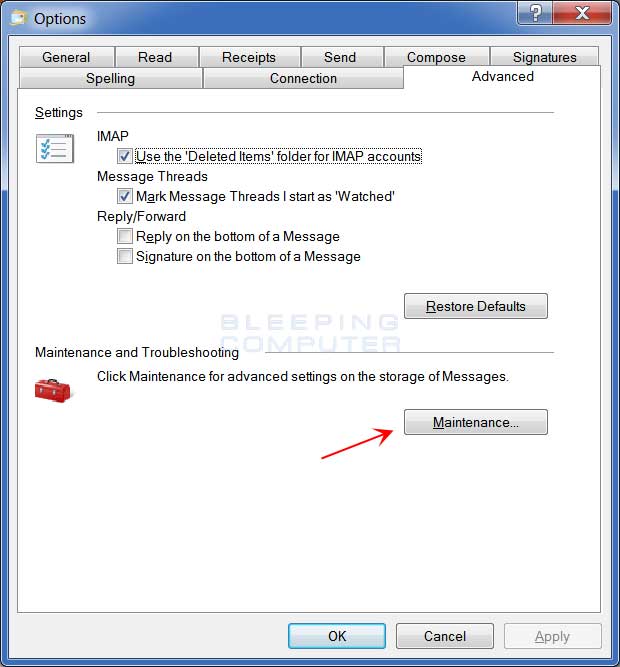
Now click on the Maintenance option as indicated by the red arrow in the image above. This will bring you to the Maintenance settings screen.
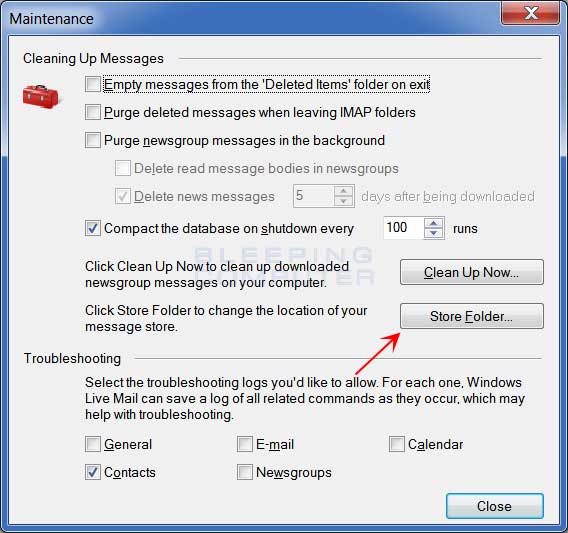
Now click on the Store Folder option. This will open a small dialog box that shows the path to the current mail store folder.
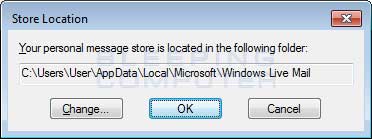
On the above screen we can change the location that Windows Live Mail stores its email. To do this, click on the Change button and you will now be presented with a Browse dialog box where you can select the new location for the mail store.
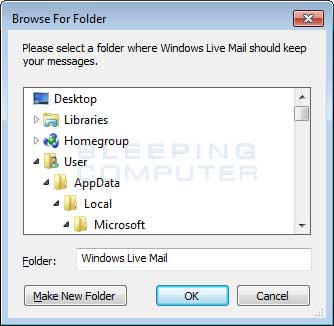
Browse to an existing location that you wish to move your mail to or create a new folder. Once you are done, click on the OK button. You will now be shown the Store Location dialog box with the new path that you selected.
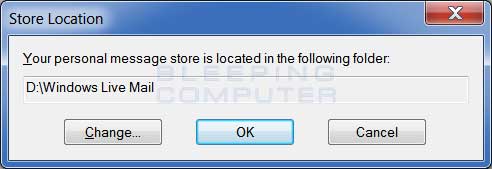
To have Windows Live Mail use this new folder, click on the OK button. Once you click on the OK button, you will be shown a prompt that states you need to restart Windows Live Mail for these changes to go into effect. Click on the OK button in this prompt and then close Windows Live Mail.
Once you close Windows Live Mail, the program will automatically copy all your existing mail and mail folders to the new location.
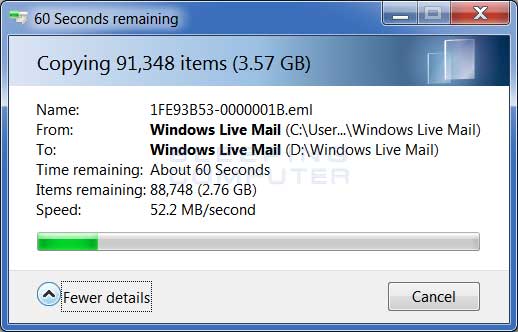
Once it is done, you can start Windows Live Mail again and the program will now be storing your mail in the new location.
Unfortunately, even though Windows Live Mail states it is moving your mail it is actually just copying it. You will still need to delete your old Windows Live Mail folder in order to free up the space on your C: drive. To do this close Windows Live Mail and browse to the old Windows Live Mail folder which is located under the following folder:
Windows 8, Windows7, Windows Vista: C:\Users\ AppData\Local\Microsoft\
Windows XP: C:\Documents and Settings\ \ Application Data\Microsoft\
When you open that folder you will see a subfolder named Windows Live Mail. This is your old mail store. First rename it to Windows Live Mail.old and start Windows Live Mail again. If you can still access your email then we know that the program is using the new folder and we can safely delete the old one. Close Windows Live Mail again and now delete the Windows Live Mail.old folder. When the folder has finished deleting, you can now empty your Recycle Bin.
Windows Live Mail is now using the new folder and you have freed up the space it was using on your C: drive.
If you have any questions performing these steps, please ask in the Web Browsing/Email and Other Internet Applications forum.
Users who read this also read:

How to enable the F8 key to start Safe Mode in Windows 8
Windows 8 introduced a new boot loader that decreased the time that it takes Windows 8 to start. Unfortunately, in order to do this Microsoft needed to remove the ability to access the Advanced Boot Options screen when you press the F8 key when Windows starts. This meant that there was no easy and quick way to access Safe Mode anymore by simply pressing the F8 key while Windows starts. Instead in .

Demystifying the Windows Registry
Ever since Windows 95, the Windows operating system has been using a centralized hierarchical database to store system settings, hardware configurations, and user preferences. This database is called the Windows Registry or more commonly known as the Registry. When new hardware is installed in the computer, a user changes a settings such as their desktop background, or a new software is installed, .

How to create a command-line toolkit for Windows
If you are a system administrator, IT professional, or a power user it is common to find yourself using the command prompt to perform administrative tasks in Windows. Whether it be copying files, accessing the Registry, searching for files, or modifying disk partitions, command-line tools can be faster and more powerful than their graphical alternatives. This tutorial will walk you through .
How to switch between tabs in the Internet Explorer start screen app
In the Internet Explore app on the Windows 8 Start screen you can open different tabs that each contain a different a web page. This allows you to have multiple sites open at the same time that you can switch between as necessary. This tutorial will explain how to create new tabs, remove existing tabs, and switch between tabs in Internet Explorer on the Start Screen.

All About E-mail
According to a report by The Radicati Group on May 9th, 2006, there about 171 billion e-mail messages sent daily, 1.1 billion e-mail users worldwide, and 1.4 billion active e-mail accounts. These numbers are staggering and truly reflect how e-mail has become such an important medium for communicating with friends, family, colleagues, and clients. Though so many of you use e-mail all the time, how .


