- Отправка почты из командной строки посредством msmtp
- Send mail via CMD console
- 4 Answers 4
- Отправка писем из командной строки Telnet с SMTP авторизацией
- Отправка сообщений электронной почты из командной строки, с помощью утилиты Blat.exe
- 1. Утилита Blat.exe
- 2. bat-файлы для отправки сообщений
- 3. Заключение
- Смотрите также:
- 7 Command Line Utilities to Easily Send Email Using SMTP
Отправка почты из командной строки посредством msmtp
msmtp — простой консольный клиент для отправки сообщений электронной почты по протоколу SMTP.
Поскольку в сети достаточно статей про настройку msmtp через файлы конфигурации, рассмотрим возможность отправки сообщений без использования таких файлов. Это может потребоваться, например, когда адрес отправителя и данные аутентификации формируется непосредственно в скрипте перед отправкой (запрашиваются из БД и т.п.)
В данной статье рассматривается отправка почты через публичные серверы smtp на примере версии 1.4.31
Публичные серверы обычно предоставляют порты для обычного и защищенного обмена по протоколу SMTP. При обычном передача сообщений протокола идет открытым текстом. При защищенном — шифруется SSL.
Для обычного обмена как правило используется стандартный порт 25. Пример простейшего скрипта для отправки представлен ниже:
В данном примере тело сообщения формируется в переменной MAIL_MESSAGE. Отправка сообщения производится на 25 порт сервера smtp.from.ru. Для авторизации в данном случае используются имя пользователя и пароль. В качестве имени пользователя используется адрес отправителя. Такая процедура авторизации является обычной практикой для публичных серверов. Пароль в примере передается открытым текстом, что не очень хорошо. Возможные способы защиты пароля можно найти в сети, например здесь.
Ключ -d используется для отладки обмена с сервером.
Для защищенного обмена обычно используется порт 465. При обмене с использованием SSL (SMTPS) предыдущий пример требуется немного изменить:
В данном примере отличается номер порта MAIL_PORT, а также добавились следующие опции:
—tls=on, включает TLS туннель;
—tls-certcheck=off, без проверки сертификата (проверка сертификата выходит за рамки данной статьи);
—tls-starttls=off, данная опция выполняет немедленный запуск TLS при старте обмена с сервером;
msnmp может включать TLS туннель STARTTLS SMTP командой из обычного режима. При этом для обмена с сервером используется стандартный порт 25 (иногда 587). Чтобы включить данный режим в предыдущем примере необходимо изменить номер порта MAIL_PORT=587 и включить опцию —tls-starttls=on (можно удалить из параметров командной строки, поскольку эта опция включена в настройках программы по умолчанию)
К сожалению, программа не умет отсылать письма с вложениями. Тело письма с вложениями нужно формировать самостоятельно. Следующий пример, демонстрирует отправку такого письма:
В этом примере параметры командной строки msmtp такие же, как в первом скрипте.
Сообщение состоит из двух секций, разделяемых специальной меткой MAIL_BOUNDARY.
Секция с текстом сообщения находится непосредственно в теле письма.
Вложение в данном примере представляет собой секцию с содержимым видеофайла, кодированную base64 при помощи утилиты uuencode.
Данная статья не подлежит комментированию, поскольку её автор ещё не является полноправным участником сообщества. Вы сможете связаться с автором только после того, как он получит приглашение от кого-либо из участников сообщества. До этого момента его username будет скрыт псевдонимом.
Send mail via CMD console
Hi i want to send mail via microsoft cmd console. I tried many way, but i didnt succeed.
the error is :
the error is :
but it didnt worked. i dont know where is the problem or what is the problem.
thanks for your advice.
4 Answers 4
Scenario: Your domain: mydomain.com Domain you wish to send to: theirdomain.com
1. Determine the mail server you’re sending to. Open a CMD prompt Type
EDIT Be sure to type exit to terminate NSLOOKUP.
2. Connect to their mail server
SMTP communicates over port 25. We will now try to use TELNET to connect to their mail server «mail.theirdomain.com»
Open a CMD prompt
You should see something like this as a response:
Be aware that different servers will come up with different greetings but you should get SOMETHING. If nothing comes up at this point there are 2 possible problems. Port 25 is being blocked at your firewall, or their server is not responding. Try a different domain, if that works then it’s not you.
3. Send an Email
Now, use simple SMTP commands to send a test email. This is very important, you CANNOT use the backspace key, it will work onscreen but not be interpreted correctly. You have to type these commands perfectly.
So, what does that all mean? EHLO — introduce yourself to the mail server HELO can also be used but EHLO tells the server to use the extended command set (not that we’re using that).
MAIL FROM — who’s sending the email. Make sure to place this is the greater than/less than brackets as many email servers will require this (Postini).
RCPT TO — who you’re sending it to. Again you need to use the brackets. See Step #4 on how to test relaying mail!
DATA — tells the SMTP server that what follows is the body of your email. Make sure to hit «Enter» at the end.
. — the period alone on the line tells the SMTP server you’re all done with the data portion and it’s clear to send the email.
quit — exits the TELNET session.
4. Test SMTP relay Testing SMTP relay is very easy, and simply requires a small change to the above commands. See below:
See the difference? On the RCPT TO line, we’re sending to a domain that is not controlled by the SMTP server we’re sending to. You will get an immediate error is SMTP relay is turned off. If you’re able to continue and send an email, then relay is allowed by that server.
Отправка писем из командной строки Telnet с SMTP авторизацией
В некоторых случаях с целью тестирования или диагностики работы почты, почтовому администратору требуется проверить отправку писем через свои сервера Exchange (и не только) с определенных хостов. В том случае, если сервер не требует авторизации (open-relay сервер), отправить почту можно из командной строки telnet . Однако в большинстве случае почтовые сервера для отправки почты требуют авторизации. В этом примере мы покажем, как в консоли telnet выполнить аутентификацию типа AUTH LOGIN на SMTP сервере и отправить письмо.
AUTH LOGIN – в терминологии Exchange – это базовая аутентификация, когда имя и пароль пользователя передаются по сети в закодированном по алгоритму base64 виде. На большинстве внутренних серверах Exchange администраторы не отключают BasicAuthentication . Проверить ее поддержку можно в настройках принимающего коннектора.
Примечание . Обращаем ваше внимание что злоумышленник при доступе к каналу связи может легко перехватить и расшифровать закодированные по Base64 учетные данные пользователя. Поэтому этот способ авторизации рекомендуется использовать исключительно в частных корпоративных сетях.
Для авторизации на почтовом сервер с с помощью AUTH LOGIN, нам нужно преобразовать имя и пароль пользователя, из-под которого будет отправляться письмо в формат Base64. Это можно сделать с помощью скриптов или онлайн сервисов. Я воспользоваться сайтом https://www.base64encode.org/.
Имя пользователя: testuser@contoso.com , в кодировке Base64 получилось: dGVzdHVzZXJAY29udG9zby5jb20=
Пароль: $up3RsTr)ng — в Base64 JHVwM1JzVHIpbmc=
Теперь в командой строке с помощью Telnet подключаемся на 25(SMTP) порт нашего почтового сервера (вводимые команды я буду выделять синим цветов):
telnet mail.contoso.com 25
Если это Exchange, он вернет что-то вроде;
220 mail.contoso.com Microsoft ESMTP MAIL Service ready at Thu, 10 Aug 2015 14:25:30 +0300
Сервер вернет список поддерживаемых типов авторизаций и возможностей. Как вы видите базовая авторизация (AUTH LOGIN) в списке имеется.
250-mail.contoso.com Hello [192.168.100.15]
250-SIZE 36700160
250-PIPELINING
250-DSN
250-ENHANCEDSTATUSCODES
250-STARTTLS
250-AUTH LOGIN
250-8BITMIME
250-BINARYMIME
250 CHUNKING
Сообщаем SMTP серверу, что мы хотим авторизоваться с помощью имеющейся учетной записи:
Сервер должен ответить:
334 VXNlcm5hbWU6
Теперь вставляем имя пользователя в формате Base64, которое мы закодировали ранее:
dGVzdHVzZXJAY29udG9zby5jb20=
Сервер должен ответить:
Теперь пора вставить пароль в формате Base64:
JHVwM1JzVHIpbmc=
Если имя и пароль пользователя верны, сервер ответит.
235 2.7.0 Authentication successful
535 5.7.8 Error: authentication failed: UGFzc3dvcmQ6
mail from: testuser@contoso.com
250 2.1.0 Sender OK
rcpt to: admin@contoso.com
250 2.1.5 Recipient OK
data
354 Start mail input; end with .
from: TestUserovich
to: TheAdmin
Subject: Test BASE SMTP Authenticated via Telnet
This is test
.
250 2.6.0 [InternalId=6384384] Queued mail for delivery
221 2.0.0 Closing connection.
Connection closed by foreign host.
На этом все, тестовое письмо должно успешно доставиться в ящик получателя.
Отправка сообщений электронной почты из командной строки, с помощью утилиты Blat.exe
Сегодня я расскажу о том, как отправлять сообщения на электронную почту из командной строки. Можно привести массу ситуаций, когда необходимо выполнять данное действие. Например, для контроля выполнения различных регламентных заданий, резервного копирования баз данных и пр. А поможет нам в этом маленькая, удобная и абсолютно бесплатная утилита Blat.exe.
1. Утилита Blat.exe
Скачать программу Blat можно с официального сайта или с текущего. На момент написания статьи последней была версия 3.0.7. В архиве 2 папки: full — непосредственно сама программа и docs — документация по программе. Для установки необходимо скопировать содержимое папки full в «C:\Windows\system32\» или в любую другую директорию, но в этом случае при вызове программы придется указывать путь к исполняемому файлу. Я в своем примере буду использовать второй вариант.
Есть возможность сразу создать профиль для отправки сообщений, для этого необходимо выполнить «Blat -install smtp.yoursite.tld youruserid@yoursite.tld». Я не буду рассматривать данный режим работы. Подробнее читайте в файле «readme.txt».
2. bat-файлы для отправки сообщений
Если открыть файл «syntax.txt» из прилагаемой документации, то можно увидеть огромный список команд, поддерживаемый данной утилитой, что говорит о ее богатых возможностях. Выделим основные и получим следующий «батник» send_email.bat (скачать все файлы в одном архиве) для отправки сообщения с адреса report@mydomen.com на адрес user@mydomen.com:
Таким образом, для отправки сообщения достаточно будет просто вызвать файл send_email.bat:

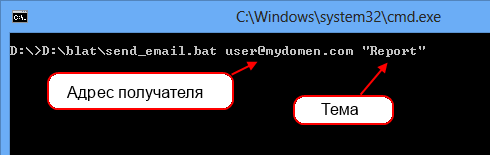
Можно доработать файл таким образом, чтобы адрес получателя и тема сообщения задавалась параметрами запуска. Вот содержимое такого bat-файла:
И пример его запуска с параметрами:
Если получателей несколько, то при вызове утилиты можно указать текстовый файл с адресами получателей сообщения:
Где файл mail_list.txt будет содержать адреса получателей разделенные переносом строки.
Ну и наконец, приведу пример файла, который я использую в данный момент. В нем все файлы находятся в директории с исполняемым bat-файлом, список адресов берется из файла, а тема письма задается параметром. Сделано это для того чтобы в зависимости от работы задания отсылать письма с разной темой. Например:
3. Заключение
Данные примеры не описывают все возможности программы Blat.exe. Она поддерживает сервера SMTP, NNTP, POP3 и IMAP, есть возможность хранить настройки в файле или в реестре, прикреплять вложения в тело письма и многое другое. Я думаю, что взяв за основу предложенные выше файлы, вы сможете написать любой скрипт для отправки электронных сообщений при помощи этой замечательной утилиты.
Смотрите также:
В данной статье представлен экземпляр кода на язке 1С и добавлена небольшая обработка, позволяющая отправить электронное сообщение средствами 1С, есть возможность прикрепления файлов в тело письма. В первую очередь, будет…
В данной статье я рассмотрю пример кода, который позволяет отправлять электронные сообщения из 1С:Предприятие 8 с помощью стандартной библиотеки CDO.Message. Данная библиотека по умолчанию входит во все версии ОС Windows начиная с Win2K.…
Утилита Sysprep, основным предназначением которой является подготовка эталонного образа Windows к развёртыванию, на борту операционной системы от Microsoft появилась давно, ещё в версии Windows NT 4.0, увидевшей свет в 1996…
7 Command Line Utilities to Easily Send Email Using SMTP
Not only is email very useful for communication between friends and families and sending messages with attachments such as reports, photos, documents, presentations, video clips and music files, it’s also useful for notification purposes. For example, a website monitoring service such as Pingdom has alerts where you’ll be notified through different methods such as email, SMS, twitter or in-app when your server is down. Third party backup software also normally has at least an email notification feature where you can set it up to automatically email you when the backup process has completed or failed.
If you are writing a batch file and want to send an automated email when the batch has completed running or if you’re faced with a third party software that does not even support email notification, then the simple solution is to use a command line email sending tool for Windows. Here we have 7 ways to look at.
- sender@gmail.com = Replace it with your full Gmail address
- recipient@email.com = Replace it with the email address that will receive the message
- YourGmailPassword = Replace it with your Gmail password
- subject = The subject of the email. Make sure it is enclosed with double quotes if there are spaces. For example, “This is a long subject“
- body = The message of the email. Should also enclose with double quotes if there are spaces
1. SwithMail
Out of all the command line email sending tools, we’d consider SwithMail as one of the best in its class, if not the best. Instead of the need to write really long command line options to silently send an email where you might make mistakes and need a few tries to get it right, configuring SwithMail is quite foolproof thanks to the easy to use settings configuration GUI. You even test the email settings to make sure that it is able to successfully send an email.

Other than the standard options such as attachments, CC, BCC that you’d normally find when sending an email, SwithMail supports returning error codes, global variables and wildcard attachments which is very useful to automatically send log files with dated filenames. Below is a working example of SwithMail command line options to send an email using Gmail account.
SwithMail.exe /s /from sender@gmail.com /pass YourGmailPassword /server smtp.gmail.com /p 587 /SSL /to recipient@email.com /sub subject /b message
2. CMail
If you need to use a command line email sending tool that supports proxy, CMail would be your choice as it’s the only one that can support socks and HTTPS based proxy. Other interesting features that can be found in CMail are sending the whole directory content based on wildcard attachment and delivery status notification.
The full working command line to send an email using Gmail is as follows:
CMail.exe -secureport -host:sender@gmail.com:YourGmailPassword@smtp.gmail.com:465 -from:sender@gmail.com -to:recipient@email.com -subject:subject -body:message
3. SendSMTP
Running SendSMTP will bring up an interactive graphical user interface to send emails but at the same time it also supports command line instructions to silently send email with just one line of commands. Although an advanced user would have no problems with the command line arguments, a GUI will greatly help a basic computer user in creating a working config file.

Some notable features found in SendSMTP are the ability to save the password as encrypted using 128-bit Rijndael (AES) rather than saving the password as clear text, enable log file to save the activity of the SendSMTP program, and can return codes to report if the send email is successful (0), failed (1), or cannot find settings (2). The full command line for SendSMTP to send email using Gmail is as follow.
SendSMTP.exe /nos /host smtp.gmail.com /port 587 /auth 2 /userid sender@gmail.com /pass YourGmailPassword /from sender@gmail.com /to recipient@email.com /subject subject /body message
However, if you’ve saved the settings as default from the GUI which will create a SendSMTP.ini file at the same location as the program, a much shorter command line can be used to send an email.
Do note that there are 2 versions available on the download page. You will need the newer version with the bigger file size to support sending email using Gmail because the old version does not support SASL authentication.
4. mailsend
Comparing with the utilities mentioned above, mailsend is a simpler command line tool to send email using SMTP. It doesn’t have fancy features such as loading config from an external file, password encryption, GUI, error codes and etc. However, an interesting feature found in mailsend that is not available on other command line email sending tool is the ability to show SMTP server information by using the -info option.

mailsend is available for both Windows and Linux operating system. Below is the example command line for mailsend to send an email using Gmail.
mailsend1.17b15.exe -t recipient@email.com -f sender@gmail.com -ssl -port 465 -auth -smtp smtp.gmail.com -sub subject -M message -user sender@gmail.com -pass YourGmailPassword
5. Send-It-Quiet
Send-It-Quiet is the smallest command line SMTP mailer utility that weighs only 14KB in size and this is made possible with .NET Framework. This would also mean that you need to have .NET Framework 3.5 installed to run Send-It-Quiet. Send-It-Quiet only comes with very basic parameters that are enough to send an email. Possibly the only extra features found in Send-It-Quiet are the return value of ERRORLEVEL and also the flexibility of manually adding the parameters to registry.
The command line to send an email using Send-It-Quite with a Gmail account is:
senditquiet.exe -s smtp.gmail.com -port 587 -u sender@gmail.com -protocol ssl -p YourGmailPassword -f sender@gmail.com -t recipient@email.com -subject subject -body message
6. SendEmail
SendEmail is written in Perl but there is no need to install Perl in Windows for this command line mailer utility to work. SendEmail was last updated in 2009, but the last version has TLS support which means it can send email using Gmail SMTP. In terms of features, it is quite similar to Send-It-Quiet which only supports the standard email sending options such as to, from, subject, body, attachment, etc. SendEmail is available for both Windows and Linux operating systems.
Here is an example of the command line options that can send email using Gmail SMTP.
sendEmail.exe -o tls=yes -f sender@gmail.com -t recipient@email.com -s smtp.gmail.com:587 -xu sender@gmail.com -xp YourGmailPassword -u subject -m message
7. PowerShell
PowerShell is included in Windows operating systems since Windows 7 which means you can actually use a powershell script to send an email through Gmail SMTP without any of the command line tools mentioned above.

The sample script that can be downloaded at the link below is a very basic one that is meant to only send an email without attachment support. Simply download the ps1 script, open it with Notepad or Windows PowerShell ISE and change the credentials located at line number 8. The command line to run the powershell script is as follows. Make sure you update the path to the .ps1 file.
Powershell.exe -executionpolicy remotesigned -File C:\Users\Raymond\sendemail.ps1
The popular Blat is not included in the list because it does not support SSL which means it cannot send email using Gmail SMTP. Bmail (last updated in 2004), cmdsendmail which is a part of CommandLine Tools, and XmlSendmail are also example of command line send mail utility that doesn’t support SSL.


