- Mail Transfer Agent
- Using an MTA
- Enabling MTA on the Security Gateway
- Configuring MTA Advanced Settings
- Disabling the MTA
- Configuring the Network to Disable the MTA
- Configuring the Network to Use an MTA
- Deploying MTA in Monitor Only Mode
- MTA Engine Updates
- MTA Monitoring
- Записки IT специалиста
- Почтовый сервер для начинающих. Структура и принцип работы
- Дополнительные материалы:
Mail Transfer Agent
Using an MTA
You can enable the Security Gateway as an MTA (Mail Transfer Agent) to manage SMTP traffic. The MTA works with these blades: Threat Emulation, Threat Extraction, and Anti-Spam and Mail Security.
When a gateway scans SMTP traffic, sometimes the email client is not able to keep the connection open for the time that is necessary to handle the email. In such cases, there is a timeout for the email. An MTA deployment prevents this problem. The MTA first accepts the email from the previous hop, does the necessary actions on the email and then relays the email to the next hop. The MTA is able to scan SMTP encrypted traffic for the supported blades.
Note — MTA is also supported on VSX gateways. The MTA configuration is the same for VSX and non-VSX gateways.
To use the Security Gateway as an MTA:
Enabling MTA on the Security Gateway
When selected, the Security Gateway is an MTA for SMTP traffic. For a topology that uses TLS between the previous hop and the Security Gateway, you must import the mail server certificate to the Security Gateway.
To enable the Security Gateway as an MTA:
- In SmartConsole, go to Gateways & Servers and double-click the Security Gateway.
- From the navigation tree, select Mail Transfer Agent.
The Mail Transfer Agent page opens.
- Click the add rule button.
- Right-click the Domain cell and select Edit.
- Enter the domain for the SMTP traffic for this rule. The default setting is to use the wildcard * to accept all recipient domains.
- Click OK.
- Click the Next Hop cell and select the node object that is the mail server for this rule.
Note — From R80.20, you can define a domain object as the Next Hop. This lets you use multiple mail servers based on a DNS name. This DNS configuration allows load balancing and high-availability capabilities based on DNS configuration.
You can also configure the MTA to only scan the emails and not forward them to the mail server.
- Click Import.
The Import Outbound Certificate window opens.
- Click Browse and select the certificate file.
- Enter the Private key password for the certificate.
- Click OK.
- Select Enable SMTP/TLS.
By default, when you enable a gateway as an MTA, an implied rule is created at the top of the Access Control Policy, which opens port 25 for connections destined to the gateway. The default source in the implied rule is any source IP. You can configure the source column to allow traffic from specific sources.
To disable this implied rule, clear Create an implied rule at the top of the Access Control Policy
An MTA rule is created at the top of the Threat Prevention Rule Base.
Configuring MTA Advanced Settings
The MTA Advanced Settings window lets you configure which interfaces on the Security Gateway are listening to SMTP traffic that is sent to Threat Emulation.
Use the Mail Settings section to define these settings:
- Maximum time that emails are kept in the MTA queue.
- The MTA hard drive limit. When this limit is reached, the MTA stops processing emails.
- Use the Troubleshooting section to generate a log or send an alert if emails are delayed in the MTA.
Emails that are in the MTA longer than the Maximum delayed time are blocked or allowed without processing. The Troubleshooting setting lets you receive a log or alert when one of the limits is exceeded.
To configure the MTA advanced settings:
- Double-click the Security Gateway and from the navigation tree select Mail Transfer Agent.
The Mail Transfer Agent page opens.
In the Advanced Settings section, click Configure Settings.
The MTA Advanced Settings window opens.
- All interfaces — SMTP traffic from all the interfaces is sent for scanning
- All external — SMTP traffic from the external interfaces is sent for scanning
- Use specific — SMTP traffic from the list of specified interfaces is sent for scanning. To add an interface to the list, click the plus sign ( + ). To remove a selected interface from the list, click the minus sign ( — ).
- % of storage — The percentage limit of MTA hard disk space.
- MB — Total MB limit of MTA hard disk space.
- Allow — SMTP traffic is allowed
- Block — SMTP traffic is blocked
- None — No logs are generated
- Log — A log is generated in the Logs & Monitor view
- Alert — Logs the event and sends the configured alert
- When mail is delayed for more than — Set the maximum number of minutes that email is delayed in the MTA before the track option is done
- Track — Select None (no logs are generated), Log (logs generated in the Logs & Monitor view), Alert (logs the event and sends the configured alert).
Disabling the MTA
To disable the MTA:
Configuring the Network to Disable the MTA
The MTA address can be saved in the cache. If the MTA queue is not empty, or you disable the MTA first, it is possible to lose emails that are sent to the network.
To disable MTA for email that is sent to the internal mail server:
- Connect to the DNS settings for the network.
- Change the MX records, and define the mail server as the next hop.
- Wait for 24 hours.
- Disable the MTA on the Security Gateway.
To disable MTA for email that is sent to a different MTA:
- Connect to the SMTP settings on the MTA that sends SMTP traffic to the internal mail server.
- Change the SMTP settings and define the mail server as the next hop.
- Make sure that the MTA queue is empty.
- Disable the MTA on the Security Gateway.
Configuring the Network to Use an MTA
After you configure the Security Gateway as an MTA, change the settings to send SMTP traffic from external networks to the Security Gateway. Each organization has an MX record that points to the internal mail server, or a different MTA. The MX record defines the next hop for SMTP traffic that is sent to the organization. These procedures explain how to change the network settings to send SMTP to the Check Point MTA.

Important — If it is necessary to disable the MTA on the Security Gateway, change the SMTP settings or MX records first. Failure to do so can result in lost emails.
To configure an MTA for email that is sent to the internal mail server:
- Connect to the DNS settings for the network.
- Change the MX records, and define the Security Gateway as the next hop.
To configure an MTA for email that is sent to a different MTA:
- Connect to the SMTP settings on the MTA that sends email to the internal mail server.
- Change the SMTP settings and define the Security Gateway as the next hop.
Deploying MTA in Monitor Only Mode
You can use the Check Point MTA to only monitor SMTP traffic.
Configure the MTA to only scan the emails, but not to forward them to the mail server.
Note — Make sure that the mail relay in the network can send a copy of the emails to the Check Point MTA.
To configure the MTA not to forward emails:
- In SmartConsole, create a new Host object.
- Configure these settings:
- Name — For example, No_Forward
- IPv4 Address — Enter 0.0.0.0
- In the Gateways & Servers view, double-click the Security Gateway.
- From the navigation tree, click Mail Transfer Agent.
The Mail Transfer Agent page opens.
MTA Engine Updates
The Mail Transfer Agent Engine Update is an accumulation of new features and bug fixes to the MTA engine. MTA updates are available to users of R80.10 with Jumbo HFA take 142 and up, and users of R80.20 GA.
It is delivered in the form of a CPUSE Hotfix and can be installed and upgraded manually through the CPUSE User Interface and CLISH commands. cpstop/cpstart or reboots are not required.
The updates do not conflict with the regular Jumbo HFAs (for example, R80_10_jumbo_hf) and can be updated independently.
To update the MTA engine:
Open the Gaia Portal > upgrades (CPUSE) > Status and Actions > MTA Engine Updates
For more information on the MTA engine updates, see sk123174.
To check the current version of Mail Transfer Agent Update, run this command:
MTA Monitoring
There are 3 new views for MTA monitoring in SmartView available for R80.10 gateways with Jumbo Hotfix take 142 or R80.20 gateways:
To see these views:
- In SmartConsole, go to the Logs & Monitor view.
- Click the + sign to open a new tab.
- At the bottom left corner, click SmartView.
The views are based on logs that are updated with each email status change. You can change the time frame of the views in the upper left corner of the MTA Live Monitoring page. You can customize the views, create new widgets and export the views to Excel/PDF.
Here is a description of each one of the new views:
- MTA Live Monitoring — Shows the current status of the email traffic which passed through the MTA in the selected time frame.
The left side shows the distribution of the emails in queue in a graph and a table. If you right-click the Action column in the table, you can do these actions on the email:
- Retry — Try to handle the email again
- Drop — Delete the email
- Bypass — Do not perform the security inspection and send the email to the next hop
The right side shows these views for the selected time frame:
- Statistical information on the number of emails in the queue.
- The number of emails delivered.
- Email Status — a diagram which shows a distribution of the email traffic which passed through the MTA, based on these statuses:
- Bounced — The MTA sent the Emails back to the sender.
- Deferred — A temporary failure occurred. The MTA will retry to perform the applicable action again.
- Dropped — The MTA did not transfer the emails to the next hop.
- Skipped — The MTA bypassed the emails. No scanning was performed.
When you click a column in the diagram, a window opens with a list of the logs that the column is based on.
- Emails by Status Timeline.
- Email Content Timeline.
- Emails in Queue Timeline.
You can use compare the 3 timelines to identify trends in email traffic and analyze the root cause for all kinds of situations. For example, if the emails in queue timeline shows many emails in the queue at a certain point in time, you can look at the other timelines to check the possible reasons for this. If the content timeline shows many emails with links and attachments at the same point in time, this could explain it, because they take longer to scan.
This view shows the causes of failure and the number of failures for each cause. For example: too many parallel requests for scanning or exceeded operation timeout.
The most common failure timeline shows the X top failures. The default is 5.
The Email Failure timeline shows all failures.
Записки IT специалиста
Технический блог специалистов ООО»Интерфейс»
- Главная
- Почтовый сервер для начинающих. Структура и принцип работы
Почтовый сервер для начинающих. Структура и принцип работы

Многие системные администраторы испытывают определенные трудности при работе с системами электронной почты. Это неудивительно, почтовый сервер имеет гораздо более сложную структуру, чем файловый сервер, роутер или сервер терминалов. В этой статье мы рассмотрим структуру и принцип работы почтовых серверов, без понимания которых настройка системы электронной почты вполне способна превратиться в шаманские танцы с бубном.
Данный материал содержит довольно много упрощений и обобщений, с целью дать системным администраторам необходимый минимум знаний. На наш взгляд, ради администрирования одного-двух почтовых серверов начального уровня становиться специалистом в области электронной почты совсем не обязательно.
Для большинства пользователей и начинающих администраторов почтовый сервер представляет собой некий «черный ящик», который получив письмо «неведомыми» путями доставляет его адресату и наоборот. Все взаимодействие с таким сервером заключается в обращении почтового клиента к определенным портам, а то и вообще через веб-интерфейс. Однако внутри скрыт целый механизм, понимание работы которого имеет ключевое значение для успешной настройки и обслуживания системы электронной почты. Это особенно важно для администрирования серверов на платформе Linux. В отличии от Windows, где почтовый сервер представляет собой законченное программное решение и о внутреннем взаимодействии уже позаботились разработчики, в Linux компоненты почтового сервера представляют собой отдельные программы и настраивать их взаимодействие нужно самостоятельно.
Рассмотрим структуру почтового сервера, а также что происходит когда пользователь пытается отправить почту.
 Важнейшей часть почтового сервера является MTA (Mail Transfer Agent — агент пересылки почты) в задачи которого входит прием и передача почты. Очень часто (в Linux / UNIX) МТА называют также почтовым сервером. MTA работает по протоколу SMTP, и его одного, в принципе, уже достаточно для создания системы электронной почты. Когда-то давно именно так и было и для доступа к своему почтовому ящику требовалось обладать определенными техническими знаниями.
Однако прогресс не стоит на месте, MTA, получая письмо, помещает его в почтовый ящик пользователя на сервере, к которому последний должен получить доступ, желательно наиболее простым и понятным способом. Вот здесь на сцену выходит MDA (Mail Delivery Agent — агент доставки почты), его задача по запросу почтового клиента передать ему почту из почтового ящика на сервере. MDA может работать по протоколам POP3 или IMAP, в ряде случаев для «общения» почтового клиента и агента доставки могут применяться собственные протоколы, обладающие расширенной функциональностью, например MAPI (Exchange Server).
Вопреки распространенному заблуждению, MDA не имеет никакого отношения к процессу передачи почты. Это прерогатива MTA. Если провести аналогию, MTA можно представить как почтовое отделение, которое занимается приемом и отправкой почты, а MDA с почтальоном, который приносит пришедшую корреспонденцию к вам домой. Если почтальон заболел, то это никак не скажется на работе почты, просто вы не получите письма на дом. Также и MDA, его отказ не приводит к неработоспособности почтового сервера, становится недоступно только получение почты почтовым клиентом, в то же время к ней можно спокойно получить доступ другими путями, например, через веб интерфейс.
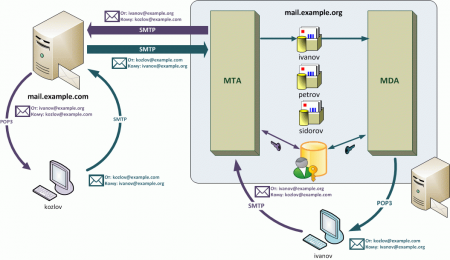
Посмотрим, что происходит при отправке почты. В нашем примере пользователь Иванов, находящийся в домене example.org (ivanov@example.org), пишет письмо Козлову в домен example.com (kozlov@example.com). Для Иванова процесс отправки почты состоит из создания сообщения и нажатия кнопки «Отправить» в почтовом клиенте. Почтовый клиент соединяется с МТА по протоколу SMTP и первым делом сообщает свои учетные данные. Авторизовав пользователя, MTA принимает сообщение и пытается доставить его дальше.
Вообще-то авторизация не является обязательной процедурой для MTA, но без авторизации мы получим открытый релей, т.е. любой может воспользоваться нашим сервером для пересылки почты, а как спамеры обрадуются! В настоящее время открытые релеи возникают в основном из-за ошибок настройки сервера. Однако вполне допустима ситуация, когда MTA без авторизации принимает почту от доверенных пользователей, например из локальной сети предприятия.
Для авторизации MTA может использовать собственный список пользователей, системный список, списки пользователей LDAP или AD. Также существует способ: авторизация POP прежде SMTP, когда пользователь перед отправкой почты авторизуется на MDA, который, в свою очередь подтверждает аутентификацию пользователя для MTA.
Следующим шагом MTA анализирует служебную информацию письма, определяя домен получателя, если он относится к доменам обслуживаем данным МТА, производится поиск получателя и письмо помещается в его ящик. Так произошло, если бы Иванов написал письмо Петрову или Сидорову.
Если домен получателя не обслуживается MTA, формируется DNS-запрос, запрашивающий MX-записи для данного домена. MX-запись представляет особый вид DNS-записи, которая содержит имена почтовых серверов, обрабатывающих входящую почту для данного домена. MX-записей может быть несколько, в этом случае MTA пробует последовательно установить соединение, начиная с сервера с наибольшим приоритетом. При отсутствии MX-записи запрашивается A-запись (запись адреса, сопоставляющая доменное имя с IP-адресом) и выполняется попытка доставить почту на указанный там хост. При невозможности отправить сообщение, оно возвращается отправителю (помещается в почтовый ящик пользователя) с сообщением об ошибке.
Мы не будем рассматривать работу принимающего сервера, будем считать что все прошло нормально, Козлов получил письмо от Иванова и написал ему ответ. Сервер, обслуживающий домен example.com, проводит точно такие же действия и пробует передать почту нашему серверу. Получив входящее сообщение MTA, как и в случае с локальным отправителем, проверяет домен получателя, если он входит в число обслуживаемых MТА, обработка сообщения продолжается, иначе сервер отказывается принимать почту. После проверки домена проверяется получатель, если он присутствует в списке пользователей, сообщение доставляется в его ящик, в противном случае возможны два варианта: отказ от приема сообщения или прием сообщения в общий почтовый ящик (ящик администратора). С одной стороны такая настройка увеличивает число принимаемого спама, с другой позволяет не потерять письма с ошибками в написании адреса.
Еще одной мерой защиты от спама является запрос PTR-записи. PTR-запись (запись указателя) связывает IP-адрес с именем домена. Запрашивая PTR, MTA принимает почту только в том случае если домен отправителя совпадает с доменом отправляющего сервера.
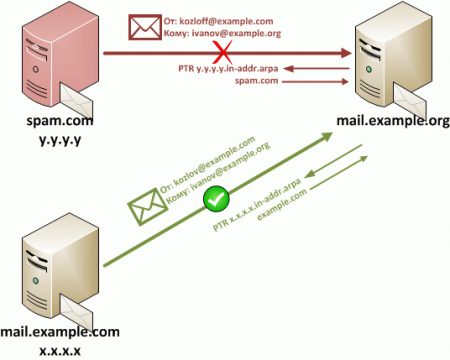 Рассмотрим пример более подробно. Некий спамерский сервер spam.com пытается рассылать письма с поддельным отправителем, якобы от известного нам сервера example.com. В случае фильтрации по белым / черным спискам такое письмо будет доставлено, так как отправителем числится пользователь из доверенного домена (на что и рассчитывали спамеры). В целях борьбы со спамом MTA формирует запрос PTR записи для IP-адреса отправляющего сервера, который он сообщает в процессе SMTP сессии. Для адреса y.y.y.y PTR-запрос вернет имя домена spam.com, которое не совпадает с доменом отправителя, что будет причиной отказа в приеме данного сообщения. В то-же время сообщения от сервера x.x.x.x будут получены, так как домен из PTR-записи для x.x.x.x (example.com) совпадает с доменом отправителя.
Итак, сообщение получено и находится в почтовом ящике пользователя. Как его прочитать? Почтовое хранилище, где находятся ящики пользователей, может быть организовано самыми различными способами: начиная от банальных папок и фалов, заканчивая базой данных. Не обладая техническими знаниями, прочитать собственную почту вряд-ли удастся. Но разве это должно волновать пользователя Иванова? Для него процесс получения почты сводится к нажатию кнопки «Получить» в почтовом клиенте.
Для получения почты клиент устанавливает соединение с MDA по протоколу POP3 или IMAP, обязательно передавая данные для авторизации. MDA проверяет наличие пользователя в списках и, при успешной проверке, передает клиенту все новые сообщения находящиеся в его почтовом ящике. Пользователь Иванов получает свою корреспонденцию и может работать с ней удобным ему способом.
На этом наша статья заканчивается, мы настоятельно рекомендуем вдумчивое прочтение и усвоение изложенного в ней материала. В последующем, при рассмотрении практических реализаций почтовых серверов мы будем подавать материал из расчета, что читатель имеет знания в объеме не менее данной статьи.
Дополнительные материалы:
Помогла статья? Поддержи автора и новые статьи будут выходить чаще:
Или подпишись на наш Телеграм-канал: