- Create a Bootable USB Flash Drive
- To create a bootable USB flash drive
- Как создать загрузочную USB флешку для установки Windows 7/ 8.1 /10
- Обзор из нескольких отличных программ для создания загрузочной флешки для установки Windows любой версии на компьютер, ноутбук, ультрабук, планшет. В описании каждой программы добавлен небольшой мануал по использованию
- Начнем, пожалуй, с ПО, которое предлагает компания Microsoft
- Создание загрузочной флешки Windows с помощью USB/DVD Download Tool
- Скачать программу: Windows USB/DVD Download Tool
- MediaCreationTool
- Скачать программу: MediaCreationTool
- Альтернатива в виде программы Rufus
- Скачать программу: Rufus
- 3 Methods to Create Bootable USB Windows 10 [Full Guide]
- Why create a bootable USB in Windows 10?
- 3 Methods to make a bootable USB drive for Window 10
- 1. Create bootable USB Windows 10 via CMD
- 2. Make bootable Win 10 USB via Windows USB/DVD Download Tool
- 3. Make bootable USB via MediaCreationTool
- Further study: create bootable USB to run Win 10 from flash drive
- Summary
Create a Bootable USB Flash Drive
Applies To: Windows Server 2016 Essentials, Windows Server 2012 R2 Essentials, Windows Server 2012 Essentials
You can create a bootable USB flash drive to use to deploy Windows Server Essentials. The first step is to prepare the USB flash drive by using DiskPart, which is a command-line utility. For information about DiskPart, see DiskPart Command-Line Options.
To create a bootable USB flash drive for use in recovering or reinstalling Windows on a PC instead of a server, see Create a recovery drive.
For additional scenarios in which you may want to create or use a bootable USB flash drive, see the following topics:
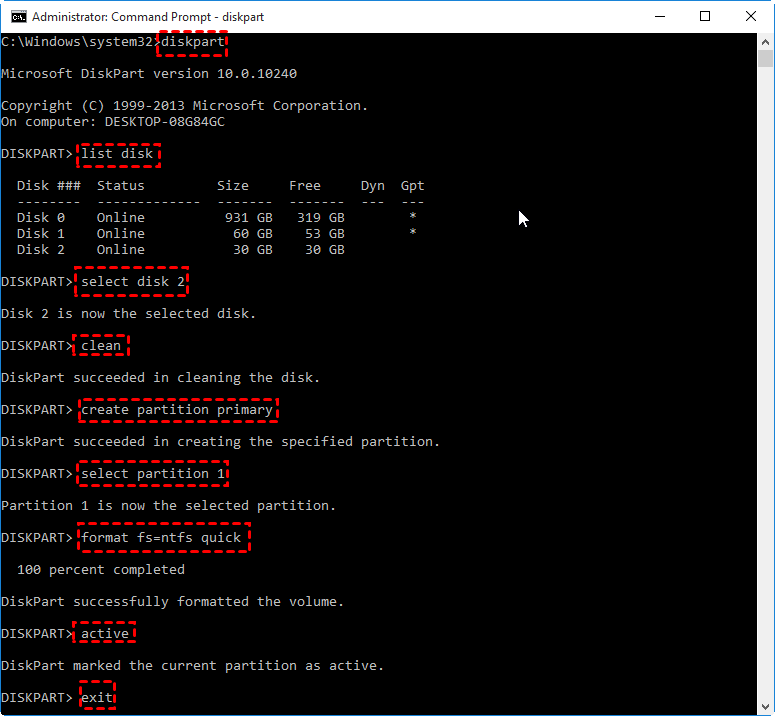
To create a bootable USB flash drive
Insert a USB flash drive into a running computer.
Open a Command Prompt window as an administrator.
In the new command line window that opens, to determine the USB flash drive number or drive letter, at the command prompt, type list disk , and then click ENTER. The list disk command displays all the disks on the computer. Note the drive number or drive letter of the USB flash drive.
At the command prompt, type select disk , where X is the drive number or drive letter of the USB flash drive, and then click ENTER.
Type clean , and the click ENTER. This command deletes all data from the USB flash drive.
To create a new primary partition on the USB flash drive, type create partition primary , and then click ENTER.
To select the partition that you just created, type select partition 1 , and then click ENTER.
To format the partition, type format fs=ntfs quick , and then click ENTER.
If your server platform supports Unified Extensible Firmware Interface (UEFI), you should format the USB flash drive as FAT32 rather than as NTFS. To format the partition as FAT32, type format fs=fat32 quick , and then click ENTER.
Type active , and then click ENTER.
Type exit , and then click ENTER.
When you finish preparing your custom image, save it to the root of the USB flash drive.
Как создать загрузочную USB флешку для установки Windows 7/ 8.1 /10
Обзор из нескольких отличных программ для создания загрузочной флешки для установки Windows любой версии на компьютер, ноутбук, ультрабук, планшет. В описании каждой программы добавлен небольшой мануал по использованию
Стационарные компьютеры постепенно уходят в прошлое. Их место занимают более мобильные устройства: ноутбуки, нетбуки, ультрабуки, планшеты.
И если у большинства классических ноутбуков присутствует Dvd/Cd-Rom и установить Windows можно с помощью обычного лицензионного диска (коробочная версия поставки от MicroSoft), то с ультрабуками, нетбуками и планшетами всё несколько сложнее.
Производители, в стремлении уменьшить вес, габариты и себестоимость, перестали устанавливать Dvd привод для чтения дисков. Вам повезло, если вы купили ноутбук с официально установленной операционной системой Windows. В данном случае, на одном из разделов вашего жесткого диска существует образ для восстановления ОС.
А если случилось так, что Ваш жесткий диск вышел из строя? Или вы купили устройство без предустановленной Windows? Вам таком случае не обойтись без знания как создать загрузочную флешку и специальных программ для этого.
Мы подготовили небольшую подборку специальных программ для создания загрузочных флешек для установки Windows на любой современный компьютер, ноутбук, ультрабук или планшет и простое описание для быстрого старта.
Начнем, пожалуй, с ПО, которое предлагает компания Microsoft
На выбор нам предоставляется два варианта программ:
- Windows USB/DVD Download Tool(подходит для Windows XP, 7, Vista);
- MediaCreationTool(подходит для Windows 8 и выше);
Создание загрузочной флешки Windows с помощью USB/DVD Download Tool
После скачивания программы, её нужно, установить, думаю с этим проблем у Вас не возникнет. Программа проста в использовании, но на всякий случай мы сделаем краткое руководство:
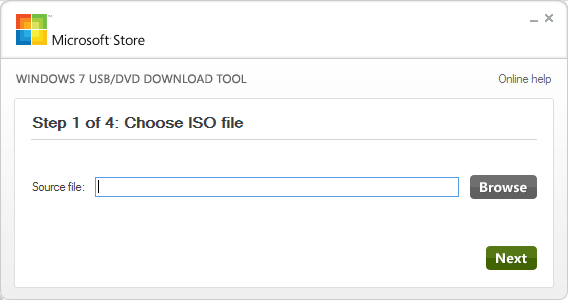
После запуска Вы увидите следующее окно: 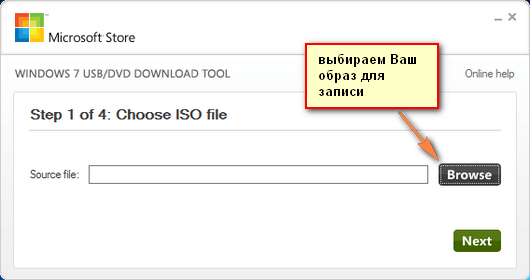
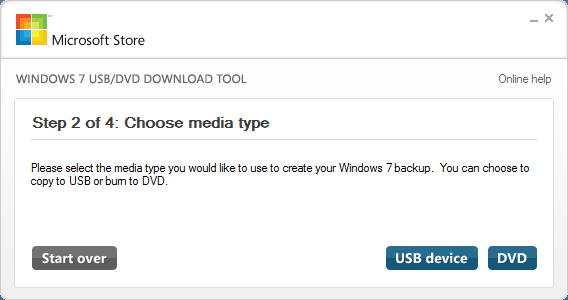
После выбора нажимаем «Next» и попадаем в следующее пункт выбора, так как мы создаем загрузочную флешку то выбираем «usb device» :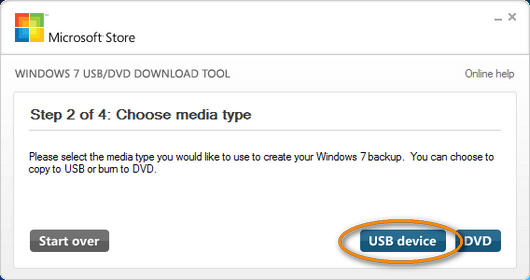
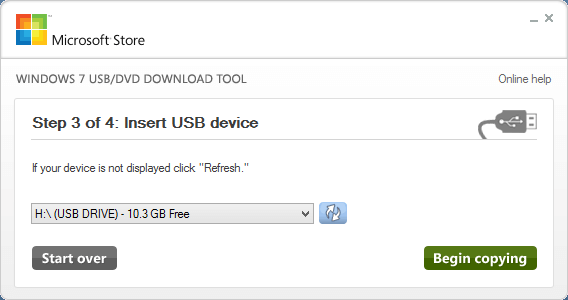
После этого выбираем Вашу флешку и нажимаем «Begin copying»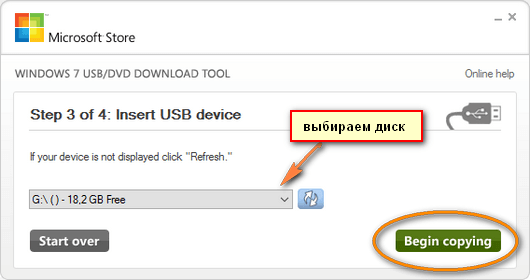
после этого выскочит предупреждение, что Ваше устройство для записи будет отформатировано, нажимаем на кнопку «Erase USB device» и ждём окончания записи 🙂
Скачать программу: Windows USB/DVD Download Tool
MediaCreationTool
С этой программой, еще проще. Установка её не требуется, как скачали запускаем файлик и видим следующее окно: 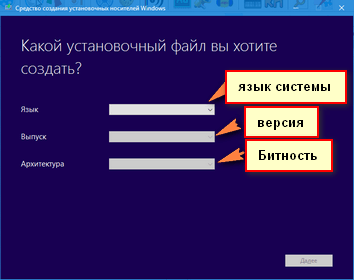
В поле «язык», выбираем язык системы. В поле «версия» выбираем вашу редакцию(ВАЖНО! если у вас есть лицензионный ключ, выбирайте редакцию для него, в противном случае Вы не сможете активировать систему). В поле «архитектура» выбираем разрядность системы( небольшое напоминание: если у вас 3 и менее гигабайта оперативной памяти, рекомендуется использовать 32-х разрядную, если 4 и более — 64).
После выбора настроек нажимаем «далее», выбираем Вашу флешку и нажимаем «далее» и записываем образ.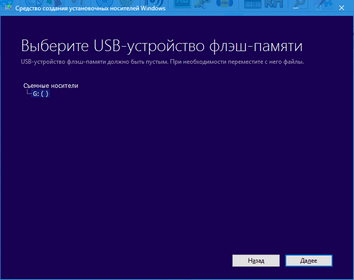
Дожидаемся записи на флешку, время зависит от Вашей скорости в интернете.
Скачать программу: MediaCreationTool
Альтернатива в виде программы Rufus
На самом деле существует множество программ для этих целей, почему выбрали эту? Немаловажный факт играет то, что с её помощью можно создавать загрузочные флешки и не только для стандартного биоса но и для uefi, который является загрузчиком в большинстве новых ноутбуков.
Сейчас мы пошагово рассмотрим способы создания:
Теперь пройдемся по пунктам в меню:
Устройство — непосредственно ваша флешка, для того, чтоб можно было видеть жесткий диск, нужно нужно нажать на стрелочку и поставить галочку как на картинке:
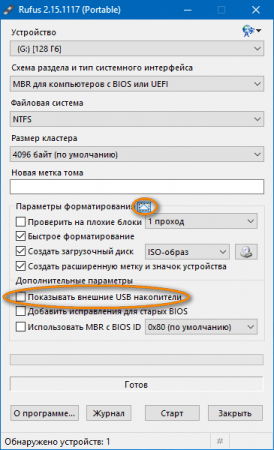
В схеме раздела и тип системного интерфейса выбираем, для какой загрузки будет флешка(uefi или обычный биос).
Если вы выбрали в uefi, то во вкладке файловая система, ОБЯЗАТЕЛЬНО выбираем в fat32!
Размер кластера оставляем без изменений и для выбора вашего образа нажимаем на кнопку указанную ниже на картинке. 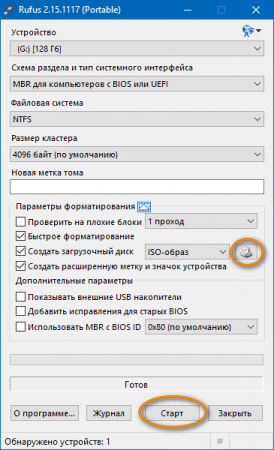
После чего нажимаем на старт и ждём пока запишется Ваша флешка.
Скачать программу: Rufus
Как видим, создать загрузочную флешку для установки Windows 7/ 8.1 /10 совсем не сложно.
3 Methods to Create Bootable USB Windows 10 [Full Guide]
Here, we collect three different methods to help you create bootable USB in Windows 10 easily and effectively.

By Emily  / Last Updated June 10, 2020
Why create a bootable USB in Windows 10?
In most cases, when the Windows 10 operating system goes wrong and the PC starts to run slowly or even stop working properly, your first move will be searching online for a solution. If lucky, you can get an effective solution to fix this issue. If not, the last resort should be reinstalling the operating system from the DVD or CD. What if your PC does not have an optical drive, or the original installation DVD is not available any longer?
In this situation, a bootable USB installer is a great alternative, which allows you to reinstall Windows 10 from a USB drive. Briefly, the USB stick is portable and compatible with nearly all desktops or laptops. After all, a USB port can be found on every PC. Besides, installing OS from USB drive is also quicker than from DVD or CD. Therefore, more and more users like to make a bootable USB installer to keep handy.
3 Methods to make a bootable USB drive for Window 10
In this part, we would like to share 3 different methods with you to make a bootable USB flash drive so that you can install OS more flexibly. Without any further ado, let’s get started.
Note: no matter which method you will choose finally, please ensure you have a copy of the required files stored in USB stick because it will be erased in the process. Free AOMEI Backupper is recommended for this backup task.
1. Create bootable USB Windows 10 via CMD
First of all, we will demonstrate how to make a bootable USB using Command Prompt. Download the Windows 10 ISO files from the official site and make sure the USB flash drive has at least 5GB free space.
Step 1. Press “Win+R” at the same time to open “Run” dialogue. Input “cmd” and hit on “Enter” key.
Step 2. When the Command Prompt window opens, type “diskpart” and press “Enter” to launch DiskPart.exe tool. Then execute the following command in sequence.
в–ёlist disk
в–ёselect disk #
в–ёclean
в–ёcreate partition primary
в–ёselect partition 1
▸format fs=ntfs quick (To create UEFI bootable USB, format it as FAT32 with command “format fs=fat32 quick” instead)
в–ёactive
After you format the USB flash drive and set the primary partition as active, type “Exit” to close the diskpart.exe. Then use File Explorer to copy and paste the entire contents of the Windows ISO to the USB flash drive.
What if file copy fails?
If the Windows image file is over than 4GB, surpassing the file size limit of FAT32 file system, you will fail to copy files onto the USB flash drive. Once it happens, do as below:
1. Copy everything except the Windows image file (sources\install.wim) to the USB drive (either drag and drop, or use the following command, where D: is the mounted ISO and F: is the USB flash drive.)
robocopy D: F: /s /max:3800000000
2. Split the Windows image file into smaller files, and copy them onto the USB drive:
Dism /Split-Image /ImageFile:D:\sources\install.wim /SWMFile:F:\sources\install.swm /FileSize:3800
2. Make bootable Win 10 USB via Windows USB/DVD Download Tool
Secondly, you can make use of the Windows USB/DVD Download Tool. It can create a copy of ISO files onto USB flash drive as an installer.
Step 2. Run it. In the Source box, type the name and path of your Windows ISO file, or click BROWSE and select the file from the OPEN dialog box. Click “Next”.
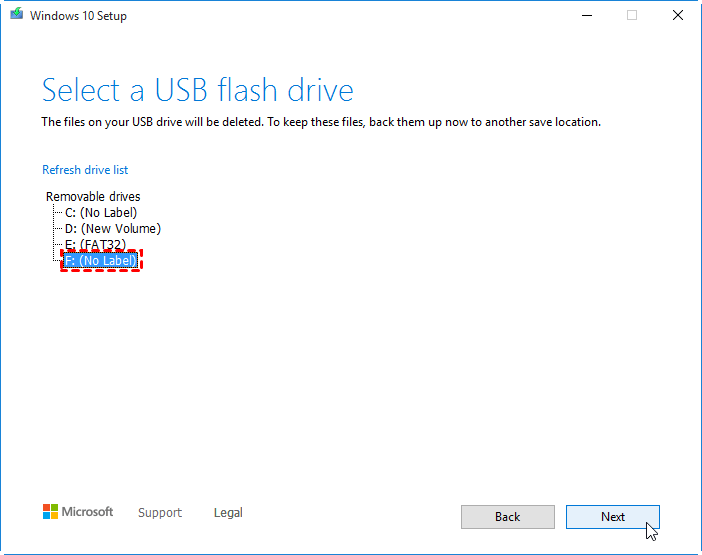
Step 3. Select USB DEVICE to create a copy on a USB flash drive.
Step 4. Choose your USB drive and click “Begin copying”.
After it is finished, install Windows by moving to the root folder of your USB drive, and then double-click Setup.exe.
3. Make bootable USB via MediaCreationTool
Considering that most users tend to use MediaCreationTool, so here we also illustrate how to use this tool to create bootable USB in Windows 10.
Step 1. Download MediaCreationTool and run it as an administrator.
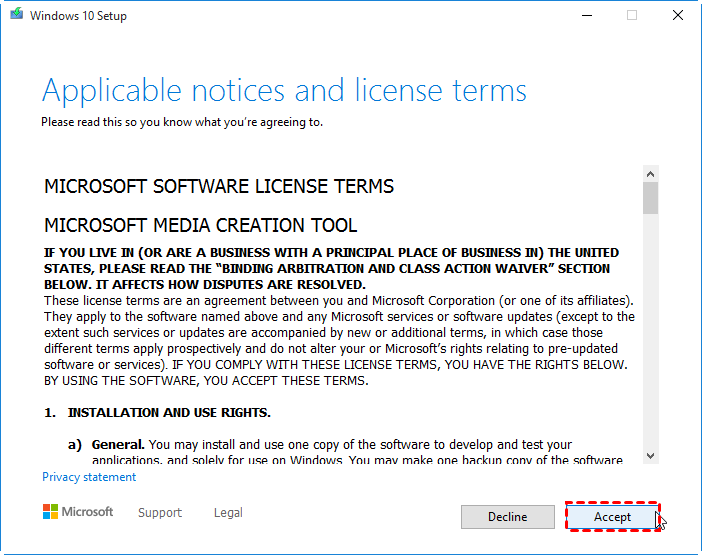
Step 2. Select ”Accept” in the license terms screen.
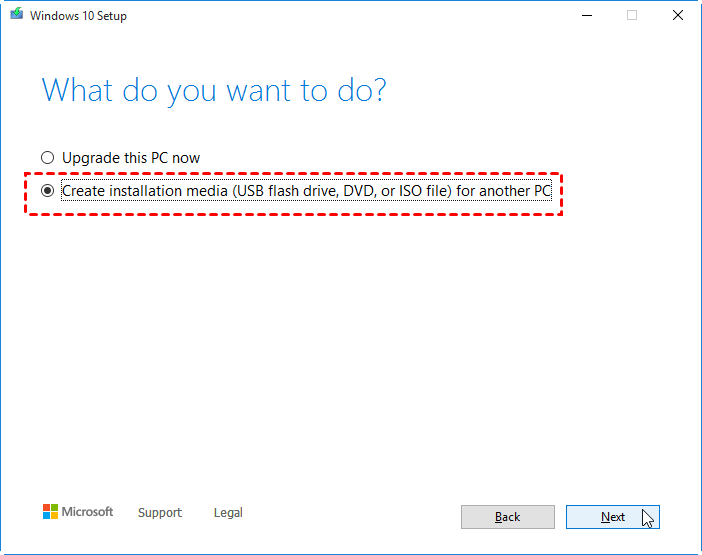
Step 3. Select “Create installation media for another PC”, and then select Next.
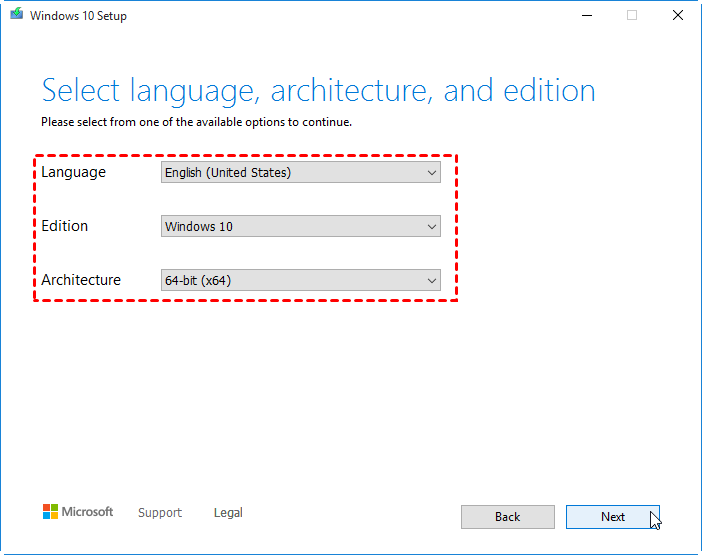
Step 4. Choose the language, edition, and architecture (64-bit or 32-bit) for Windows 10.
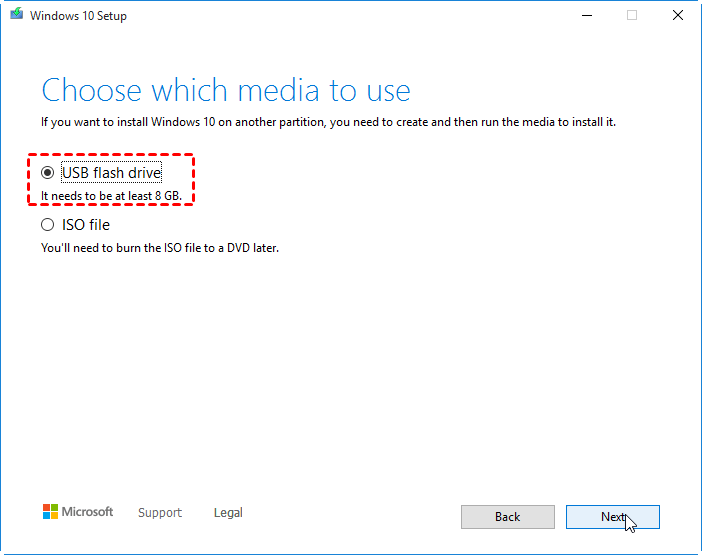
Step 5. Choose ”USB flash drive” and click “Next”.
Step 6. Choose your prepared USB drive from the list, then ”Next”.
Step 7. Once done, the tool will start to download the latest Windows 10 installation files to your device.
When it is over, this data is written to your flash drive and the USB is made bootable with the newest Windows 10 setup.
Further study: create bootable USB to run Win 10 from flash drive
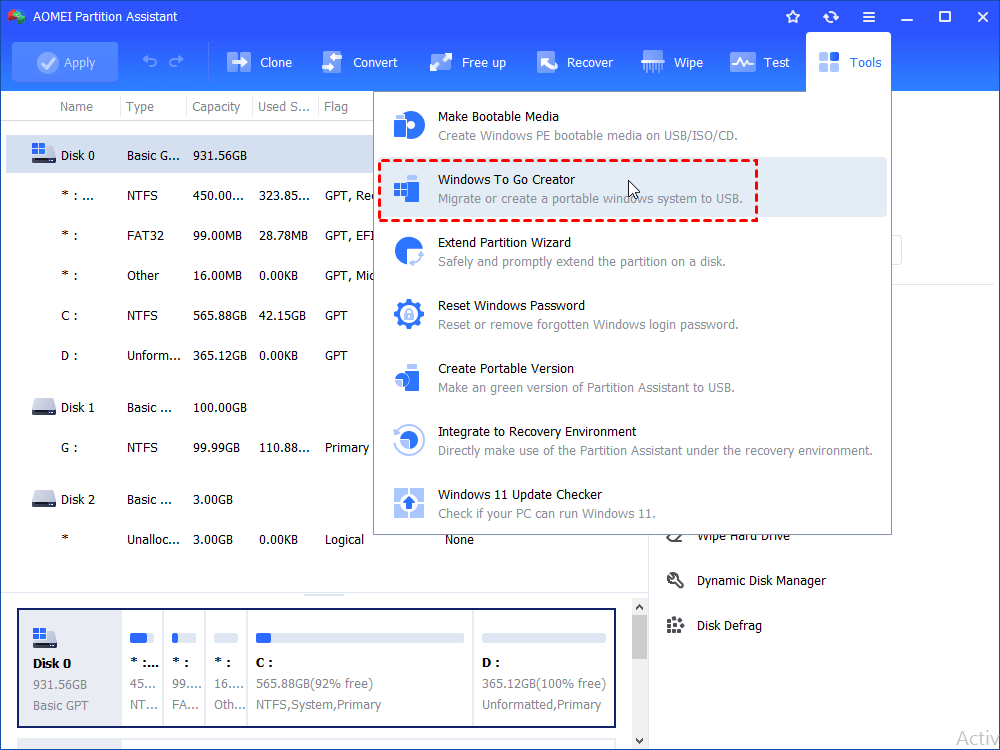
Above content is all about how to make a bootable USB stick to install OS. If you do that for running Windows 10 operating system on another computer with an older operating system, you can run Windows 10 directly through a bootable USB drive. For this purpose, you can turn to the free partition manager: AOMEI Partition Assistant Standard. It is compatible with all editions of Windows 10/8/7 and Windows XP/Vista. With it, you can create Windows bootable USB drive with ISO files. Below is the detailed instruction:
Step 1. Download the freeware, install and run AOMEI Partition Assistant Standard.
Step 2. Click “All Tools” > “Windows To Go Creator” on the left side.
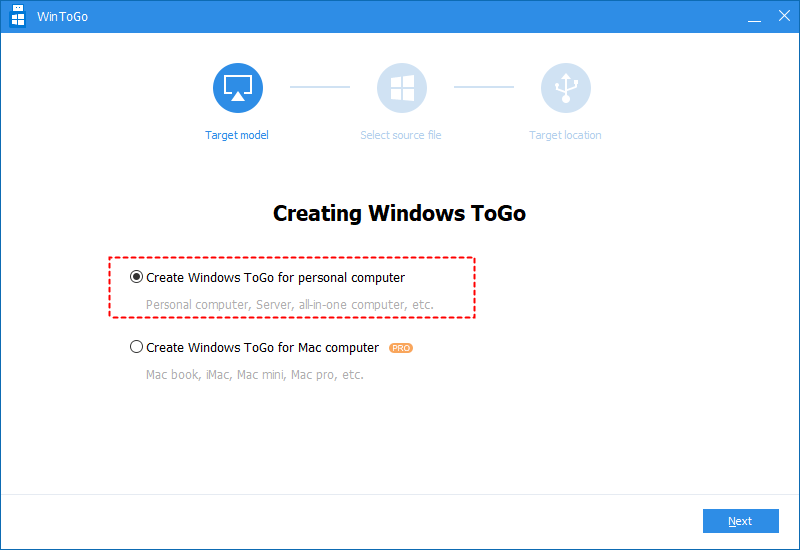
Step 3. Tick “Create Windows ToGo for personal computer”, and then click “Next”.
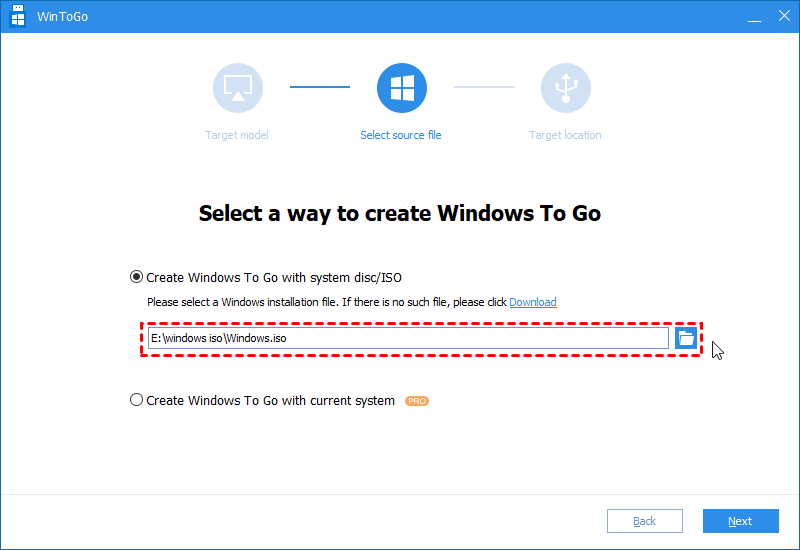
Step 4. Choose “Create Windows To Go with system disc/ISO” and select the prepared ISO file. Click “Next”.
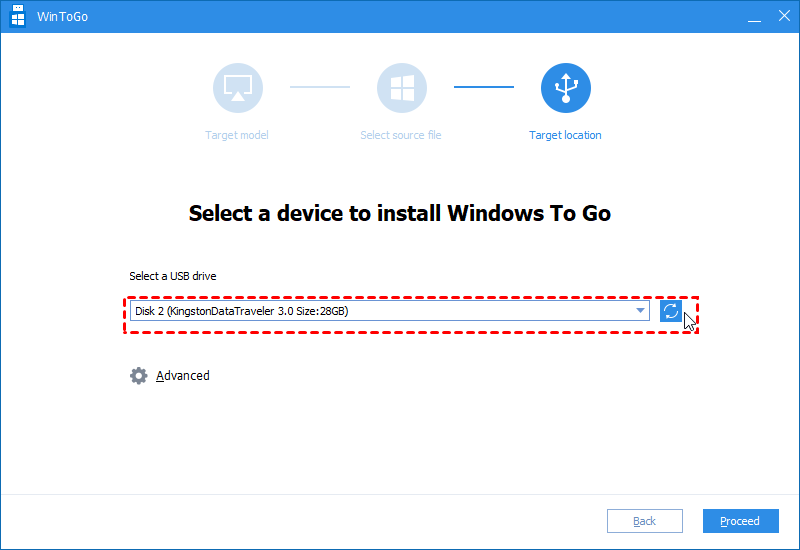
Step 5. Select the USB drive you have prepared and click “Proceed”.
After it is done, you can insert the bootable USB to the target computer, change boot order in BIOS and boot PC from it.
If you want to create bootable USB drive with current operating system installed on your computer, you can upgrade to Professional. That also enables you to run Windows from USB on Mac.
Summary
In this article, we shared 3 different ways to create bootable USB in Windows 10 as an installer, plus an additional way to make a portable boot USB to run OS on any other computers. Choose one according to your specific requirements. If you plan to create a bootable USB to repair boot issues caused by damaged MBR or disk errors, the AOMEI Partition Assistant Standard can also help you a lot.


