- How to create a user account on Ubuntu Linux
- Steps to create a user account on Ubuntu Linux
- Ubuntu create user account commands
- Verification
- How do I log in using ssh?
- Creating a user account using useradd command on Ubuntu
- How to delete a user account
- How to change Linux user password
- Conclusion
- Creating a new user and modifying its privileges in Linux
- Simple way to create a new user in Linux.
- Universal way to create a new user in Linux.
- New user’s system privileges
- Setting password and account expiration
- How to delete a user
- Создание пользователя в Linux. Команды adduser и useradd
- В чем отличия adduser и useradd?
- Команда adduser
- Создание пользователя командой adduser
- Команда useradd
- Синтаксис команды useradd
- Создание нового пользователя
- Создание нового пользователя с домашней директорией в /home
- Создание нового пользователя с произвольной домашней директорией
- Создание нового пользователя с произвольными UID, GID
- Создание пользователя с указанием оболочки (shell)
- Создать пользователя и добавить его в группы
- Заключение
- How to Create Users in Linux Using the ‘useradd’ Command
- The ‘useradd’ command adds new users to your Linux system
- What to Know
- How to Create a User
- How to Create a User With a Home Directory
- How to Create a User With a Different Home Directory
- How to Change a User’s Password Using Linux
- How to Switch Users
- Create a User With an Expiry Date
- How to Create a User and Assign Them to a Group
- Adjust Login Defaults Within Linux
- How to Specify Login Password Expiry
- Force Creation of a User Without a Home Folder
- Specify the User’s Full Name
- Analyze the /etc/passwd File
How to create a user account on Ubuntu Linux
Steps to create a user account on Ubuntu Linux
- Open the terminal application
- Log in to remote box by running the ssh user@your-ubuntu-box-ip
- To add a new user in Ubuntu run sudo adduser userNameHere
- Enter password and other needed info to create a user account on Ubuntu server
- New username would be added to /etc/passwd file, and encrypted password stored in the /etc/shadow file
Let us see all commands in details and
Ubuntu create user account commands
Let us say you need to add a new user in Ubuntu called vivek, type the following command in your shell:
$ sudo adduser vivek
Type your own password and other info:
Verification
Use the grep command or cat command as follows:
$ cat /etc/passwd
$ grep ‘^vivek’ /etc/passwd
Sample outputs:
How do I log in using ssh?
From your Windows (WSL) or macOS or Linux desktop, run:
$ ssh vivek@your-aws-ubuntu-server-ip
OR
$ ssh -i
/.ssh/aws.pub.key vivek@your-aws-ubuntu-server-ip
Enter the password when prompted.
Creating a user account using useradd command on Ubuntu
Alternatively, you can use the useradd command is a low level utility for adding users on Ubuntu. The syntax is:
$ sudo useradd -s /path/to/shell -d /home/
$ sudo passwd
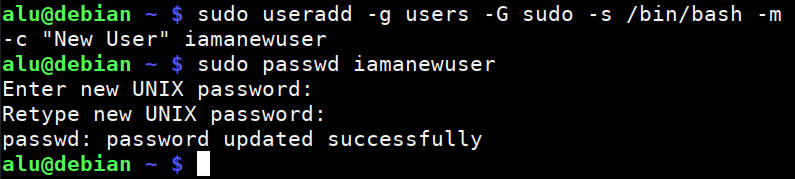
Let us create a new user named vivek using the useradd command on Ubuntu:
$ sudo useradd -s /bin/bash -d /home/vivek/ -m -G sudo vivek
$ sudo passwd vivek
Where,
- -s /bin/bash – Set /bin/bash as login shell of the new account
- -d /home/vivek/ – Set /home/vivek/ as home directory of the new Ubuntu account
- -m – Create the user’s home directory
- -G sudo – Make sure vivek user can sudo i.e. give admin access to the new account
I strongly recommend installing ssh keys while creating the new user account. You must have RSA/ed25519 key pair on your local desktop/laptop . Use the cat command to view your current RSA/ed25519 public key on the desktop:
$ cat
View public ssh key on your macos/unix/linux desktop
How to delete a user account
Use the userdel command as follows:
sudo userdel
sudo userdel vivek
To remove home directory and mail spool too, enter:
sudo userdel -r
sudo userdel -r jerry
How to change Linux user password
Run the following passwd command:
sudo passwd
sudo passwd tom
To change your own password, enter:
passwd
First, the user is prompted for their current password. If the current password is correctly typed, a new password is requested. The new password must be entered twice to avoid password mismatch errors.
- No ads and tracking
- In-depth guides for developers and sysadmins at Opensourceflare✨
- Join my Patreon to support independent content creators and start reading latest guides:
- How to set up Redis sentinel cluster on Ubuntu or Debian Linux
- How To Set Up SSH Keys With YubiKey as two-factor authentication (U2F/FIDO2)
- How to set up Mariadb Galera cluster on Ubuntu or Debian Linux
- A podman tutorial for beginners – part I (run Linux containers without Docker and in daemonless mode)
- How to protect Linux against rogue USB devices using USBGuard
Join Patreon ➔
Conclusion
In this quick tutorial, you learned how to add users in Ubuntu Linux using the CLI. The same commands works for any Debian/Ubuntu based distribution too. See useradd man page using the man command or read it online here:
man 8 useradd
man 8 passwd
man 8 adduser
🐧 Get the latest tutorials on Linux, Open Source & DevOps via
Источник
Creating a new user and modifying its privileges in Linux
In this post, you will learn:
If you use Linux with a graphical desktop environment like Ubuntu, for example, you can add or remove new users through its Settings. But this is simplified and I have to say a limited way to do that. The right way is to use the command line. And it is the only way if you work with a server Linux system. Below, you will learn all you need to know about how to create, delete, and modify users in the Linux command line.
Simple way to create a new user in Linux.
Many Linux systems have a user-friendly command to add a new user. The command is adduser. You type this command and the username of a new user.
The command will prompt you to create a user password, full name, and some additional information which can be skipped if you want.

And that’s it. The new user is created. This command also creates a home directory for new user ( /home/username )
However, if you also need to grant this user the administrative privileges, you need to add it to the sudo group:
Now, this new user will be able to execute the administrative commands with sudo .
This was the simplest way to create a new user in Linux. The adduser command is available in many Linux ditros, but in fact, it is a more user-friendly type of the command useradd , which is more advanced. Below, I would like to show you how to use this more advanced command too.
Universal way to create a new user in Linux.
If adduser is not available in your distro or you want to have little more control over the new user. You need to use the command useradd . I know the names are similar and easy to mix. But try to remember that useradd is a more important command. Basically, adduser just points to useradd .
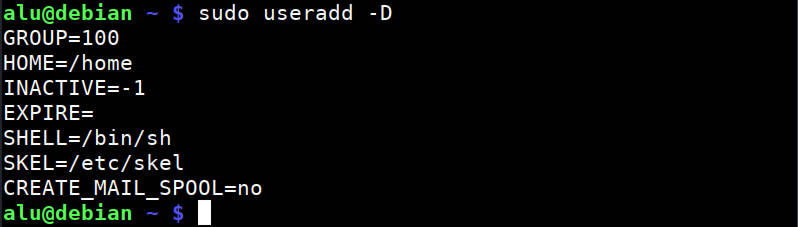
To create a new user with the default options, run:
To check what default options were used to create a user, run:
These are the default rules on my Debian VPS (they may differ for your system. ):
You can change these options and use some more. To see all available options of the useradd command, check its help:
Based on these options, a more complete command would be:
Finally, you need to set a password for this user with passwd.
New user’s system privileges
As you have seen I added a new user to the sudo group and granted it administrative privileges. This is what I did on my server and this what you would want to do if you are an admin of the system. But if you create a user on your Linux system for someone else, you probably do not want them to have administrative privileges. So, do not add them to the sudo group.
Setting password and account expiration
If you are a system administrator and you have many uses in your system, besides not including them in the sudo group, you may also want to enhance the security of your system by the expiration time on the passwords and accounts of these new users.
You can do this with the command chage . Note, it is without n . The command is short of change age.
You can see all the available options of this command:
To check if there are any limitations set on a user, run:
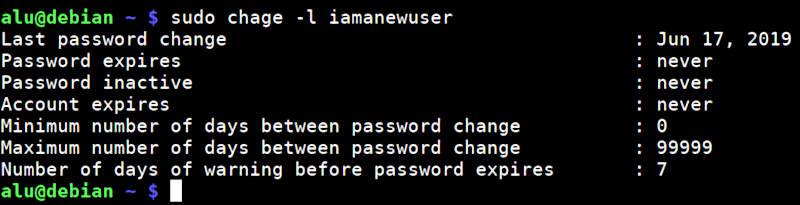
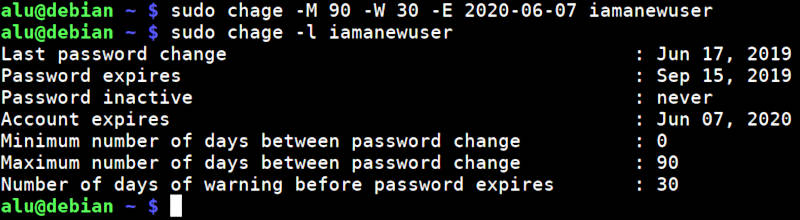
Usually, there are no expiration dates by default. But you can set some limits with the command chage :
The above command will set a password expiration date to 90 days and warning about the need to update the password to 30 days before the expiration. And the account will expire on June 6, 2020.
You can see that if you check the status of the user:
You can also do some manipulation with users using the command usermod . But I have to skip it because this post will be too long.
How to delete a user
Finally, to delete a user, run this command:
If you also want to remove the home directory of this user, add option -r. But be careful, because it will remove all the data of this user:
Источник
Создание пользователя в Linux. Команды adduser и useradd

Для создания пользователей в Linux можно использовать графические утилиты, предоставляемые дистрибутивом, или воспользоваться командной строкой.
Для создания пользователей из командной строки обычно используют утилиты adduser или useradd. Рассмотрим, использование данных утилит.
В чем отличия adduser и useradd?
useradd — это низкоуровневая утилита для создания пользователей в Linux.
adduser — представляет собой более простое решение для создания пользователей и по факту является надстройкой над useradd, groupadd и usermod.
Утилита adduser доступна не во всех дистрибутивах Linux. Реализация adduser также может отличаться. Если в дистрибутиве присутствует утилита adduser, то для создания пользователей рекомендуется использовать именно ее.
Команда adduser
Создание пользователя командой adduser
Рассмотрим, как создать обычного пользователя командой adduser
Чтобы создать нового пользователя, выполняем команду adduser и указываем имя пользователя (вместо pupkin укажите имя пользователя, которого вы создаете):
После запуска данной команды, вы должны ввести пароль для нового пользователя. Затем будет предложено ввести дополнительную информацию о пользователе: имя, номер комнаты (кабинета), телефоны и комментарий. Вводить эту информацию необязательно. Просто нажимайте Enter , чтобы пропустить ввод данных.
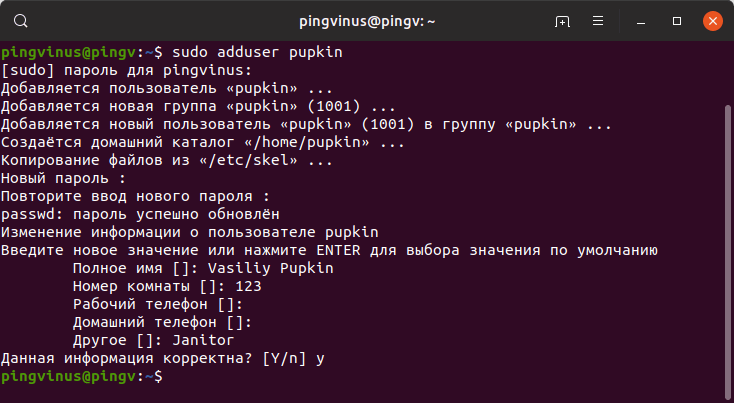
В результате выполнения команды adduser будут выполнены следующие действия:
- Создается новый пользователь с именем, которое вы указали при выполнении команды.
- Создается группа с тем же именем.
- Создается домашний каталог пользователя в директории /home/имяпользователя
- В домашний каталог копируются файлы из директории /etc/skel
В данной директории хранятся файлы, которые копируются в домашний каталог всех новых пользователей.
Команда useradd
Синтаксис команды useradd
Команда useradd принимает в качестве аргумента имя пользователя, а также различные опции.
Синтаксис команды следующий:
Создание нового пользователя
Чтобы просто создать пользователя используется команда useradd без каких-либо опций. Указывается только имя пользователя.
Данная команда создает нового пользователя с системными параметрами по умолчанию, которые прописаны в файле /etc/default/useradd
Чтобы пользователь мог войти в систему, необходимо задать для него пароль. Для этого используем команду:
Создание нового пользователя с домашней директорией в /home
Создадим пользователя и его домашнюю директорию.
Домашняя директория создается по умолчанию в каталоге /home . Имя директории совпадает с именем пользователя.
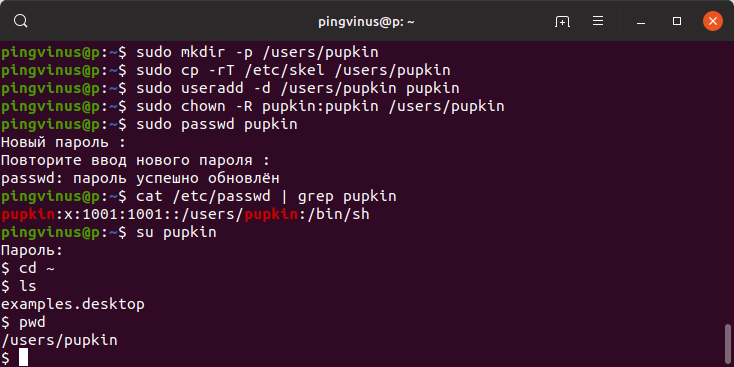
Создание нового пользователя с произвольной домашней директорией
Чтобы создать пользователя с домашней директорией, расположенной в произвольном месте, используется опция -d , после которой указывается путь до директории. Директорию необходимо создать заранее.
Создаем домашнюю директорию для будущего пользователя:
Копируем файлы и директории, которые по умолчанию создаются в домашней директории пользователя в данной системе. Данные файлы находятся в директории /etc/skel
Создаем пользователя и указываем домашнюю директорию:
Меняем права доступа у домашней директории:
Задаем пароль для пользователя:
Можно просмотреть информацию о пользователе, которая сохранена в файле /etc/passwd
Создание нового пользователя с произвольными UID, GID
Каждый пользователь в Linux имеет свой числовой идентификатор — UID, а также идентификатор основной группы пользователя — GID.
При создании пользователя можно задать произвольные номера UID и/или GID. При указании номера группы, группа с этим номером должна быть создана заранее.
Создание пользователя с указанием оболочки (shell)
По умолчанию новые пользователи создаются с оболочкой /bin/sh Чтобы задать другую оболочку, используется опция -s /путь/до/оболочки
Создать пользователя и добавить его в группы
Обычно пользователи в Linux принадлежат нескольким группам. Чтобы при создании нового пользователя задать группы, к которым он будет принадлежать, используется опция -G список,групп
Заключение
Мы рассмотрели примеры создания нового пользователя в Linux с использованием команд adduser и useradd . Команда adduser более простая и в большинстве случаев рекомендуется использовать именно ее.
Источник
How to Create Users in Linux Using the ‘useradd’ Command
The ‘useradd’ command adds new users to your Linux system
:max_bytes(150000):strip_icc()/headshot-00415ba557444a8a9b6bb139498b97c5.jpg)
What to Know
- To add a new user: Use the command useradd test («test» is the new user’s name). Use sudo useradd test if you lack the proper privileges.
- To create a user with a home directory: Use sudo useradd -m test or sudo useradd -m -d /test test to change the default directory.
- To set a user’s password: Use passwd test and to switch users, use the su — test command.
This article explains how to create users in Linux using the command line and the «useradd» command. We also share commands to create users with a home directory, set a user’s password, switch users, set an expiry date when creating a user, assign specific groups for a new user, adjust login defaults, create a user without a home folder, specify a user’s full name, and view details about a particular user.
How to Create a User
The following command adds a new user named test to your system.
The basic command to create a user (named test) would be:
useradd test
You’ll need privileges to /etc/password to do this; as such, you’ll likely sudo the above command:
sudo useradd test
What happens when this command is run depends on the contents of the configuration file located in /etc/default/useradd.
To view the contents of /etc/default/useradd, run the following command:
sudo nano /etc/default/useradd
The configuration file sets a default shell which in Ubuntu is bin/sh. All the other options are commented out.
:max_bytes(150000):strip_icc()/useradd-58f7aa9d3df78ca1595dc808-5b3e70d046e0fb00373541ef.png)
The commented-out options allow you to set a default home folder, a group, the number of days after the password has expired before the account becomes disabled, and a default expiry date.
The important thing to glean from the above information is that running the useradd command without any switches may produce different results on different distributions and it is all to do with the settings in the /etc/default/useradd file.
The sudo utility is not installed on every distribution. If it’s not installed, log in to an account with appropriate permissions for creating users.
How to Create a User With a Home Directory
Based on the /etc/defaults/useradd file, the user may or may not have been assigned a home directory based on the settings file.
To force the creation of a home directory, use the following command:
sudo useradd -m test
The above command creates a /home/test folder for the user test.
:max_bytes(150000):strip_icc()/adduserwithhome-58f7ab593df78ca1595f07da.png)
How to Create a User With a Different Home Directory
If you want the user to have a home folder in a different place than the default, use the -d switch.
sudo useradd -m -d /test test
The above command creates a folder called test for user test under the root folder.
:max_bytes(150000):strip_icc()/useradddifferenthome-58f7ac605f9b581d59594e19.png)
Within the -m switch, the folder may not be created. It depends on the setting in the /etc/login.defs file.
To get this to work without specifying a -m switch, edit the /etc/login.defs file. At the bottom of the file, add the following line:
CREATE_HOME yes
How to Change a User’s Password Using Linux
After you create a user with a home folder, change the user’s password.
To set a user’s password, use the following command:
passwd test
The passwd command allows you to set the test user’s password. You will be prompted for the password you wish to use.
:max_bytes(150000):strip_icc()/changepassword-58f7ace63df78ca15961f285.png)
How to Switch Users
Test your new user’s account by typing the following into a terminal window:
su — test
The above command switches user to the test account and, assuming you created a home folder, you will be placed in the home folder for that user.
:max_bytes(150000):strip_icc()/switchuser-58f7ad3c5f9b581d595aee10.png)
Create a User With an Expiry Date
If you work in an office and a new contractor is going to be at your office for a short period of time, set an expiry date on their user account. Similarly, if you have family coming to stay, create a user account for that family member that expires after they depart.
To set an expiry date when creating a user, use the following command:
sudo useradd -m -e 2017-04-25 test
The date must be specified in the format YYYY-MM-DD where YYYY is the year, MM is the month number, and DD is the day number.
:max_bytes(150000):strip_icc()/adduserwithexpirydate-58f7ae055f9b581d595cb98e.png)
How to Create a User and Assign Them to a Group
When a new user joins your company, assign specific groups for that user so that they have access to the same files and folders as other members of their team. For example, John is joining as an accountant.
The following command would add john to the accounts group.
sudo useradd -g accounts john
:max_bytes(150000):strip_icc()/addusertogroup-58f7ae8f3df78ca15965bc6c.png)
Adjust Login Defaults Within Linux
The /etc/login.defs file is a configuration file that provides the default behavior for login activities. There are some key settings in this file.
To open the /etc/login.defs file, enter the following command:
sudo nano /etc/login.defs
:max_bytes(150000):strip_icc()/logindefaults-58f7aede3df78ca1596675cc-5b3e712346e0fb0037e6b5db.png)
The login.defs file contains many settings including the following, which you might want to change:
- PASS_MAX_DAYS: How long before a password expires.
- PASS_MIN_DAYS: How often a password can be changed.
- PASS_WARN_AGE: Number of days warning before a password expires.
- LOGIN_RETRIES: Number of login attempts before failure.
- LOGIN_TIMEOUT: How long before the login times out.
- DEFAULT_HOME: A user can log in if no home folder exists.
These are the default options and can be overridden when creating a new user.
How to Specify Login Password Expiry
Set a password expiry date, the number of login retries, and the timeout when creating a user. The following example shows how to create a user with a password warning, a maximum number of days before the password expires, and login-retries set.
sudo useradd -m -K PASS_MAX_DAYS=5 -K PASS_WARN_AGE=3 -K LOGIN_RETRIES=3 test
:max_bytes(150000):strip_icc()/useraddloginexpiry-58f7af973df78ca159682eb4.png)
Force Creation of a User Without a Home Folder
If the login.defs file has the CREATE_HOME yes option set then when a user is created, a home folder is automatically created.
To create a user without a home folder regardless of the settings, use the following command:
sudo useradd -M test
:max_bytes(150000):strip_icc()/addusernohome-58f7affb3df78ca15969455f.png)
It is confusing that -m stands for create home and -M stands for do not create home.
Specify the User’s Full Name
As part of your user creation policy, you might choose to use the first initial followed by the last name. For example, the username for John Smith would be jsmith. When looking for details about a user, you might not then be able to distinguish between John Smith and Jenny Smith.
Add a comment when you create an account so it is easier to find the user’s real name. Execute the following to add a comment:
sudo useradd -m smithj -c «John Smith»
:max_bytes(150000):strip_icc()/useraddwithcomments-58f7b0735f9b581d5962c87c.png)
Analyze the /etc/passwd File
When you create a user, the details of that user are added to the /etc/passwd file. To view the details about a particular user, use the grep command as follows:
grep smithj /etc/passwd
The above command returns details about all users with the word john as part of the username.
:max_bytes(150000):strip_icc()/userinfo-58f7b0a83df78ca1596af28a.png)
The /etc/passwd file contains a colon-separated list of fields about each user. The fields are as follows:
- Username
- Encrypted password (which will always display as x)
- Userid
- User’s group id
- Full name of the user
- User’s home directory
- Login shell
While many desktop Linux distributions provide a graphical tool for creating users, it is a good idea to learn how to do it from the command line so that you can transfer your skills from one distribution to another without learning new user interfaces.
Источник


