- How to Create A Partition in Windows 7 without Formatting?
- Why need to create new partitions in Windows 7?
- Create a partition in Windows 7 built-in Disk Management
- How to create a partition in windows 7 more efficiently and safely?
- More about AOMEI Partition Assistant
- Create and format a hard disk partition
- How to Make Partition Bootable in Windows 7 Effortlessly?
- Need to make partition bootable in Windows 7
- Solutions to make bootable partition in Windows 7
- Solution 1. Use Diskpart to create boot partition
- Solution 2. Use Disk Management to set partition bootable
- Solution 3. Use the best partition manager to set partition active
- Summary
- How to Make Partition in Windows 7/8/10 After Installation
- Reasons to make partition
- Two ways to make partition in windows 7 after installation
- Method 1: Make partition with disk management
- Method 2: Make partition with AOMEI Partition Assistant
- Conclusion
How to Create A Partition in Windows 7 without Formatting?
How to make or create a new partition in Windows 7 32/64 bit without formatting hard drive? Free AOMEI Partition Assistant provides the easiest and safest way to create a partition in Windows 10/8.1/8/7/XP/Vista.

By AOMEI  / Last Updated July 26, 2019
Why need to create new partitions in Windows 7?
A hard disk drive (HDD) can be partitioned into multiple distinct partitions. Each partition works separately, so you can install another operating system (OS) along with Windows 7 or store different types of data.
It is not advisable to keep your data, applications, and operating system (OS) on a same partition, because it is like putting all eggs in basket and increases the risk of data loss. If your Windows 7 crashes, the whole data in system partition might be damaged. When partitioning a hard disk, one often creates multiple partitions for different usage. The most common example is to partition a hard drive into 4 partitions, one for system, and the others for software, data, and backup.
Create a partition in Windows 7 built-in Disk Management
Windows 7 has its built-in tool — Disk Management, which can be used to create new partitions.
To create a new partition:
1. Open Disk Management. You can right click My Computer, and go Manage > Storage > Disk Management to open it.
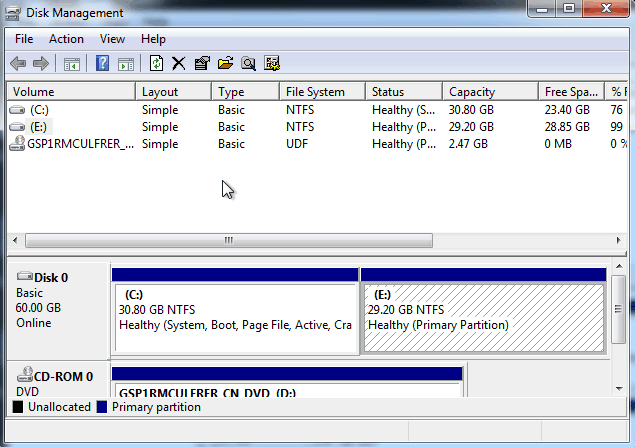
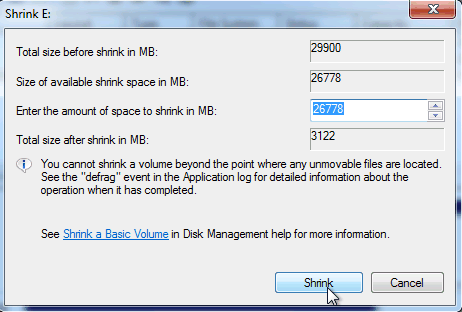
2. Right click the partition you want use to create new partition and select «Shrink Volume». Then enter the amount of space your want to shrink and click Shrink to proceed.
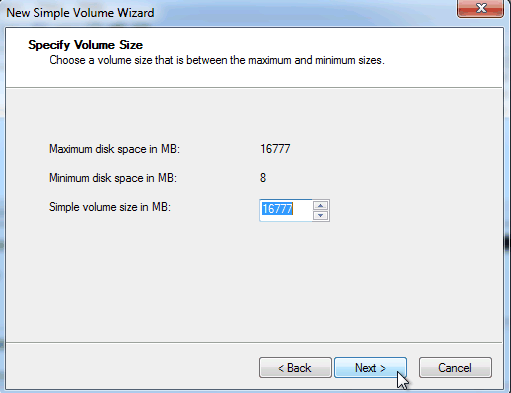
3. Right click the unallocated space and select «New Simple Volume». Then follow the New Simple Volume Wizard to create a new partition.
If your disk style is MBR, sometimes creating partitions in Windows 7 may fail with an error that you cannot create a new volume in this unallocated space because the disk already contains maximum number of partitions or the operation you selected will convert the selected basic disk(s) to dynamic disk(s). This happens because an MBR disk can only hold at most 4 primary partitions. The solution is either to convert MBR to GPT disk or use third party software to create a partition.
How to create a partition in windows 7 more efficiently and safely?
AOMEI Partition Assistant Standard, a freeware for Windows 10/8.1/8/7/XP/Vista, enables you to create Windows 7 partition in multiple ways. Here comes the simplest way. Let’s see how it works:
Fist, install this Windows 7 disk partition software and launch it.
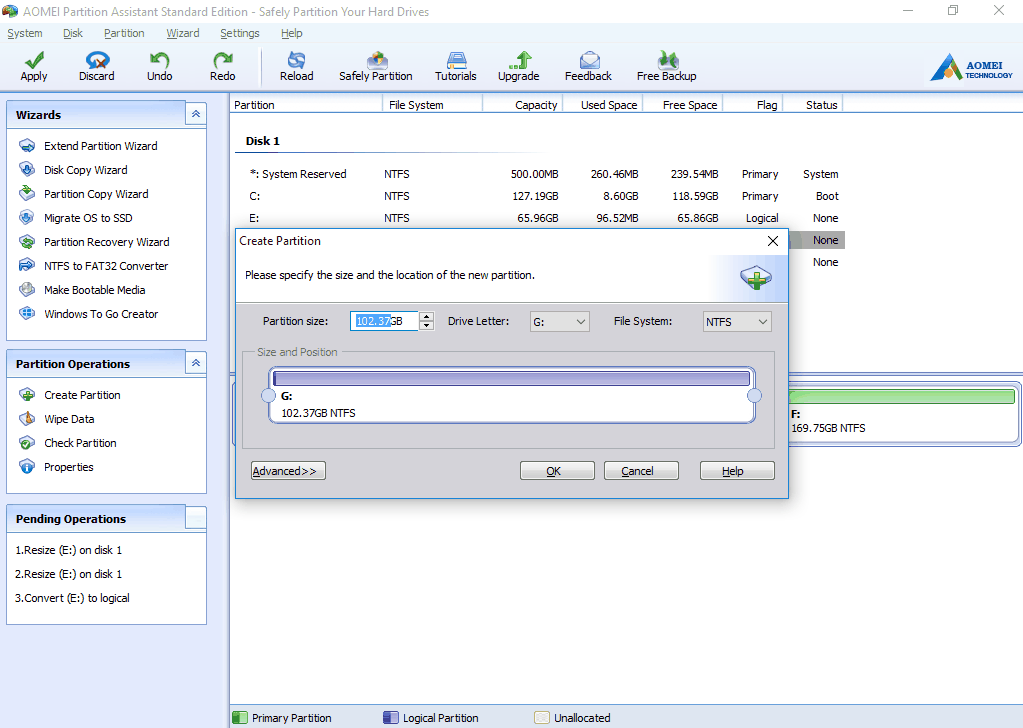
Second, right click a partition that has enough space to create new partition and select «Create Partition».
Third, on this screen, drag the slider to adjust partition size. Then click Advanced to change drive letter, select file system, and create as primary partition or logical partition. NTFS file system was invented by Microsoft, so only Windows can use this file system. If you want to use this partition to install Linux or other systems, you’d better select FAT 32. Otherwise, you need to convert to FAT32.
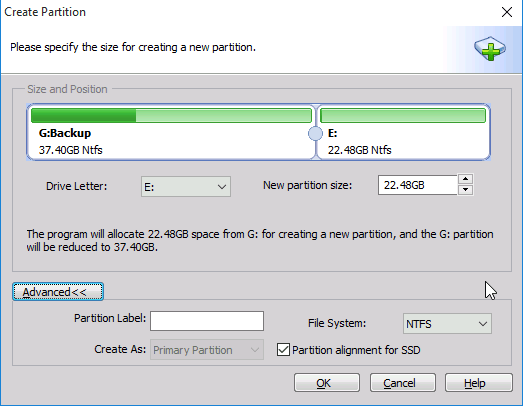
Forth, after clicking OK, you can preview the operations. If there is no problem, click Apply to save the changes. Note that this program will not make any changes to your disk until you click Apply option.
Besides this method, you can also shrink a partition to create unallocated space and then use the unallocated space to create a Windows 7 partition. What is more amazing about AOMEI is that it allows you to shrink a partition from both sizes, allowing you to manage disk and partitions it contains more flexible.
More about AOMEI Partition Assistant
AOMEI Partition Assistant Standard is a freeware to help you manage your disk and the partitions it contains in Windows 10/8.1/8/7/XP/Vista. Providing the concise interface, AOMEI Partition Assistant allows you to create partitions in Windows 7 with the easiest and safest way. In addition, it also brings many other useful features, such as Migrate OS to SSD, NTFS to FAT32 converter, Disk Copy Wizard, Convert MBR to GPT without data loss, and more. It can handle all storage devices that Windows detects. Besides the usually used file system, NTFS and FAT 32, AOMEI Partition Assistant also supports FAT16/FAT12/exFAT/ReFS/Ext2/Ext3/Ext4.
Create and format a hard disk partition
To create a partition or volume (the two terms are often used interchangeably) on a hard disk, you must be logged in as an administrator, and there must be either unallocated disk space or free space within an extended partition on the hard disk.
If there is no unallocated disk space, you can create some by shrinking an existing partition, deleting a partition, or by using a third-party partitioning program.
Open Computer Management by selecting the Start button. The select Control Panel > System and Security > Administrative Tools, and then double-click Computer Management.
In the left pane, under Storage, select Disk Management.
Right-click an unallocated region on your hard disk, and then select New Simple Volume.
In the New Simple Volume Wizard, select Next.
Enter the size of the volume you want to create in megabytes (MB) or accept the maximum default size, and then select Next.
Accept the default drive letter or choose a different drive letter to identify the partition, and then select Next.
In the Format Partition dialog box, do one of the following:
If you don’t want to format the volume right now, select Do not format this volume, and then select Next.
To format the volume with the default settings, select Next.
Review your choices, and then select Finish.
Note: When you create new partitions on a basic disk, the first three will be formatted as primary partitions. Beginning with the fourth, each one will be configured as a logical drive within an extended partition.
How to Make Partition Bootable in Windows 7 Effortlessly?
To start a system normally, you should first make the relevant partition bootable. This article provides three methods to make partition bootable in Windows 7.
By AOMEI / Last Updated February 27, 2020
Need to make partition bootable in Windows 7
Boot partition, also known as boot volume, is the disk partition that contains the boot loader and necessary files for the Windows operating system. It is the prerequisite to start a computer normally. A suitable boot partition does not only need to contain the related bootable data, it also needs to be marked as an active partition.
For each OS you install, you’ll have boot partitions for each. If you have multiple systems in one disk and you only want to load the appropriate operating system, then you can make the related partition bootable by setting the partition active. But meanwhile, other partitions cannot be set as an active partition because one disk can only has one active partition.
Besides, set active partition is often used when your computer fails to boot. If your computer can’t boot, you should first check if the boot partition is set as active. If not set, you must mark this partition as active to make partition bootable in Windows 7.
Solutions to make bootable partition in Windows 7
How to create boot partition in Windows 7? Here, three efficient methods are listed. Within your own circumstances, choose a solution that will be satisfying for you.
Solution 1. Use Diskpart to create boot partition
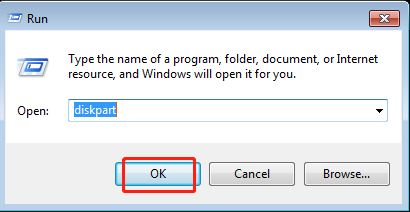
Step 1. Press Windows logo key + R to open Run box. Then type diskpart and click OK.
Step 2. Type the commands below into the Command Prompt one at a time and press Enter after each command.
list disk
select disk n (replacing n with the number assigned to the relevant drive)
list partition
select partition n (replacing n with number of the partition you want to set as active)
active
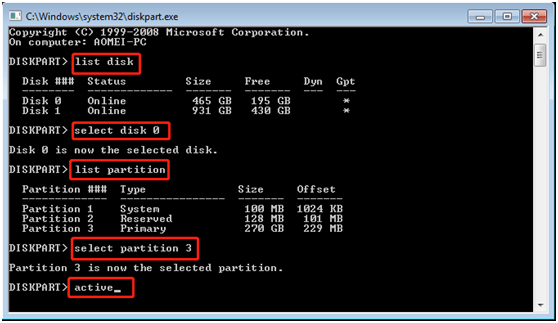
Step 3. Your partition is now active. Type exit, press Enter and then restart your computer.
Solution 2. Use Disk Management to set partition bootable
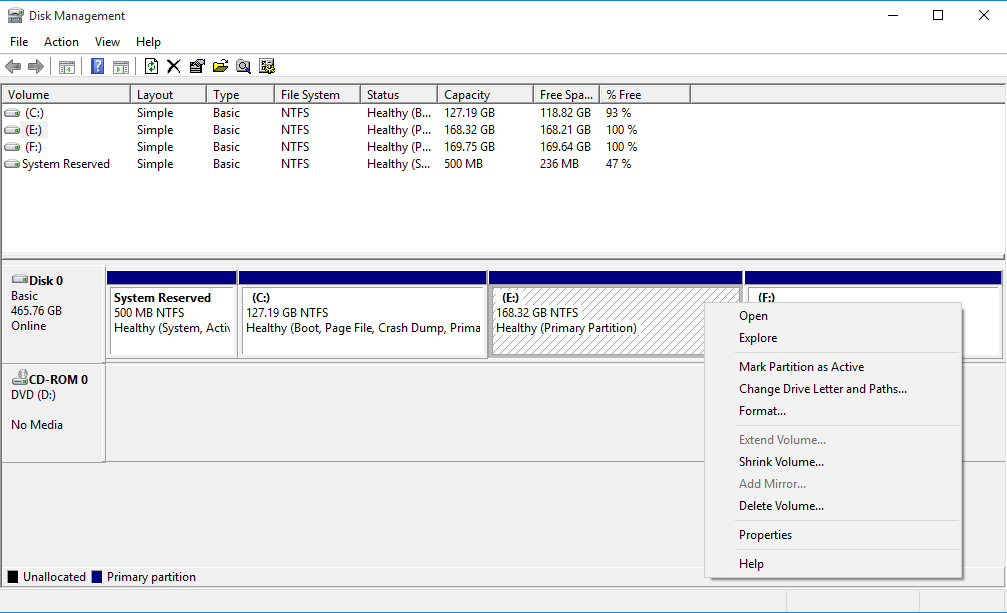
Step 1. Press Windows logo key + R to open Run box. Type diskmgmt.msc and then click OK.
Step 2. Right click the partition you want to set as active. Then choose Mark Partition as Active.

Step 3. Wait for the process to finish and then restart your computer.
Although the two methods noted above can make partition bootable in Windows 7, you must be very careful when using them, as data loss will occur if you make a mistake in the process. Moreover, you aren’t allowed to return to the previous step in the use process. For your data security, the third method is highly recommended.
Solution 3. Use the best partition manager to set partition active
Things get easier and safer when you use AOMEI Partition Assistant Professional. This is a comprehensive partition manager that enables you to make partition bootable in Windows 7/8/8.1/10/Vista/XP effortlessly.
It has a feature called Set Active Partition that allows you to mark a partition as active in 3 easy steps. Cancelling the current operations is also very simple to operate. By using this utility, you also can fix mark partition as active greyed out. Now, let’s look at the detailed steps.
Step 1. Right click the primary partition you want to set as active. Click Advanced and Set Active Partition subsequently.
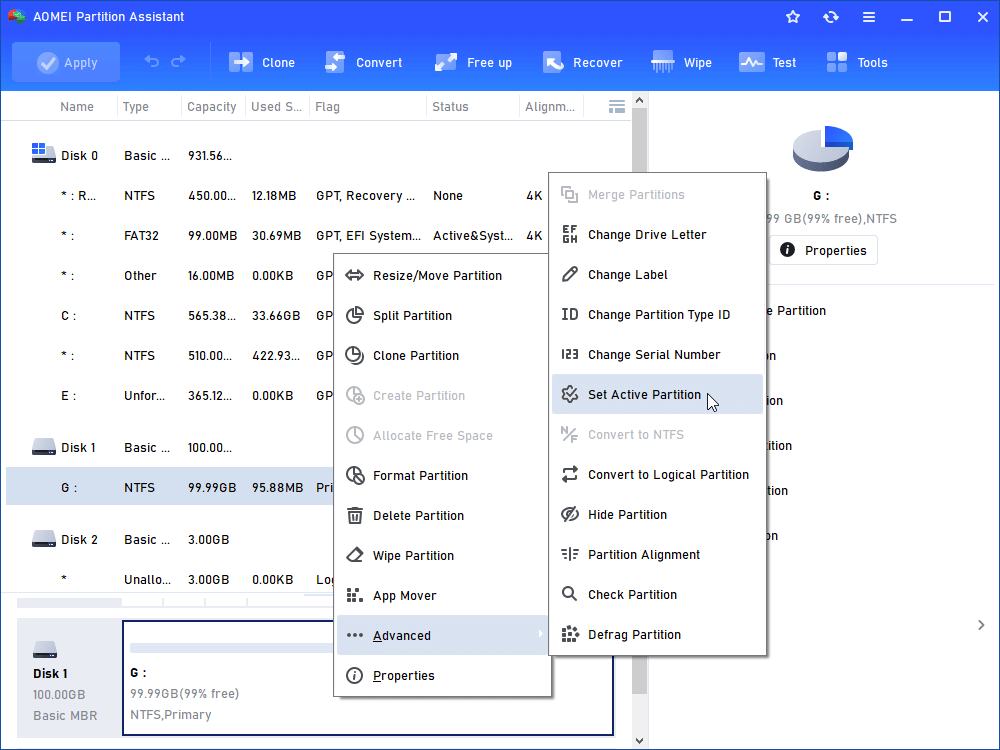
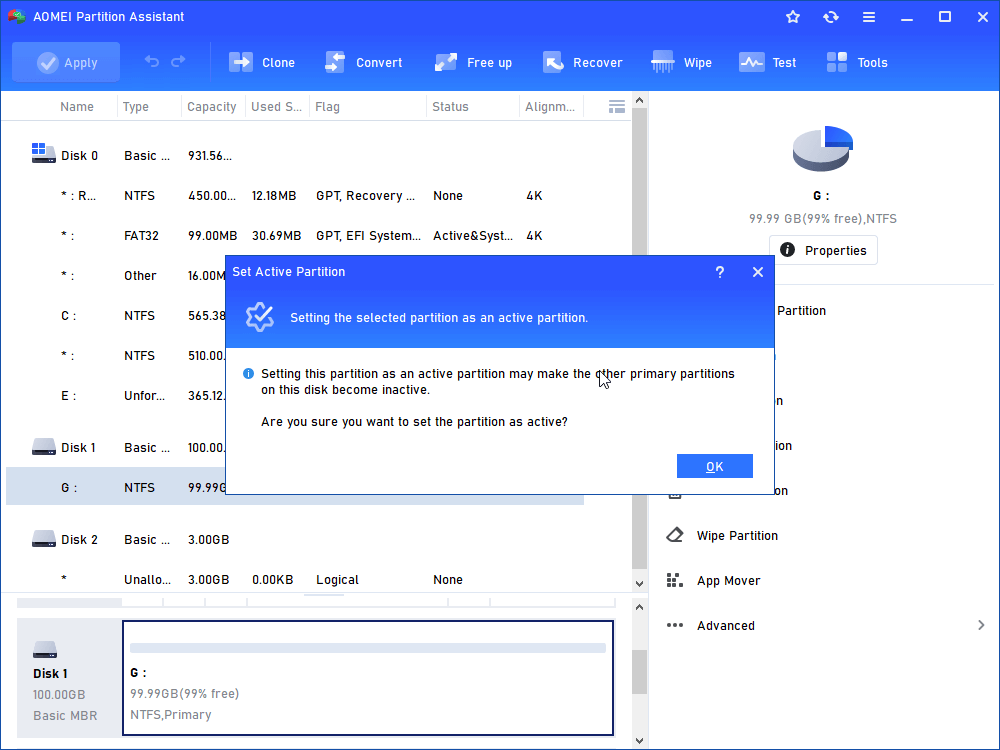
Step 2. Click OK to continue.
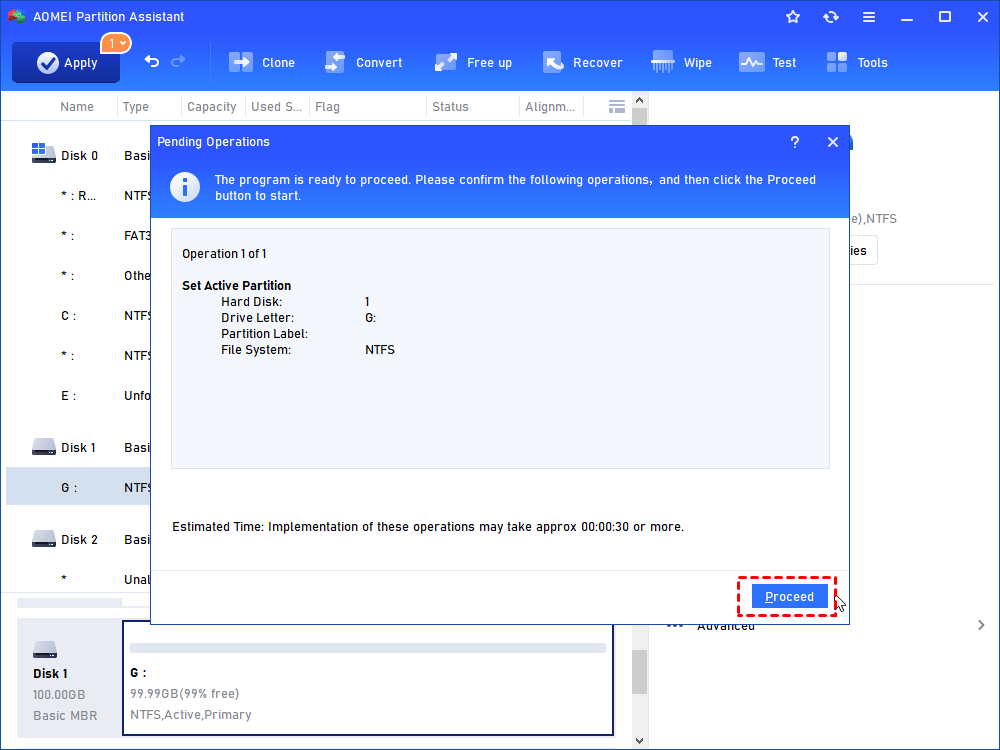
Step 3. Confirm your operations and then click Apply and Proceed.
Tips:
Only a primary partition can be marked as active. Other partitions can’t be set as active. Otherwise, your computer will stop working. If there is no primary partition, you can convert logical partition to primary partition.
Make sure the partition contains the loader or boot files such as “boot.ini”, “ntldr”, “bootmgr” or “BCD” before marking it as active.
Summary
This tutorial contains three practical methods to help you make partition bootable in Windows 7. They are Diskpart, Disk Management and AOMEI Partition Assistant Professional respectively. It is suggested that you use the third method as it is easier and safer. Besides, this utility can solve various problems, such as migrating OS to SSD, converting MBR to GPT, and so on.
How to Make Partition in Windows 7/8/10 After Installation
Making partition can separate your OS from your data. This passage will introduce how to make partition in Windows 7 after installation.
By AOMEI / Last Updated December 8, 2017
Reasons to make partition
Disk partitioning is to divide the hard drive into multiple logical units. Mainly, by partitioning your disk, you can separate your operating system from your data and thus when system corrupted, it can reduce the chances of your data becoming corrupted. For this reason, you can make partition after installation. Next, this passage will introduce how to make partition in Windows 7 after installation.
Two ways to make partition in windows 7 after installation
Method 1: Make partition with disk management
For example, you have C/D/E three primary partitions in Windows 7 after installation, and you want to make more partitions on this disk. Let’s see how to make disk partition in Windows 7 after installation with disk management.
Step 1: Use Windows+R to open Run, type “diskmgmt.msc” and click OK.
Step 2: Right-click on the partition you wish to resize and select the Shrink Volume option.
Step 3: Enter the size you wish to shrink your drive to in megabytes (1000 MB = 1GB). Then click on the Shrink button.
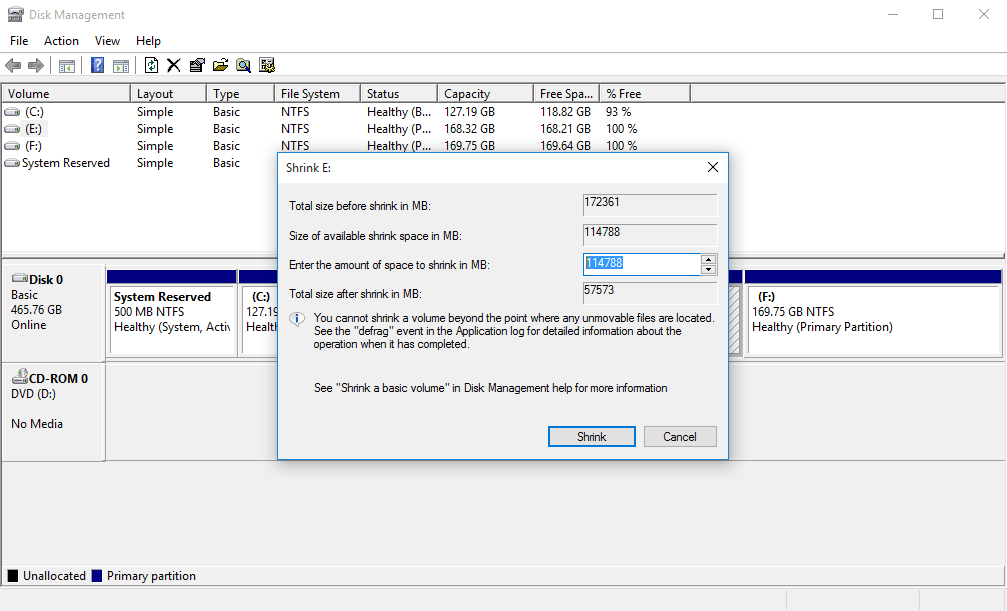
Note: You cannot shrink your volume greater than the amount indicated in the Size of available shrink space in MB section.
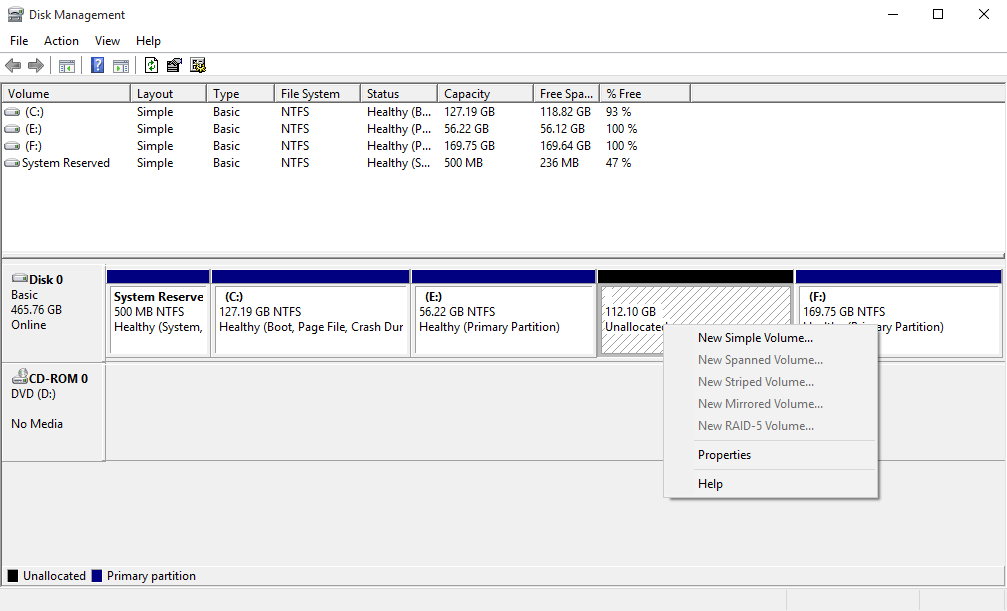
Step 4: You should now see a new unallocated partition in your Disk Management window. Right-click on the unallocated partition and select the New Simple Volume option. The New Simple Volume Wizard should pop up. lick on the Next button to continue. Enter the amount of memory you wish to allocate for your new partition and click on the Next button.
Step 5: Enter the amount of memory you wish to allocate for your new partition and click on the Next button. To store data on this partition, you must format it first. Click on the Format this volume with the following settings:
For File System, select NTFS
For Allocation unit size, select Default
For Volume Label, type the name you wish to give your new drive.
Click on the Perform a quick format
Then click on the Next button

If you want another new partition, follow the same step. If your disk is MBR, sometimes, you may receive an error message: you cannot create a new volume in this allocated space because the disk already contains the maximum number of partitions.
MBR disk only supports 4 primary partitions or 3 primary partitions and 1 extended partition at most. In this case, you have to convert primary partition to logical partition.
Method 2: Make partition with AOMEI Partition Assistant
Disk Management has some limitations, the size of available shrink space is very small, or even zero. Sometimes, the disk already contains the maximum number of partitions, and you do not want to delete an old one to create a new one with Disk Management, what should you do?
In this case, you can use a third party software. AOMEI Partition Assistant Standard is a professional disk management tool. It is fast and free to use. It allows you to make partition in Windows 7/8/10 without formatting. Let’s see how to create partition in Windows 7/8/10 with AOMEI Partition Assistant.
Step 1: Download AOMEI Partition Assistant and launch the software.
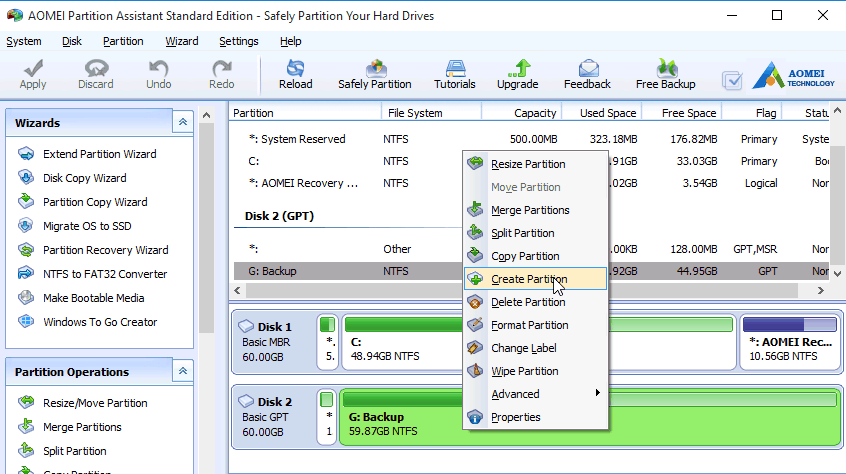
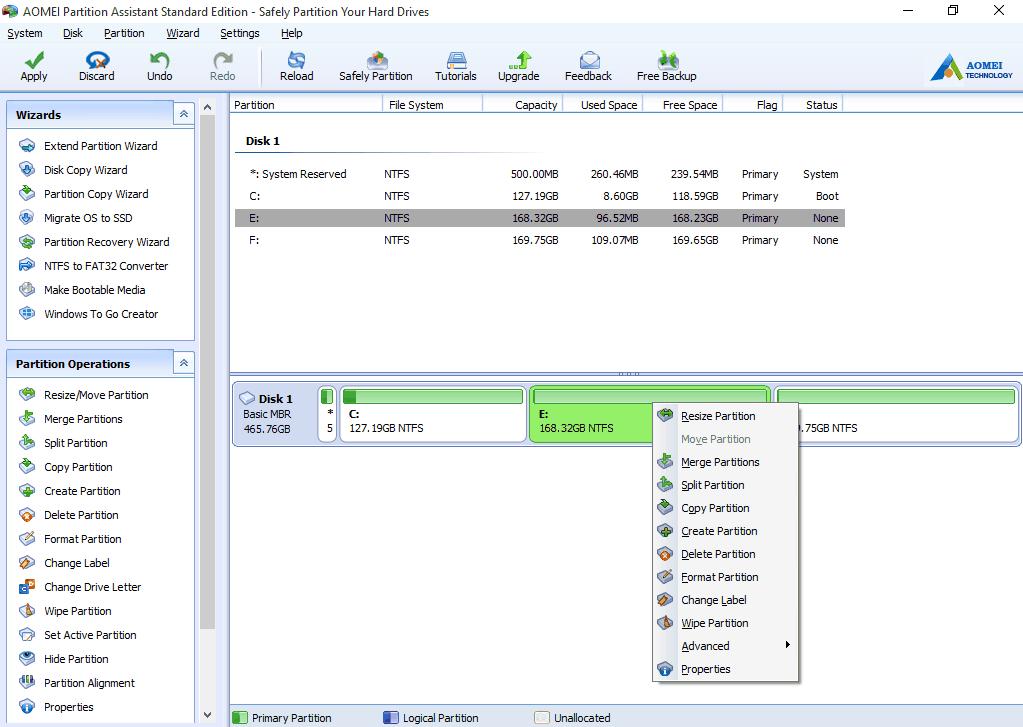
Step 2: Right click the partition you want to shrink and choose Resize Partition.
Step 3: Position the mouse pointer on the right border of the partition and drag the border rightwards to extend partition. Or type the size of unallocated space after. Then click OK.
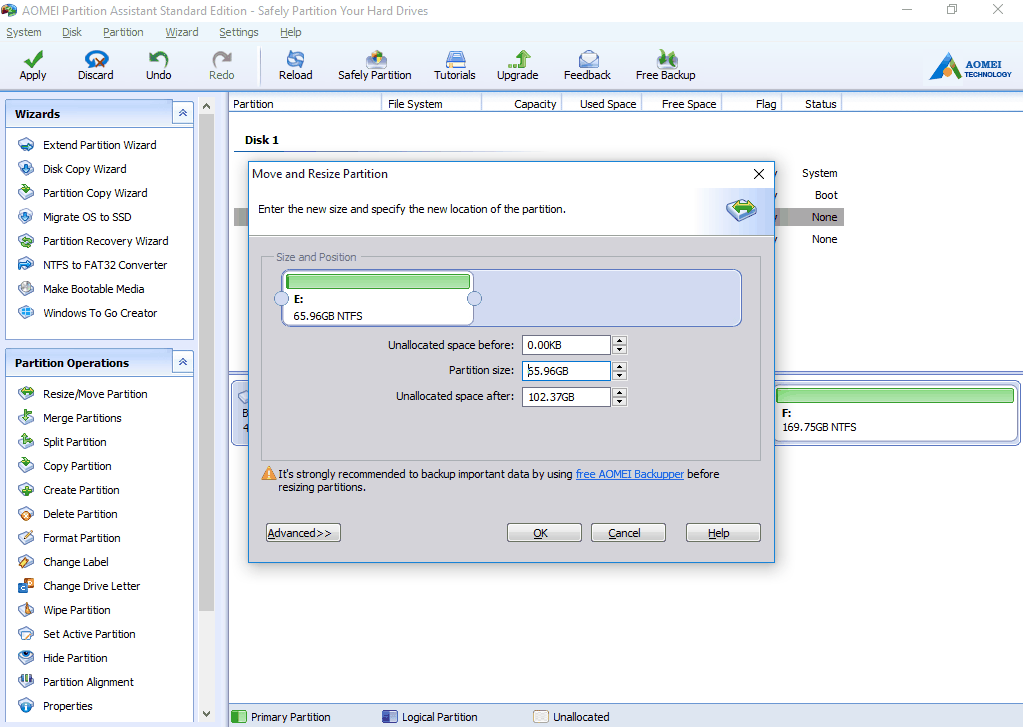
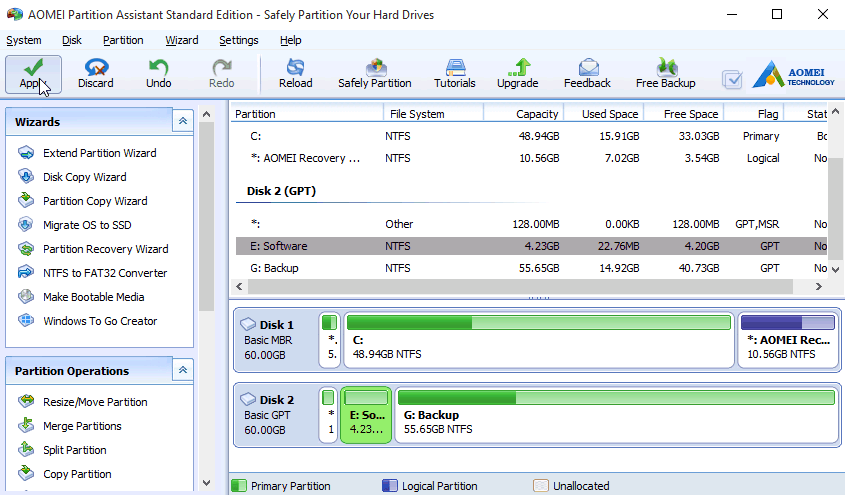
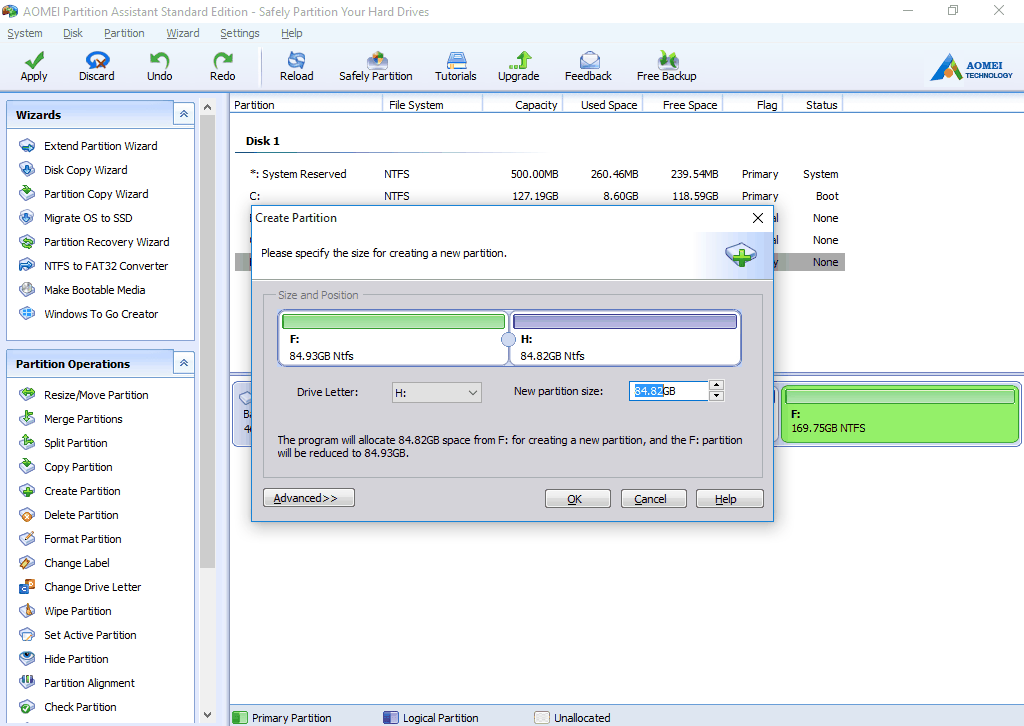
Step 4: You will see there is an unallocated space of 55.96GB right after E partition. Right click the unallocated space and choose Create Partition. Type the Partition Size, choose Drive Letter and File System, then click OK.
Step 5: Click Apply at upper left corner to save the change.
Another easy way to create partition without unallocated space.
If there is no unallocated space, you do not have to resize partition for unallocated space. You can create a new partition directly on old partition with NTFS or Fat32 file system as long as it has free space.
Take F drive as an example, right click F partition and choose create partition. Input Drive Letter and New partition size, click OK. At last, click Apply to save the change.
If the disk is MBR, and you already have 4 primary partitions. You still want to create another partition, you do not have to worry the error message: you cannot create a new volume in this allocated space because the disk already contains the maximum number of partitions.
When there is already 4 primary partitions, you create new partitions with AOMEI Partition Assistant, it will automatically convert new partition and the resized partition to logical partition. In addition, AOMEI Partition Assistant allows you to move partition which cannot be operated with disk management.
Conclusion
To make a conclusion, this passage introduces how to make partition in Windows 7/8/10 after installation with two ways, you can choose based on your own preference.
Besides making partition, AOMEI Partition Assistant has many other powerful features. For example, you can Convert FAT32 to NTFS, make bootable media, migrate OS to SSD, etc.


