- Управление правилами Windows Firewall с помощью PowerShell
- Управление сетевыми профилями брандмауэра Windows из PowerShell
- Создание, редактирование и удаление правил Windows Firewall из PowerShell
- Вывод правил Windows Firewall через PowerShell
- Configure Windows Firewall for remote debugging
- Configure ports for remote debugging
- Ports on the remote computer that enable remote debugging
- Configure remote debugging through Windows firewall
- Allow and configure the remote debugger through Windows Firewall
- Troubleshoot the remote debugging connection
Управление правилами Windows Firewall с помощью PowerShell
Эта статья посвящена основам управления настройками и правилами встроенного Windows Firewall из командной строки PowerShell. Мы рассмотрим, как включать/отключать брандмауэр для различных профилей, создавать и удалять правила файервола, и рассмотрим небольшой скрипт, позволяющий сформировать удобную таблицу с текущим набором активных правил брандмауэра.
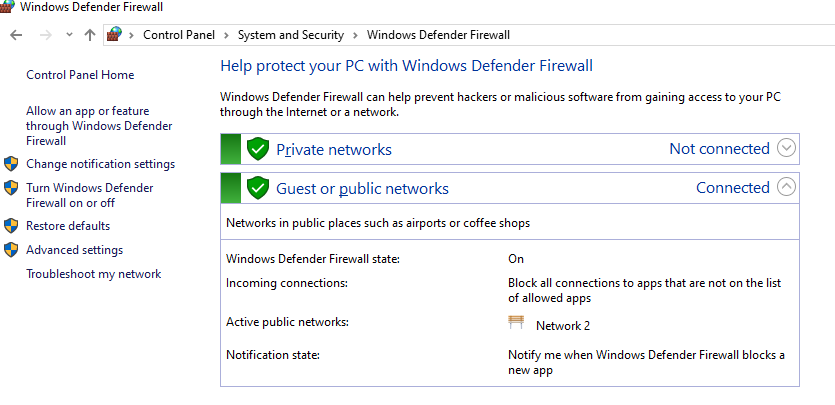
Вы можете управлять настройками Windows Firewall из графической консоли Control Panel -> System and Security -> Windows Defender Firewall. Однако начиная с Windows 8.1 (Windows Server 2012R2) для управления встроенным брандмауэром в систему был добавлен встроенный PowerShell модуль NetSecurity.
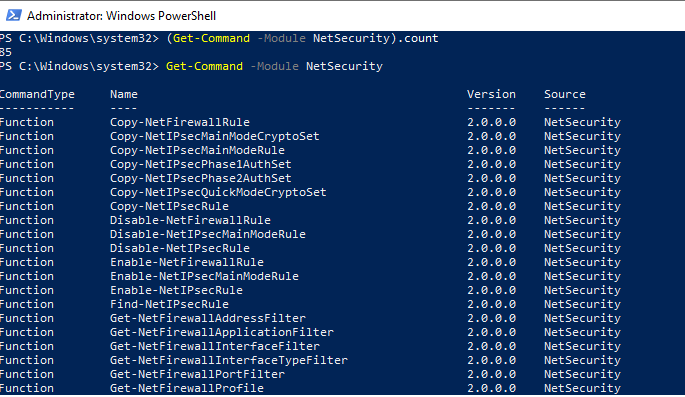
В модуле NetSecurity в Windows 10 доступно 85 команд. Вы можете вывести их список:
Get-Command -Module NetSecurity
Управление сетевыми профилями брандмауэра Windows из PowerShell
В Windows Firewall есть три типа сетевых профилей:
- Domain (Доменный) – применяется к компьютерам, включенным в домен Active Directory;
- Private (Частный) – домашние или рабочие сети;
- Public (Общий) – общедоступные сети.
Каждый профиль может отличаться используемым набором правил файервола. По умолчанию все сетевые интерфейсы компьютера защищены фаейрволом и к ним применяются все три типа профилей.
Чтобы включить все три сетевых профиля Domain, Public и Private, используйте команду:
Set-NetFirewallProfile -All -Enabled True
Либо укажите конкретный профиль вместо All:
Set-NetFirewallProfile -Profile Public -Enabled True
Чтобы отключить файервол для всех трех сетевых профилей, используется команда:
Set-NetFirewallProfile -All -Enabled False
С помощью командлета Set-NetFirewallProfile вы можете изменить параметры профиля (действие по-умолчанию, журналирование, путь и размер файла журнала, настройки оповещений и т.д.).
Как вы вероятно знаете, по умолчанию Windows Firewall включен в современных ОС для всех профилей. В настройках профилей разрешены все исходящие подключения и блокируется входящие (кроме разрешенных).
Изменим действие по-умолчнию для профиля Public – заблокировать все входящие подключения.
Set-NetFirewallProfile –Name Public –DefaultInboundAction Block
Текущие настройки профиля можно вывести так:
Get-NetFirewallProfile -Name Public

Если вы управляете настройками Windows Firewall через GPO, вы можете вывести текущие результирующие настройки профилей так:
Get-NetFirewallProfile -policystore activestore
Проверим, что все параметры брандмауэра применяются ко всем сетевым интерфейса компьютера.
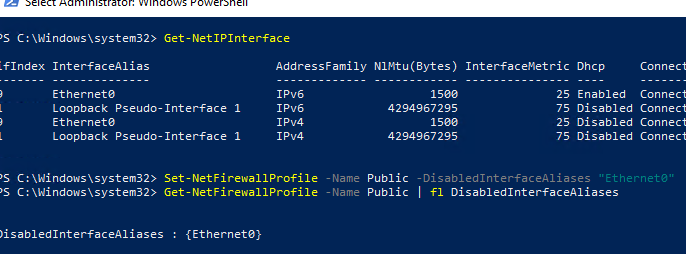
Get-NetFirewallProfile -Name Public | fl DisabledInterfaceAliases
Если все интерфейсы защищены, команда должна вернуть:

Можно отключить определенный профиль для интерфейса (вывести список имен интерфейсов можно с помощью командлета Get-NetIPInterface).
Set-NetFirewallProfile -Name Public -DisabledInterfaceAliases «Ethernet0»
Как вы видите, теперь профиль Public не применяется к интерфейсу Ethernet0:
Вы можете настроить параметры логирования сетевых подключений на уровне каждого профиля. По умолчанию журналы Windows Firewall хранятся в каталоге %systemroot%\system32\LogFiles\Firewall, размер файла – 4 Мб. Вы можете изменить включить журналирование подключений и увеличить максимальный размер файла:
Set-NetFireWallProfile -Profile Domain -LogBlocked True -LogMaxSize 20000 -LogFileName ‘%systemroot%\system32\LogFiles\Firewall\pfirewall.log’
Создание, редактирование и удаление правил Windows Firewall из PowerShell
Для управления правилами брандмауэра есть 9 командлетов:
- New-NetFirewallRule
- Copy-NetFirewallRule
- Disable-NetFirewallRule
- Enable-NetFirewallRule
- Get-NetFirewallRule
- Remove-NetFirewallRule
- Rename-NetFirewallRule
- Set-NetFirewallRule
- Show-NetFirewallRule
Рассмотрим несколко простых примеров открытия портов в Windows Firewall.
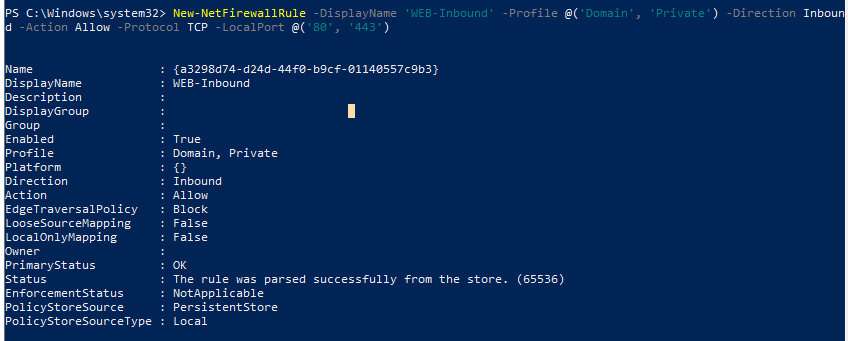
Например, вы хотите разрешить входящие TCP подключения на порты 80 и 443 для профилей Domain и Private, воспользуйтесь такой командой:
New-NetFirewallRule -DisplayName ‘WEB-Inbound’ -Profile @(‘Domain’, ‘Private’) -Direction Inbound -Action Allow -Protocol TCP -LocalPort @(’80’, ‘443’)
Вы можете разрешить или заблокировать трафик для конкретной программы. Например, вы хотите заблокировать исходящие соединения для FireFox:
New-NetFirewallRule -Program “C:\Program Files (x86)\Mozilla Firefox\firefox.exe” -Action Block -Profile Domain, Private -DisplayName “Block Firefox” -Description “Block Firefox” -Direction Outbound
Разрешим входящее RDP подключение по порту 3389 только с IP одного адреса:
New-NetFirewallRule -DisplayName «AllowRDP» –RemoteAddress 192.168.1.55 -Direction Inbound -Protocol TCP –LocalPort 3389 -Action Allow
Чтобы разрешить ping для адресов из указанной подсети, используйте команды:
$ips = @(«192.168.1.50-192.168.1.60», «192.165.2.22-192.168.2.200», ”10.10.0.0/16”)
New-NetFirewallRule -DisplayName «Allow inbound ICMPv4» -Direction Inbound -Protocol ICMPv4 -IcmpType 8 -RemoteAddress $ips -Action Allow
New-NetFirewallRule -DisplayName «Allow inbound ICMPv6» -Direction Inbound -Protocol ICMPv6 -IcmpType 8 -RemoteAddress $ips -Action Allow
Чтобы отредактировать имеющееся правило брандмауэра, используется командлет Set-NetFirewallRule. Например, вы хотите разрешить входящие подключения с указанного IP адреса для ранее созданного правила:
Get-NetFirewallrule -DisplayName ‘WEB-Inbound’ | Get-NetFirewallAddressFilter | Set-NetFirewallAddressFilter -RemoteAddress 192.168.1.20
Если нужно добавить в правило файервола несколько IP адресов, используйте такой скрипт:
$ips = @(«192.168.1.50», «192.165.2.22»,”192.168.1.20”)
Get-NetFirewallrule -DisplayName ‘WEB-Inbound’|Set-NetFirewallRule -RemoteAddress $ips
Вывести все IP адреса, которые содержатся в правиле брандмауэра:
Get-NetFirewallrule -DisplayName ‘Allow inbound ICMPv4’|Get-NetFirewallAddressFilter

Вы можете включать/отключать правила файервола с помощью командлетов Disable-NetFirewallRule и Enable-NetFirewallRule.
Disable-NetFirewallRule –DisplayName ‘WEB-Inbound’
Чтобы разрешить ICMP (ping), выполните команду:
Enable-NetFirewallRule -Name FPS-ICMP4-ERQ-In
Чтобы удалить правило брандмауэре используется командлет Remove-NetFirewallRule.
Вывод правил Windows Firewall через PowerShell
Список активных правил для входящего трафика можно вывести так:
Если, например, нам нужно вывести список блокирующих исходящих правил:
Get-NetFirewallRule -Action Block -Enabled True -Direction Outbound
Если нужно отобразить имя программы в правиле:
Get-NetFirewallRule -Action Block -Enabled True -Direction Outbound | %
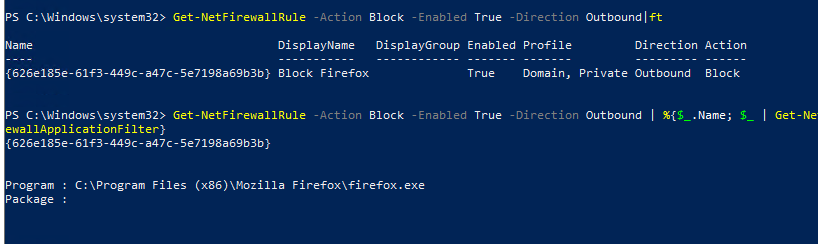
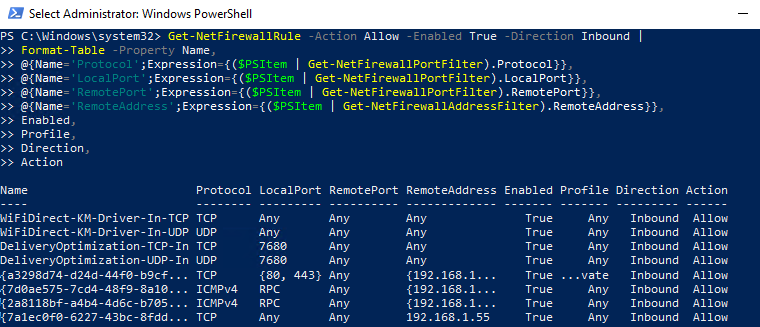
Как вы видите командлет Get-NetFirewallRule не выводит порты сетевые порты и IP адреса для правил брандмауэра. Чтобы вывести всю информацию о разрешенных входящих (исходящих) подключениях в более удобном виде с отображением номеров портов, используйте такой скрипт:
PowerShell предоставляет широкие возможности по управлению правилами Windows Firewall из командной строки. Вы можете автоматически запускать скрипты PowerShell для открытия/закрытия портов при возникновении определенных событий. В следующей статье мы рассмотрим простую систему на базе PowerShell и Windows Firewall для автоматической блокировки IP адресов, с которых выполняется удаленный перебор паролей по RDP на Windows VDS сервере.
Configure Windows Firewall for remote debugging
On a network protected by Windows Firewall, the firewall must be configured to permit remote debugging. Visual Studio and the remote debugging tools try to open the correct firewall ports during installation or startup, but you may also need to open ports or allow apps manually.
This topic describes how to configure the Windows firewall to enable remote debugging on Windows 10, 8/8.1, and 7; and Windows Server 2012 R2, 2012, and 2008 R2 computers. The Visual Studio and remote computer don’t have to be running the same operating system. For example, the Visual Studio computer can run Windows 10, and the remote computer can run Windows Server 2012 R2.
The instructions for configuring the Windows firewall differ slightly on different operating systems, and for older versions of Windows. Windows 8/8.1, Windows 10, and Windows Server 2012 settings use the word app, while Windows 7 and Windows Server 2008 use the word program.
Configure ports for remote debugging
Visual Studio and the remote debugger try to open the correct ports during installation or startup. However, in some scenarios, such as a third-party firewall, you may need to open ports manually.
To open a port:
In Windows Start menu, search for and open Windows Firewall with Advanced Security. In Windows 10, this is Windows Defender Firewall with Advanced Security.
For a new incoming port, select Inbound Rules and then select New Rule. For an outgoing rule, select Outbound Rules instead.
In the New Inbound Rule Wizard, select Port, and then select Next.
Select either TCP or UDP, depending on the port number from the following tables.
Under Specific local ports, enter a port number from the following tables, and select Next.
Select Allow the Connection, and then select Next.
Select one or more network types to enable, including the network type for the remote connection, and then select Next.
Add a name for the rule (for example, msvsmon, IIS, or Web Deploy), and then select Finish.
The new rule should appear and be selected in the Inbound Rules or Outbound Rules list.
To open a port using PowerShell:
For Windows Firewall, you can use PowerShell commands such as New-NetFirewallRule.
The following example opens port 4024 for the remote debugger on the remote computer. The path you need to use may be different.
Ports on the remote computer that enable remote debugging
For remote debugging, the following ports must be open on the remote computer:
| Ports | Incoming/Outgoing | Protocol | Description |
|---|---|---|---|
| 4022 | Incoming | TCP | For VS 2017. The port number increments by 2 for each Visual Studio version. For more information, see Visual Studio remote debugger port assignments. |
| 4023 | Incoming | TCP | For VS 2017. The port number increments by 2 for each Visual Studio version. This port is only used to remote debug a 32-bit process from a 64-bit version of the remote debugger. For more information, see Visual Studio remote debugger port assignments. |
| 3702 | Outgoing | UDP | (Optional) Required for remote debugger discovery. |
| Ports | Incoming/Outgoing | Protocol | Description |
|---|---|---|---|
| 4024 | Incoming | TCP | For VS 2019. The port number increments by 2 for each Visual Studio version. For more information, see Visual Studio remote debugger port assignments. |
| 4025 | Incoming | TCP | For VS 2019. The port number increments by 2 for each Visual Studio version. This port is only used to remote debug a 32-bit process from a 64-bit version of the remote debugger. For more information, see Visual Studio remote debugger port assignments. |
| 3702 | Outgoing | UDP | (Optional) Required for remote debugger discovery. |
If you select Use Managed Compatibility Mode under Tools > Options > Debugging, open these additional remote debugger ports. Debugger Managed Compatibility Mode enables a legacy, Visual Studio 2010 version of the debugger.
| Ports | Incoming/Outgoing | Protocol | Description |
|---|---|---|---|
| 135, 139, 445 | Outgoing | TCP | Required. |
| 137, 138 | Outgoing | UDP | Required. |
If your domain policy requires network communication to be performed through IPSec, you must open additional ports on both the Visual Studio and remote computers. To debug on a remote IIS web server, open port 80 on the remote computer.
| Ports | Incoming/Outgoing | Protocol | Description |
|---|---|---|---|
| 500, 4500 | Outgoing | UDP | Required if your domain policy requires network communication to be performed through IPSec. |
| 80 | Outgoing | TCP | Required for web server debugging. |
To allow specific apps through the Windows firewall, see Configure remote debugging through Windows Firewall.
Configure remote debugging through Windows firewall
You can install the remote debugging tools on the remote computer, or run them from a shared folder. In either case, the remote computer firewall must be configured correctly.
On a remote computer, the remote debugging tools are in:
Allow and configure the remote debugger through Windows Firewall
In Windows Start menu, search for and open Windows Firewall, or Windows Defender Firewall.
Select Allow an app through Windows Firewall.
If Remote Debugger or Visual Studio Remote Debugger doesn’t appear under Allowed apps and features, select Change settings, and then select Allow another app.
If the remote debugger app still isn’t listed in the Add an app dialog, select Browse, and navigate to \Common7\IDE\Remote Debugger\ , depending on the appropriate architecture for your app. Select msvsmon.exe, and then select Add.
In the Apps list, select the Remote Debugger that you just added. Select Network types, and then select one or more network types, including the network type for the remote connection.
Select Add, and then select OK.
Troubleshoot the remote debugging connection
If you can’t attach to your app with the remote debugger, make sure the remote debugging firewall ports, protocols, network types, and app settings are all correct.
In the Windows Start menu, search for and open Windows Firewall, and select Allow an app through Windows Firewall. Make sure Remote Debugger or Visual Studio Remote Debugger appears in the Allowed apps and features list with a selected check box, and the correct network types are selected. If not, add the correct apps and settings.
In the Windows Start menu, search for and open Windows Firewall with Advanced Security. Make sure Remote Debugger or Visual Studio Remote Debugger appears under Inbound Rules (and optionally, Outbound Rules) with a green checkmark icon, and that all settings are correct.
- To view or change the rule settings, right-click the Remote Debugger app in the list and select Properties. Use the Properties tabs to enable or disable the rule, or change port numbers, protocols, or network types.
- If the remote debugger app doesn’t appear in the rules list, add and configure the correct ports.


