- Install Hyper-V on Windows 10
- Check Requirements
- Enable Hyper-V using PowerShell
- Enable Hyper-V with CMD and DISM
- Enable the Hyper-V role through Settings
- 1. Prerequisites
- 2. Use Hyper-V paravirtualization with VirtualBox 6
- 3. Info : versions 1079 and earlier of Windows 10 are not supported
- Make sure you have enabled the windows hypervisor platform feature
- Вопрос
- Ответы
- Все ответы
- Почему VirtualBox не видит VT-x если запущен Hyper-V?
Install Hyper-V on Windows 10
Enable Hyper-V to create virtual machines on Windows 10.
Hyper-V can be enabled in many ways including using the Windows 10 control panel, PowerShell or using the Deployment Imaging Servicing and Management tool (DISM). This documents walks through each option.
Note: Hyper-V is built into Windows as an optional feature — there is no Hyper-V download.
Check Requirements
- Windows 10 Enterprise, Pro, or Education
- 64-bit Processor with Second Level Address Translation (SLAT).
- CPU support for VM Monitor Mode Extension (VT-c on Intel CPUs).
- Minimum of 4 GB memory.
The Hyper-V role cannot be installed on Windows 10 Home.
Upgrade from Windows 10 Home edition to Windows 10 Pro by opening up Settings > Update and Security > Activation.
For more information and troubleshooting, see Windows 10 Hyper-V System Requirements.
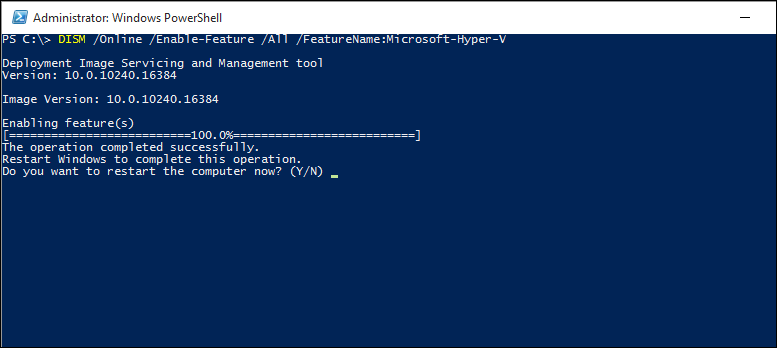
Enable Hyper-V using PowerShell
Open a PowerShell console as Administrator.
Run the following command:
If the command couldn’t be found, make sure you’re running PowerShell as Administrator.
When the installation has completed, reboot.
Enable Hyper-V with CMD and DISM
The Deployment Image Servicing and Management tool (DISM) helps configure Windows and Windows images. Among its many applications, DISM can enable Windows features while the operating system is running.
To enable the Hyper-V role using DISM:
Open up a PowerShell or CMD session as Administrator.
Type the following command:
For more information about DISM, see the DISM Technical Reference.
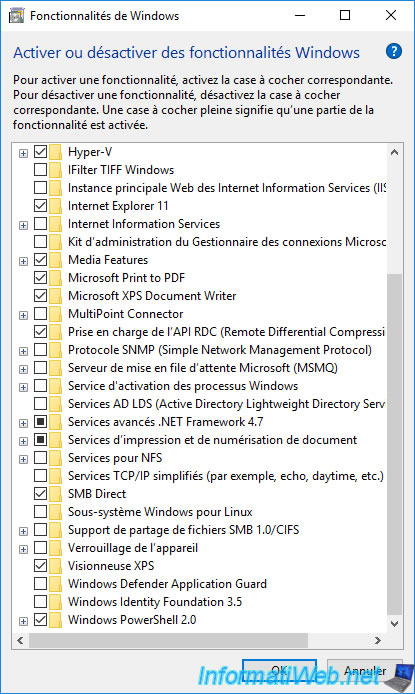
Enable the Hyper-V role through Settings
Right click on the Windows button and select вЂApps and Features’.
Select Programs and Features on the right under related settings.
Select Turn Windows Features on or off.
Select Hyper-V and click OK.
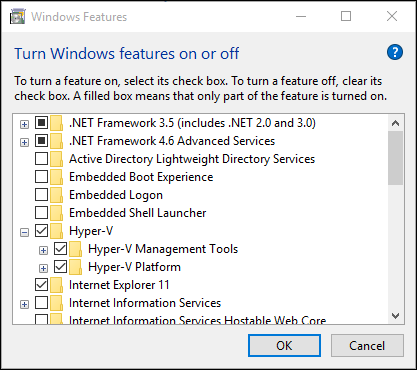
When the installation has completed you are prompted to restart your computer.
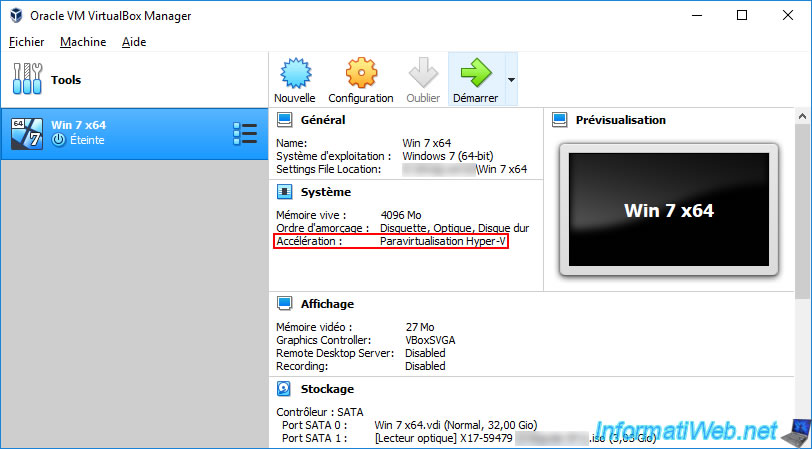
Since version 6.0, VirtualBox is able to use the Hyper-V API to coexist next to Hyper-V.
But, performance will be worse and it does not work with all versions of Windows 10.
This solution is therefore only useful if you want to be able to use virtual machines simultaneously with Hyper-V and VirtualBox.
Note that you can also use a multi-boot to boot or not with Hyper-V (if you want) so you don’t have to uninstall and reinstall Hyper-V every time.
1. Prerequisites
For this to work, you must use a version of Windows 10 that is supported by VirtualBox 6.
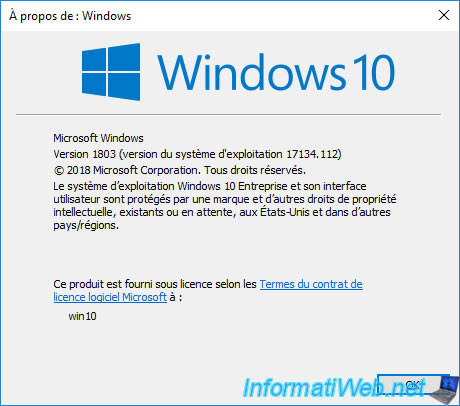
According to our tests, only Windows 10 v1803 x64 is supported by versions 6.0 and 6.0.14 of VirtualBox (even if the virtual machines will be slower).
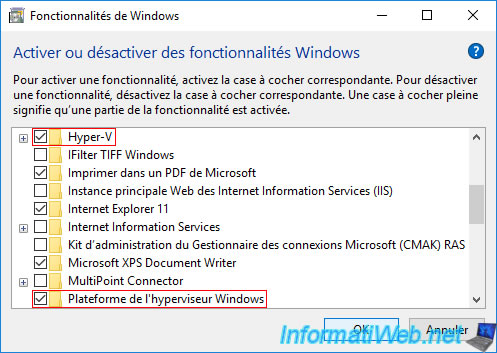
Indeed, for this to work, the «Hyper-V» AND «Windows Hypervisor Platform» features need to be enabled on Windows 10.
However, the «Windows Hypervisor Platform» feature is only available from Windows 10 v1803.
And from the version 1809 of Windows 10, the virtual machine will try to start and will freeze on a black screen.
Important : this will not work on Windows 8 either, because this «Windows Hypervisor Platform» feature is not present.
2. Use Hyper-V paravirtualization with VirtualBox 6
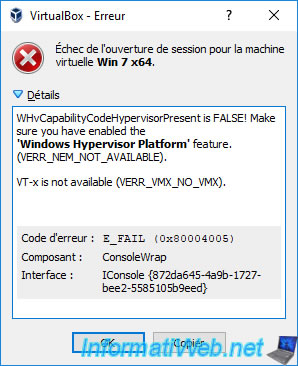
If Hyper-V is enabled in Windows 10 features, but the «Windows Hypervisor Platform» feature is disabled, VirtualBox will only use Hyper-V Paravirtualization.
If you attempt to start the virtual machine, VirtualBox will tell you that the «Windows Hypervisor Platform» feature must be enabled in Windows 10 and that Intel virtualization technology (VT-x) is not available.
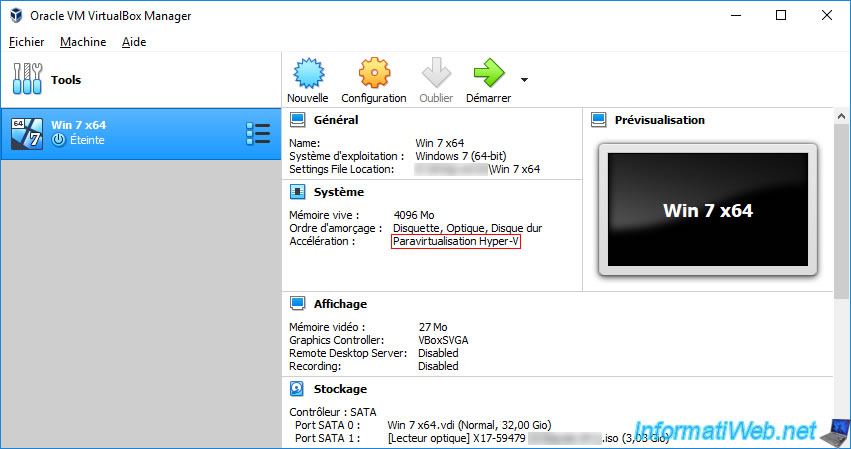
Once you have enabled the «Hyper-V» and «Windows Hypervisor Platform» features in Windows 10, VirtualBox will use accelerations : VT-x/AMD-V, Nested Paging, Hyper-V Paravirtualization.

This time, you can start your virtual machine without any problem.
In addition, you will see a green bird icon (with a V) at the bottom right indicating that VirtualBox is using Hyper-V paravirtualization instead of its own virtualization technology.
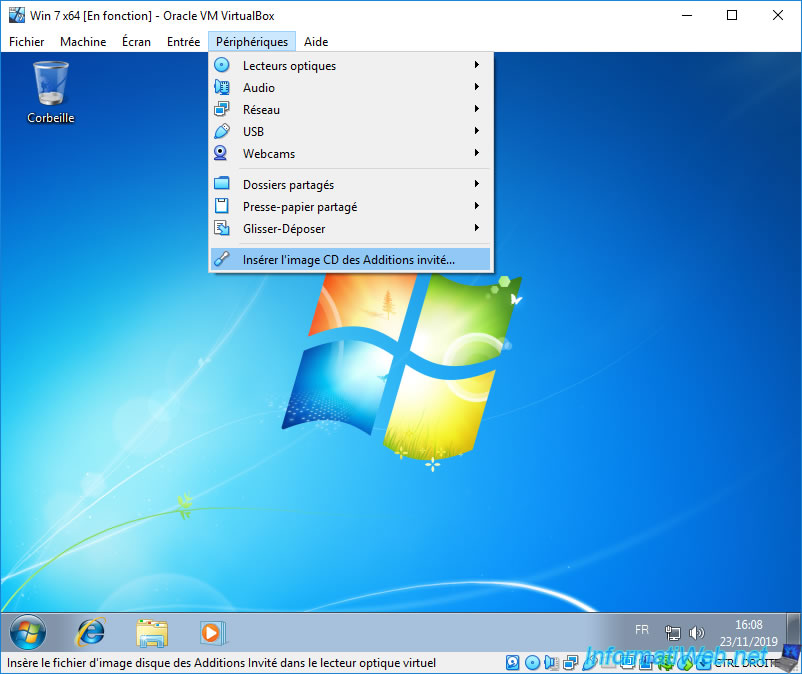
Once the guest OS is installed, install the guest additions as usual by going to : Devices -> Insert Guest Additions CD image.
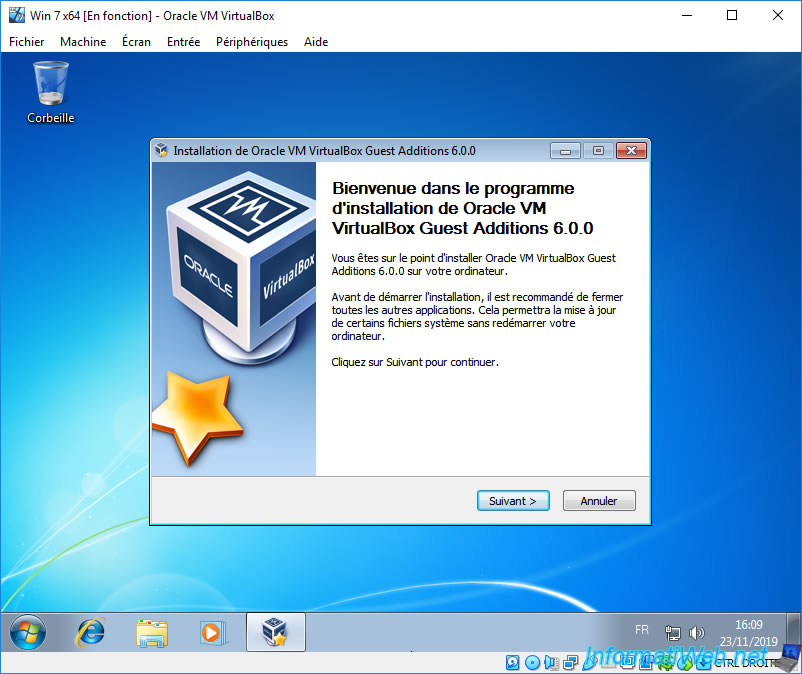
As you can see, the guest additions have been installed correctly even though the virtual machine is virtualized via Hyper-V.
Indeed, you will still benefit VirtualBox virtual hardware and therefore VirtualBox features.
3. Info : versions 1079 and earlier of Windows 10 are not supported
As mentioned at the beginning of this tutorial, you will need Windows 10 v1803 for this to work.
Indeed, the «Windows Hypervisor Platform» is only available from version 1803 and this one allows VirtualBox to be based on the native Hyper- V to work next to it.
Info : enabling the Hyper-V feature masks the availability of Intel VT-x for other virtualization software.
But, enabling the «Windows Hypervisor Platform» feature can fix this problem. However, since this feature is not available before version 1803 of Windows 10, VirtualBox can no longer work next to Hyper-V.
If you create a virtual machine in VirtualBox, you will see that the Hyper-V Paravirtualization acceleration is displayed, because Hyper-V is installed on the host PC.
But, the «VT-x/AMD-V» acceleration is not displayed, because Hyper-V reserve it and it’s no longer accessible by VirtualBox.
As a result, the virtual machine will not boot, because the native Hyper-V API is not present in your version of Windows 10 and the Intel virtualization technology (VT-x) is not available for VirtualBox.
Make sure you have enabled the windows hypervisor platform feature
![]()
Вопрос
![]()
![]()
Operating system: Windows Pro 10 — 64bits (1803)
CPU: Intel Core i3-4330
I am using Visual Studio Community 2017 (15.8.8). When I run the android emulator I am getting this warning:
» To start Android Emulator Android_Accelerated_x86_Oreo in Hyper-V, you must have installed and enabled Windows Hypervisor Platform.
Set it to Enable or Disable Windows features.»
Hyper-V is checked. But I do not see the option of «Windows Hypervisor Platform»:
Ответы
![]()
![]()
Thank you for your reply.
Finally I solved following these steps:
1- Uncheck Hyper-V
2- Restart computer
3- Check this option (Tools — Android — Sdk Manager — Intel x86 Emulator accelerator).
Now Android emulator works fine. UWP emulator, too.
Все ответы
![]()
![]()
Welcome to the MSDN forum.
I tried to reproduce your issue on my environment (my environment is Windows 10 Enter 1803). but I find the Windows Hypervisor Platform feature exists in turn windows features on or off.
Now, please open Windows PowerShell with administrator privilege -> type command line: WindowsOptionalFeature -Online -FeatureName *Hyper-V* -> press Enter. Have a look if the Hyper-V Platform in the list.
If yes, you can run command line: enable-WindowsOptionalFeature -Online -FeatureName «Microsoft-Hyper-V» –All. Wait for minutes and you will see the prompt, type “Y” -> then your PC will reboot. After that, test your project again.
Почему VirtualBox не видит VT-x если запущен Hyper-V?
Пытаюсь включить VirtualBox 6.0.10 с включенным гипервизором.
Получаю следующую ошибку
VT-x is not available (VERR_VMX_NO_VMX).
VT-x в настройках биоса включен, виртуалки Hyper-V запускаются и работают нормально. Если выключить гипервизор VirtualBox начинает работать нормально.
Собственно в чем проблема?
UPD:
Ошибка в логах
- Вопрос задан более года назад
- 9526 просмотров

Что вы подразумеваете под «гипервизором»?
Если программу использующую гипервизор, то у меня запущен только VirtualBox
Если саму службу гипервизора, то если я не ошибаюсь начиная с VirtualBox 6 Oracle анонсировали её совместимость

Vocler, Гипервизор — платформа виртуализации, и она использует средства виртуализации процессора.
Если кто-то использует VT-x — никто другой не сможет его использовать.
Если саму службу гипервизора, то если я не ошибаюсь начиная с VirtualBox 6 Oracle анонсировали её совместимость
Oracle VM VirtualBox can be used on a Windows host where Hyper-V is running.


Oracle VM VirtualBox can be used on a Windows host where Hyper-V is running. This is an experimental feature.
Note: When using this feature, you might experience significant Oracle VM VirtualBox performance degradation on some host systems.
вы уже нашли документацию от oracle, в которой указано, как эту экспериментальную совместимость задействовать?
Да
( На всякий: я не автор вопроса)
доустановите фичу Windows Hypervisor Platform
vvmtutby, включил, перезагрузил, не помогло
P. S: Форум лежит, но я его уже читал до того как задать вопрос. Решения не нашел
значит дело в экспериментальности этой фичи или в том, что суть этой фичи неправильно понята вами или неправильно выражена разработчиком.
(с) Капитан очевидность
Ну собственно в этом суть почти любого вопроса на тостере, если возникают какие-либо непонятки то проблема либо в разработчике, либо в пользователе. Цель вопроса — узнать что конкретно не так.
здесь вы в лучшем случае дождётесь советов вроде «поставьте чистую систему и попробуйте с нуля», «обратитесь в поддержку oracle», «ознакомьтесь с документацией».
В таком случае пускай вопрос висит, пока кто-нибудь не найдет решение, либо пока Oracle не доведут фичу до ума. В любом случае расписываться в своем бессилии — это не ответ.
Vocler, т.е. пункт 7 не помог?
For reference the core steps we are using are:
Make sure build is 1809 higher of Windows10.
Step 1: Enable all Virtualisation extensions in the bios. e.g. Intel Virtulization technology and VT-d
Step 2: In Control Panel, Add and remove programs, turn on Windows Features enable Windows Hypervisor Platform and Hyper-V
Step 3: Install VirtualBox at least .10
Step 4: Create new machine e.g. «Testmachine»
Step 5: Load cmd prompt, (cmd)
Step 6: cd into your install folder for virtualbox, usually «cd C:\Program Files\Oracle\VirtualBox»
Step 7: setextradata «» «VBoxInternal/NEM/UseRing0Runloop» 0 , e.g. setextradata «Testmachine «VBoxInternal/NEM/UseRing0Runloop» 0
Please note Step 7 is case sensitive.
Step 8: Use as per normal, in this case our Hyper-V and VirtualBox ran together, we also used USB devices. The speed was very reasonable.
Проверил .vbox файл, строка
Там есть, так что команда правильная. Видимо дело не в UseRing0Runloop
Н-да, а автору ( FirstVoid) помогло . . .
Можно «как образец» со страницы
QEMU with WHPX
взять
QEMU 4.1.0-733 binaries for Windows (x86-64), compiled with support for Hyper-V and Haxm accelerators
QEMU 4.0.0-rc1-70 проявил себя хорошо
qemu-system-x86_64.exe -accel whpx -M q35 -m 1024 Example.ISO -net user -net nic
Убедимся, что WHPX «включён и работает»
VirtualBox можно попробовать:
VirtualBox-6.1.0_BETA1-133315-Win.exe
«Если и это не поможет», то м.б. если собрать из исходных кодов, закомментировав проверки …
(
Разработчики QEMU смогли ведь работать с WHPX, что же мешает р-ам vBox .
Вариант «доустановите фичу Windows Hypervisor Platform» + пункт 7:
For reference the core steps we are using are:


