- User Tools
- Site Tools
- Tree Window
- Viewport
- Layout
- Isolating a Single Viewport
- Projection Types
- Splitters
- Sizing the Viewports
- Rendering
- Rendering Modes
- Shadows
- «Extras»
- Toolbar
- Rendering Mode Menu
- Node-Selection Mode
- Toggle Leaves, Fronds, Branches, Zones, and Proxies
- «Extras» Menu
- Selection Style Menu
- Visibility
- Forces
- Collision Objects
- Degradation
- Manipulator Mode
- Zoom Menu
- Tree Window Properties
- Tree Window Overlays
- Light
- Light Properties
- Wind Indicator
- Fan Properties
- LOD Indicator
- Using Near and Far
- Axis Indicator
- Navigation
- Standard
- Panning
- Rotating
- Zooming
- Alternative Control Schemes
- Trackball
- Panning
- Rotating
- Zooming
- Traveler
- Walking
- Strafing
- Changing Height
- Looking Up and Down
- Here’s How to Build a Treehouse in 10 «Easy» Steps
- How much does it cost to build a treehouse?
- How do you build a treehouse?
- 1. Pick the right trees or trees
- 2. Design your treehouse for success
- 3. Gather the materials you need
- 4. Get the right tools for the job
- 5. Mount the main supports and build the main platform
- 6. Add braces, if needed
- 7. Put the flooring down
- 8. Construct the railings, walls, and entrance
- 9. Add a ladder
- 10. ‘Plonk’ a roof on it and enjoy
User Tools
Site Tools
Tree Window
This section details the purpose and use of the window where the models are displayed and edited.
Keyboard Shortcuts
To view a table of the keyboard shortcuts for the ‘Generation Editor’, go to the ‘Keyboard Shortcuts’ page.
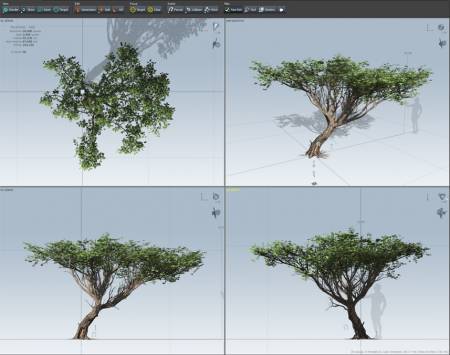
Viewport
These are the 3D regions where the tree is rendered. The tree window can either show a single viewport, two viewports (horizontal or vertical), or four viewports.
Layout
By default there is only a single viewport visible (perspective). To enable other views, right-click in the tree window and select the pull-right menu “Layout”. Other configurations can be found there. You can change the active viewport from the right-click menu as well.
Isolating a Single Viewport
A shortcut for isolating a single viewport is to double-click the middle mouse button inside of any viewport. Double-Middle-Click again to go back to the previous viewport arrangement.
Projection Types
There are four projection types to choose from per viewport: perspective, XY plane, XZ plane and YZ plane. The perspective projection is the default view and the other three are all orthographic projections from each axis. Extra types are added when importing cameras from an fbx file.
Splitters
Splitters are the horizontal and vertical lines that divide the viewports.
Sizing the Viewports
The viewports can be resized by adjusting the splitters. Left-Click and drag the horizontal splitter up and down to change the height of the viewports. Left-Click and drag the vertical splitter left and right to change the width of the viewports. Left-Clicking and dragging the region where the splitters cross allows width and height to be changed simultaneously. The splitters can be reset via the “Layout” portion of the right-click menu.
Rendering
Rendering Modes
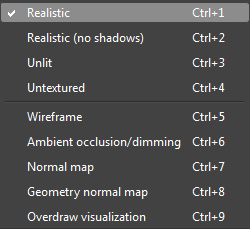
The rendering mode can be changed via the firsts tree window toolbar button. Options include textured and untextured, lit and unlit, shadows, as well as special rendering modes such as wireframe, ambient occlusion/dimming, normal map, and overdraw. The rendering mode menu can also be accessed from the contextual right-click menu. the “W” hotkey will toggle between wireframe and the last rendering mode before pressing “W”. Pressing the toolbar button will toggle between the last two rendering modes, as will the hotkey “R”. All of the rendering modes can be access via the applicable “CTRL+” hot key as well.
Shadows
Once enabled via the rendering modes dialog, various shadow options can be found on the Tree Window Properties, such as shadow resolution, bias and grid display. The number of anti-aliasing samples is controlled via the preferences dialog found on the “Render” tab. Multi-sampling is required.
«Extras»
Various other visual aids can be made visible from the “Extras” toolbar button (or from the contextual pull-right menu). Press the toolbar button to toggle all “Extras” rendering. Extras Include:
Toolbar
The tree window toolbar houses many shortcuts, tools and other controls.

Rendering Mode Menu
Switch between various rendering modes. Use the pull down menu to select a rendering mode or press the button to toggle between the last two rendering modes.
Node-Selection Mode
Toggles node-selection mode. When enabled, clicking on any node will select it.
Toggle Leaves, Fronds, Branches, Zones, and Proxies
Toggles the visibility of leaf, frond, branch, zone, and proxy geometry.
«Extras» Menu
The ‘Extras’ menu houses visibility checkboxes for bones, frame, hints, and normals. Press the button or the hotkey “E” to toggle “Extras” rendering.
Selection Style Menu
Use the menu to select from several different methods to indicate what is selected. Press the button to toggle selection highlighting (“
Visibility
Press the button to toggle the selected object’s visibility. Use the menu to select other visibility options including “Isolation”, which hides everything but the selected object. Once in isolation, press “I” to revert back.
Forces
Press the button to toggle force rendering. Use the menu to select forces by name or add new forces.
Collision Objects
Press the button to toggle collision object rendering. Use the menu to select collision objects by name or add new collision objects.
Press the button to toggle wind. Use the menu to access more wind options including fan visibility.
Degradation
Press the button to toggle degradation (both regular and interactive, depending on what is checked). Use the menu to enable degradation types individually or access degradation options.
Manipulator Mode
Switch between translate, rotate, and scale manipulation modes.
Zoom Menu
Use the menu to access zoom functions (double clicking nothing is a short cut to zoom all) including options to save camera positions for later use.
Tree Window Properties
Press the button to edit the properties of the ‘Tree Window’ including settings for rendering, shadows, overlay, and the grid. Use the menu to quickly toggle ‘Tree Window’ features.
View Tree Window Properties
Tree Window Overlays
Light
The light object displays the directional light rotation and the various light colors (diffuse, ambient and specular). Colors are depicted with various parts of the light – the arrow represents diffuse, the inner-ring represents ambient, and the bulb itself represents specular. The light is a screen-space object that rotates with the camera, making light rotation relative to the current view. The light can be rotated either by clicking on it and setting the manipulator mode to rotate, or by holding down the ‘V’ button and dragging the left mouse button (side-to-side orbits the light while up and down movements alter the slope of the light angle).
The light can be hidden manually by setting ‘Show light’ to false on the tree window property editor.
Light Properties
Click on the light object to display the light properties in the ‘Property Editor’. Properties include light colors (diffuse, ambient and specular) and a light global light scalar. Use the light scalar to match the global light scalar used with the SpeedTree SDK.
 The fan object displays the directional influence and strength of the wind. Rotate the fan by either clicking on it and using the rotate manipulator, or by holding down the “F” key and dragging the left mouse button. Control wind strength by holding down “F” and dragging the middle mouse button. Right click in the fan area for quick access to wind functions, such as copy/pasting wind, or disabling gusting.
Wind Indicator
When wind is on, a graphical visualization of wind strength and gusting is displayed below the fan icon. The wind indicator has three sections:
Fan Properties
Click on the fan object to display the fan properties in the ‘Property Editor’.
LOD Indicator
 If LOD (level of detail) is enabled and the preview style is set to “Manual” (both are tree generator properties) , the LOD Indicator (bottom left corner of the tree window) is exposed and is able to control the current level of detail state. Drag the point from highest LOD to lowest LOD to preview LOD transitions at a fixed distance (or hold the “CTRL” key while dragging the left mouse button up and down).
The LOD Indicator can be hidden manually by setting “Show overlay” to false on the tree window properties.
Using Near and Far
If the preview style is set to “Use near and far”, the LOD Indicator is still visible, but it is disabled from editing. Zoom the camera away from the tree to see it transition between the near and far LOD property values (another tree generator property). Lines are displayed on the LOD Indicator for the level of detail count and transition ranges.
More Info: Level of Detail
Axis Indicator
The axis indicator is representation of the major axes (X, Y, and Z) from the perspective of the current camera. Toggle its visibility via the tree window properties.
Navigation
There are three modes of navigation: standard, trackball, and traveler. To switch between navigation modes, right-click in the tree window and select the pull-right menu “Navigation”.
Standard
Standard navigation mode allows users to manipulate the scene as though it were surrounded by an imaginary trackball whose “up” vector is always aligned with the global ‘Z’ axis. This navigation type makes use of a pivot point to control where the camera is looking and to define the point of rotation.
Panning
Start panning by pressing and holding the middle mouse button anywhere in the viewport. Move the mouse left, right, up, and down to move the viewpoint. Release the middle mouse button to stop panning. Panning moves both the viewpoint and the pivot point simultaneously.
Rotating
Start rotating by pressing and holding the left mouse button anywhere in the viewport. Move the mouse left and right to rotate the viewpoint around the ‘Z’ axis of the pivot point. Move the mouse up and down to rotate the viewpoint above or below the pivot point. Release the left mouse button to stop rotating. Only the viewpoint changes during rotations.
Zooming
Start zooming by pressing and holding the left and middle mouse buttons anywhere in the viewport. Move the mouse up to back away from the pivot point. Move the mouse down to move closer to the pivot point. Release both buttons to stop zooming.
An alternative to dragging the mouse with both buttons down is to roll the mouse wheel. Roll the mouse wheel up to back away from the pivot point. Roll it down to move closer.
| It is sometimes desirable to move both the pivot point and the viewpoint at the same time while zooming (i.e., “push” the viewer and pivot point through an object to another one so that future pivots will be around the new object). To do so, hold the SHIFT key down while performing a typical zoom operation. |
|---|
Alternative Control Schemes
Some people prefer to use control schemes familiar to them from other applications. Below is a table of the available control schemes. The control scheme can be changed on the Application Preferences dialog.
Autodesk® Maya®
Maya-style controls will be used:
Autodesk 3ds Max®
3ds Max-style controls will be used:
Trackball
Trackball navigation mode allows users to manipulate the scene as though it were surrounded by an imaginary trackball (this time, without an up vector restriction). This navigation type makes use of a pivot point to control where the camera is looking and to define the point of rotation.
Panning
Start panning by pressing and holding the middle mouse button anywhere in the viewport. Move the mouse left, right, up, and down to move the viewpoint. Release the middle mouse button to stop panning. Panning moves both the viewpoint and the pivot point simultaneously.
Rotating
Start rotating by pressing and holding the left mouse button anywhere in the viewport. Move the mouse left, right, up, and down to rotate freely around the pivot point. Release the left mouse button to stop rotating. Only the viewpoint changes during rotations.
Zooming
Start zooming by pressing and holding the left and middle mouse buttons anywhere in the viewport. Move the mouse up to back away from the pivot point. Move the mouse down to move closer to the pivot point. Release both buttons to stop zooming.
An alternative to dragging the mouse with both buttons down is to roll the mouse wheel. Roll the mouse wheel up to back away from the pivot point. Roll it down to move closer.
| It is sometimes desirable to move both the pivot point and the viewpoint at the same time while zooming (i.e., “push” the viewer and pivot point through an object to another one so that future pivots will be around the new object). To do so, hold the SHIFT key down while performing a typical zoom operation. |
|---|
Traveler
Traveler navigation mode allows users to navigate a scene as though they were a participant in it. Unlike the previous navigation modes, there is no pivot point. Instead, mouse motions are mapped to actions that move an imaginary traveler through the scene as follows:
Walking
Start walking by pressing and holding the left mouse button anywhere in the viewport. Move the mouse up to walk forward and down to walk backwards (faster mouse moves result in faster walking). Move the mouse left and right to change direction. Release the mouse button to stop walking. Only the viewpoint changes during rotations.
| Walking motion is typically parallel to the ‘XY’ plane. To move in the direction the traveler is looking, hold down the SHIFT key while performing a regular walk action. |
|---|
Strafing
Strafing is the act of stepping sideways without changing the direction the viewer is looking. Start strafing by pressing and holding the middle mouse button anywhere in the viewport. Move the mouse left to strafe left and right to strafe right. Release the middle mouse button to stop strafing.
Changing Height
It is possible to change the height of the imaginary traveler (distance along the ‘Z’ axis of the viewpoint). Change the height by pressing and holding the middle mouse button anywhere in the viewport. Move the mouse up to make the traveler taller and down to make the traveler shorter. Release the middle mouse button to stop changing the height.
Looking Up and Down
Start looking by pressing and holding the left and middle mouse buttons anywhere in the viewport. Move the mouse left, right, up, and down to look around without changing the position of the viewpoint. Release both buttons to stop looking.
Here’s How to Build a Treehouse in 10 «Easy» Steps
If you are thinking of building your own treehouse, here are ten basic steps you should follow.


If you fancy making your child’s day, week and year, you might want to consider building them their very own treetop retreat. This is not a small task, by any means, but such a project can be incredibly fun and educational for all involved.
Plus you will make life-long memories for your little bundles of joy. It will once complete, also give you a much-needed break from time to time!
Please note the following is not intended as an exhaustive guide. the design, size, shape, and materials used for your treehouse will depend entirely on the tree(s) in question, and your DIY skills, knowledge and experience, and budget.
How much does it cost to build a treehouse?
The cost of building a treehouse depends entirely on what materials, tools and equipment you already own and your ambitions for the final structure.
If you already have a lot of spare timber lying around and are willing to build it yourself, the costs could be very reasonable. But note that other sources claim that it can cost between 9 and 250 thousand dollars.
«Depending on what you want, tree houses cost between $9,000 and over $250,000. The average basic kid’s treehouse/platform costs between $8,000 and $15,000. Higher-end residential treehouses typically cost between $25,000 and $60,000. Tree Houses that you can live typically cost between $75,000 and $500,000.» — treetopbuilders.com.
How do you build a treehouse?
So, without further ado, here are some of the basic steps usually needed to build a basic treehouse. The following are only intended as a basic overview, as each treehouse design and build is usually unique.
That being said, there are some basic stages that you need to follow.
1. Pick the right trees or trees
The most important consideration when thinking of building a treehouse is choosing the right tree(s) to use. For larger, more substantial constructions, multiple trees are better than one, but this is not always possible.
For single trees, you want to look for ones with a decent splitting of the trunk into good-sized branches. This will allow you to have some good support and anchor points for the base of the treehouse.
You should also look for healthy deciduous or coniferous like oaks, maples, ash, and some apple, beech, and hemlock can also work well.
» All of these are strong trees that grow large and can weather many different climates, which is absolutely essential when constructing a treehouse.» — mrtreeservices.com.
The design of your treehouse is as much about the tree in question as it is about your carpentry skills. You should also make considerations for the height above the ground you want the treehouse to be.
» For an average-sized treehouse of [8 feet by 8 feet] (2.5m x 2.5 m) a trunk diameter of 12 inches (30.5 cm) or more is recommended if using a single tree. If supported over two or more trees, smaller minimum diameters will be suitable. The design of the treehouse may make it heavier than usual, in which case a larger diameter will be required, or a tougher species. Deciduous trees tend to have denser wood which can support greater loads.» — thetreehouseguide.com.
The higher up the tree, the more you’ll need to factor in safety measures for your adventurous little ones. About 2.5 to 3 meters tend to be an ideal height.
2. Design your treehouse for success
Once an ideal tree, or set of trees, have been chosen, the next stage is to design your actual treehouse. Prior to construction, your plan will likely change a little as you go along, but it’s good to keep an eye to the grander design when building the treehouse.
For best results, it is recommended to read around on the subject if you are a novice at this sort of thing. Books like David and Jeanie Stile’s series or the Black and Decker Complete Guide to Treehouses, are excellent choices.
Given that trees can vary widely in shape and form it is not possible to provide any further specific advice here. Besides, t here are plenty of video guides on places like YouTube (we’ve included a few in this article) or forums on just this subject online.
3. Gather the materials you need

Since you building something, you going to need construction materials to work with. In general, you will need at least some, or all, of the following:
- Timber or lumber
- Decking material
- Galvanized lag screws and washers
- Galvanised joist hangers
- Galvanized rafter ties
- Nails, deck screws, etc
- A basic pulley — for the kids to use when complete
4. Get the right tools for the job

Of course, you are also going to need some basic tools as well.
» The bare minimum of hand tools: hammer, saw, level, square, tape measure, adjustable wrench. Power tools: cordless drill, jigsaw
Useful but not critical power tools: miter saw (cutting lumber to length), table saw (ripping lumber), router (rounding edges).
A ladder is important, but even a stepladder would be OK if you installed a ladder/rope ladder/stairs to the treehouse early in the build.» — instructables.com.
5. Mount the main supports and build the main platform
This is probably the most vital stage of the build. Your treehouse will not stand the test of time without well-built supports.
How you do this will depend entirely on your own design based on the supporting tree(s) in question. Make sure you spend a decent amount of time and effort getting this part right.
If the main supporting structure is weak, or poorly built, the final treehouse won’t last very long. It will also have wasted a lot of your time and effort and will not be safe for your children to use.
With the main supports in place, you can begin to assemble the main platform. You can either build this directly onto the supports or prebuild and mount in sections — it is completely up to you.
This is another critical phase so take your time. And remember, «measure twice and cut once.»
6. Add braces, if needed
For added strength, it is usually also a good idea to install some braces below the platform. By adding diagonal braces from under the platform to the tree’s trunk, will prevent the treehouse from wobbling or even collapsing under its own weight.
The amount needed, and placement will depend on the tree and treehouse design in question.
7. Put the flooring down

With the main supporting structure, platform and braces in place, the next phase is to get the main flooring down to create a platform.
This is where the decking (if you bought any) will come in handy. But you could just lay larger pieces of timber sheet instead.
You will likely need to cut the lengths of decking to fit and might have to cut around the tree trunk(s) depending on your design.
With this stage complete, your treehouse should look like it is really starting to come together.
8. Construct the railings, walls, and entrance
At this point, the treehouse should be coming along nicely. Now you need to add some railings and walls. You can use old fencing or build your own timber frame structures.
It doesn’t really matter how you do this, but the main consideration is to make the treehouse safe to use. You don’t want children falling off the platform easily, after all.
Also, keep an eye on how children will enter and exit the structure. Be sure to place the entrance in a logical place.
9. Add a ladder
With the main platform and railing/walls in place, you now need to add a means of access and egress to the treehouse. A basic ladder is usually the best bet but you could consider adding a retractable rope ladder for added fun.
However, younger children might struggle with a rope ladder. You could also install the pulley at this point too (if needed).
10. ‘Plonk’ a roof on it and enjoy
With all the main elements in place, the last stage is to put a roof on top of the treehouse. You can either build a more robust structure from wood, or other materials or simply set up a tarpaulin or other weatherproof fabric.
This is completely up to you.
With the roof in place, your kids (and you) are now free to enjoy your brand new, homemade, treehouse!


