- How to Create Ubuntu Live USB in Windows
- How to make Ubuntu bootable USB in Windows:
- Step 1: Download Ubuntu ISO
- Step 2: Download Universal USB Installer
- Step 3: Creating the bootable USB
- How to Create Ubuntu Bootable USB in Windows 7,8 or 10
- Requirements
- Step 1 – Download Ubuntu ISO
- Step 2 – Install Universal USB Installer
- Step 3 – Create Ubuntu Bootable USB
- How to make Ubuntu 18 bootable USB pendrive
- Requirements
- Create Ubuntu Bootable USB on windows 10/7
- Make Ubuntu Bootable USB on Ubuntu
- How to Install Ubuntu from USB
- How to Easily Create Windows 10 Bootable USB on Ubuntu or Any Linux Distro
- Creating a Windows 10 Bootable USB for UEFI Firmware
- Boot Windows 10 ISO Installer without USB (BIOS & UEFI)
- Creating a Windows 10 Bootable USB for Legacy BIOS Using WoeUSB
- How to Use WoeUSB From the Command Line
How to Create Ubuntu Live USB in Windows
Last updated January 10, 2020 By Abhishek Prakash 93 Comments
Brief: Tutorial to show you how to create a bootable USB of Ubuntu in Windows. Instructions are valid for all versions of Ubuntu and Windows.
One of the first few steps for installing Ubuntu is to create bootable USB of Ubuntu. If you are using Windows 7 or 10, you can use Universal USB Installer to easily create a live USB. It’s my favorite tool and is extremely easy to use.
Let’s see how to easily make a live USB of Ubuntu in Windows.
How to make Ubuntu bootable USB in Windows:

Step 1: Download Ubuntu ISO
Go to Ubuntu and download the ISO image of your preferred Ubuntu version. At present, there are two LTS version available, Ubuntu 14.04 and Ubuntu 16.04. You can download whichever you prefer.
It is always a good idea to perform a checksum on ISO file you downloaded from the internet.
Step 2: Download Universal USB Installer
Once you have downloaded the ISO of Ubuntu 16.04 or 18.04, go to this page and download the latest version of Universal USB Installer.
Step 3: Creating the bootable USB
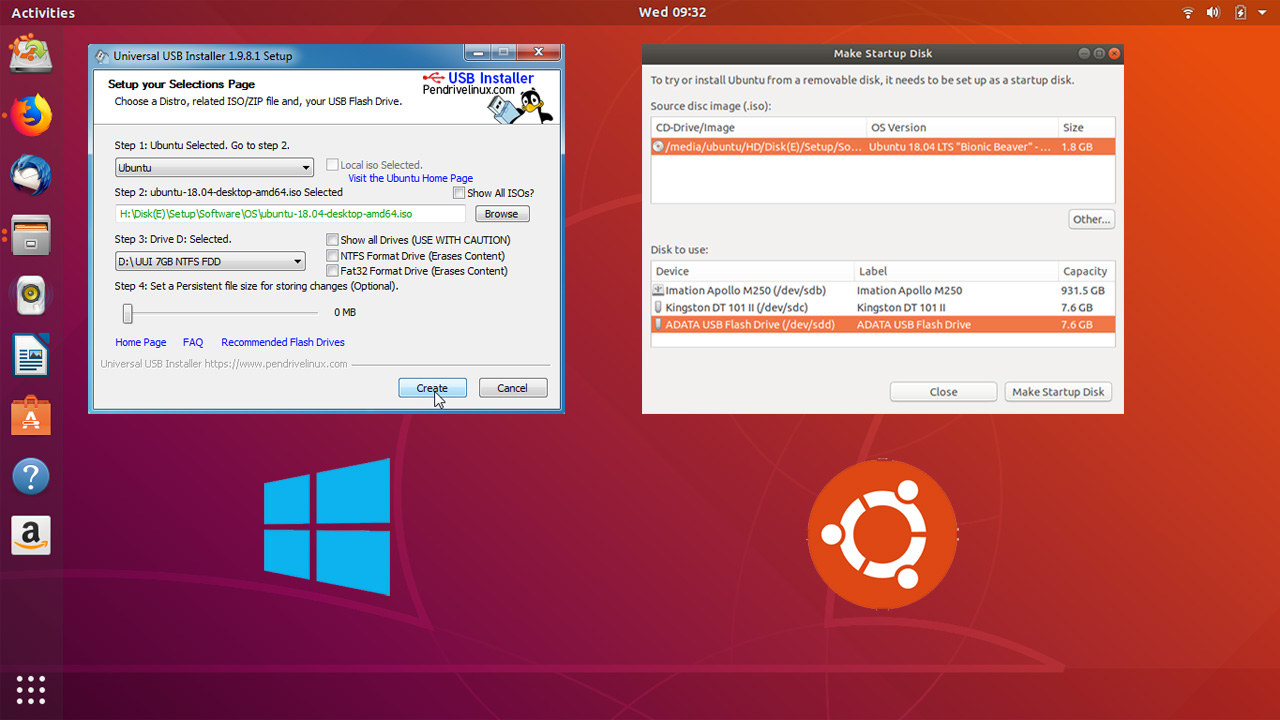
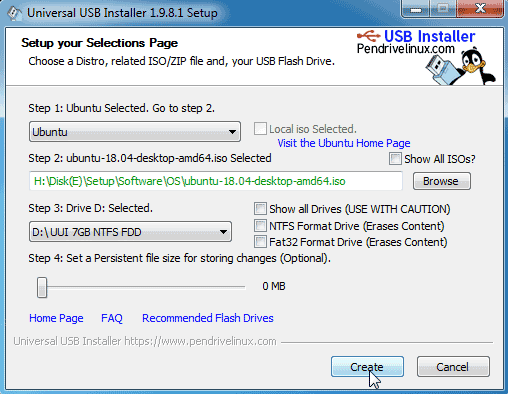
Plugin the USB drive in the computer and run Universal USB Installer. You need to do the following things now:
- Select Ubuntu under step 1
- Browse to the location of downloaded Ubuntu ISO in Step 2 section
- In Step 3, select the USB drive and also check the option to format it.

It will present you with obvious warnings, click Yes.

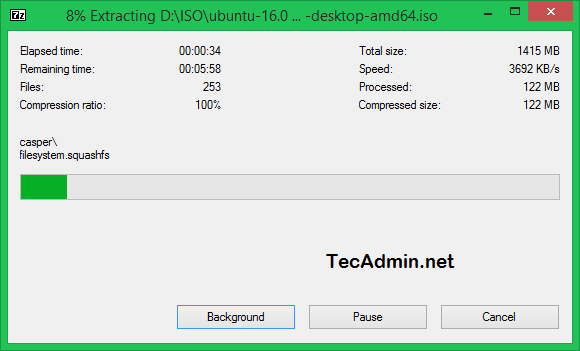
Wait for sometime for the process to complete. You can push it to background, if you like.

That said, your Ubuntu USB should be created in few minutes.

Once the live USB is created, you can proceed with testing Ubuntu in live mode.What you need to do is restart your computer. At boot time, press F2 or F10 or F12 (depending upon your system) to access boot menu.
Once there, choose to boot from USB or removable media. That’s it. You can use Ubuntu without installing here. You can also choose to install Ubuntu if you want.
I have shown the process of making a bootable Ubuntu Linux USB with Rufus tool in this video:
I hope this tutorial helped you to easily create Ubuntu live USB in Windows.
Considering that you are just starting, I advise to follow this beginner’s guide to Ubuntu and learn how to use Ubuntu. Let me know if you need some help.
Like what you read? Please share it with others.
How to Create Ubuntu Bootable USB in Windows 7,8 or 10
This tutorial will help you to create a bootable USB drive of Ubuntu in Windows 7, Windows 8/8.1 or Windows 10. After creating a bootable USB you can use this as Live USB or install on disk.
Requirements
You are required following things to create Ubuntu bootable USB in Windows systems.
- USB Drive
- Ubuntu ISO
- Universal USB Installer application
- A Windows System to create boot disk
Step 1 – Download Ubuntu ISO
Download the Ubuntu operating system from its official website. You can download any required version of Ubuntu.
Step 2 – Install Universal USB Installer
For this tutorial, I am going to use Universal USB Installer utility on Windows to create bootable USB drive. Use the below link to download this tool and install on your Windows 8/8.1 or Windows 10 system.
Step 3 – Create Ubuntu Bootable USB
At this stage, You have installed Universal USB Installer on your system. Also have downloaded Ubuntu system ISO image. Now start process of creating Ubuntu bootable USB.
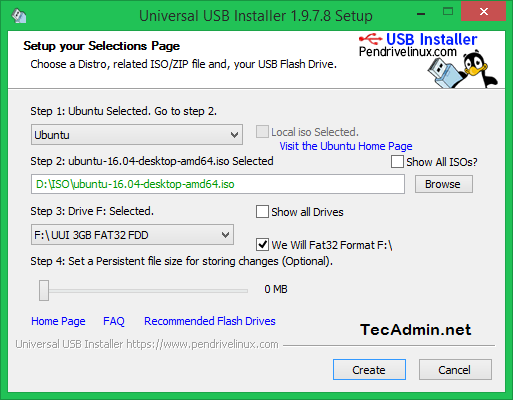
Start Universal USB Installer and select following options.
- Step 1: Select Ubuntu
- Step 2: Browse and select Ubuntu ISO image from your system.
- Step 3: Select the USB drive
Now click on Create button:
Installation process is in progress.
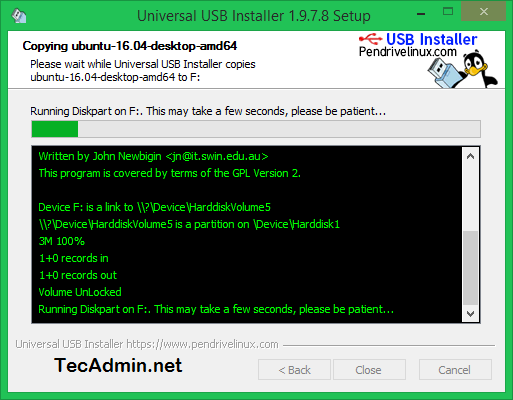
Wait for the installer complete the process. This process will take time as per your operating system speed.
After completing the process, You will see the screen like this.
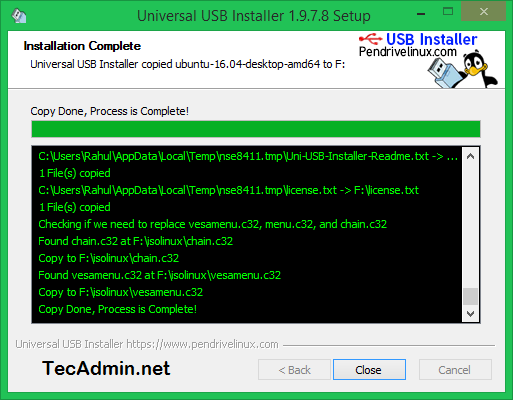
Your Ubuntu bootable USB is ready to use. Use this USB to use as live Ubuntu media or install Ubuntu operating system on your system.
How to make Ubuntu 18 bootable USB pendrive
Most computers today lack a DVD drive and it is becoming more and more common, so creating a bootable Ubuntu flash drive may be your only option to install Ubuntu 18. This tutorial explains how to make bootable Ubuntu 18 pen drive in Windows 10/Ubuntu and install Ubuntu from USB pen drive.
Requirements
To create Ubuntu bootable USB, you need to download the Ubuntu ISO image first. If you want to use Ubuntu as a Desktop operating system, download the desktop ISO image from this link.
If you want to install Ubuntu server from USB flash drive, download the server ISO image from this link.
We also need a USB pen drive with 2GB or more capacity.
Create Ubuntu Bootable USB on windows 10/7
The steps to create a bootable Ubuntu 18 flash drive from within the Windows operating system are as follows:
- Plug your USB drive into the computer.
- Format the Pen Drive in FAT32 File system.
- Download the universal usb installer from the pendrivelinux.com website.
- Double click and open the universal usb installer .exe file.
- From the setup wizard, select the Operating system (Ubuntu or Ubuntu Server Installer).
- Click on the browse button and select the Ubuntu 18 ISO image.
- Under the step 3, select your pen drive from the drop down menu.
- Click on the create button.
After the process completes, you will have a bootable Ubuntu 18 USB flash drive!
Make Ubuntu Bootable USB on Ubuntu
The steps to create a bootable Ubuntu 18 flash drive from within the Ubuntu operating system are as follows:
- Plug your USB drive into the computer.
- Launch Startup Disk Creator.

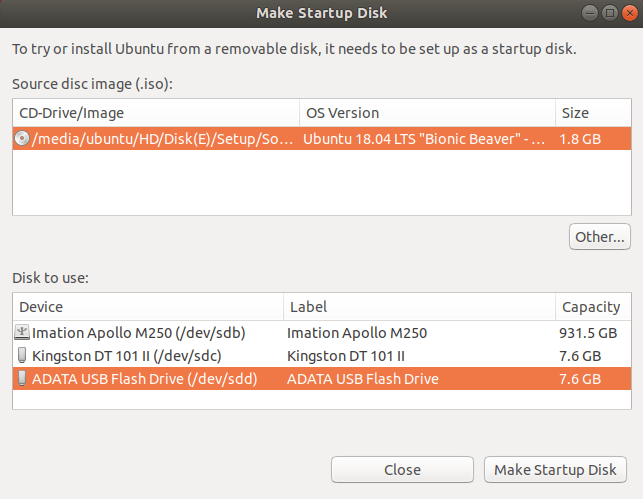
Once the installation completes, you will have a bootable Ubuntu 18.04 LTS USB flash drive to install Ubuntu from USB Pendrive!
How to Install Ubuntu from USB
To Install Ubuntu from USB, you need to change the boot order in your bios menu. You’ll normally have to press a key (such as delete, F2, or F12) during the startup to access these settings. Within the boot section you will have the option to boot your computer from the Ubuntu 18 USB pen drive (Or make the USB drive the first boot device in the boot order).
How to Easily Create Windows 10 Bootable USB on Ubuntu or Any Linux Distro
This tutorial is going to show you an easy way to create a Windows 10 bootable USB on Linux. I use Ubuntu 16.04 as an example. The method applies to any Linux distribution. I use Windows to do online banking because my bank doesn’t support Linux and sometimes play games that can’t run on Linux.
First, you should download Windows 10 ISO from Microsoft official download link. Note that you might not be able to download the ISO from this link on a Windows computer. This download link is visible to users on Linux computer. Once downloaded, follow the instructions below.
Note: It’s recommended to download the Windows 10 April 2018 update ISO, because the October Update ISO contains a file that is larger than 4GB, which can not be copied to a FAT32 partition.

Update: Microsoft doesn’t allow you to download the Windows 10 April 2018 Update ISO from their website anymore. You can download the ISO via this link: Win10 1803 English x64 ISO
Creating a Windows 10 Bootable USB for UEFI Firmware
This method works for UEFI firmware and is very simple. You create a GUID partition table on your USB stick, create a FAT32 file system on it, and then mount Windows 10 ISO image and copy those Windows 10 files to your USB stick and you are done. The following is a step-by-step guide.
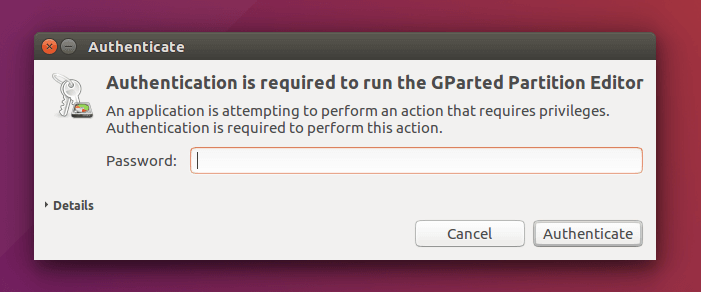
First, install GParted partition editor on your Linux distribution. Ubuntu users run the following command.
Then insert your USB stick to your computer. Make sure you back up important files in your USB stick if there’s any. Next, launch Gparted. You will need to enter your password in order to use GParted.
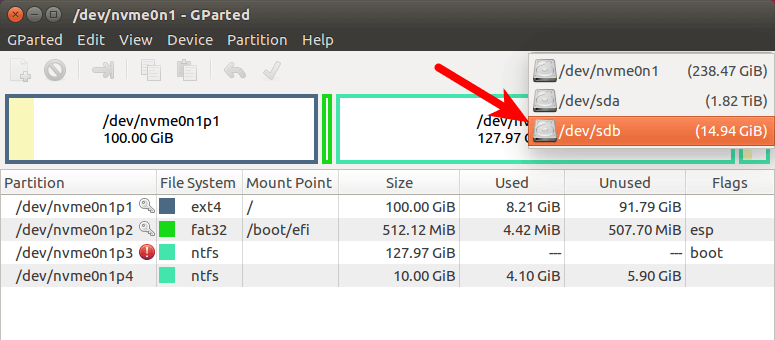
Select your USB stick from the drop-down menu on the upper-right corner. My USB stick is /dev/sdb . Yours may be different.
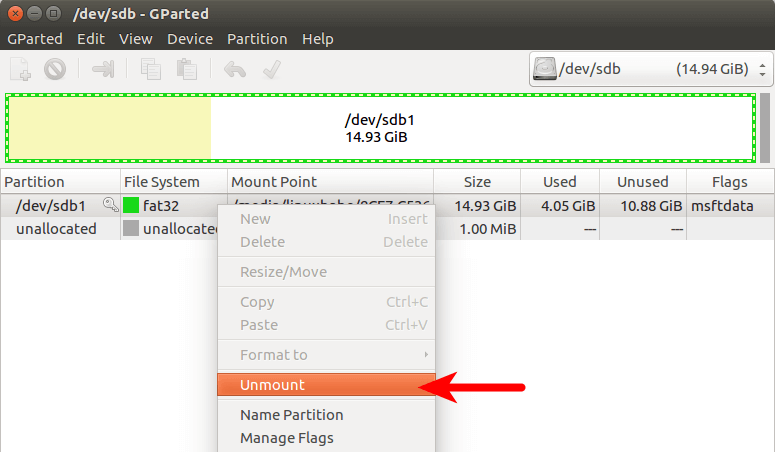
If there’s a key icon after the partition name, that means the partition is mounted. Make sure all partitions on your USB stick are unmounted. To unmount a partition, simply right-click on it and select unmount.
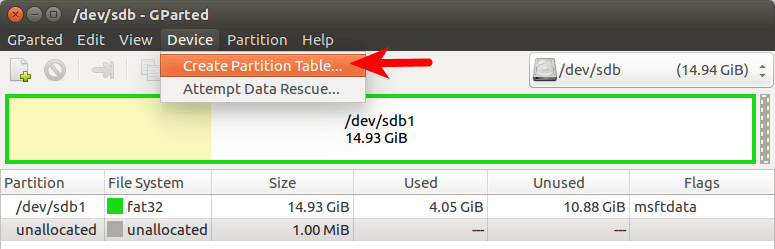
Next, on the menu bar, select Device > Create partition table.
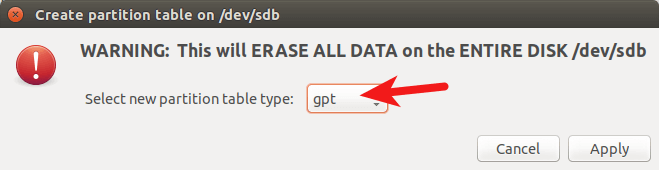
Choose GPT as the partition table type and click Apply.
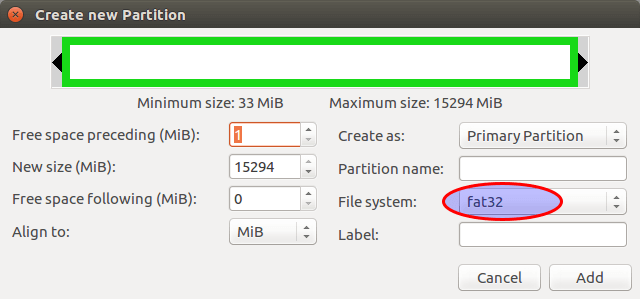
Then right-click on the unallocated space and select New to create a new partition.

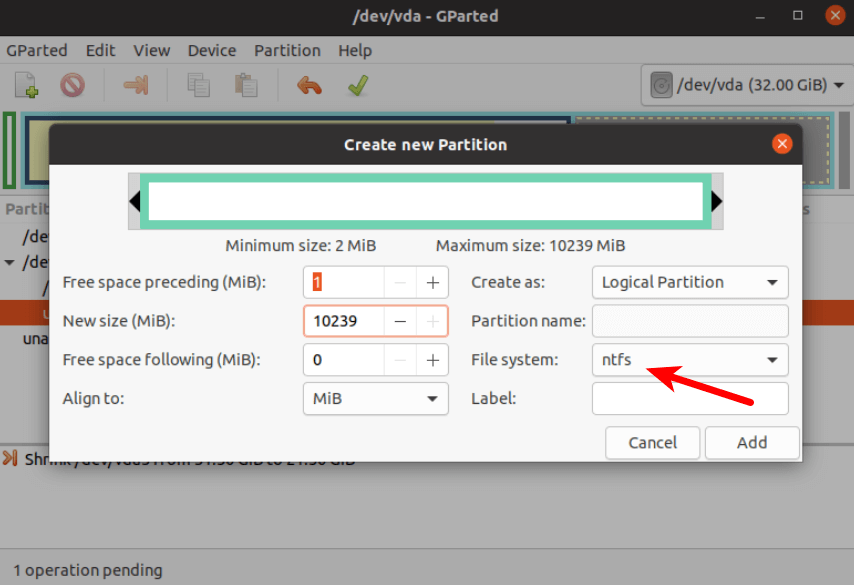
Change file system type from ext4 to fat32 and click Add.
Note: The install.wim file in Windows 10 October 2018 update ISO is 4.1G, so if you downloaded this ISO image, you need to change ext4 to ntfs . If you downloaded Windows 10 April 2018 Update ISO, which contains a 3.9G size install.wim file, you can change ext4 to fat32
Update: It is my observation that my NTFS formatted USB stick isn’t bootable on my old laptop, which was bought in 2012. However, it is bootable on my desktop computer, which was bought in 2017. It has a graphical UEFI firware (I can use my mouse to configure firmware settings).
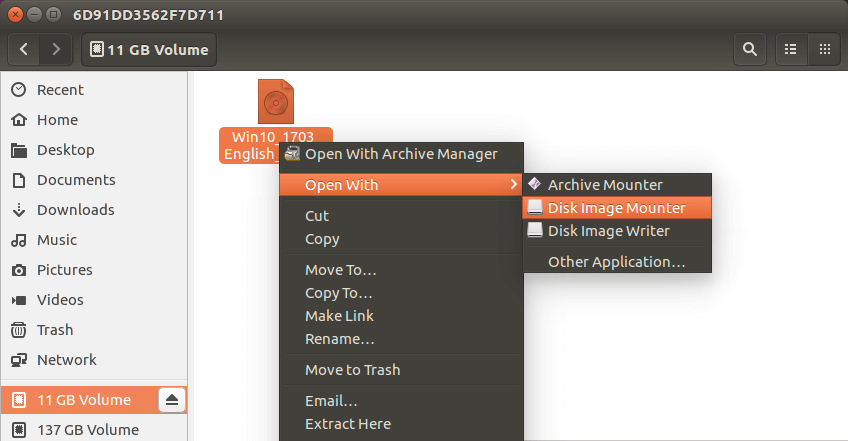
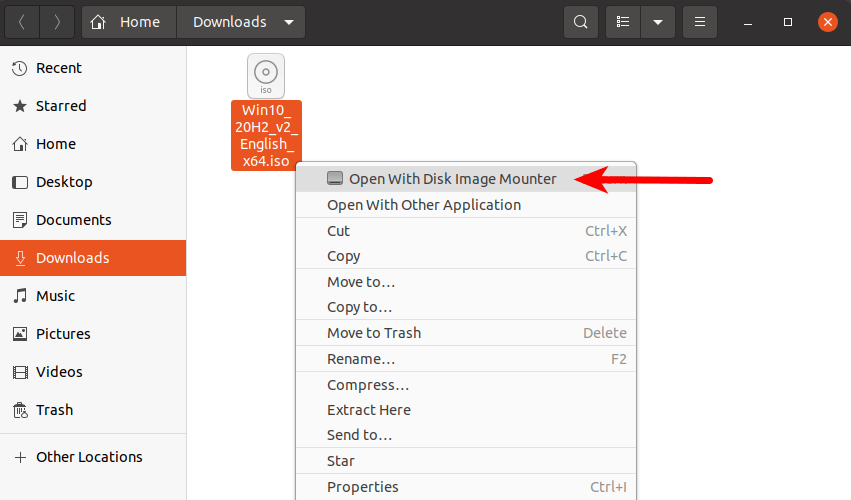
Next, click the green check button on the toolbar to apply this operation. Once that’s done, close GParted (This is important), then find your Windows 10 ISO in file manager. Open it with disk image mounter.
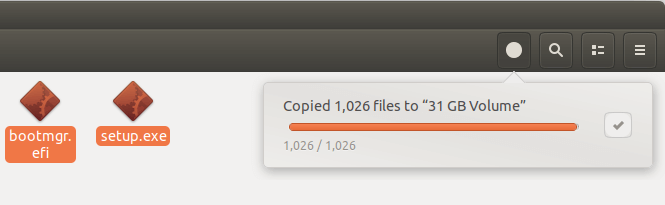
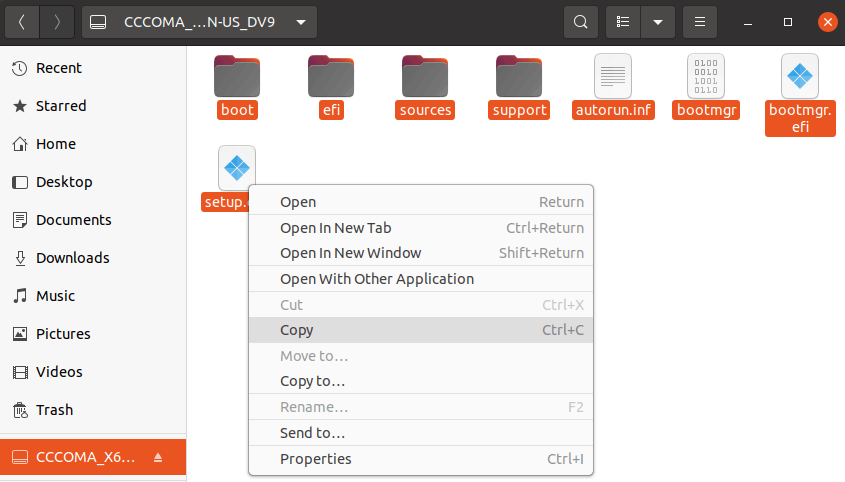
Open the mounted file system. Select all files and folders and copy them to your USB stick.
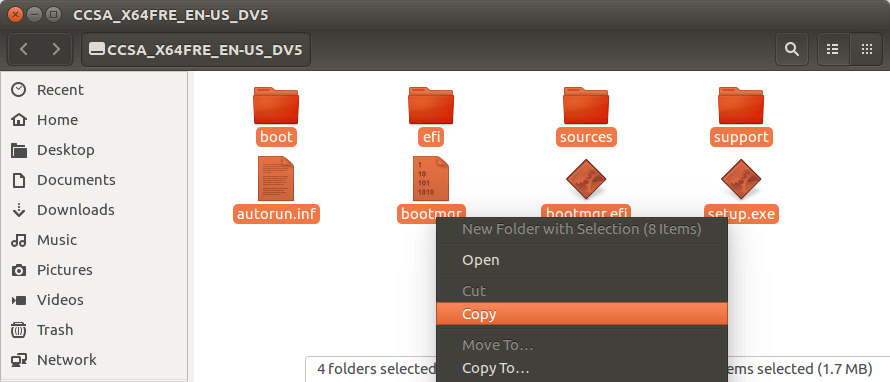
Sometimes the file manager on Ubuntu hangs and it seems that the copy operation has stopped. Actually it’s working, just be patient. When you see a check mark, it means the copy operation has finished.
If your file manager doesn’t have the Disk image mounter in the context menu, then you can use the following commands to mount. The first command will create a mount point for Windows 10 ISO and the second command will mount Windows 10 ISO under that mount point.
Now in your file manager, go to /mnt/windows10/ and copy all files and folders to your USB stick.
Once the file and folders are copied, your windows 10 bootable USB is created! You can shut down your computer, boot it from this USB stick and install Windows 10 in UEFI mode. Keep in mind that you may need to disable compatibility support module (CSM) in the firmware in order to boot in UEFI mode. You may also need to remove USB stick from your computer and insert it back in order for the firmware to detect the boot loader on your USB stick.
Boot Windows 10 ISO Installer without USB (BIOS & UEFI)
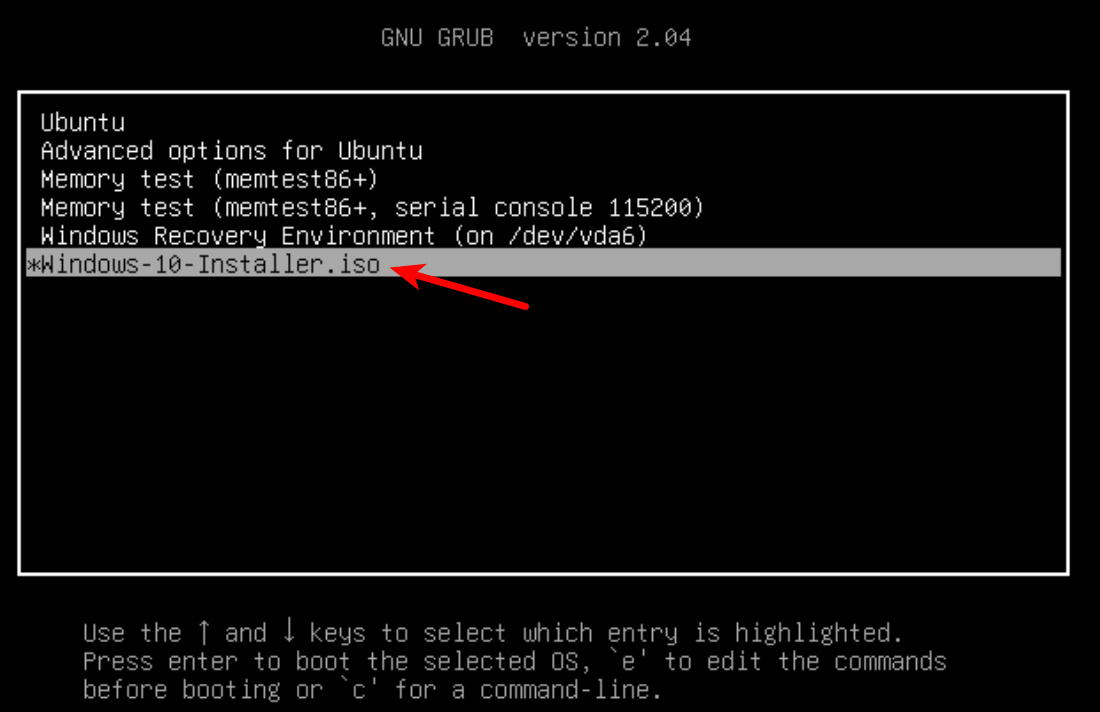
Ever wondered if you can boot Windows 10 ISO installer without a USB flash drive? Yes, you can do it with GRUB2, which is the standard boot loader on Linux.
GRUB2 can not boot Windows 10 ISO directly. You need to create a separate NTFS partition on your hard disk or SSD with a partition editor like GParted and extract the Windows 10 ISO to that partition. Download the Windows 10 ISO file. The latest Windows 10 ISO file is 5.8G. The new NTFS partition should be at least 7G and it should not be used to store any other files.
Then find your Windows 10 ISO in file manager. Open it with disk image mounter.
Open the mounted file system. Select all files and folders and copy them to the NTFS partition.
Sometimes the file manager on Ubuntu hangs and it seems that the copy operation has stopped. Actually, it’s working. Just be patient. When you see a checkmark, it means the copy operation has finished.
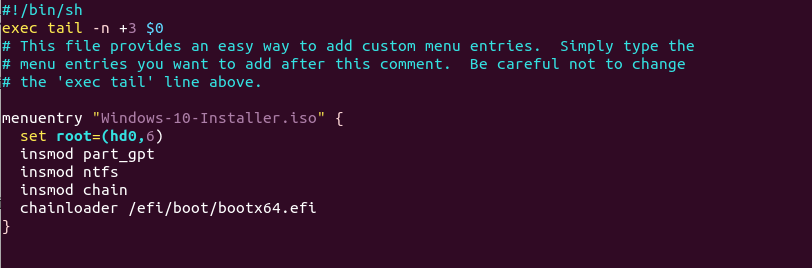
Next, open up a terminal window and edit the /etc/grub.d/40_custom file with a text editor such as Nano.
In this file, we can add custom entries to the GRUB boot menu. In this case, we want to add an entry to boot the Windows 10 installer. If your computer still uses the traditional BIOS firmware, then add the following lines in this file.
My NTFS partition is the 6th partition on my first disk, so I use (hd0,6) as the root. You can run sudo parted -l command to check your NTFS partition number. If your computer has multiple hard drives, use the drivemap command to set the partition (hd0,6) as the first hard disk, so Windows will be able to boot.
If your computer uses UEFI firmware, then add the following text in this file.
Save and close the file. (Press Ctrl+O , then press Enter to save a file in Nano text editor. Press Ctrl+X to exit.)
Then update GRUB boot menu.
Next, set GRUB to boot the Windows 10 installer for the next boot with the following command.
Unplug all your external USB storage devices, then reboot your computer. GRUB will choose the Windows 10 installer.
GRUB2 can also boot Linux ISO files stored on the hard drive, so you don’t need to create Linux live USB.
Creating a Windows 10 Bootable USB for Legacy BIOS Using WoeUSB
WoeUSB is a fork of WinUSB. Both of them are open-source software (licensed in GPL) for making Windows bootable USB sticks on Linux platform, but the latter hasn’t been updated since 2012. You may be wondering why it’s named WoeUSB. The author said it’s a GNU convention to abbreviate software that support Windows to “woe”.
To install WoeUSB on Ubuntu 14.04/16.04/17.04, you can use the following PPA. Simply open up a terminal window and run the following commands one by one. Other Linux distro users can compile this software by following the instructions on the Github project page.
This PPA contains many other software. If you don’t need them, you can now remove this PPA from your system.
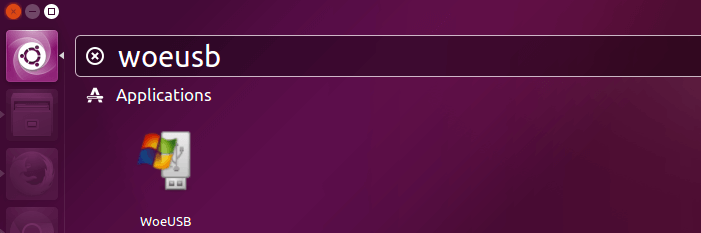
You can launch WoeUSB from Unity Dash or your application menu.
You can also start it from command line with:
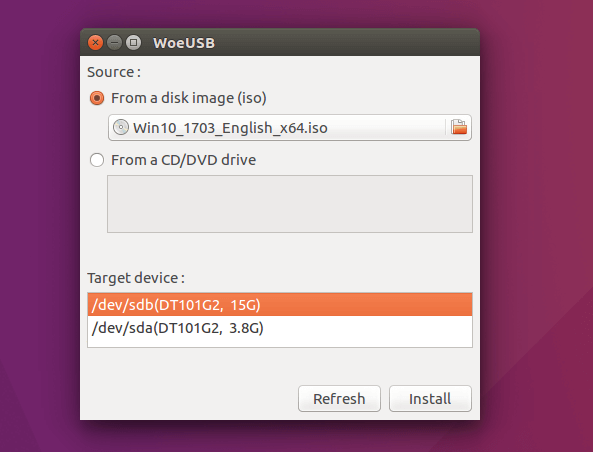
It’s very easy to use the WoeUSB GUI. Select Windows ISO image and your target USB device. Make sure your data on the USB device is backed up before hitting the Install button.
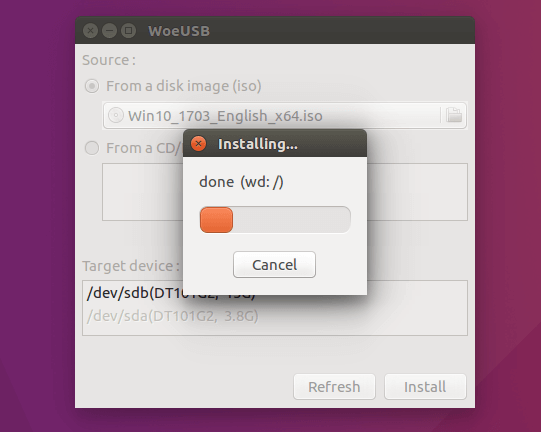
Then wait for the installation to complete.
Once done, you can use the bootable USB to install Windows 10 on your computer.
How to Use WoeUSB From the Command Line
First, find the device name of your USB stick using the following command.
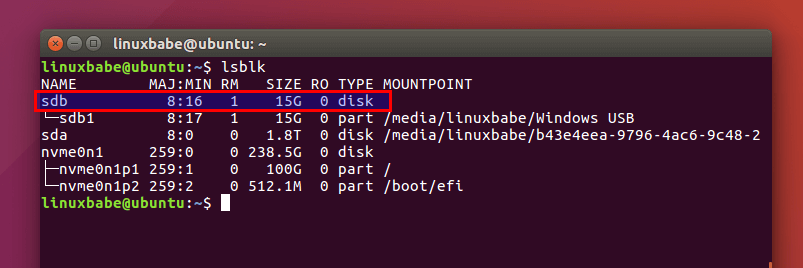
Mine is /dev/sdb . Make sure your USB is unmounted with the following command. Replace /dev/sdb1 with your own partition name.
Then create a bootable Windows 10 USB like below. Red texts shoudl be adapted to your own ISO file name and USB device name. The -v (—verbose) option will give more detailed output.
In my test, the Windows 10 USB created with WoeUSB can boot in both legacy and UEFI mode on my old computer. On my new computer, it can boot in legacy mode but failed in UEFI mode. I don’t know the exact reason, but it’s probably because of bug in this software.
That’s it! I hope this tutorial helped you create windows 10 bootable USB on Ubuntu or any Linux distribution. As always, if you found this post useful, then subscribe to our free newsletter to get new tutorials.


