- Create a Bootable USB Flash Drive
- To create a bootable USB flash drive
- How to make a bootable USB Drive using CMD or free software
- Make Bootable USB using CMD
- Free software to create Bootable USB
- ZOTAC WinUSB Maker
- Rufus
- Windows USB/DVD Download Tool
- PowerISO
- How do I create a bootable usb drive with an iso image of Windows 7?
- How to Make Bootable USB Flash Drive from ISO on Windows 10/8/7/Mac
- Method #1: Make Bootable USB from ISO Using Command Prompt
- Method #2: Create A Bootable USB using iSeePassword WizISO
- Method #3: Make Bootable USB from ISO using RMPrepUSB
Create a Bootable USB Flash Drive
Applies To: Windows Server 2016 Essentials, Windows Server 2012 R2 Essentials, Windows Server 2012 Essentials
You can create a bootable USB flash drive to use to deploy Windows Server Essentials. The first step is to prepare the USB flash drive by using DiskPart, which is a command-line utility. For information about DiskPart, see DiskPart Command-Line Options.
To create a bootable USB flash drive for use in recovering or reinstalling Windows on a PC instead of a server, see Create a recovery drive.
For additional scenarios in which you may want to create or use a bootable USB flash drive, see the following topics:
To create a bootable USB flash drive
Insert a USB flash drive into a running computer.
Open a Command Prompt window as an administrator.
In the new command line window that opens, to determine the USB flash drive number or drive letter, at the command prompt, type list disk , and then click ENTER. The list disk command displays all the disks on the computer. Note the drive number or drive letter of the USB flash drive.
At the command prompt, type select disk , where X is the drive number or drive letter of the USB flash drive, and then click ENTER.
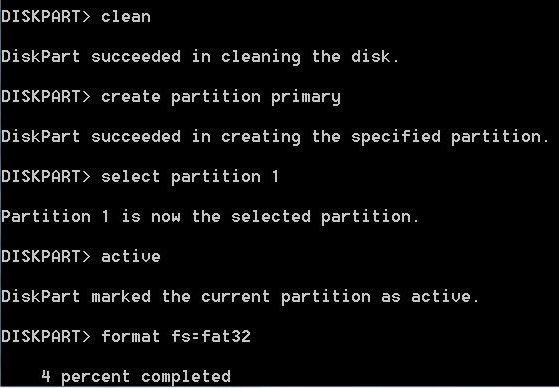
Type clean , and the click ENTER. This command deletes all data from the USB flash drive.
To create a new primary partition on the USB flash drive, type create partition primary , and then click ENTER.
To select the partition that you just created, type select partition 1 , and then click ENTER.
To format the partition, type format fs=ntfs quick , and then click ENTER.
If your server platform supports Unified Extensible Firmware Interface (UEFI), you should format the USB flash drive as FAT32 rather than as NTFS. To format the partition as FAT32, type format fs=fat32 quick , and then click ENTER.
Type active , and then click ENTER.
Type exit , and then click ENTER.
When you finish preparing your custom image, save it to the root of the USB flash drive.
How to make a bootable USB Drive using CMD or free software
There are times when your PC is not working properly. Or there might be moments when you would have to boot your PC from an external USB Drive for Windows On the Go or other reasons. That time you would need a bootable USB Drive. This is so because USB drives are available very easily and nowadays, everyone has one. Every power user has their own ways, their own tools to make a bootable USB Drive. Well, sometimes your method might encounter a bug or error or you might be new to this and finding a way to do this. You are at the right place. This article will be discussing the best ways in which you can build a bootable USB securely.
So, before we start enlisting our choices, let’s just learn about some common terms related to Booting.
Terms related to Bootable USB
- Bootloader Options: This bootloader is responsible for loading the Operating System. Sometimes, you have a choice of selecting the bootloader when choosing the installation of a specific operating system.
- grub4dos: A bootloader package designed to allow users to select between multiple operating systems installed on a single system.
- syslinux: This is a lightweight bootloader package designed to allow users to select what type of or what operating systems are to be installed.
- QEMU Emulator: QEMU Emulator or Quick Emulator is a hardware virtualization tool that helps the user to test the booting capabilities of a Drive.
- Cluster Size: The contiguous groups of sectors that are assigned by the file system are called as clusters.
- File System: This controls the accessibility of the data. This accessibility makes sure that the data is copied properly.
- Bad Sector: This is a bonus feature that some special bootable USB maker tools provide the users with. Here, the bootable drive is checked if there are any bad sectors or corrupt subpartitions after the creation of a bootable USB.
Prerequisites for creation of a bootable USB
- First of all, you need an ISO file of the operating system with the bootmgr or the boot manager.
- Secondly, you will need a USB Drive (Pendrive) with a minimum capacity of 8GB depending on the size of your ISO.
- Thirdly, you need to know if your system supports UEFI Booting. Depending on this, you can create a UEFI Capable bootable disk or a Legacy Capable bootable disk.
Now let us see how to create or make a bootable USB Drive using CMD or free software.
Make Bootable USB using CMD
This is a great way to make a bootable USB drive. That is so because you do not need any extra or third party software to be run in order to do your task. So, here is how you do it.
First of all, insert your USB Drive into the Computer.
Then, open Command Prompt by searching for cmd in the Cortana search box or hit WINKEY+R to launch the Run utility and type cmd and hit Enter.
Now, after a black window pops up, type in-
to run the DISKPART utility.
After that, you will see a new black and white window popping up that would say DISKPART>.
to list all the Storage devices connected to your computer. After you hit Enter, you will see a list of storage devices (including your hard disk) connected to the computer. Identify your disk’s number here. After this, type-
where X is the disk number, you just identified and hit Enter.
You need to clear the table records and all the visible data on the drive. For that, type-
Now, you will need to recreate a new primary partition of the drive. For that enter this command-
You just created a new primary partition. Now, you will have to select it. To do so, type-
You have to format it now to make it visible to normal users. type in-
to format it and hit Enter.
If your platform supports UEFI (Unified Extensible Firmware Interface) replace NTFS with FAT32 in the previous step.
and press Enter key to exit the utility.
Now, when you are done with preparing your image for the operating system, save it to the root of the USB Storage Device.
Free software to create Bootable USB
ZOTAC WinUSB Maker
This is one of the first Bootable USB Creators that I used. ZOTAC WinUSB Maker has been my most reliable companion every time I intended to create one. We all know ZOTAC as a company that manufactures Graphics Cards, Mini PCs or other digital boards or hardware like SSDs.
As listed on its official website, here is what ZOTAC says about their product:
Easily create a bootable Windows flash drive for your ZBOX mini-PC with the ZOTAC WinUSB Maker utility. The drag-and-drop utility makes creating bootable flash drives quick and painless – just drag the destination and source into the ZOTAC WinUSB Maker, and click start. ZOTAC WinUSB Maker supports Windows image files and DVD discs as sources for compatibility with all major operating systems supported by ZBOX mini-PCs. USB flash drive and SD card destinations are supported for simple OS installations on ZOTAC ZBOX mini-PCs.
The main highlighting features of this tool are its compatibility with Windows XP and higher with .NET Framework 4.0 installed, Smooth and simple GUI based operation, Quick operations, x64 and x86 support and UEFI Support, etc. You can download a copy for you for FREE here.
Rufus
Rufus is another very famous and easy to use bootable USB Maker. This supports all kinds of USB Pendrives, Keys, Memory Sticks, etc. The minimum software requirement is that it needs Windows XP at least.
The product page on its official website says this:
Rufus is a utility that helps format and create bootable USB flash drives, such as USB keys/pendrives, memory sticks, etc. It can be especially useful for cases where: you need to create USB installation media from bootable ISOs (Windows, Linux, UEFI, etc.) you need to work on a system that doesn’t have an OS installed you need to flash a BIOS or other firmware from DOS you want to run a low-level utility Despite its small size, Rufus provides everything you need! Oh, and Rufus is fast. For instance it’s about twice as fast as UNetbootin, Universal USB Installer or Windows 7 USB download tool, on the creation of a Windows 7 USB installation drive from an ISO. It is also marginally faster on the creation of Linux bootable USB from ISOs. (1) A non exhaustive list of Rufus supported ISOs is also provided at the bottom of this page.
It supports both UEFI and GPT installations and is also open source. It is free.
Windows USB/DVD Download Tool
Windows USB/DVD Download Tool is also a really simple tool to create a bootable USB Drive. All you need to have a pen drive and an ISO file. First, select the ISO file, check the destination drive and all the other booting settings. Now after you pass through all the four steps by clicking next, you have your bootable pen drive ready.
PowerISO
Not to be biased, but I personally love PowerISO. It is fast, multipurpose and is so feature rich. You can create various images from archives or folders; you can create bootable USB drives at a very great speed. Plus, it is portable and requires very fewer system resources. If you want to read more about it, head here to its official website.
Date: January 27, 2018 Tags: Tutorials, USB
How do I create a bootable usb drive with an iso image of Windows 7?
Which web site is this?
You need to convert those three files into a bootable .ISO file, the following article will show you how:
After you have converted it to a .ISO file, you need to burn it to a blank DVD disc as a disc image, then proceed to install:
ImgBurn — In addtion to supporting the creation of CD’s from .ISO files,
it supports a wide range of other image file formats, and it’s free.
(BIN, CUE, DI, DVD, GI, IMG, MDS, NRG, PDI and ISO)
Download and install Gear ISO burn (Free):
Note: Always use the slowest burn speed (4x or 2x) if offered a choice.
You should have the option to download the .ISO file from the Microsoft Store and simply burn it to a blank DVD as a disc image. Much easier to work with than the box files.
If you downloaded your copy of Windows 7 from the Microsoft Store, try redownloading it again:
1. Login to your Microsoft Store account ( http://store.microsoft.com ) to view your purchase history
2. Look for your Windows 7 purchase.
3. Next to Windows 7, there is an «Additional download options» drop-down menu.
4. In the drop-down menu, select «32 or 64-bit ISO.»
Download the ISO Image of Windows 7
Windows 7 Professional x64 (64-bit)
Windows 7 Professional x86 (32-bit)
Windows 7 Home Premium x64 (64-bit)
ImgBurn — In addtion to supporting the creation of CD’s from .ISO files,
it supports a wide range of other image file formats, and it’s free.
(BIN, CUE, DI, DVD, GI, IMG, MDS, NRG, PDI and ISO)
http://www.imgburn.com/
Note: Always use the slowest burn speed (4x or 2x) if offered a choice.
How to make a bootable USB thumb drive:
you will have to use a tool such as the Windows 7 USB/DVD Download Tool (http://store.microsoft.com/Help/ISO-Tool)
This simple tool will help you convert the same image file into to a USB thumb drive. For installation purposes, you should get a thumb drive that’s at least 4 GBs in size to store the installation files. Browse to where the Windows 7 Image is stored, open it.
Select the USB device where you want to have the backup stored to for installation.
Once the USB device has been identified, click the Begin copying button.
And that’s it, the next step now is to boot your computer, from the thumb drive, make sure the thumb drive you will be installing Windows 7 from is plugged into the USB port. This might vary by manufacturer, but the usual one to try is F12, start your computer and press F12 repeatedly until a screen is displayed giving you the option to boot from a USB Memory device, select that and press Enter on your keyboard.
How to Make Bootable USB Flash Drive from ISO on Windows 10/8/7/Mac
Creating USB driver in the latest Windows version has become a lot easier with the in-built ISO burners. Gone are the days when you used to download an ISO image file of the operating system and burn it into CD/DVD. USB flash drives has completely destroyed the usage of CD/DVDs and the main reason is its size, speed and portability. Bootable USB drivers simply means that you are preparing a USB flash drive to install an operating system. Essentially, creating bootable USB drivers to install operating system of your choice varies from each Windows and Mac versions.
In this short guide, we will show how to make or create a bootable USB from ISO file on all Windows version computers. Making a bootable driver is not similar to copying an ISO image file directly on the USB flash drive. Before creating a bootable USB from ISO, please remember to backup all data contained on your USB flash drive as using any trick from this guide will entirely wipe the data from your USB drive.
If you’re locked out of Windows 7 and can’t recall the password at all, don’t worry, resetting Windows 7 password will be extremelyВ easy with the help of Windows Password Recovery Pro.
Method #1: Make Bootable USB from ISO Using Command Prompt
This part can be applied from any Windows version including Windows 10, 8, 7, XP and other older versions. It is indeed an old-fashioned method but it works like charm all the time. Here’s what to do –
Step 1. Insert the USB flash drive on the computer and let the computer automatically detect it.
Step 2. Click on Start and start command prompt.
Step 3. Type «DISKPART» and press enter to start the disk part utility.
Step 4. From here, you will have to enter a series of command. First, type «List Disk» to see all the available drivers on the computer. Check the disk number of your flash drive and remember it.
Step 5. Next, type «Select Disk 1» considering Disk 1 is the USB flash driver and press Enter.
Step 6. Now keep on typing these series of commands.
— Clean
— create partition primary
— select partition 1
— active
— format fs=fat32
When the formatting process is completed, simply type «Assign» followed by exit.
Step 7. Now copy all the files of your operating system on to the USB flash drive and it is done. You can now install your operating system using the bootable USB flash drive.
Method #2: Create A Bootable USB using iSeePassword WizISO
Making a Windows install disk isn’t as simple as formatting a drive or copying ISO file to your USB drive on Windows and Mac OS X. You need to use a professional ISO Editor to write the ISO image to your USB instead of copying. Are you confused with the steps mentioned in above parts or they just didn’t work? If that was the case, then it is the time to give a try on iSeePassword WizISO, it’s an amazing tool to burn ISO image to USB with a built powerful burning engine.
WizISO a ISO Toolkit which allows you to burn ,extract, edit, create and copy disc without losing the bootableВ information. This program provides two partition style MBR and UEFI model which allows you to make UEFI bootable drive. What’s more. If you want to edit your ISO file,then just import it to the program and directly edit, add, delete, rename your ISO file then save it to a standard ISO format. . It supports 200+ USB brands mo matter it is old or new. The most important part is that it is super easy to use. Not convinced? Please check the tutorial below:
Step 1. Download iSeePassword WizISO from this website and install it on the computer. (Windows version and Mac version all available).
Step 2. Open the program after installation and the main interface is shown like blow.
Step 3. Click «Browse» button to find local ISO file and add it to computer.
Step 4. Now insert an USB drive to the computer and select the drive name from the list undert «Create A Bootable USB».
Step 5. Finally, click «Burn» button to start the burning process. It will take around 15 minutes to fully write the ISO file to USB. The actual time is depending on how lagre the file is. After that, you can take out the USB and use it to fix system issues.
Pro:
- High success rate with strong burning engine.
- User-friendly interface that everyone can use it freely.
- Take less time for burning.
- Support both DVD and USB as burning media.
- Automatically detect correct file format before burning.
Method #3: Make Bootable USB from ISO using RMPrepUSB
RMPrepUSB is yet another ISO image file burning program that helps to create bootable USB flash drives. It is absolutely free to use and it’s an open source tool. Learn how to use Rufus.
Step 1. Download it from the official website and store it on your computer.
Step 2. It’s ready-to-use program that needs no installation at all. You can open the program just by double clicking on it.
Step 3. Insert the USB flash drive and let it be recognized by the program automatically.
Step 4. Select the device name that you are using. It is recommended to use an 8 GB flash drive to run everything smoothly. Leave the rest of the options to the default settings and select the ISO image file stored in your computer. Make sure to check «Create a bootable disk» to make the USB driver bootable.
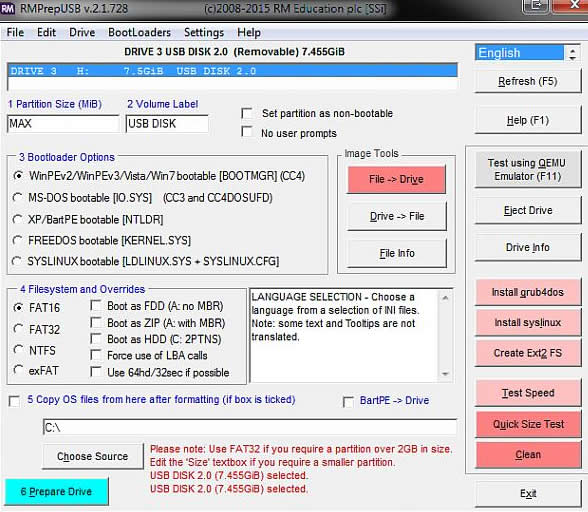
Step 5. Click on «Start» to initiate the burning process and once it is finished, you can eject the flash drive. It now a ready-made bootable USB driver.
Cons:
- Quite complicated, not intended for the beginner.
- Don’t support UEFI boot.
- Don’t provide any support.
Creating a bootable USB flash drive can be really a hectic task if you don’t know the right procedure. Hopefully, you guys were able to create a bootable USB driver by using the methods shared in this guide. If you have any easier method than this then don’t forget to share it with us. Stay tuned for more!

Vicky is a professional Windows technology author with many experience, focusing on computer technology. She’s very much enjoy helping people find solutions to their problems. Her knowledge and passion always drive her to discover everything about technology.


