- How to Make a User Account an Administrator on Windows 10
- Method 1: Use Windows 10’s Settings utility
- Method 2: Change user account type from the Control Panel
- Method 3: Change account type from the User Accounts utility
- Method 4: Change user account type from an elevated Command Prompt
- How to Make Yourself an Administrator in Windows 10
- How do I make myself administrator Windows 10?
- 1. Change your account type from Settings
- 2. Use Command Prompt
- 3. Use Control Panel
- Получение прав администратора на Windows 10
- Получение прав администратора в Windows 10 через командную строку
- Метод использования групповой политики
- Использование утилиты «netplwiz»
How to Make a User Account an Administrator on Windows 10
There are two different kinds of user accounts on Windows 10 – Standard User accounts and Administrator accounts. The difference between these two user account types is not of functionality but of permissions and authority.
Administrator accounts have complete autonomy and control over every single aspect of a Windows 10 computer – from changing computer settings for all user accounts on the computer and installing applications to getting through User Access Control (UAC), Administrator accounts can do it all. Standard User accounts, on the other hand, are relatively more limited in what they have control over – Standard Users can launch applications but not install any new ones, they can change settings but only as long as the settings they fiddle with don’t affect any other user accounts on the computer, and you need to type in the username and password for an Administrator account to get through any UAC prompts on a Standard User account on Windows 10.
On older versions of Windows, another user account type known as “Guest” used to exist, but nothing of the sort exists on Windows 10. When you create a new user account on a Windows 10 computer, it is created as a Standard User account by default, although you can choose to turn it into an Administrator account while you create it. Standard User accounts are extremely useful for when you need to create a user account for a child or for someone who cannot be trusted to not make a mess of things if given too much power but won’t fit the bill for someone who needs to have a significant amount of access to and control over a computer.
If you want to give a Standard User account on a Windows 10 computer more autonomy and control over the computer, you need to turn it into an Administrator account, which is something that is definitely possible. The following are the four different ways you can go about turning a Standard User account on a Windows 10 computer into an Administrator account:
Note: It is recommended that you try to turn a Standard User account into an Administrator account while logged into an existing Administrator account since most of the methods listed and described require administrative privileges. If you’re not already logged into an Administrator account, you will have to get through UAC prompts using the username and password for an Administrator account on the computer.
Method 1: Use Windows 10’s Settings utility
First and foremost, you can use Windows 10’s Settings utility to turn an already existing Standard User account into an Administrator account. Doing so is quite simple as you use a graphics-based interface to get the job done. If you would like to do so, you need to:
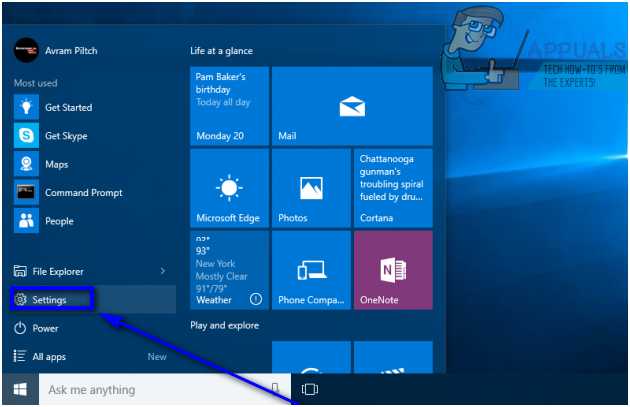
- Open the Start Menu.
- Click on Settings to open Windows 10’s Settings utility.

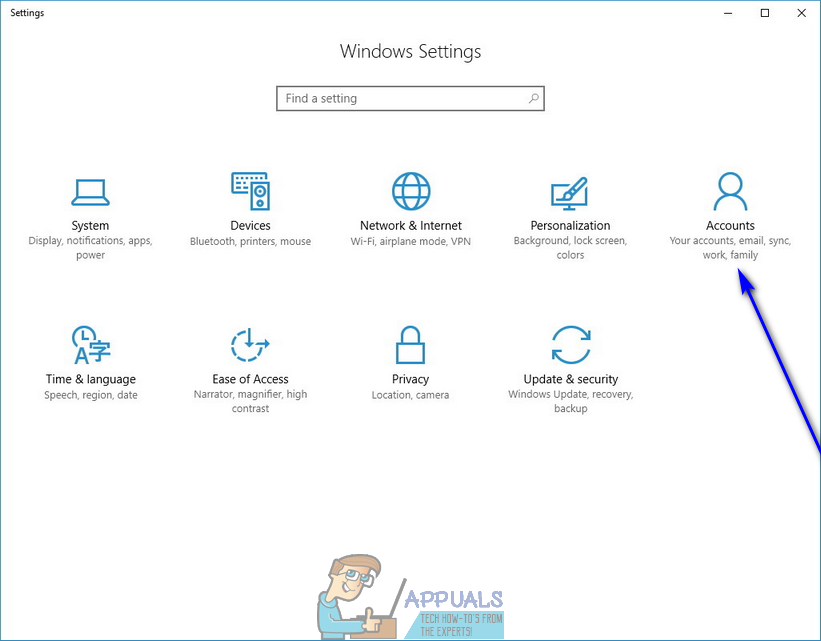
- Click on Accounts.
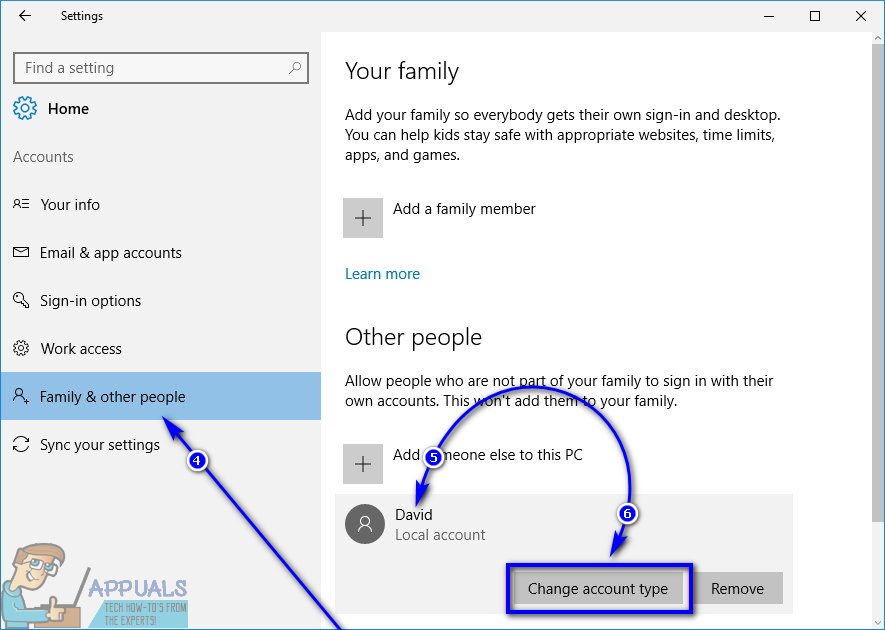
- In the left pane of the window, click on Family & other people.
- Under the Other people section in the right pane, locate and click on the Standard User account you want to make an Administrator.
- Click on Change account type.
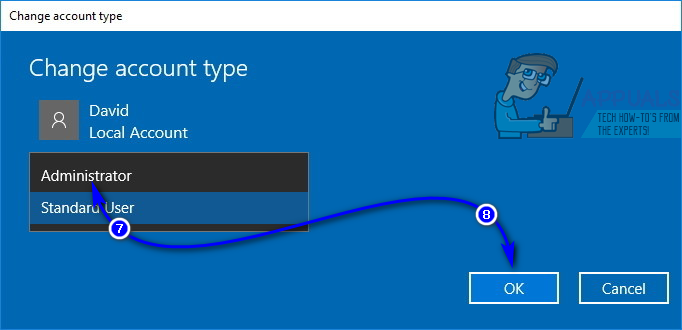
- Open the dropdown menu located directly under the Account type option and click on Administrator to select it.
- Click on OK.
- Close the Settings utility.
As soon as you do so, the selected Standard User account will be turned into an Administrator account and will be given all the same privileges as the average Administrator account. The same process described above can also be used to turn an Administrator account into a Standard User account – all a user needs to do is click on Standard User instead of Administrator in the dropdown menu in step 7.
Method 2: Change user account type from the Control Panel
One of the most prominent features of the Windows Operating System is the ability to go about doing the same thing a number of different ways. Windows 10 also has the Control Panel – a utility that has been a constant throughout the many different iterations of Windows that have existed, and it too can be used to change the account type of a user account. To turn a Standard User account into an Administrator account using this method, you need to:
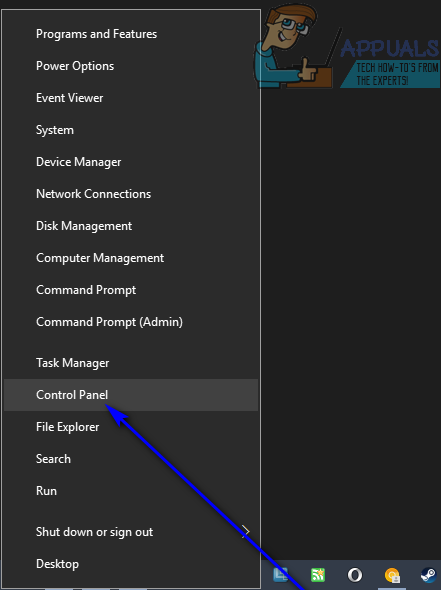
- Right-click on the Start Menu button or press the Windows Logo key + X to open the WinX Menu.
- Click on Control Panel in the WinX Menu to launch the Control Panel.
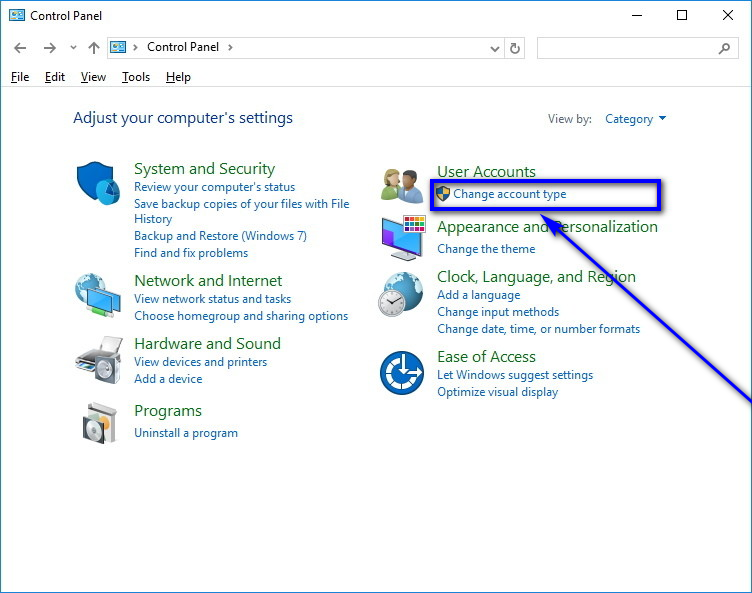
- With the Control Panel in Category view, click on Change account type under the User Accounts section.
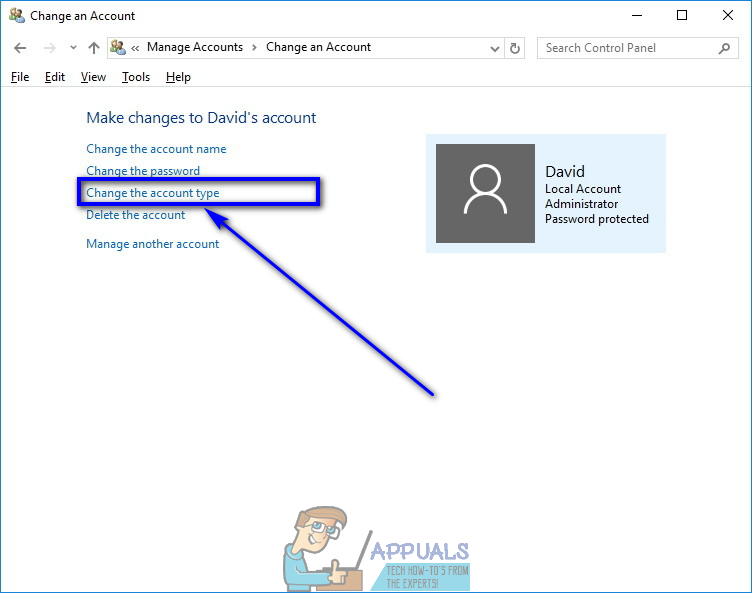
- Locate and click on the Standard User account you want to turn into an Administrator account.
- Click on Change the account type.
- Click on the radio button next to the Administrator option to select it.
- Click on Change Account Type and you’re all done!
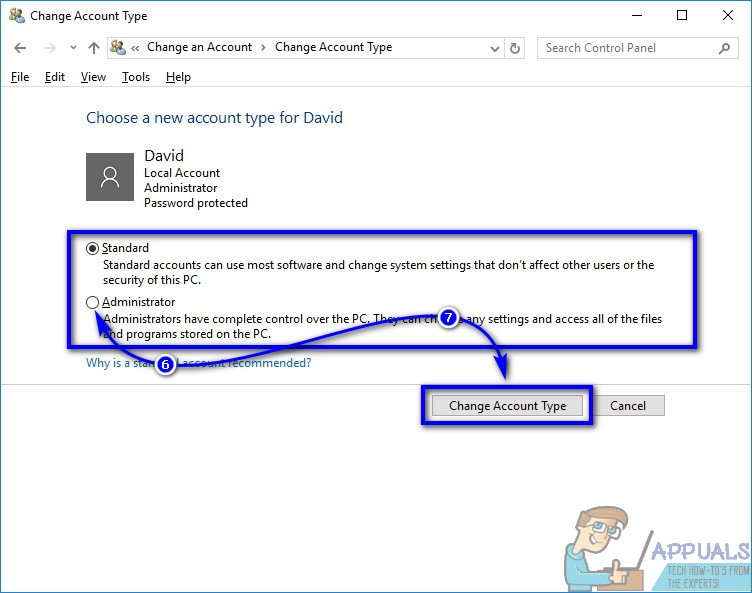
You can now close the Control Panel as the selected Standard User account will have been successfully turned into an Administrator account.
Method 3: Change account type from the User Accounts utility
A slightly more sophisticated but a lot more direct way to change the account type of a user account on Windows 10 is to do so from the User Accounts utility that exists on all versions of the Windows Operating System. To use this method, you need to:
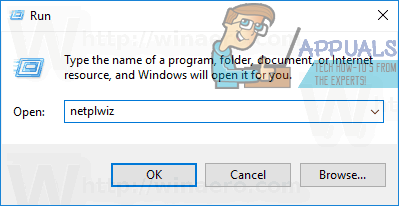
- Press the Windows Logo key + R to open a Run dialog.
- Type netplwiz into the Run dialog and press Enter to launch the User Accounts utility.
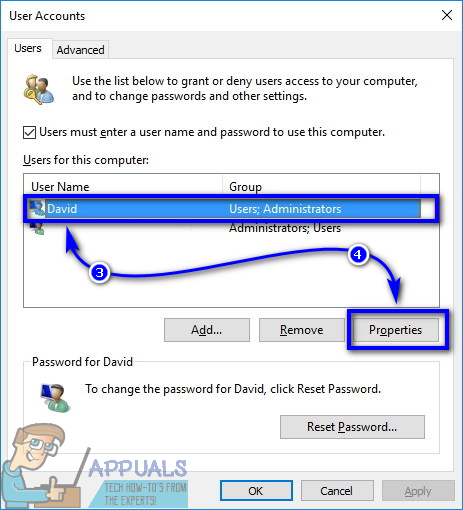
- Under the Users for this computer: section, locate and click on the Standard User account you want to turn into an Administrator account to select it.
- Click on Properties.
- Navigate to the Group Membership tab.
- Click on the radio button next to the Administrator option to select it. In this dialog, you will also see an option known as Other, selecting which will allow you to choose from an array of different access and control levels ranging from Backup Operators and Power Users to Remote Desktop Users, but none of these have the same access to and control over a Windows 10 computer as an Administrator account, so you’re better off not paying any attention to them.
- Click on Apply and then on OK.
- Click on Apply and then on OK in the User Accounts window.
Method 4: Change user account type from an elevated Command Prompt
Last, but certainly not the least, you can turn a Standard User account on a Windows 10 computer into an Administrator account, all from the comfort of an elevated Command Prompt. All it takes is a couple of simple commands! If you would like to use this method to turn a Standard User account into an Administrator account, you need to:
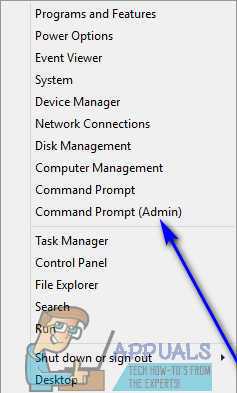
- Right-click on the Start Menu or press the Windows Logo key + X to open the WinX Menu.
- Click on Command Prompt (Admin) to launch an elevated Command Prompt that has administrative privileges.
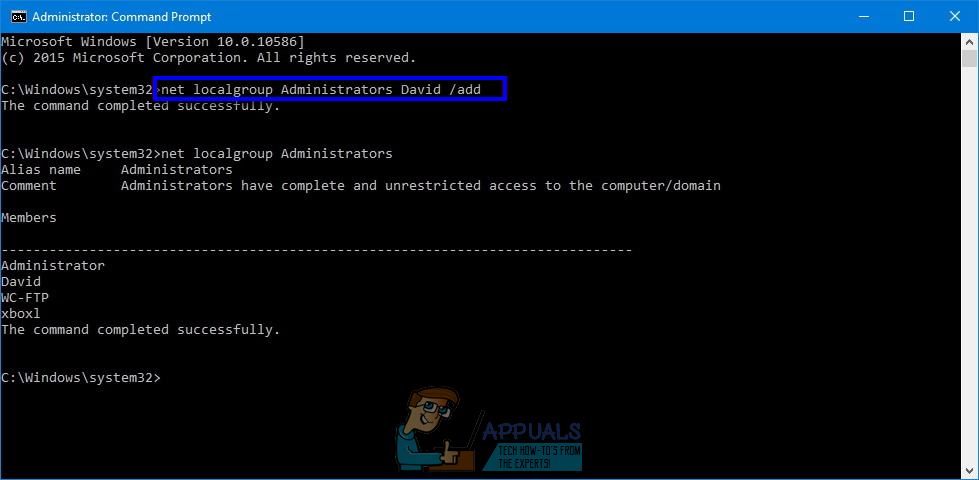
- Type the following command into the elevated Command Prompt, replacing AccountName with the exact name of the Standard User account you want to turn into an Administrator account, and then press Enter:
net localgroup Administrators AccountName /add - As soon as the command has been executed, close the elevated Command Prompt. The selected Standard User account will have been successfully turned into an Administrator account.
While this guide has been engineered to be used on Windows 10, all of the methods listed and described above (apart from Method 1, of course) can also be used to turn Standard User accounts on older versions of the Windows Operating System into Administrator accounts with just a tiny bit of tinkering to make some of the steps viable – opening the Control Panel a different way on versions of Windows that don’t have the WinX Menu, for example.
How to Make Yourself an Administrator in Windows 10


- Download Restoro PC Repair Tool that comes with Patented Technologies (patent available here).
- Click Start Scan to find Windows issues that could be causing PC problems.
- Click Repair All to fix issues affecting your computer’s security and performance
- Restoro has been downloaded by 0 readers this month.
Managing an account on Windows 10, 8 or on Windows 8.1, whether we are talking about an administrator account or just a regular user, can be easily handled. All you have to do for changing the rights for one particular account is to access the default Windows settings, this being exactly what we will be checking during the guidelines from below.
But why do you need to make yourself an administrator on Windows 10, 8? Well if you want to have access to various locations, files or programs you need to be an administrator. Moreover, only an administrator can install, remove, modify or run protected files and software, which means that Windows 10, 8 is preventing unauthorized users from messing with internal files and settings. In that matter, if you want to gain full control over your Windows 10, Windows 8 or Windows 8.1 device first you must make yourself an administrator.
How do I make myself administrator Windows 10?
1. Change your account type from Settings
- First of all, you need to log into Windows with an Admin account.
- Now, open your Start Screen and from there within the Search box, type “user”.
- From the results select “settings” and pick “User Accounts”.
- From the User Accounts main window select the “Change your Account type” option.
- Then just check the “Administrator” box and you are done.

2. Use Command Prompt
Another method you can use is the following one:
- From your Home Screen launch the Run box – press Wind + R keyboard keys.
- Type “cmd” and press enter.
- On the CMD window type “net user administrator /active:yes”.
- That’s it. Of course you can revert the operation by typing “net user administrator /active:no”.
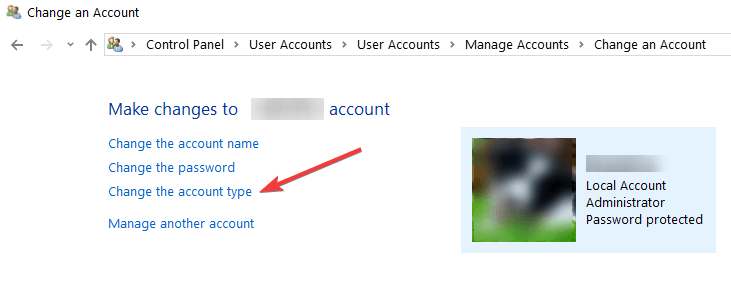
3. Use Control Panel
You can also change your account by using the Control Panel. Here are the steps to follow:
- Go to Start > type ‘control panel’ > double click on the first result to launch the Control Panel.
- Go to User Accounts > select Change account type.
- Select the user account to change > Go to Change the account type.
- Select Administrator > confirm your choice to complete the task.
So, there you have it, that’s how you can make yourself an administrator on Windows 10, Windows 8 or Windows 8.1. If you have questions or if you just want to share your experience with us and with our readers, don’t hesitate and use the comments field from below.
RELATED STORIES TO CHECK OUT:
Получение прав администратора на Windows 10

Обладать правами администратора требуется для того, чтобы во всем объеме использовать все необходимые возможности операционной системы Windows 10, а также, чтобы вносить различные важные изменения в нее. Данные права подразумевают доступ к расширенным функциям изменения и сохранения документов и материалов, а также использование определенных программ.
На сегодняшний день есть обширное количество способов для того, чтобы получить права администратора в операционной системе Windows 10. Давайте рассмотрим и запомним некоторые из них.
Получение прав администратора в Windows 10 через командную строку
Это один из самых простых и быстрых способов для получения учётной записи администратора. Нам потребуется ввести комбинацию клавиш «Win+R» и в поле «Выполнить» вводим комбинацию «cmd«.

Должна открыться командная строка, в которой необходимо ввести следующее:
После данной команды мы нажимаем клавишу «Enter».

Если высветилось сообщение, что имя не найдено, то необходимо ввести команду:
После этого выйдет полный список всех пользователей.

Необходимо отыскать имя администратора, который скрыт.
После чего необходимо повторить введение первой команды, только вводим не «administrator», а другое, правильное значение. Такая запись будет создана без пароля, но лучшим решением будет его создать и установить. Для этого вводим команду «net user администратор», где «администратор»- это наименование учётной записи.

Метод использования групповой политики
Утилита «secpol.msc» поможет в получении прав администратора. Удобный и быстрый вариант получить права администратора. Для этого потребуется запустить редактор командой «Win+R» и ввести «secpol.msc«.
Здесь необходимо отыскать раздел «Локальные политики» и далее «Параметры безопасности«.
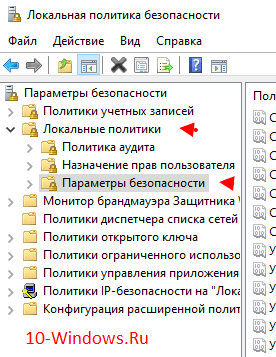
Далее нужно выбрать «Учетные записи: Состояние учетной записи «Администратор»«.

Открываем этот параметр и ставим метку на пункт «Включен«, жмем «Применить» и «Ок«.
 После всех выполненных операций необходимо перезагрузить всю систему.
Использование утилиты «netplwiz»
Для того, чтобы использовать утилиту «netplwiz», потребуется ввести комбинацию «Win+R» и в поле для ввода текста ввести:
Выберите нужную учетку и нажмите «Свойства».

В следующем окне переходим в раздел «Членство в группах«.

Ставим метку на «Администратор«, жмем «Применить«, затем «Ok«.
Перезагружаем свой компьютер.
Таким образом, мы уяснили, что получить права администратора можно и другими методами. Главное, чтобы вы смогли держать под контролем управление системой и конфиденциальную информацию на своем компьютере.


