- Create a Bootable USB Flash Drive
- To create a bootable USB flash drive
- Create Bootable CD/DVD/USB Based on Windows PE or Linux
- AOMEI Backupper
- Key Features
- Create System Image
- Create Disk Image
- Backup Files
- Clone Hard Disk
- Automatic Backup
- AOMEI Freeware
- User Say
- Introduction of Bootable CD
- Making Windows PE Bootable CD
- Making Bootable USB Flash Drive or USB Disk
- Making Linux Bootable CD
- Making Bootable ISO File
- How to Make a Bootable USB Disk and Install Windows 8, Windows 7, Windows XP
- How to Create a Bootable Windows 7 USB Drive
- How to Create a Bootable Windows 8 USB Drive
- How to Create a Bootable Windows XP USB Drive
- Booting and installing Windows from USB Drive
Create a Bootable USB Flash Drive
Applies To: Windows Server 2016 Essentials, Windows Server 2012 R2 Essentials, Windows Server 2012 Essentials
You can create a bootable USB flash drive to use to deploy Windows Server Essentials. The first step is to prepare the USB flash drive by using DiskPart, which is a command-line utility. For information about DiskPart, see DiskPart Command-Line Options.
To create a bootable USB flash drive for use in recovering or reinstalling Windows on a PC instead of a server, see Create a recovery drive.
For additional scenarios in which you may want to create or use a bootable USB flash drive, see the following topics:
To create a bootable USB flash drive
Insert a USB flash drive into a running computer.
Open a Command Prompt window as an administrator.
In the new command line window that opens, to determine the USB flash drive number or drive letter, at the command prompt, type list disk , and then click ENTER. The list disk command displays all the disks on the computer. Note the drive number or drive letter of the USB flash drive.
At the command prompt, type select disk , where X is the drive number or drive letter of the USB flash drive, and then click ENTER.
Type clean , and the click ENTER. This command deletes all data from the USB flash drive.
To create a new primary partition on the USB flash drive, type create partition primary , and then click ENTER.
To select the partition that you just created, type select partition 1 , and then click ENTER.
To format the partition, type format fs=ntfs quick , and then click ENTER.
If your server platform supports Unified Extensible Firmware Interface (UEFI), you should format the USB flash drive as FAT32 rather than as NTFS. To format the partition as FAT32, type format fs=fat32 quick , and then click ENTER.
Type active , and then click ENTER.
Type exit , and then click ENTER.
When you finish preparing your custom image, save it to the root of the USB flash drive.
Create Bootable CD/DVD/USB Based on Windows PE or Linux

February 1, 2021
How to create bootable disc CD, DVD or USB? AOMEI Backupper can help to create bootable disc of Windows PE, Linux and make ISO bootable file easily and efficiently.
AOMEI Backupper

An easy-to-use and versatile tool offers data backup, files sync, disaster recovery, and disk clone solutions.
Key Features
Create System Image
Backup all contents in system drive to an image, including Windows and apps.
Create Disk Image
Backup entire disk to an image. Support HDD/SSD, MBR/GPT, removable drives.
Backup Files
Backup specified files to local disks, external drives or NAS/network share.
Clone Hard Disk
Clone a hard disk to another or an SSD with larger or smaller capacity.
Automatic Backup
Set & forget. Create a schedule to backup data automatically.
AOMEI Freeware
User Say
I wish to inform you that AOMEI Backupper is the best software I have used previously. Thank you so much for this free backup software.
I recently found your Windows system/data backup software-AOMEI Backupper- and I must say, this is by far the best I have tried in the last 6 months.
AOMEI Backupper is awesome. Its team solved ttough problem for me. I think it is a unique and personal software belonging to me.
Introduction of Bootable CD
Bootable CD is a kind of special disc, which contains a bootable operating system. This operation system generally is a compact version of Linux or Windows PE. A disc which has been installed a compact operating system is called Bootable CD.
If the Windows operating system installed on hard disk, such as, Windows XP/Vista/7/8/10, can not boot or suffers a system crash, we can restore the operating system through a bootable CD so as to make the operating system on the disc work normally again.
It is always recommended to backup Windows drivers so as to restore them and insure a working computer after recovering system. Or you may download the magic tool Driver Talent for Network Card which is able to download and install network drivers without internet connection in case of no internet after system recovery.
Create bootable disc will help you boot your computer successfully. The bootable CD maker AOMEI Backupper supports creating two kinds of bootable CD or USB Flash Drive. One is Linux boot disc, and another is Windows PE boot disc. The former one can be created straightway, while the latter one may require installing Windows AIK kit in your operating system in advance. Linux boot disc has several drawbacks. For example, some hardware does not support it, such as, hardware RAID; and some functions of the software can not be used. Therefore, we strongly recommend creating Windows PE bootable CD first. The comparison of the available functions between these two types of disc is as follows.
| Features | Windows PE bootable CD | Linux bootable CD |
| File, Folder, Disk and partition backup |  |  |
| System Backup | | |
| System Restore | | |
| File, Folder, Disk and partition Restore | | |
| Disk and partition clone | | |
| Explore image file | | |
| Support hardware RAID | | |
Making Windows PE Bootable CD
When making a Windows PE bootable CD, the free backup software — AOMEI Backupper will check out whether your operating system meets the corresponding requirements. For instance, is it necessary to install Windows AIK? If it does, this software will provide corresponding notices. If your operating system is Vista or higher version of OS, such as, Windows 7/8/2008 R2/2011/2012, usually you can directly create a bootable CD without installing Windows AIK.
Here come the steps of how to create bootable disc with AOMEI Backupper.
Step 1. Under the «Tools» tab, select «Create Bootable Media» option.

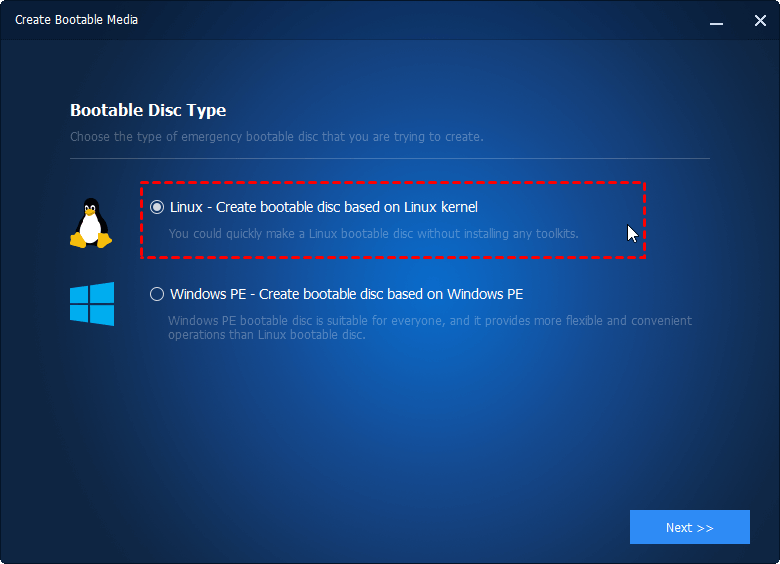
Step 2. In the pop-up window, choose «Windows PE-create bootable disc based on Windows PE» option, and then click «Next».

Step 3. If your system installed on a GPT disk, you will see two options below:
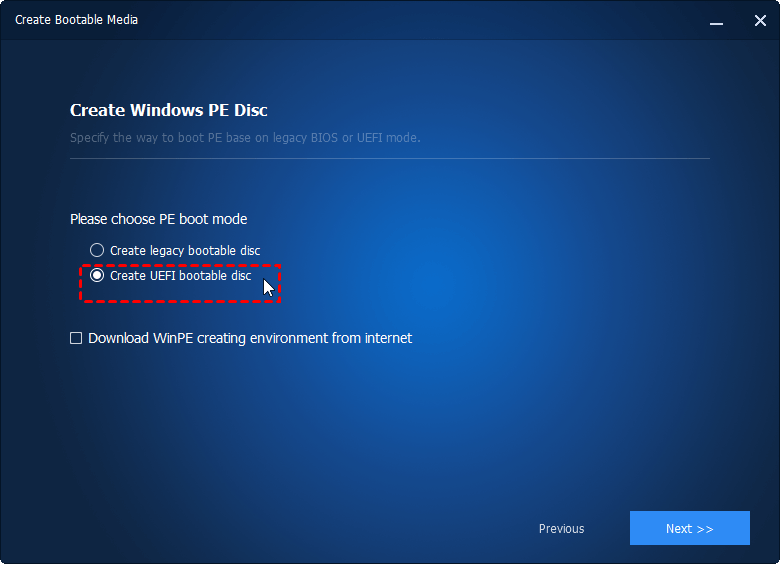
Usually, we suggest you to keep the first default option. If you need to use the bootable media on multiple computers of different hardware configruations, (such as some computers do not support UEFI boot), you can select the second option for better compatibility.
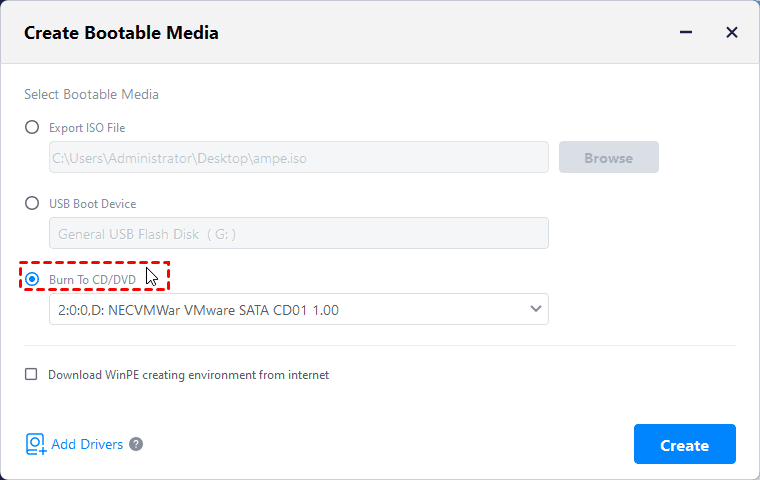
Step 4. In the pop-up window, select «Burn to CD/DVD» option, and then click «Next». (Notes: you need a CD-burning program, and also you need to insert the CD/DVD into the CD-ROM, or the «Burn to CD/DVD» option will not be available).
Step 5. When the operation is done, just click «Finish» to exit the interface.
Here you have already made a bootable CD. Then, you can reboot your computer, and set the CD-ROM as the first boot device in BIOS settings and test if your computer can boot from the disc. Then, when something bad happens, you can perform windows 10 system image restore to different computer, even with dissimilar hardware.
Making Bootable USB Flash Drive or USB Disk
If you do not have a CD/DVD, but a USB flash drive, you can use a USB drive to replace CD/DVD, to create a bootable USB drive. The making way is the same as creating a bootable CD. You just need to see the following screenshot, select «USB Boot Device» and click Next.

Making Linux Bootable CD
The way to create Linux bootable CD is just the same as those steps of creating Windows PE bootable CD/USB Drive. The only difference is that you can create this kind of CD at any time without meeting any requirement, or need a Windows AIK installation. Just like what has been said before, the compatibility of Linux bootable CD might be a little bit poorer.
The operating process of making Linux bootable disc is just similar to that of making Windows PE bootable disc. You can just refer to the steps above. Here is is screenshot:
During the process of making Linux CD, if you do not possess a CD, AOMEI Backupper allows you create a bootable USB drive. The only requirement is that, when choosing the bootable media type, select the USB Boot Device. Then you can boot the operating system from the USB disk to do the recovery operations.
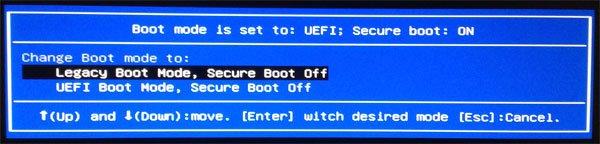
Note: Linux bootable media does not support for EFI/UEFI boot, if your computer boot mode is UEFI mode, you need to enter into BOIS to change the BIOS boot mode from UEFI to Legacy Boot Mode like the following snapshot (you may also learn how to change the setting by referring to the manual of your motherboard).
Making Bootable ISO File
If you do not have CD or USB disk, or if there is a problem when making the bootable CD, you could create a bootable ISO file first, and then employ some burning software, like Nero to burn ISO file to a CD or USB disk.
Here come the operating steps of creating bootable ISO file.
First, select «Create Bootable Media» option under the «Utilities» item. Then, in the next window, select «Windows PE» or «Linux» item, and click «Next» until you get to this interface. Then, select the «Export ISO file» option, and then click «Next».
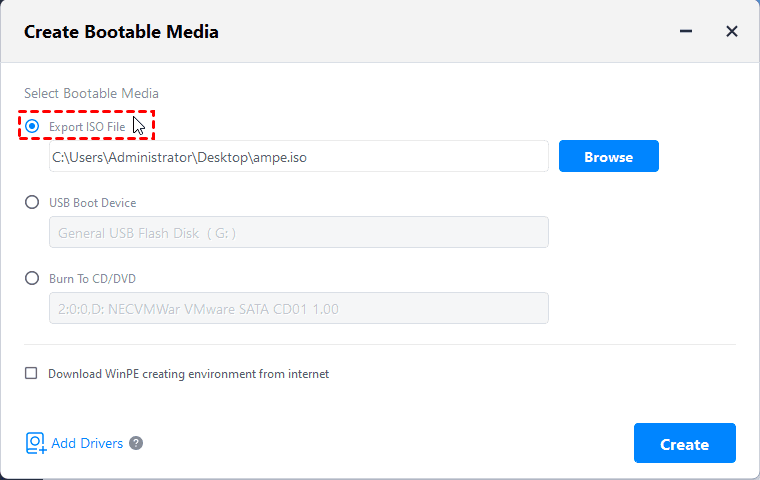
At last, click «Finish» when the operation has been done.
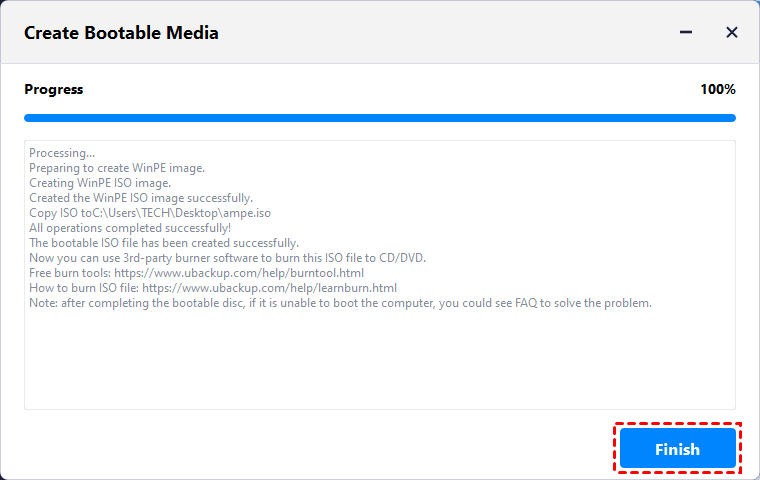
Now, after creating the ISO file, you can easily burn ISO to CD or USB with burning tool and follow the tutorial how to burn ISO file to CD/USB to burn this ISO file. Also, you can complete this task with the Windows 7 integrates built-in burning utility by right clicking this ISO file > Open With > Windows Disc Image Burner.
Note: If you don’t want to create bootable disc, you could enable AOMEI Backupper recovery environment in Windows boot options menu, then boot from the recovery environment to backup, restore, clone data.
How to Make a Bootable USB Disk and Install Windows 8, Windows 7, Windows XP
Ever faced a virus attack on your PC? Have an old laptop that refuses to boot up one fine day, throwing up errors such as bootmgr missing or NTLDR missing? Your best option in both these cases may be to reinstall Windows on your computer. When you first use your computer, you’re prompted to create a DVD backup of your Windows install, but keeping a DVD safely and not losing it can be a bother. Being able to reinstall Windows using a USB you just keep nearby can be a big help, and to do this all you need to do first is create a bootable Windows USB drive. This is also very helpful if you bought a compact laptop — many smaller new devices don’t have a DVD drive.
Remember you’ll need a working Windows install (any version) to do this — if your computer won’t boot, use a friend’s to follow these steps.
Here’s everything you need to know about the process.
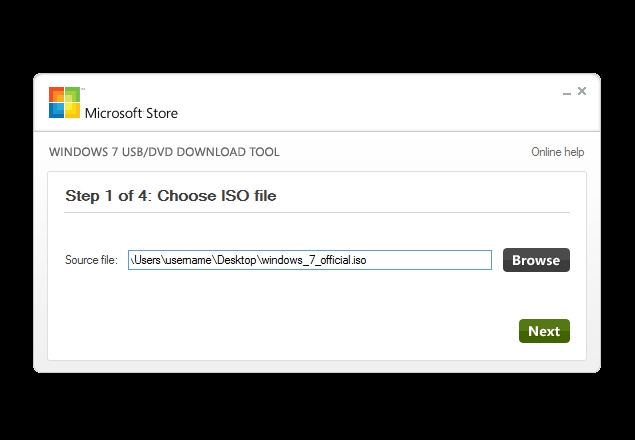
How to Create a Bootable Windows 7 USB Drive
The first thing you need is a Windows ISO or an image file. This is a virtual copy of a Windows installation DVD and you can source this legally from Microsoft without a product key. Here are the links for various edition of Windows 7.
You’ll still need a valid product key when you reinstall Windows so make sure you keep that safely.
Once you’ve downloaded the Windows 7 ISO file, follow these steps to burn it to a pen drive.
Download the Windows USB/DVD tool from here and run it.
Click Browse and select the downloaded Windows 7 ISO file.
Click Next.
The next page asks whether you want to save this file to a USB or a DVD. Click USB device.
Connect a pen drive with at least 4GB space to your computer. Make sure you back up all data on the pen drive to your computer as it will be erased during this process.
Select your pen drive from the drop down menu and click Begin copying.
When this process is complete, you’ll have a bootable Windows 7 USB ready.
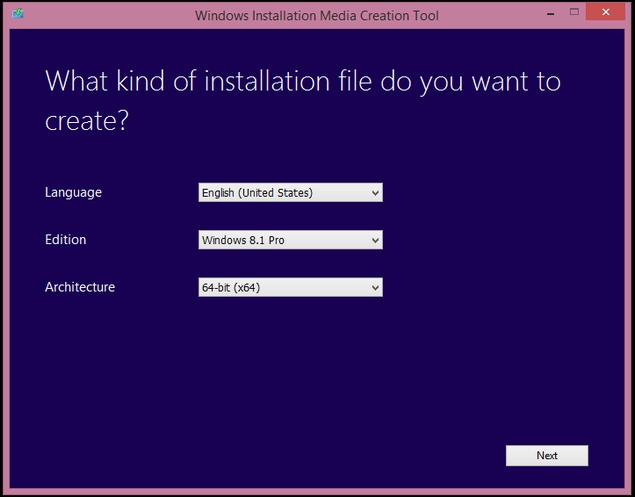
How to Create a Bootable Windows 8 USB Drive
Download the Windows Installation Media Creation Tool from here and run it.
Select the Language from the first drop-down menu.
Then select the Edition of Windows you want to install. Your choices are: Windows 8.1, Windows 8.1 N, Windows 8.1 Pro, Windows 8.1 Pro N and Windows 8.1 Single Language.
In the third drop-down menu next to Architecture choose whether you want a 32-bit or 64-bit version of the OS. If you need to see which version you’re running right now, right click on My Computer and select Properties. There, you’ll see the information you need under Windows Edition and System type respectively. Alternatively, check Microsoft’s website for detailed instructions.
Click Next.
Plug in a USB drive to your computer. Make sure that it has at least 4GB space. If there’s any important data on the drive, create a backup as this process will erase the pen drive completely.
Now you’ll be asked to choose where to save the ISO file. Choose USB flash drive.
Click Next.
You’ll see a list of USB drives connected to your computer. Select your pen drive from the list and click Next.
Now the Media Creation Tool will begin downloading the ISO straight to your pen drive. When the download completes, click Finish.
How to Create a Bootable Windows XP USB Drive
Go to the Windows XP SP3 ISO download page.
Select the language from the drop-down menu and click the big red Download button.
Download a free programme such as ISOtoUSB to burn the image to a pen drive. There are a lot of apps that let you do this and you can use any of these. We found ISOtoUSB easy to use and light, so we picked it over others.
Install ISOtoUSB on your computer and open it.
Click Browse and select the downloaded Windows XP ISO file.
Plug in a pen drive with at least 1GB free space to your computer. All data on this pen drive will be erased so make sure you have a backup.
In ISOtoUSB, select the pen drive from the drop-down menu.
Click the checkbox next to Bootable
Click Burn.
When the process is complete, a bootable Windows XP USB drive will be ready.
Booting and installing Windows from USB Drive
Now you have a bootable pen drive ready, you can boot off this drive and install Windows. Installing Windows is quite straightforward, but the steps leading up to it may vary a little depending on the manufacturer of your computer. We’ve added a brief explanation below on how to do this.
When you’re booting up the computer, on the very first screen, you’ll see a text which says something like «Press Del to Enter BIOS». Press whatever key is listed — this is usually Delete, or one of F1, F2, F8, or F12 — when the computer is booting, to enter the BIOS. There, you need to find a menu like Advanced BIOS settings, and select USB as the primary boot device. Now, you need to save and exit BIOS — the key to do so will be listed on-screen, but it is usually F10. Plug in the USB, and when you reboot, you’ll start the install process for Windows on your computer. Follow on screen instructions to install Windows 8, Windows 7, or Windows XP.
Did you manage to create a bootable Windows pen drive? Let us know via the comments. For more tutorials, head to our How To section.
For the latest tech news and reviews, follow Gadgets 360 on Twitter, Facebook, and Google News. For the latest videos on gadgets and tech, subscribe to our YouTube channel.


