- Make for Windows
- Version
- Description
- Homepage
- Download
- Create bootable WinPE media
- Step 1: Create working files
- Step 2: Customize WinPE (Usually not needed)
- Common customizations
- Step 3: Create bootable media
- Create a bootable WinPE USB drive
- Create a WinPE ISO, DVD, or CD
- Create a WinPE VHD to use with Hyper-V
- Troubleshooting
- window
- Usage and option summary
- Default behavior
- -w Defining a custom window size
- -l and -r Defining asymmetric windows
- -sw Defining asymmetric windows based on strand
- -sm Enforcing matches with the same “strandedness”
- -Sm Enforcing matches with the opposite “strandedness”
- -u Reporting the presence/absence of at least one overlapping feature
- -c Reporting the number of overlapping features
- -v Reporting the absence of any overlapping features
- -header Print the header for the A file before reporting results.В
Make for Windows
Make: GNU make utility to maintain groups of programs
Version
Description
Make is a tool which controls the generation of executables and other non-source files of a program from the program’s source files. Make gets its knowledge of how to build your program from a file called the makefile, which lists each of the non-source files and how to compute it from other files. When you write a program, you should write a makefile for it, so that it is possible to use Make to build and install the program.
Capabilities of Make
- Make enables the end user to build and install your package without knowing the details of how that is done — because these details are recorded in the makefile that you supply.
- Make figures out automatically which files it needs to update, based on which source files have changed. It also automatically determines the proper order for updating files, in case one non-source file depends on another non-source file. As a result, if you change a few source files and then run Make, it does not need to recompile all of your program. It updates only those non-source files that depend directly or indirectly on the source files that you changed.
- Make is not limited to any particular language. For each non-source file in the program, the makefile specifies the shell commands to compute it. These shell commands can run a compiler to produce an object file, the linker to produce an executable, ar to update a library, or TeX or Makeinfo to format documentation.
- Make is not limited to building a package. You can also use Make to control installing or deinstalling a package, generate tags tables for it, or anything else you want to do often enough to make it worth while writing down how to do it.
Homepage
Download
If you download the Setup program of the package, any requirements for running applications, such as dynamic link libraries (DLL’s) from the dependencies as listed below under Requirements, are already included. If you download the package as Zip files, then you must download and install the dependencies zip file yourself. Developer files (header files and libraries) from other packages are however not included; so if you wish to develop your own applications, you must separately install the required packages.
| Description | Download | Size | Last change | Md5sum |
|---|---|---|---|---|
| • Complete package, except sources | Setup | 3384653 | 25 November 2006 | 8ae51379d1f3eef8360df4e674f17d6d |
| • Sources | Setup | 1252948 | 25 November 2006 | b896c02e3d581040ba1ad65024bbf2cd |
| • Binaries | Zip | 495645 | 25 November 2006 | 3521948bc27a31d1ade0dcb23be16d49 |
| • Dependencies | Zip | 708206 | 25 November 2006 | d370415aa924fa023411c4099ef84563 |
| • Documentation | Zip | 2470575 | 25 November 2006 | 43a07e449d4bab3eb3f31821640ecab7 |
| • Sources | Zip | 2094753 | 25 November 2006 | 8bed4cf17c5206f8094f9c96779be663 |
You can also download the files from the GnuWin32 files page.
You can monitor new releases of the port of this package.
Create bootable WinPE media
The Windows Assessment and Deployment Kit (ADK) and WinPE Add ons include the CopyPE and MakeWinPEMedia command line utilities. When run from the Deployment and Imaging Tools Environment, CopyPE creates a working set of WinPE files, that MakeWinPEMedia can use to create bootable WinPE media. MakeWinPEMedia can create bootable WinPE USB drives, virtual hard disks, or ISOs that allow you to boot a VHD or burn to a DVD or CD.
To create bootable WinPE media, install:
- The ADK with the Deployment Tools option checked during setup
- The WinPE Add ons
If you’re using the ADK for Windows 10, version 1803 or earlier, Windows PE is included in the ADK when you choose the Windows Preinstallation environment option during setup and doesn’t require a separate addon.
separate add-on that you download and install after you install the ADK. See Download and install the Windows ADK to download th version of WinPE for the version of the ADK you’re using.
Step 1: Create working files
No matter what type of media you’re going to create, the first thing to do is create a working set of WinPE files on your technician PC.
Start the Deployment and Imaging Tools Environment as an administrator.
Run copype to create a working copy of the Windows PE files. For more information about copype, see Copype command line options.
Step 2: Customize WinPE (Usually not needed)
Note, when you add more packages to WinPE, it slows WinPE performance and boot time. Only add additional packages when necessary.
Common customizations
Add an update. If you’re going to be capturing an FFU at the end of the lab, apply KB4048955 to your WinPE image. To learn more, see: WinPE: mount and customize.
Add a video or network driver. (WinPE includes generic video and network drivers, but in some cases, additional drivers are needed to show the screen or connect to the network.). To learn more, see WinPE: Add drivers.
Add PowerShell scripting support. To learn more, see WinPE: Adding Windows PowerShell support to Windows PE. PowerShell scripts are not included in this lab.
Set the power scheme to high-performance. Speeds deployment. Note, our sample deployment scripts already set this scheme automatically. See WinPE: Mount and Customize: High Performance.
Optimize WinPE: Recommended for devices with limited RAM and storage (for example, 1GB RAM/16GB storage). After you add drivers or other customizations to Windows PE, see WinPE: Optimize and shrink the image to help reduce the boot time.
Step 3: Create bootable media
Now that you now have a set of working files, you can use MakeWinPEMedia to build bootable WinPE media.
Create a bootable WinPE USB drive
Attach a USB drive to your technician PC.
Start the Deployment and Imaging Tools Environment as an administrator.
Optional You can format your USB key prior to running MakeWinPEMedia. MakeWinPEMedia will format your WinPE drive as FAT32. If you want to be able to store files larger than 4GB on your WinPE USB drive, you can create a multipartition USB drive that has an additional partition formatted as NTFS. See Create a multipartition USB drive for instructions.
Use MakeWinPEMedia with the /UFD option to format and install Windows PE to the USB flash drive, specifying the USB key’s drive letter:
This command reformats the partition.
The bootable WinPE USB drive is ready. You can use it to boot a PC into WinPE.
Create a WinPE ISO, DVD, or CD
Use MakeWinPEMedia with the /ISO option to create an ISO file containing the Windows PE files:
Optional Burn a DVD or CD: In Windows Explorer, right-click the ISO file, and select Burn disc image > Burn, and follow the prompts.
Create a WinPE VHD to use with Hyper-V
You can create a bootable VHD to use with Hyper-V.
When running Windows PE in Hyper-V, consider using an ISO file format instead of a VHD to enable faster setup of the virtual PC.
To install Windows PE to a VHD:
Create a virtual hard drive (.vhdx):
Prepare the drive by using MakeWinPEMedia:
Detach the drive:
Troubleshooting
If WindowsВ PE doesn’t appear, try the following workarounds, rebooting the PC each time:
To boot a PC that supports UEFI mode: In the firmware boot menus, try manually selecting the boot files: \EFI\BOOT\BOOTX64.EFI.
If your PC requires storage or video drivers to boot, try adding those same drivers to the WindowsВ PE image. For more information, see WinPE: Mount and Customize.
window
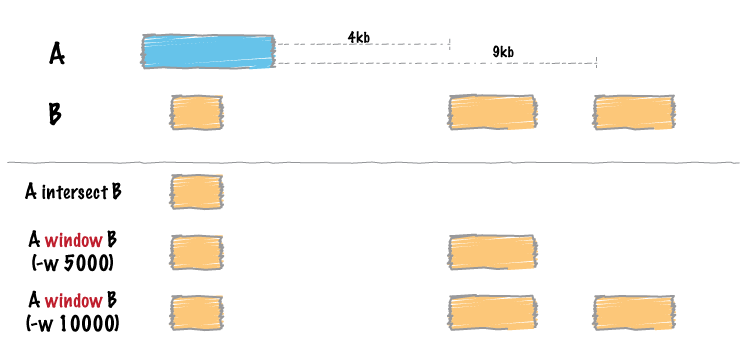
Similar to bedtools intersect , window searches for overlapping features in A and B. However, window adds a specified number (1000, by default) of base pairs upstream and downstream of each feature in A. In effect, this allows features in B that are “near” features in A to be detected.
Usage and option summary
Usage:
(or):
| Option | Description |
|---|---|
| -abam | BAM file A. Each BAM alignment in A is compared to B in search of overlaps. Use “stdin” if passing A with a UNIX pipe: For example: samtools view -b | bedtools window -abam stdin -b genes.bed |
| -ubam | Write uncompressed BAM output. The default is write compressed BAM output. |
| -bed | When using BAM input (-abam), write output as BED. The default is to write output in BAM when using -abam. For example: bedtools window -abam reads.bam -b genes.bed -bed |
| -w | Base pairs added upstream and downstream of each entry in A when searching for overlaps in B. Default is 1000 bp. |
| -l | Base pairs added upstream (left of) of each entry in A when searching for overlaps in B. Allows one to create asymmetrical “windows”. Default is 1000bp. |
| -r | Base pairs added downstream (right of) of each entry in A when searching for overlaps in B. Allows one to create asymmetrical “windows”. Default is 1000bp. |
| -sw | Define -l and -r based on strand. For example if used, -l 500 for a negative-stranded feature will add 500 bp downstream. By default, this is disabled. |
| -sm | Only report hits in B that overlap A on the same strand. By default, overlaps are reported without respect to strand. |
| -Sm | Only report hits in B that overlap A on the opposite strand. By default, overlaps are reported without respect to strand. |
| -u | Write original A entry once if any overlaps found in B. In other words, just report the fact at least one overlap was found in B. |
| -c | For each entry in A, report the number of hits in B while restricting to -w, -l, and -r. Reports 0 for A entries that have no overlap with B. |
| -v | Only report those entries in A that have no overlaps with B. |
| -header | Print the header from the A file prior to results. |
Default behavior
By default, bedtools window adds 1000 bp upstream and downstream of each A feature and searches for features in B that overlap this “window”. If an overlap is found in B, both the original A feature and the original B feature are reported.
-w Defining a custom window size
Instead of using the default window size of 1000bp, one can define a custom, symmetric window around each feature in A using the -w option. One should specify the window size in base pairs. For example, a window of 5kb should be defined as -w 5000 .
For example (note that in contrast to the default behavior, the second B entry is reported):
-l and -r Defining asymmetric windows
One can also define asymmetric windows where a differing number of bases are added upstream and downstream of each feature using the -l (upstream) and -r (downstream)** options.
By default, the -l and -r options ignore strand. If you want to define upstream and downstream based on strand, use the -sw option (below) with the -l and -r options.
For example (note the difference between -l 200 and -l 300):
-sw Defining asymmetric windows based on strand
Especially when dealing with gene annotations or RNA-seq experiments, you may want to define asymmetric windows based on “strand”. For example, you may want to screen for overlaps that occur within 5000 bp upstream of a gene (e.g. a promoter region) while screening only 1000 bp downstream of the gene. By enabling the -sw (“stranded” windows) option, the windows are added upstream or downstream according to strand. For example, imagine one specifies -l 5000 , -r 1000 as well as the -sw option. In this case, forward stranded (“+”) features will screen 5000 bp to the left (that is, lower genomic coordinates) and 1000 bp to the right (that is, higher genomic coordinates). By contrast, reverse stranded (“-“) features will screen 5000 bp to the right (that is, higher genomic coordinates) and 1000 bp to the left (that is, lower genomic coordinates).
For example (note the difference between -l 200 and -l 300 ):
-sm Enforcing matches with the same “strandedness”
This option behaves the same as the -s option for bedtools intersect while scanning for overlaps within the “window” surrounding A. That is, overlaps in B will only be included if the B interval is on the same strand as the A interval.
-Sm Enforcing matches with the opposite “strandedness”
This option behaves the same as the -S option for bedtools intersect while scanning for overlaps within the “window” surrounding A. That is, overlaps in B will only be included if the B interval is on the opposite strand as the A interval.
-u Reporting the presence/absence of at least one overlapping feature
This option behaves the same as for bedtools intersect . That is, even if multiple overlaps exist, each A interval will only be reported once.
-c Reporting the number of overlapping features
This option behaves the same as for bedtools intersect . That is, it will report the count of intervals in B that overlap each A interval.
-v Reporting the absence of any overlapping features
This option behaves the same as for bedtools intersect . That is, it will only report those intervals in A that have have zero overlaps in B.
-header Print the header for the A file before reporting results.В
By default, if your A file has a header, it is ignored when reporting results. This option will instead tell bedtools to first print the header for the A file prior to reporting results.


