- Установка пакетов и управление ими с помощью консоли диспетчера пакетов в Visual Studio (PowerShell) Install and manage packages with the Package Manager Console in Visual Studio (PowerShell)
- Поиск и установка пакета Find and install a package
- Открытие консоли и элементов управления консоли Opening the console and console controls
- Установка пакета Install a package
- Удаление пакета Uninstall a package
- Обновление пакета Update a package
- Поиск пакета Find a package
- Доступность консоли Availability of the console
- Расширение консоли диспетчера пакетов Extend the Package Manager Console
- Настройка профиля PowerShell NuGet Set up a NuGet PowerShell profile
- Create an MSIX package from any desktop installer (MSI, EXE, ClickOnce, or App-V)
- Packaging method
- Prepare computer
- Choose the installer you want to package
- MSI installers
- App-V installers
- EXE installers
- ClickOnce installers
- Scripts
- Manual installation
- Signing preference
- Package information
- Installation
- Manage first launch tasks
- Services report
- Create package
Установка пакетов и управление ими с помощью консоли диспетчера пакетов в Visual Studio (PowerShell) Install and manage packages with the Package Manager Console in Visual Studio (PowerShell)
Консоль диспетчера пакетов NuGet позволяет использовать команды PowerShell NuGet для поиска, установки, удаления и обновления пакетов NuGet. The NuGet Package Manager Console lets you use NuGet PowerShell commands to find, install, uninstall, and update NuGet packages. Это удобно, когда пользовательский интерфейс диспетчера пакетов не позволяет выполнять операции. Using the console is necessary in cases where the Package Manager UI does not provide a way to perform an operation. См. подробнее об использовании CLI nuget.exe в консоли. To use nuget.exe CLI commands in the console, see Using the nuget.exe CLI in the console.
Консоль встроена в Visual Studio для Windows. The console is built into Visual Studio on Windows. Она не включена в Visual Studio для Mac и Visual Studio Code. It is not included with Visual Studio for Mac or Visual Studio Code.
Перечисленные здесь команды относятся только к консоли диспетчера пакетов в Visual Studio и отличаются от команд модуля «Управление пакетами», доступных в общей среде PowerShell. The commands listed here are specific to the Package Manager Console in Visual Studio, and differ from the Package Management module commands that are available in a general PowerShell environment. В частности, в каждой среде есть команды, недоступные в другой среде, а в командах с тем же именем могут отличаться некоторые аргументы. Specifically, each environment has commands that are not available in the other, and commands with the same name may also differ in their specific arguments. При использовании консоли «Управление пакетами» в Visual Studio применяются команды и аргументы, описанные в этой статье. When using the Package Management Console in Visual Studio, the commands and arguments documented in this present topic apply.
Поиск и установка пакета Find and install a package
Для поиска и установки пакета необходимо выполнить три простых шага: For example, finding and installing a package is done with three easy steps:
Откройте проект или решение в Visual Studio, а затем откройте консоль, щелкнув Средства > Диспетчер пакетов NuGet > Консоль диспетчера пакетов. Open the project/solution in Visual Studio, and open the console using the Tools > NuGet Package Manager > Package Manager Console command.
Найдите пакет, который требуется установить. Find the package you want to install. Если вы уже знакомы с этим процессом, перейдите к шагу 3. If you already know this, skip to step 3.
Выполните команду установки: Run the install command:
Все операции, доступные в консоли, также можно выполнить с помощью CLI NuGet. All operations that are available in the console can also be done with the NuGet CLI. Но команды консоли работают в контексте Visual Studio и сохраненного проекта или решения, и область их применения часто шире, чем у их эквивалентов в CLI. However, console commands operate within the context of Visual Studio and a saved project/solution and often accomplish more than their equivalent CLI commands. Например, при установке пакета с помощью консоли добавляется ссылка на проект, а при использовании команды CLI этого не происходит. For example, installing a package through the console adds a reference to the project whereas the CLI command does not. По этой причине разработчики, работающие в Visual Studio, обычно предпочитают использовать консоль вместо CLI. For this reason, developers working in Visual Studio typically prefer using the console to the CLI.
Многие операции консоли зависят от наличия решения, открытого в Visual Studio с использованием известного имени пути. Many console operations depend on having a solution opened in Visual Studio with a known path name. Если у вас нет решения или оно не сохранено, отобразится сообщение об ошибке «Решение не открыто или не сохранено. If you have an unsaved solution, or no solution, you can see the error, «Solution is not opened or not saved. Убедитесь, что вы открыли и сохранили решение». Please ensure you have an open and saved solution.» Это означает, что консоль не может определить папку решения. This indicates that the console cannot determine the solution folder. Эту ошибку можно исправить, сохранив несохраненное решение или создав и сохранив решение, если оно не открыто. Saving an unsaved solution, or creating and saving a solution if you don’t have one open, should correct the error.
Открытие консоли и элементов управления консоли Opening the console and console controls
Откройте консоль в Visual Studio, щелкнув Средства > Диспетчер пакетов NuGet > Консоль диспетчера пакетов. Open the console in Visual Studio using the Tools > NuGet Package Manager > Package Manager Console command. Консоль — это окно Visual Studio, которое может быть упорядочено и размещено по вашему усмотрению (см. руководство по настройке макетов окон в Visual Studio). The console is a Visual Studio window that can be arranged and positioned however you like (see Customize window layouts in Visual Studio).
По умолчанию команды консоли работают с конкретным источником пакета и проектом, как указано в элементе управления в верхней части окна. By default, console commands operate against a specific package source and project as set in the control at the top of the window:

Выбор другого источника пакета или проекта изменяет эти значения по умолчанию для последующих команд. Selecting a different package source and/or project changes those defaults for subsequent commands. Чтобы переопределить эти настройки, не меняя значения по умолчанию, большинство команд поддерживают параметры -Source и -ProjectName . To overrride these settings without changing the defaults, most commands support -Source and -ProjectName options.
Чтобы управлять источниками пакетов, щелкните значок шестеренки. To manage package sources, select the gear icon. Это ярлык для диалогового окна Средства > Параметры > Диспетчер пакетов NuGet > Источники пакетов, как описано на странице, посвященной пользовательскому интерфейсу диспетчера пакетов. This is a shortcut to the Tools > Options > NuGet Package Manager > Package Sources dialog box as described on the Package Manager UI page. Кроме того, элемент управления справа от средства выбора проектов очищает содержимое консоли. Also, the control to the right of the project selector clears the console’s contents:

Крайняя правая кнопка прерывает команду, которая выполняется в течение долгого периода времени. The rightmost button interrupts a long-running command. Например, выполнение Get-Package -ListAvailable -PageSize 500 перечисляет первые 500 пакетов в источнике по умолчанию (например, nuget.org), что может занять несколько минут. For example, running Get-Package -ListAvailable -PageSize 500 lists the top 500 packages on the default source (such as nuget.org), which could take several minutes to run.

Установка пакета Install a package
При установке пакета в консоли выполняются те же действия, которые описаны в руководстве по установке пакета NuGet, со следующими дополнениями: Installing a package in the console performs the same steps as described on What happens when a package is installed, with the following additions:
- Консоль отображает применимые условия лицензии в окне с соответствующим соглашением. The Console displays applicable license terms in its window with implied agreement. Если вы не согласны с условиями, следует сразу же удалить пакет. If you do not agree to the terms, you should uninstall the package immediately.
- Кроме того, ссылка на пакет добавляется в файл проекта и отображается в обозревателе решений в узле Ссылки. Сохраните проект, чтобы просмотреть изменения непосредственно в файле проекта. Also a reference to the package is added to the project file and appears in Solution Explorer under the References node, you need to save the project to see the changes in the project file directly.
Удаление пакета Uninstall a package
См. подробнее об Uninstall-Package. See Uninstall-Package. Если необходимо найти идентификатор, чтобы просмотреть все пакеты, установленные в проекте по умолчанию, используйте команду Get-Package. Use Get-Package to see all packages currently installed in the default project if you need to find an identifier.
При удалении пакета выполняются следующие действия: Uninstalling a package performs the following actions:
- Удаляются ссылки на пакет из проекта (и любого используемого формата управления). Removes references to the package from the project (and whatever management format is in use). Ссылки больше не отображаются в обозревателе решений References no longer appear in Solution Explorer. (возможно, потребуется перестроить проект, чтобы он был удален из папки Bin). (You might need to rebuild the project to see it removed from the Bin folder.)
- Отменяются все изменения, внесенные в app.config или web.config при установке пакета. Reverses any changes made to app.config or web.config when the package was installed.
- Удаляются ранее установленные зависимости, если остальные пакеты не используют эти зависимости. Removes previously-installed dependencies if no remaining packages use those dependencies.
Обновление пакета Update a package
Поиск пакета Find a package
См. подробнее о Find-Package. See Find-Package. В Visual Studio 2013 и более ранних версиях используйте команду Get-Package. In Visual Studio 2013 and earlier, use Get-Package instead.
Доступность консоли Availability of the console
Начиная с Visual Studio 2017, NuGet и диспетчер пакетов NuGet автоматически устанавливаются при выборе рабочей нагрузки, связанной с .NET. Вы также можете установить эти компоненты отдельно, щелкнув Отдельные компоненты > Средства для работы с кодом > Диспетчер пакетов NuGet в установщике Visual Studio. Starting in Visual Studio 2017, NuGet and the NuGet Package Manager are automatically installed when you select any .NET-related workloads; you can also install it individually by checking the Individual components > Code tools > NuGet package manager option in the Visual Studio installer.
Кроме того, если у вас нет диспетчера пакетов NuGet в Visual Studio 2015 и более ранних версиях, щелкните Инструменты > Расширения и обновления и найдите расширение диспетчера пакетов NuGet. Also, if you’re missing the NuGet Package Manager in Visual Studio 2015 and earlier, check Tools > Extensions and Updates. and search for the NuGet Package Manager extension. Если вы не можете использовать установщик расширений в Visual Studio, скачайте расширение отсюда: https://dist.nuget.org/index.html. If you’re unable to use the extensions installer in Visual Studio, you can download the extension directly from https://dist.nuget.org/index.html.
Консоль диспетчера пакетов сейчас недоступна в Visual Studio для Mac. The Package Manager Console is not presently available with Visual Studio for Mac. Но аналогичные команды доступны через CLI NuGet. The equivalent commands, however, are available through the NuGet CLI. В Visual Studio для Mac есть пользовательский интерфейс для управления пакетами NuGet. Visual Studio for Mac does have a UI for managing NuGet packages. См. подробнее о включении пакета NuGet в проект. See Including a NuGet package in your project.
Консоль диспетчера пакетов не входит в Visual Studio Code. The Package Manager Console is not included with Visual Studio Code.
Расширение консоли диспетчера пакетов Extend the Package Manager Console
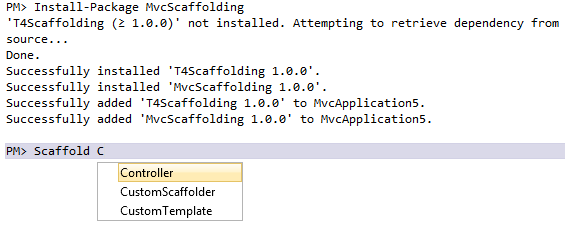
Некоторые пакеты устанавливают новые команды для консоли. Some packages install new commands for the console. Например, MvcScaffolding создает команды, например команду Scaffold (см. ниже), которая, в свою очередь, создает контроллеры и представления ASP.NET MVC. For example, MvcScaffolding creates commands like Scaffold shown below, which generates ASP.NET MVC controllers and views:
Настройка профиля PowerShell NuGet Set up a NuGet PowerShell profile
Профиль PowerShell позволяет сделать часто используемые команды доступными при использовании PowerShell. A PowerShell profile lets you make commonly-used commands available wherever you use PowerShell. NuGet поддерживает профиль NuGet, который обычно находится в следующем расположении: NuGet supports a NuGet-specific profile typically found at the following location:
Чтобы найти профиль, в консоли введите $profile . To find the profile, type $profile in the console:
Create an MSIX package from any desktop installer (MSI, EXE, ClickOnce, or App-V)
You can use the MSIX Packaging Tool to create an MSIX application package from any of the following options:
This doc will walk you through how to take any existing assets you have, and convert them to MSIX.
Before you start conversion, we recommend ensuring that you understand your installer, and whether it will convert.
We also recommend following the best practices to configure your environment and the MSIX Packaging Tool for conversion.
The MSIX Packaging Tool currently supports App-V 5.1. If you have a package with App-V 4.x, we recommend that you use the source installer to convert to MSIX.
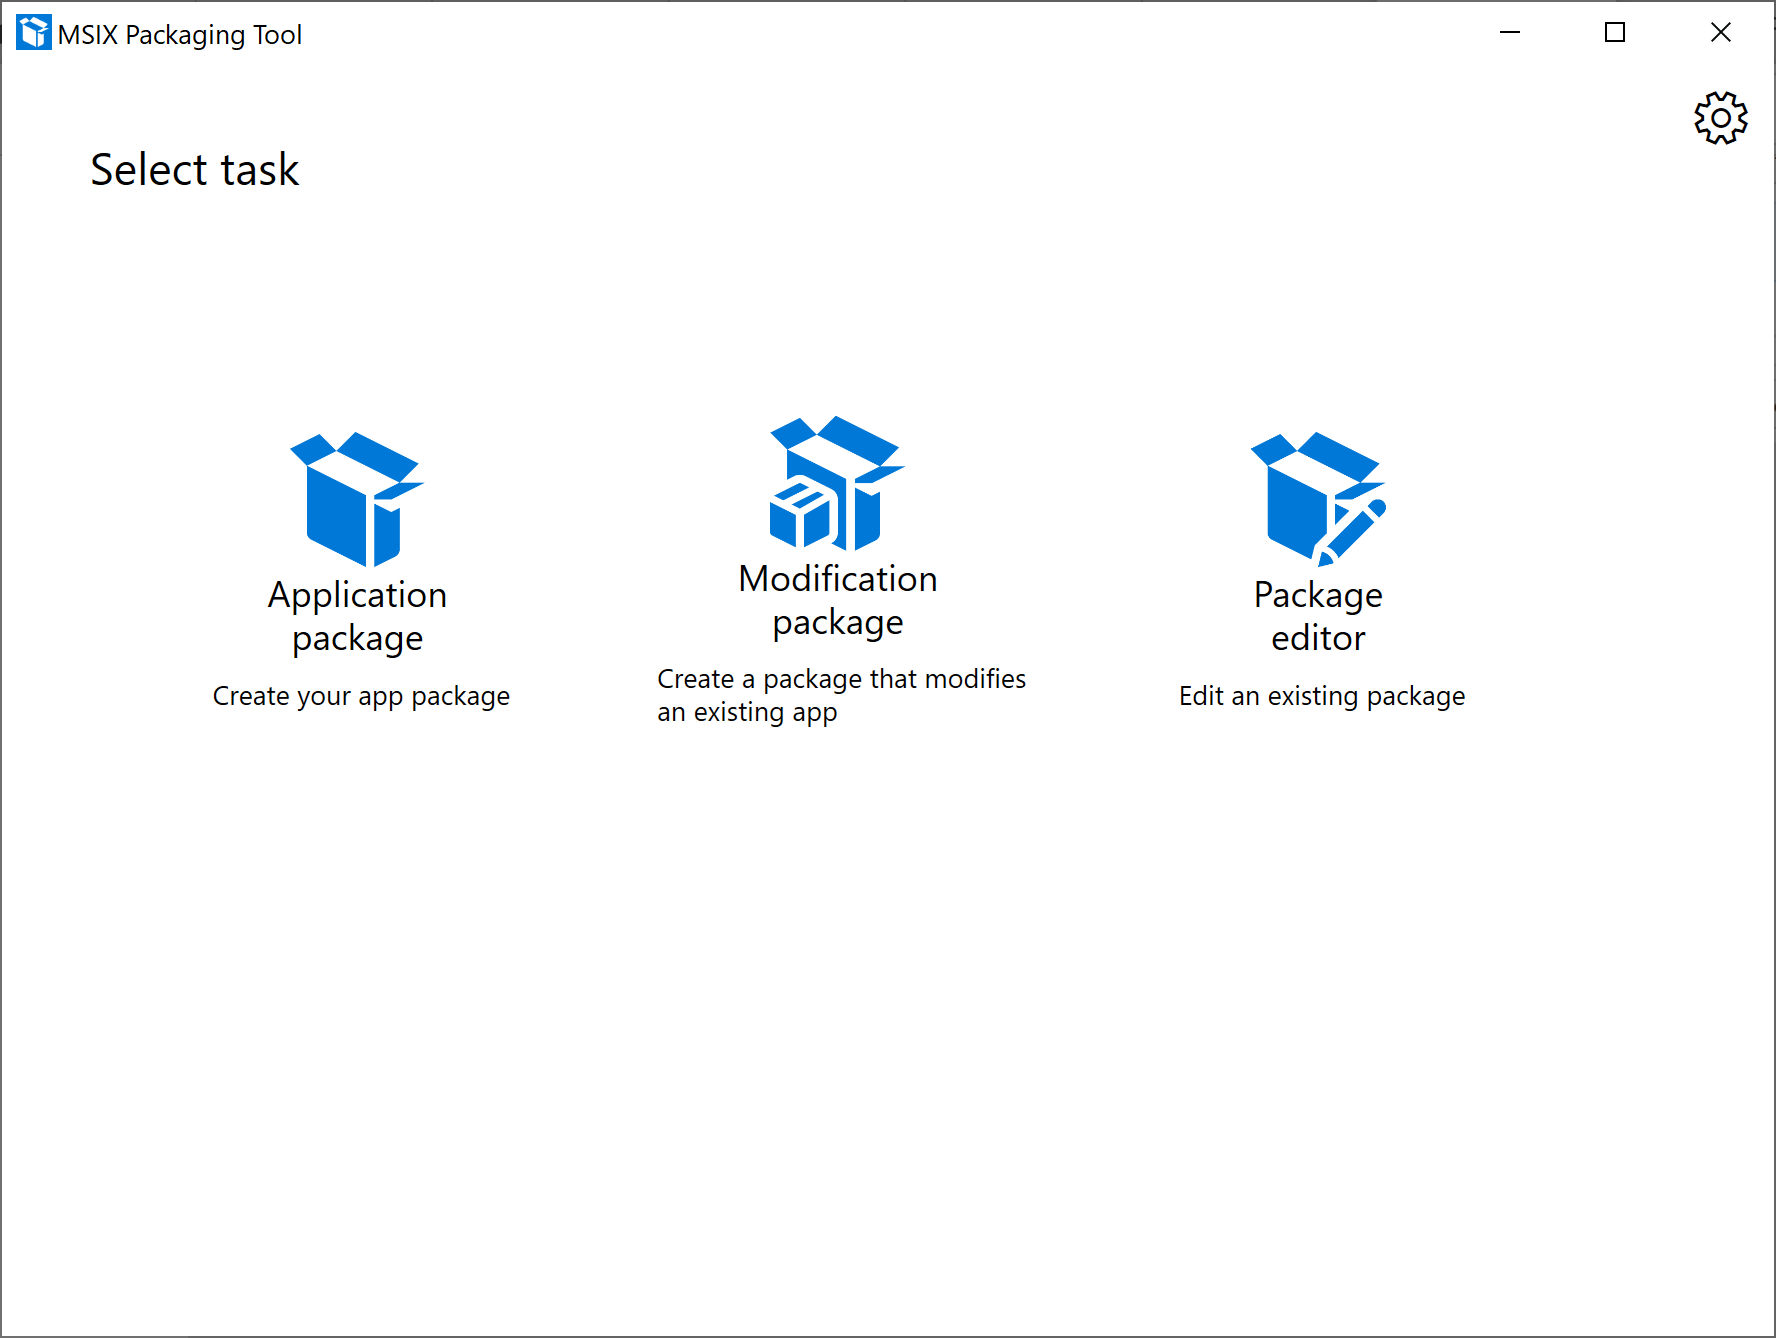
When the tool is first launched, you will be prompted to provide consent to sending telemetry data. It’s important to note that the diagnostic data you share only comes from the app and is never used to identify or contact you.
Creating an application package is the most commonly used option. This is where you will create an MSIX package from an installer, or by manual installation of the application payload.
Packaging method
Select an option your conversion machine:
If you are already working in a clean environment, select Create package on this computer
If you want to connect to an existing virtual or remote machine, select Create package on a remote machine
- You will need to set up your remote machine before you are able to convert on it
If you have a local virtual machine on your machine you want to convert on, select Create package on a local virtual machine
- Please note that we only support Hyper-V virtual machines, if you want to use another virtualization product you can connect using the remote machine option.
Click Next
Prepare computer
Next, the Prepare computer page provides options to prepare the computer for packaging.
The MSIX Packaging Tool Driver is required and the tool will automatically try to enable it if it is not enabled. The tool will first check with DISM to see if the driver is installed. If you run into an issue, try checking our troubleshooting documentation, then filing a Feedback Hub issue if the problem persists.
The MSIX Packaging Tool Driver monitors the system to capture the changes that an installer is making on the system which allows MSIX Packaging Tool to create a package based on those changes.
Windows Update is Active We will temporarily disable Windows Update for the duration of packaging so that we don’t collect any extraneous data.
The Pending reboot checkbox is disabled by default. You’ll need to manually restart the machine and then launch the tool again if you are prompted that pending operations need a reboot. This not required, only recommended.
[Optional] Check the box for Windows Search is Active and select Disable selected if you choose to disable the search service.
- This is not required, only recommended.
- Once disabled, the tool will update the status field to Disabled.
[Optional] Check the box for SMS Host is Active and select Disable selected if you choose to disable the host service.
- This is not required, only recommended.
- Once disabled, the tool will update the status field to Disabled.
When you’re done preparing the machine, click Next.
Choose the installer you want to package
The first thing you will want to do is understand what will happen with the installer you wish to convert. With any of these installers, you can specify them here to simplify your workflow, or you can manually run it at the time of installation later in the workflow.
MSI installers
If you are converting a .msi installer, you can simply browse for it, and specify the .msi. If you have an accompanying .mst or .msp file, you can specify that in the installer arguments field. One of the benefits of specifying your .msi here is that we can pull all of the package information from it, saving you time on the next step of conversion.
App-V installers
If you are converting using an App-V, this is a really simple process for you. All you need to do is specify an App-V file, and you get fast tracked to the create an MSIX page. This is because the manifest of the package simply needs to get translated to an MSIX package, and then it just works as an MSIX. The caveat here is that the tool only supports App-V 5.1 — if your App-V is version 4.x, we recommend that you take the source installer and then convert it directly to MSIX.
EXE installers
If you are converting a .exe installer, you can specify the installer at this point. Due to the lack of format consistency with an exe, you will need to manually enter the package information for your installer.
ClickOnce installers
If you are converting a ClickOnce installer, you can specify the installer at this point. Like an .exe, you will need to manually enter the package information for your installer.
Scripts
If you are using a script to install your application, you can specify the command line here. Alternatively, you can leave this field blank and run the script manually during the installation phase.
Manual installation
If you wish to manually run your installer, or perform the actions of the installer manually, you can leave the installer field blank, and during the installation phase, perform the actions required for your installer.
If you are trying to generate a conversion template file, you will be unable to do so without specifying an installer.
If you have any installer arguments, you can enter the desired argument in the provided field. This field accepts any string.
Signing preference
Under Signing preference, select a signing option. You can also set this as a default in your settings, which will save you some steps each time you convert.
- Sign with Device Guard signing This option allows you to sign in to your Microsoft Active Directory account that you have configured to use with Device Guard signing, which is a signing service that Microsoft provides where you don’t need to provide your own certificate. Learn more about how to set up your account and about Device Guard signing here.
- Sign with a certificate(.pfx) Browse to and select your .pfx certificate file. If the certificate is password protected, type the password in the password box.
- Specify a .cer file (does not sign) This option allows you to specify a .cer file. This is useful when you don’t want to sign the package, but you want to ensure that the publisher information matches the subject of the certificate that will be used for signing.
- Do not sign package Select this option if you will be signing your package at a later time. NOTE: You cannot install an MSIX package if it is not signed
- When signing, we highly recommend adding a timestamp to your certificate so that the validity of your certificate can outlast its expiration date. The accepted format is an RFC 3161 time stamp server URL.
Signing an MSIX package format application with a SHA1 certificate is not supported.
Click Next to proceed.
Package information
After you choose to package your application on an existing virtual machine, you must provide information about to the app. The tool will try to auto-fill these fields based on the information available from the installer. You will always have a choice to update the entries as needed. If the field as an asterisk*, it’s required. Inline help is provided if the entry is not valid.
- Package name:
- Required and corresponds to package identity Name in the manifest to describe the contents of the package.
- Is not shown to the end user.
- Is case-sensitive and cannot have a space.
- Can accept string between 3 and 50 characters in length that consists of alpha-numeric, period, and dash characters.
- Cannot end with a period and be one of these: «CON», «PRN», «AUX», «NUL», «COM1», «COM2», «COM3», «COM4», «COM5», «COM6», «COM7», «COM8», «COM9», «LPT1», «LPT2», «LPT3», «LPT4», «LPT5», «LPT6», «LPT7», «LPT8», and «LPT9.»
- Package display name:
- Required and corresponds to package in the manifest to display a friendly package name to the user, in start menu and settings pages.
- Field accepts A string between 1 and 256 characters in length and is localizable.
- Publisher name:
- Required and corresponds to package that describes the publisher information.
- The Publisher attribute must match the publisher subject information of the certificate used to sign a package.
- This field accepts a string between 1 and 8192 characters in length that fits the regular expression of a distinguished name : «(CN | L | O | OU | E | C | S | STREET | T | G | I | SN | DC | SERIALNUMBER | Description | PostalCode | POBox | Phone | X21Address | dnQualifier | (OID.(0 | 86)(.(0 | 68))+))=(([^,+=»<>#;])+ | «.»)(, ((CN | L | O | OU | E | C | S | STREET | T | G | I | SN | DC | SERIALNUMBER | Description | PostalCode | POBox | Phone | X21Address | dnQualifier | (OID.(0 | 23)(.(0 | 55))+))=(([^,+=»<>#;])+ | «.»)))*».
- Publisher display name:
- Required and corresponds to package in the manifest to display a friendly publisher name to the user, in App installer and settings pages.
- Field accepts A string between 1 and 256 characters in length and is localizable.
- Version:
- Required and corresponds to the package in the manifest to describe the version number of the package.
- This field accepts a version string in quad notation: «Major.Minor.Build.Revision».
- Description:
- This field is optional.
- Install location:
- This is the location that the installer is going to copy the application payload to (usually Programs Files folder).
- This field is optional but recommended when the app payload is being installed outside of the Program Files folders.
- Browse to and select a folder path.
- Make sure this file matches the installer’s install location while you go through the application install operation.
- Add support for MSIX Core to this package.
- When selected, this checkbox will then reveal a drop down that will aloow you to select a Windows version for MSIX Core support for the package you are generating.
Installation
- This is the installation phase where the tool is monitoring and capturing the application install operations.
- The tool will launch the installer in the environment that was specified previously and you’ll need to go through the installer wizard to install the application.
- Make sure the installation path matches what was defined earlier in the package information page.
- You might need to create a shortcut in desktop for the newly installed application.
- Once you’re done with the application installation wizard, make sure you finish or close on the installation wizard.
- If you need to run multiple installers you can do that manually at this point.
- If the app needs other pre-requisites, you need to install them now.
- If the application needs .Net 3.5/20, add the optional feature to Windows.
- If you did not specify an installer previously, here is where you can manually run your installer or script.
- If your installer requires a restart, you can perform a manual restart, or use the ‘restart’ button to perform the restart, and you will return to this point in the conversion process after the restart.
- When you’ve completed installing the application, click Next.
Manage first launch tasks
This page shows application executables that the tool captured. We recommended launching the application at least once to capture any first launch tasks.
You can launch the executable by selecting it, and then clicking run. You can also remove any unnecessary entry points by selecting it, and then clicking remove.
If there are multiple applications, check the box that corresponds to the main entry point. If you don’t see the application .exe here, manually browse to and run it. Then, refresh list.
Click Next You’ll be prompted with a pop up asking for confirmation that you’re finished with application installation and managing first launch tasks.
- If you’re done, click Yes, move on.
- If you’re not done, click No, I’m not done. You’ll be taken back to the last page to where you can launch applications, install or copy other files, and dlls/executables.
Services report
Starting in the 1.2019.1220.0 version of the MSIX Packaging Tool, you can convert an installer with services, and so we’ve added a Services report page. If no services were detected, you will still see this page, but it will be empty with a message that no services were detected at the top of the page.
The Services report page lists services that were detected in your installer during conversion. Services that have all the information they need and are supported will be shown in the Included table. Services that need additional information, need a fix, or aren’t supported will be shown in the Excluded table.
To fix a service or see additional data about the service, double-click the service entry in the table to view a pop-up with more information about the service. You can edit some of this information if you need to.
- Key name: The name of the service. This is not editable.
- Description: The description of the service entry.
- Display name: The display name of the service.
- Image path: Location of the service executable. This is not editable.
- Start account: The start account for the service.
- Startup type: Type of startup for the service. Supports Automatic, Manual, and Disabled.
- Arguments: Arguments to be run when the service starts.
- Dependencies: Dependencies for the service.
After a service has been fixed, you can move it to the Included table or you can choose to leave it in the Excluded table if you don’t want it in your final package. For additional information, check out the services documentation.
Create package
- Provide a location to save the MSIX package.
- By default, packages are saved in local app data folder.
- You can define the default save location in Settings menu.
- If you are generating a conversion template file, you can also specify a different save location for that template file if you don’t want it in the same location as the MSIX package.
- If you’d like to continue to edit the content and properties of the package before saving the MSIX package, you can select Package editor and be taken to package editor.
- Click Create to create the MSIX package.
You’ll be presented with a pop up when the package is created. This pop up will include the save location, linked to the file location of the newly created package. It also includes a link to the location of the log files for the MSIX Packaging Tool. You can close this pop up and get redirected to the welcome page. You can also select Package editor to see and modify the package content and properties.


