- Install Windows 10 on your Mac with Boot Camp Assistant
- What you need to install Windows 10 on Mac
- How to install Windows 10 on Mac
- 1. Check your Secure Boot setting
- 2. Use Boot Camp Assistant to create a Windows partition
- 3. Format the Windows (BOOTCAMP) partition
- 4. Install Windows
- 5. Use the Boot Camp installer in Windows
- How to switch between Windows and macOS
- Learn more
- Restart your Mac in macOS or Windows
- How to start up in macOS from Windows
- How to start up in Windows from macOS
- Learn more
- The 5 Best Ways to Run Windows on Your Mac
- Find out which option best fits you
- Boot Camp
- Virtualization
- ТОП-3 способа запуска программ Windows в MacOS
- Как пользоваться эмулятором Wine на macOS?
- Достоинства и недостатки Wine
- Виртуальные машины
- Какие бывают виртуальные машины — топ лучших
- Достоинства и недостатки виртуальных машин
- Что такое Boot Camp?
- Достоинства и недостатки Boot Camp
- Что выбрать: эмулятор Wine, виртуальные машины, Boot Camp?
- Заключение
Install Windows 10 on your Mac with Boot Camp Assistant
With Boot Camp, you can install Microsoft Windows 10 on your Mac, then switch between macOS and Windows when restarting your Mac.
What you need to install Windows 10 on Mac
- MacBook introduced in 2015 or later
- MacBook Air introduced in 2012 or later
- MacBook Pro introduced in 2012 or later
- Mac mini introduced in 2012 or later
- iMac introduced in 2012 or later 1
- iMac Pro (all models)
- Mac Pro introduced in 2013 or later
The latest macOS updates, which can include updates to Boot Camp Assistant. You will use Boot Camp Assistant to install Windows 10.
64GB or more free storage space on your Mac startup disk:
- Your Mac can have as little as 64GB of free storage space, but at least 128GB of free storage space provides the best experience. Automatic Windows updates require that much space or more.
- If you have an iMac Pro or Mac Pro with 128GB of memory (RAM) or more, your startup disk needs at least as much free storage space as your Mac has memory. 2
An external USB flash drive with a storage capacity of 16GB or more, unless you’re using a Mac that doesn’t need a flash drive to install Windows.
A 64-bit version of Windows 10 Home or Windows 10 Pro on a disk image (ISO) or other installation media. If installing Windows on your Mac for the first time, this must be a full version of Windows, not an upgrade.
- If your copy of Windows came on a USB flash drive, or you have a Windows product key and no installation disc, download a Windows 10 disk image from Microsoft.
- If your copy of Windows came on a DVD, you might need to create a disk image of that DVD.

![]()
How to install Windows 10 on Mac
To install Windows, use Boot Camp Assistant, which is included with your Mac.
1. Check your Secure Boot setting
Learn how to check your Secure Boot setting. The default Secure Boot setting is Full Security. If you changed it to No Security, change it back to Full Security before installing Windows. After installing Windows, you can use any Secure Boot setting without affecting your ability to start up from Windows.
2. Use Boot Camp Assistant to create a Windows partition
Open Boot Camp Assistant, which is in the Utilities folder of your Applications folder. Follow the onscreen instructions.
- If you’re asked to insert a USB drive, plug your USB flash drive into your Mac. Boot Camp Assistant will use it to create a bootable USB drive for Windows installation.
- When Boot Camp Assistant asks you to set the size of the Windows partition, remember the minimum storage-space requirements in the previous section. Set a partition size that meets your needs, because you can’t change its size later.
3. Format the Windows (BOOTCAMP) partition
When Boot Camp Assistant finishes, your Mac restarts to the Windows installer. If the installer asks where to install Windows, select the BOOTCAMP partition and click Format. In most cases, the installer selects and formats the BOOTCAMP partition automatically.
4. Install Windows
Unplug any external devices that aren’t necessary during installation. Then click Next and follow the onscreen instructions to begin installing Windows.
5. Use the Boot Camp installer in Windows
After Windows installation completes, your Mac starts up in Windows and opens a ”Welcome to the Boot Camp installer” window. Follow the onscreen instructions to install Boot Camp and Windows support software (drivers). You will be asked to restart when done.
- If the Boot Camp installer never opens, open the Boot Camp installer manually and use it to complete Boot Camp installation.
- If you have an external display connected to a Thunderbolt 3 port on your Mac, the display will be blank (black, gray, or blue) for up to 2 minutes during installation.
How to switch between Windows and macOS
Restart, then press and hold the Option (or Alt) ⌥ key during startup to switch between Windows and macOS.
Learn more
If you have one of these Intel-based Mac models using OS X El Capitan or later, you don’t need a USB flash drive to install Windows:
- MacBook introduced in 2015 or later
- MacBook Air introduced in 2017 or later 3
- MacBook Pro introduced in 2015 or later 3
- iMac introduced in 2015 or later
- iMac Pro (all models)
- Mac Pro introduced in late 2013 or later
For more information about using Windows on your Mac, open Boot Camp Assistant and click the Open Boot Camp Help button.
1. If you’re using an iMac (Retina 5K, 27-inch, Late 2014) or iMac (27-inch, Late 2013) or iMac (27-inch, Late 2012) with a 3TB hard drive and macOS Mojave or later, learn about an alert you might see during installation.
2. For example, if your Mac has 128GB of memory, its startup disk must have at least 128GB of storage space available for Windows. To see how much memory your Mac has, choose Apple menu > About This Mac. To see how much storage space is available, click the Storage tab in the same window.
3. These Mac models were offered with 128GB hard drives as an option. Apple recommends 256GB or larger hard drives so that you can create a Boot Camp partition of at least 128GB.
Information about products not manufactured by Apple, or independent websites not controlled or tested by Apple, is provided without recommendation or endorsement. Apple assumes no responsibility with regard to the selection, performance, or use of third-party websites or products. Apple makes no representations regarding third-party website accuracy or reliability. Contact the vendor for additional information.
Restart your Mac in macOS or Windows
After installing Microsoft Windows on your Mac, you can choose whether your Mac starts up in macOS or Windows.
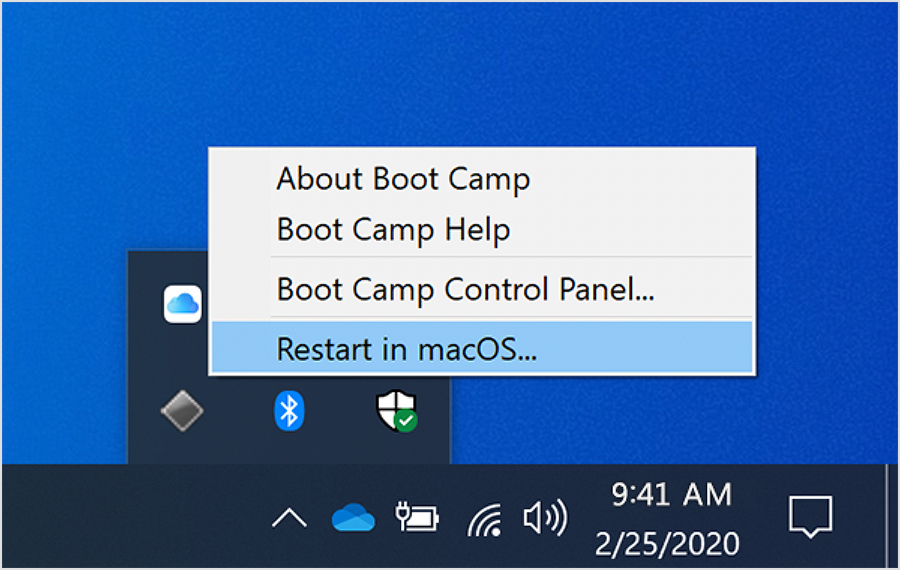
How to start up in macOS from Windows
- From the notification area on the right side of the Windows taskbar, click to show hidden icons.
- Click the Boot Camp icon .
- From the menu shown, choose Restart in macOS.
If you haven’t installed the latest Boot Camp updates, you might get the message ”Could not locate the OS X boot volume.»
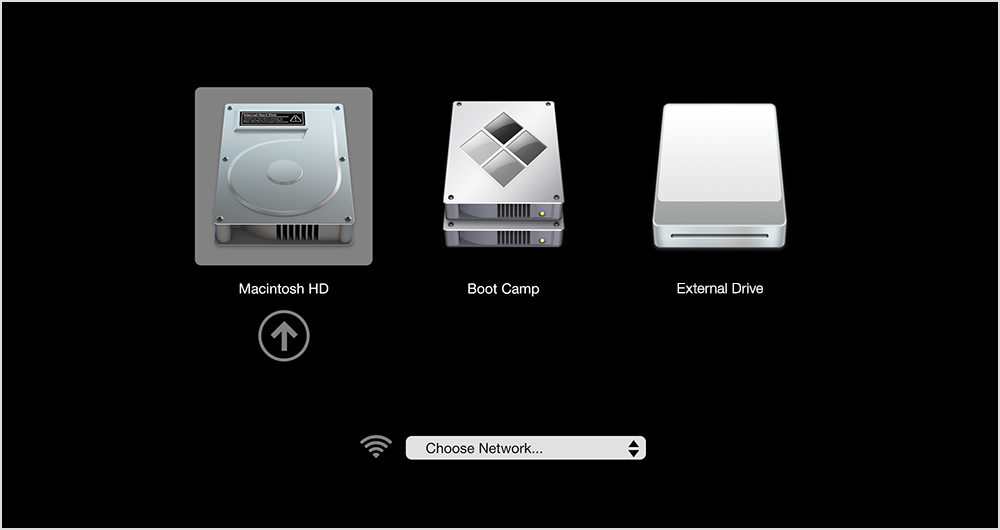
Or use Startup Manager as your Mac starts up:
- Restart your Mac from the Start menu in Windows.
- Press and hold the Option (or Alt) ⌥ key as your Mac begins to restart.
- Select your Mac startup volume (Macintosh HD) in the Startup Manager window, then press Return or click the up arrow:
How to start up in Windows from macOS
- Use Startup Manager to choose your Windows (Boot Camp) volume during startup.
- Or select your Boot Camp volume in Startup Disk preferences, then restart.
Learn more
- If you’re having difficulty using VoiceOver or another screen reader to complete these steps, please contact Apple Support.
- Learn how to install Windows 10 on your Mac.
Information about products not manufactured by Apple, or independent websites not controlled or tested by Apple, is provided without recommendation or endorsement. Apple assumes no responsibility with regard to the selection, performance, or use of third-party websites or products. Apple makes no representations regarding third-party website accuracy or reliability. Contact the vendor for additional information.
The 5 Best Ways to Run Windows on Your Mac
Find out which option best fits you
While macOS is made to run using Mac hardware, it is not the only operating system that can run on a Mac computer.
Plenty of other operating systems, including Window and Linux, will work on a Mac device. That makes the Mac among the most versatile computers you can buy. Here’s what we’d use to install Windows on a Mac.
Boot Camp
:max_bytes(150000):strip_icc()/BootCampPartition-5849de633df78c491eaf721b.jpg)
Supports Windows 7, 8.1, and 10
Windows runs natively on Mac hardware for best performance
Requires a full Windows license for the initial install.
Cannot run Windows and Mac OS concurrently.
Perhaps the best-known option for running Windows on a Mac is Boot Camp. Included free with your Mac, Boot Camp allows you to install Windows and then choose between Mac and Windows on startup.
Because Boot Camp runs Windows directly on your Mac’s hardware (there is no virtualization or emulation to be performed) Windows can run at the best possible speed your Mac is able to deliver.
Installing Windows on your Mac is no more difficult than installing Windows on a PC. Apple even provides the Boot Camp Assistant to partition the startup drive to make room for Windows as well as to install all the drivers Windows needs for special Apple hardware.
Virtualization
:max_bytes(150000):strip_icc()/ParallelsWizard-576f016d5f9b585875b92396.jpg)
Run both macOS and a guest OS side-by-side.
Not limited to Windows; a large number of guest operating systems are supported.
Performance tuning and customization needed to achieve the best performance.
May impact the performance of your Mac.
Virtualization allows several operating systems to run on computer hardware at the same time. Virtualization abstracts the hardware layer, making it look like each operating system has its own processor, RAM, graphics, and storage.
Virtualization on the Mac makes use of a software layer called a hypervisor to emulate all of the underlying hardware. As a result, the guest operating system running on the virtual machine does not run as fast as in Boot Camp. But unlike Boot Camp, both the Mac operating system and the guest operating system run at the same time.
There are three primary virtualization apps for Mac:
- Parallels: The first to bring virtualization to the Mac. Parallels supports a wide range of guest OS, including Windows, Linux, and Mac.
- VMWare Fusion: Fusion is the Mac virtualization app offered by VMWare — a leader in virtualization tech. Fusion supports the installation of many different operating systems, including Windows, Linux, and macOS.
- VirtualBox: Oracle supports an open source virtualization app known as VirtualBox. This free virtualization app runs on multiple computer systems, including Mac. Like the other virtualization apps, VirtualBox can be used to run many different operating systems, including Windows, Linux, and macOS.
Installing the virtualization apps is similar to any other Mac app. Guest OS may be more involved with some customization required to obtain the best performance. All three apps have lively forums and support services to help with tuning the performance.
ТОП-3 способа запуска программ Windows в MacOS
Если вам необходимо запустить на Макбуке программу Windows, то придется воспользоваться сторонним софтом. Самым популярным решением станет бесплатный эмулятор Wine. Он отличается высокой производительностью, благодаря которой программы не «тормозят». Минусами эмулятора Windows для mac OS является то, что он не дружит с некоторыми приложениями.
Как пользоваться эмулятором Wine на macOS?
- Чтобы эмулятор работал на ПК с системой macOS, нужно предварительно скачать и установить утилиту XQuartz. В последних версиях macOS открытый программный код вмонтирован в оболочку системы. Его можно найти по адресу: Applications/Utilities/Xquartz.app.
- После ее установки компьютер необходимо перезагрузить.
- Далее скачайте сам эмулятор . Wine скачать на mac можно с официального сайта.
- Дождитесь завершения установки. После чего софт можно найти в следующей директории: /Users/ваша_учетная_запись/.wine. Она будет скрыта, поэтому воспользуйтесь гайдом, как находить скрытые папки.
- Для запуска Windows нужно ввести команду «wine program.exe» либо запустить установочный файл скрытой папки в предыдущем пункте.
Достоинства и недостатки Wine
Плюсы эмуляторов для Windows:
- Не нужно лицензионное ПО.
- Данный способ значительно экономит ресурсы системы.
- Сложная настройка. Перед использованием любого софта, его предварительно нужно настроить. Особенно это сложно делать с играми.
- Совместимость. Некоторые «тяжелые» приложения, забирающие много ресурсов системы, могут некорректно работать или не работать вовсе.
Виртуальные машины
На выходе получается полноценная оперативная система, только располагается она на «виртуальном» железе. Получается, что внутри одной ОС создается другая, которая при запуске забирает часть ее оперативной памяти.
На данный момент существует несколько таких виртуальных машин. Они бывают платные и бесплатные. По большей части они ничем не различаются между собой. Разве что, в бесплатных функционал ограничен. Но в то же время, при полном образе можно легко запустить на mac программу для Windows.
- Установка дополнительной ОС со съемного носителя или образа загрузочного диска.
- Указание количества ресурсов, которые может использовать дополнительная ОС.
- Установка и пользование приложениями.
Какие бывают виртуальные машины — топ лучших
- Parallels Desktop – самая популярная платная программа. Благодаря ей создается гибрид систем. Любые приложения запускаются сразу, вне зависимости от того, к какой системе они принадлежат.
Достоинства и недостатки виртуальных машин
- Возможность работать с двумя системами одновременно.
- Легко получить доступ к файлам.
- Потеря производительности из-за одновременной работы двух систем.
- Некоторые приложение (чаще игры) не работают.
Что такое Boot Camp?
Это программа, позволяющая устанавливать «окна» на Макбук. Система займет отдельное место на жестком диске и будет работать независимо от «яблочной».
Для этого вам потребуется:
- 50 Гб свободного места во внутренней памяти.
- Загрузочный диск с Windows.
Достоинства и недостатки Boot Camp
- Такой метод не ресурсоемкий, потому что одновременно пользоваться можно только одной ОС.
- Все приложения и игры беспроблемно устанавливаются и работают.
- Чтобы переключаться между ОС, нужно каждый раз перезапускать компьютер.
- Не будет доступа к файлам разных систем.
Что выбрать: эмулятор Wine, виртуальные машины, Boot Camp?
Если вы не можете определиться, каким способом воспользоваться, то следующие рекомендации для вас:
- Boot Camp нужен, в первую очередь, для тех, кто будет пользоваться играми.
- Виртуальная машина нужна тогда, когда необходимо пользоваться одновременно двумя ОС.
- Эмулятор подходит для простых задач и нечастого применения.
Заключение
Нет таких людей, которые не имели бы дело с ОС Windows. Со временем некоторые пользователи «окон» переходят на «яблочную» систему. Но у них остаются на «окнах» программы, не имеющие аналогов на Mac, и без которых не получается обходиться.
Для такой проблемы есть несколько решений: запуск программ Windows в MacOS с помощью эмулятора Wine, виртуальных машин или Boot Camp. Каждое имеет свои особенности и недостатки, и только вы определите, что вам больше всего подойдет.
Ставь лайк, если нравится материал и подписывайся на наш Дзен канал!


