- Tools To Create A Bootable Linux USB Drive
- Tools To Create A Bootable Linux USB Drive
- 1. Unetbootin
- 2. Etcher – USB and SD Card Writer
- 3. Gnome Multi-Writer
- 4. Rufus
- 5. Ubuntu Startup Disk Creator
- 6. XBOOT
- 7. Universal USB Installer
- 8. Linux Live USB Creator
- Making bootable linux usb from windows
- 2. Requirements
- 3. USB selection
- 4. Boot selection and Partition scheme
- 5. Select the Ubuntu ISO file
- 6. Write the ISO
- 7. Additional downloads
- 8. Write warnings
- 9. Writing the ISO
- 10. Installation complete
- USB flash installation medium
- Contents
- Using the ISO as is (BIOS and UEFI)
- In GNU/Linux
- Using basic command line utilities
- Using GNOME Disk Utility
- Using MultiWriter
- Using Kindd
- Using Popsicle
- Using SUSE Studio ImageWriter
- Using xorriso-dd-target
- In Windows
- Using win32diskimager
- Using USBwriter
- Using Rufus
- Using Cygwin
- dd for Windows
- Using flashnul
- In macOS
- Using macOS dd
- In Android
- EtchDroid
- Using manual formatting
- BIOS and UEFI
- In GNU/Linux
- In Windows
- BIOS only
- In GNU/Linux
- UEFI only
- In GNU/Linux
- In Windows
- Using a multiboot USB drive
- Using ventoy
- In Windows
- Loading the installation medium from RAM
- Inadvisable methods
- Using etcher
Tools To Create A Bootable Linux USB Drive

Last Updated on August 16, 2021
Insight: Tools To Create A Bootable Linux USB Drive
One of the easiest and the efficient way to install a Linux is via Bootable USB drive. In this post, we have mentioned some of the free tools to create a bootable Linux USB drive.
Tools To Create A Bootable Linux USB Drive
1. Unetbootin
Uneetbootin is a cross-platform, open-source and free to use tool to make your USB bootable.
For Ubuntu Users:
Run the following command to install.
2. Etcher – USB and SD Card Writer

Etcher is an open-source and cross-platform image writing tool. Etcher is developed using technologies like JS, HTML, node.js and GitHub’s Electron framework.
3. Gnome Multi-Writer
Gnome Multi-Write is a tool developed by the official Gnome project team. It can be used to write an ISO file to multiple USB devices at once.

4. Rufus
Rufus is lightweight, small and easy to use the software. It is a portable USB, bootable maker. It is available on Windows-based platform.
5. Ubuntu Startup Disk Creator
The Ubuntu Startup Disk Creator is a tool by Ubuntu which helps you to write the ISO image to your USB drive and make it bootable.
6. XBOOT
XBoot is an easy-to-use software to create Multiboot USB/ISO. One interesting feature is that you can compile multiple files like Linux, Antivirus rescue CDs, etc. into one Multiboot ISO file.
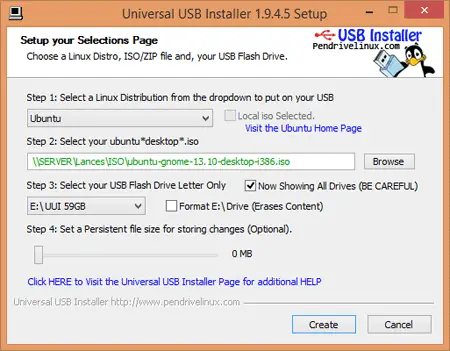
7. Universal USB Installer
Universal USB Installer is another easy to use Live Linux Bootable USB Creator. It is available for a Windows-based platform.
8. Linux Live USB Creator
LinuxLive USB Creator is an open-source free to use software which is only available for Windows. It can be used to create portable, bootable and virtualized USB disk running Linux.
Источник
Making bootable linux usb from windows
With a bootable Ubuntu USB stick, you can:
- Install or upgrade Ubuntu
- Test out the Ubuntu desktop experience without touching your PC configuration
- Boot into Ubuntu on a borrowed machine or from an internet cafe
- Use tools installed by default on the USB stick to repair or fix a broken configuration
Creating a bootable Ubuntu USB stick from Microsoft Windows is very simple and we’re going to cover the process in the next few steps.
Alternatively, we also have tutorials to help you create a bootable USB stick from both Ubuntu and Apple macOS.

2. Requirements
- A 4GB or larger USB stick/flash drive
- Microsoft Windows XP or later
- Rufus, a free and open source USB stick writing tool
- An Ubuntu ISO file. See Get Ubuntu for download links

Take note of where your browser saves downloads: this is normally a directory called ‘Downloads’ on your Windows PC. Don’t download the ISO image directly to the USB stick! If using Windows XP or Vista, download version 2.18 of Rufus.
3. USB selection
Perform the following to configure your USB device in Rufus:
- Launch Rufus
- Insert your USB stick
- Rufus will update to set the device within the Device field
- If the Device selected is incorrect (perhaps you have multiple USB storage devices), select the correct one from the device field’s drop-down menu

You can avoid the hassle of selecting from a list of USB devices by ensuring no other devices are connected.
4. Boot selection and Partition scheme
Now choose the Boot selection. Choices will be Non bootable and FreeDOS. Since you are creating a bootable Ubuntu device select FreeDOS.
The default selections for Partition scheme (MBR) and Target system (BIOS (or UEFI-CSM)) are appropriate (and are the only options available).

5. Select the Ubuntu ISO file
To select the Ubuntu ISO file you downloaded previously, click the SELECT to the right of “Boot selection”. If this is the only ISO file present in the Downloads folder you will only see one file listed.
Select the appropriate ISO file and click on Open.

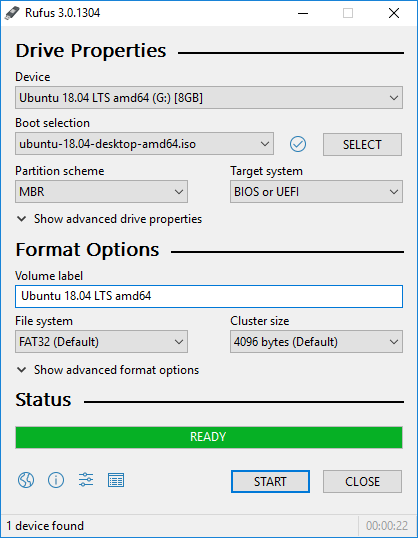
6. Write the ISO
The Volume label will be updated to reflect the ISO selected.
Leave all other parameters with their default values and click START to initiate the write process.

7. Additional downloads
You may be alerted that Rufus requires additional files to complete writing the ISO. If this dialog box appears, select Yes to continue.

8. Write warnings
You will then be alerted that Rufus has detected that the Ubuntu ISO is an ISOHybrid image. This means the same image file can be used as the source for both a DVD and a USB stick without requiring conversion.
Keep Write in ISO Image mode selected and click on OK to continue.

Rufus will also warn you that all data on your selected USB device is about to be destroyed. This is a good moment to double check you’ve selected the correct device before clicking OK when you’re confident you have.

If your USB stick contains multiple partitions Rufus will warn you in a separate pane that these will also be destroyed.
9. Writing the ISO
The ISO will now be written to your USB stick, and the progress bar in Rufus will give you some indication of where you are in the process. With a reasonably modern machine, this should take around 10 minutes. Total elapsed time is shown in the lower right corner of the Rufus window.

10. Installation complete
When Rufus has finished writing the USB device, the Status bar will be green filled and the word READY will appear in the center. Select CLOSE to complete the write process.

Congratulations! You now have Ubuntu on a USB stick, bootable and ready to go.
If you want to install Ubuntu, take a look at our install Ubuntu desktop tutorial.
Источник
USB flash installation medium
This page discusses various multi-platform methods on how to create an Arch Linux Installer USB drive (also referred to as «flash drive», «USB stick», «USB key», etc) for booting in BIOS and UEFI systems. The result will be a Live USB (Live CD-like) system that can be used for installing Arch Linux, system maintenance or for recovery purposes, and that, because of using Overlayfs for / , will discard all changes once the computer shuts down.
If you would like to run a full install of Arch Linux from a USB drive (i.e. with persistent settings), see Install Arch Linux on a removable medium. If you would like to use your bootable Arch Linux USB stick as a rescue USB, see Change root.
Contents
Using the ISO as is (BIOS and UEFI)
In GNU/Linux
Using basic command line utilities
This method is recommended due to its simplicity and universal availability, since these tools are part of coreutils (pulled in by the base meta-package).
Run the following command, replacing /dev/sdx with your drive, e.g. /dev/sdb . (Do not append a partition number, so do not use something like /dev/sdb1 ):
- using cat :
- using cp :
- using dd :
- using tee :
See [1] and [2] for a comparison and perspective on the use of those tools and why dd may be the least adapted one.
Using GNOME Disk Utility
Linux distributions running GNOME can easily make a live CD through nautilus and gnome-disk-utility . Simply right-click on the .iso file, and select Open With Disk Image Writer. When GNOME Disk Utility opens, specify the flash drive from the Destination drop-down menu and click Start Restoring.
Using MultiWriter
gnome-multi-writer is a simple GTK3 based graphical tool to write an ISO file to one or multiple USB devices at once.
Using Kindd
Kindd is a Qt based graphical frontend for dd. It is available as kindd AUR .
Using Popsicle
Popsicle is a tool made for flashing ISO files to multiple USB devices in parallel by the PopOS development team. It is written in Rust and uses GTK. It is available as popsicle AUR .
Using SUSE Studio ImageWriter
SUSE Studio ImageWriter is a Qt based tool made by the OpenSUSE development team. It is available as imagewriter AUR .
Using xorriso-dd-target
xorriso-dd-target (from libisoburn ) is a shell script which attempts to reduce the risk of overwriting the wrong storage device. Its safest mode is named -plug_test . For example, to use it as a regular user who can elevate to root using sudo:
In Windows
Using win32diskimager
win32diskimager is another graphical USB iso writing tool for Windows. Simply select your iso image and the target USB drive letter (you may have to format it first to assign it a drive letter), and click Write.
Using USBwriter
This method does not require any workaround and is as straightforward as dd under Linux. Just download the Arch Linux ISO, and with local administrator rights use the USBwriter utility to write to your USB flash memory.
Using Rufus
Rufus is a multi-purpose USB ISO writer. It provides a graphical user interface and does not care if the drive is properly formatted or not.
Simply select the Arch Linux ISO, the USB drive you want to create the bootable Arch Linux onto and click START.
Using Cygwin
Make sure your Cygwin installation contains the dd package.
Place your image file in your home directory:
Run cygwin as administrator (required for cygwin to access hardware). To write to your USB drive use the following command:
where archlinux-version-x86_64.iso is the path to the iso image file within the cygwin directory and \\.\x: is your USB flash drive where x is the windows designated letter, e.g. \\.\d: .
On Cygwin 6.0, find out the correct partition with:
and write the ISO image with the information from the output. Example:
dd for Windows
A GPL licensed dd version for Windows is available at http://www.chrysocome.net/dd. The advantage of this over Cygwin is a smaller download. Use it as shown in instructions for Cygwin above.
To begin, download the latest version of dd for Windows. Once downloaded, extract the archive’s contents into Downloads or elsewhere.
Now, launch your command prompt as an administrator. Next, change directory ( cd ) into the Downloads directory.
If your Arch Linux ISO is elsewhere you may need to state the full path, for convenience you may wish to put the Arch Linux ISO into the same folder as the dd executable. The basic format of the command will look like this.
Simply replace the various null spots (indicated by an «x») with the correct date and correct drive letter. Here is a complete example.
Using flashnul
flashnul is an utility to verify the functionality and maintenance of Flash-Memory (USB-Flash, IDE-Flash, SecureDigital, MMC, MemoryStick, SmartMedia, XD, CompactFlash etc).
From a command prompt, invoke flashnul with -p , and determine which device index is your USB drive, e.g.:
When you have determined which device is the correct one, you can write the image to your drive, by invoking flashnul with the device index, -L , and the path to your image, e.g:
As long as you are really sure you want to write the data, type yes, then wait a bit for it to write. If you get an access denied error, close any Explorer windows you have open.
If under Vista or Win7, you should open the console as administrator, or else flashnul will fail to open the stick as a block device and will only be able to write via the drive handle windows provides
In macOS
Using macOS dd
First, you need to identify the USB device. Open /Applications/Utilities/Terminal and list all storage devices with the command:
Your USB device will appear as something like /dev/disk2 (external, physical) . Verify that this is the device you want to erase by checking its name and size and then use its identifier for the commands below instead of /dev/diskX.
A USB device is normally auto-mounted in macOS, and you have to unmount (not eject) it before block-writing to it with dd . In Terminal, do:
Now copy the ISO image file to the device. The dd command is similar to its Linux counterpart, but notice the ‘r’ before ‘disk’ for raw mode which makes the transfer much faster:
This command will run silently. To view progress, send SIGINFO by pressing Ctrl+t . Note diskX here should not include the s1 suffix, or else the USB device will only be bootable in UEFI mode and not legacy. After completion, macOS may complain that «The disk you inserted was not readable by this computer». Select ‘Ignore’. The USB device will be bootable.
In Android
EtchDroid
EtchDroid is a OS image flasher for Android. It works without root permissions on Android 5 to Android 8. According to bug reports it does not always work on Android 9 and Android 4.4.
To create an Arch Linux installer, download the ISO image file on your Android device. Plug the USB drive to your device, using a USB-OTG adapter if needed. Open EtchDroid, select «Flash raw image», select your Arch ISO, then select your USB drive. Grant the USB API permission and confirm.
Keep your phone on a table while it is writing the image: a lot of USB-OTG adapters are a bit wobbly and you might unplug it by mistake.
Using manual formatting
BIOS and UEFI
In GNU/Linux
This method is more complicated than writing the image directly with dd , but it does keep the flash drive usable for data storage (that is, the ISO is installed in a specific partition within the already partitioned device without altering other partitions).
- If not done yet, create a partition table on /dev/sdX .
- If not done yet, create a partition on the device. The partition /dev/sdXn must be formatted to FAT32.
- Mount the FAT32 file system located in the USB flash device and extract the contents of the ISO image to it. For example:
Booting requires specifying the volume on which the files reside. By default the label ARCH_YYYYMM (with the appropriate release year and month) is used. Thus, the file system’s label has to be set accordingly. Alternatively, you can change this behaviour by altering the lines ending by archisolabel=ARCH_YYYYMM in the files:
- BIOS boot: /mnt/syslinux/archiso_sys-linux.cfg
- UEFI boot: /mnt/loader/entries/01-archiso-x86_64-linux.conf , /mnt/loader/entries/02-archiso-x86_64-speech-linux.conf and /mnt/loader/entries/03-archiso-x86_64-ram-linux.conf
To use an UUID instead, replace those portions of lines with archisodevice=/dev/disk/by-uuid/YOUR-UUID .
Syslinux files for BIOS systems are already copied to /mnt/syslinux . Unmount the FAT file system, install the syslinux and mtools packages and run the following commands to make the partition bootable:
In Windows
- Partition and format the USB drive using Rufus USB partitioner. Select partition scheme option as MBR for BIOS and UEFI and File system as FAT32. Uncheck «Create a bootable disk using ISO image» and «Create extended label and icon files» options.
- Change the Volume Label of the USB flash drive X: to match the LABEL mentioned in the archisolabel= part in \loader\entries\archiso-x86_64.conf . This step is required for Official ISO (Archiso). This step can be also performed using Rufus, during the prior «partition and format» step.
- Extract the ISO (similar to extracting ZIP archive) to the USB flash drive using 7-Zip.
- Download official Syslinux 6.xx binaries (zip file) from https://www.kernel.org/pub/linux/utils/boot/syslinux/ and extract it. The version of Syslinux should be the same version used in the ISO image.
- Run the following command (in Windows cmd prompt, as admin):
- Install Syslinux to the USB by running (use win64\syslinux64.exe for x64 Windows):
BIOS only
In GNU/Linux
Making a USB-ZIP drive
For some old BIOS systems, only booting from USB-ZIP drives is supported. This method allows you to still boot from a USB-HDD drive.
- Download syslinux and mtools from the official repositories.
- Find your usb drive with lsblk .
- Type mkdiskimage -4 /dev/sdx 0 64 32 (replace x with the letter of your drive). This will take a while.
From here continue with the manual formatting method. The partition will be /dev/sdx4 due to the way ZIP drives work.
UEFI only
For UEFI-only booting, it is enough to copy the files from the ISO and either change the FAT volume’s label or edit boot loader configuration files to set archisolabel / archisodevice accordingly.
In GNU/Linux
This method involves simply copies files from the ISO image to a USB flash drive and either adjusts the systemd-boot configuration or the file system’s label.
- If not done yet, create a partition table on /dev/sdX and a partition ( /dev/sdXn ) on the device.
- If not done yet, format the partition to FAT32:
- Mount the FAT32 file system:
- Extract the ISO image to the mounted file system:
- Either:
- edit /mnt/loader/entries/archiso-x86_64-linux.conf and /mnt/loader/entries/archiso-x86_64-speech-linux.conf and change archisolabel=ARCH_YYYYMM to match your device, e.g. by replacing it with archisodevice=/dev/disk/by-uuid/YOUR-UUID ,
- or unmount the file system and change its LABEL to match ARCH_YYYYMM :
- Unmount the FAT32 file system.
In Windows
- Partition the USB flash drive and format it to FAT32.
- Right click on archlinux-version-x86_64.iso and select Mount.
- Navigate to the newly created DVD drive and copy all files and folders except for syslinux to the USB flash drive.
- When done copying, right click on the DVD drive and select Eject.
- Either:
- edit X:\loader\entries\archiso-x86_64-linux.conf and X:\loader\entries\archiso-x86_64-speech-linux.conf with a text editor and change archisolabel=ARCH_YYYYMM to match your device, e.g. by replacing it with archisolabel=YOUR-LABEL ,
- or change the FAT32 volume label to match ARCH_YYYYMM .
- Eject the USB flash drive.
Using a multiboot USB drive
This allows booting multiple ISOs from a single USB device, including the archiso. Updating an existing USB drive to a more recent ISO is simpler than for most other methods. See Multiboot USB drive.
Using ventoy
Ventoy is an open source tool to create bootable USB drive for ISO/WIM/IMG/VHD(x)/EFI files. With ventoy, you do not need to format the disk over and over, you just need to copy the ISO/WIM/IMG/VHD(x)EFI files to the USB drive and boot them directly. You can copy many files at a time and ventoy will give you a boot menu to select them. It is available as ventoy-bin AUR .
In Windows
Loading the installation medium from RAM
 This article or section is a candidate for merging with Multiboot USB drive#Using Syslinux and memdisk.
This method uses Syslinux and a Ramdisk (MEMDISK) to load the entire Arch Linux ISO image into RAM. Since this will be running entirely from system memory, you will need to make sure the system you will be installing this on has an adequate amount. A minimum amount of RAM between 500 MB and 1 GB should suffice for a MEMDISK based, Arch Linux install.
For more information on Arch Linux system requirements as well as those for MEMDISK see the Installation guide and here. For reference, here is the preceding forum thread.
Preparing the USB flash drive
Begin by formatting the USB flash drive as FAT32. Then create the following folders on the newly formatted drive.
Copy the needed files to the USB flash drive
Next copy the ISO that you would like to boot to the Boot/ISOs folder. After that, extract from the following files from the latest release of syslinux from here and copy them into the following folders.
- ./win32/syslinux.exe to the Desktop or Downloads folder on your system.
- ./memdisk/memdisk to the Settings folder on your USB flash drive.
Create the configuration file
After copying the needed files, navigate to the USB flash drive, /boot/Settings and create a syslinux.cfg file.
For more information see the Syslinux article.
Final steps
Finally, create a *.bat file where syslinux.exe is located and run it («Run as administrator» if you are on Vista or Windows 7):
Inadvisable methods
Using etcher
etcher contains analytics and first-party advertising. See [3], [4] and [5].
Источник


