- «Локальные пользователи и группы» в Windows 10
- Запуск «Локальных пользователей и групп»
- «Пользователи»
- «Группы»
- Добавление нового пользователя
- Присоединение пользователя к группе
- How to manage users and groups in Windows 10
- Steps to manage users accounts in Windows 10
- Use a local account
- Edit sign-in options
- Set Work Access
- Family & Other Users
- Sync your Microsoft account settings
- Microsoft account options in the latest Windows 10 OS versions
- 12.3.1.9 Lab – Configure Users and Groups in Windows Answers
- 12.3.1.9 Lab – Configure Users and Groups in Windows Answers
- Lab – Configure Users and Groups in Windows ( Answers Version )
- Introduction
- Recommended Equipment
- Part 1: Creating New Users
- Step 1: Access Local Users and Groups Manager.
- Step 2: Create new users.
- Step 3: Verify user and group permissions.
- Part 2: Creating New Groups
- Step 1: Create new groups.
- Step 2: Assign group permissions to folders.
- Part 3: Modifying User and Group Permissions
- Step 1: Verify and modify folder permissions.
- Step 2: Disable a user account.
- Step 3: Clean up.
- Reflection
«Локальные пользователи и группы» в Windows 10

Важно! Рассматриваемая оснастка присутствует только в редакциях Pro и Enterprise!
Запуск «Локальных пользователей и групп»
Доступ к рассматриваемому элементу можно получить следующим образом:
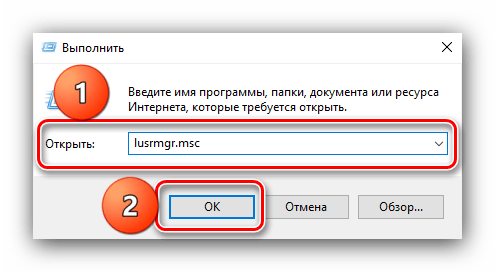
- Вызовите инструмент «Выполнить» сочетанием клавиш Win+R, введите в нём запрос lusrmgr.msc и щёлкните «ОК».
Запустится нужный инструмент.
Теперь взглянем подробнее на особенности приложения.
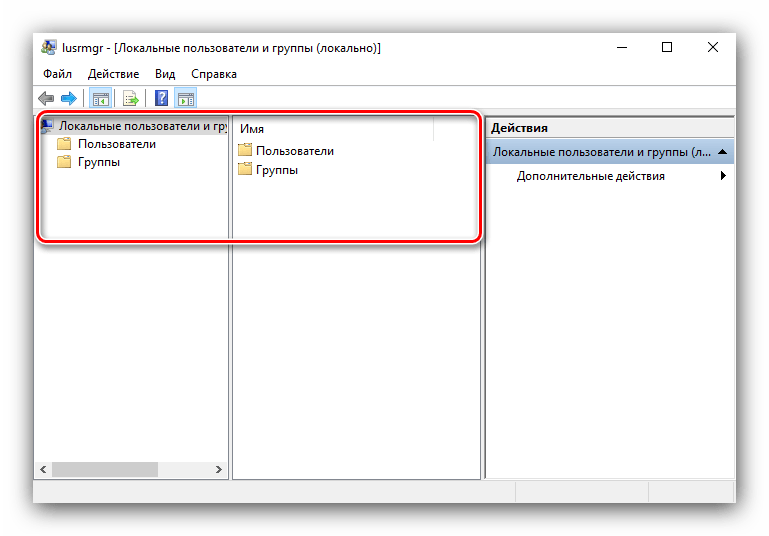
«Пользователи»
В данном каталоге присутствуют такие категории:
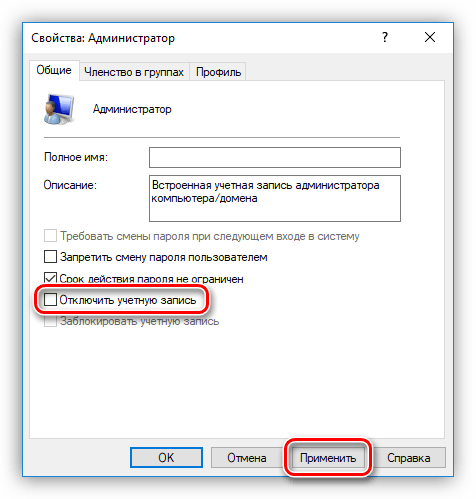
- «Администратор» – встроенный аккаунт, который используется в процессе инсталляции ОС перед тем, как юзер создаст свой собственный. Полномочия данной учётки весьма обширны, плюс её нельзя никаким образом удалить. Она пригодится в случае, когда в систему необходимо внести серьёзные изменения, но обычного пользователя-администратора для этой цели недостаточно.
Читайте также: Использование встроенной учётной записи администратора Windows 10
Читайте также: Отключение Защитника в Windows 10
«Группы»
В каталоге «Группы» записей намного больше – они обозначают категории, разграниченные в правах и выполняемых функциях. В этой директории обычно присутствуют следующие элементы:
- «Администраторы» – основная группа, члены которой имеют полный доступ к управлению операционной системой, соответственно, добавлять к ней новые учётки стоит с осторожностью.
- «Администраторы Hyper-V» – здесь находятся записи, которым разрешен доступ к виртуальной машине Hyper-V.
Читайте также: Виртуальная машина в Windows 10
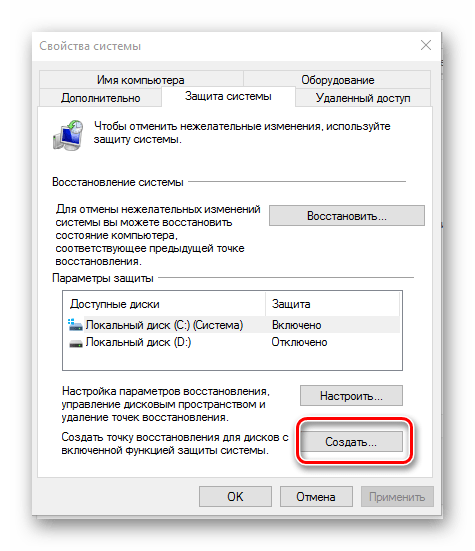
Читайте также: Создание точек восстановления Windows 10
Остальные позиции представляют собой системные категории, с которыми рядовой юзер навряд ли столкнётся.
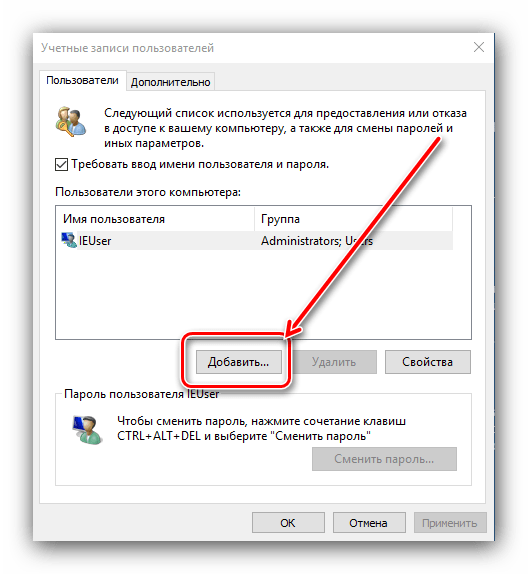
Добавление нового пользователя
Посредством рассматриваемой оснастки можно добавить новую учётную запись. Процедура описана одним из наших авторов, рекомендуем прочитать статью по ссылке далее.
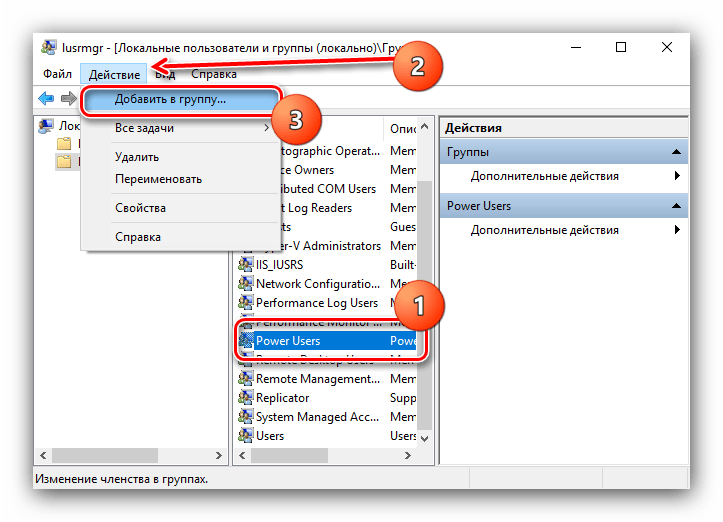
Присоединение пользователя к группе
Редактирование группы происходит по похожему алгоритму:
- Выделите одиночным кликом ЛКМ категорию, после чего воспользуйтесь вариантами «Действие» – «Добавить пользователя в группу».
В окне свойств группы кликните по кнопке «Добавить».
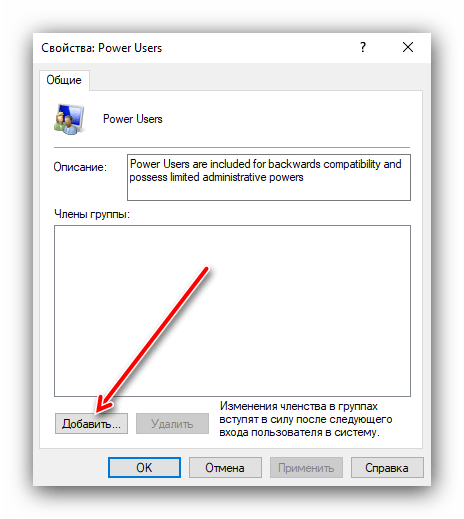
Укажите имя аккаунта в блоке «Введите имена выбираемых объектов», после чего щёлкните «Проверить имена».
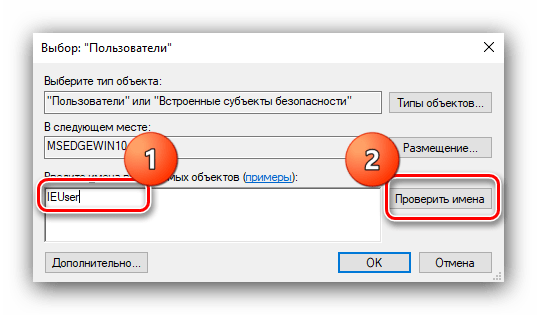
Под названием должно появиться подчёркивание – это означает, что объект распознан и будет присоединён.
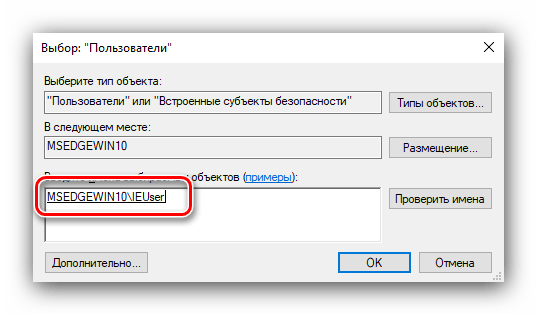
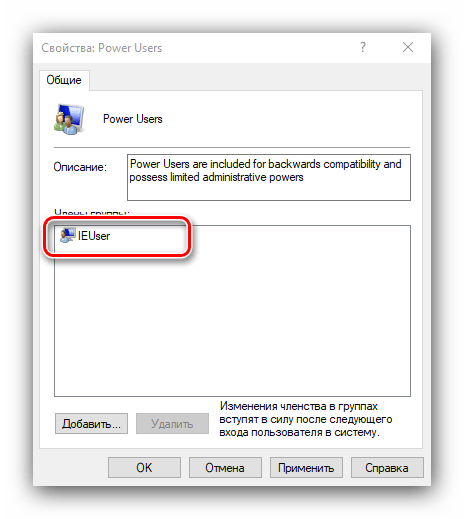
По возвращении в окно свойств вы увидите имя добавленной учётки.
Как видим, действительно ничего сложного.
Теперь вам известно, что собой представляет оснастка «Локальные пользователи и группы» в Windows 10.
How to manage users and groups in Windows 10


Windows 8 was the first Windows version to introduce Microsoft accounts allowing you to sync your settings and files between different computers.
Windows 10 expanded this feature by allowing you to customize your accounts even more. In this guide, we’ll explain to you how you can manage users in Windows 10.
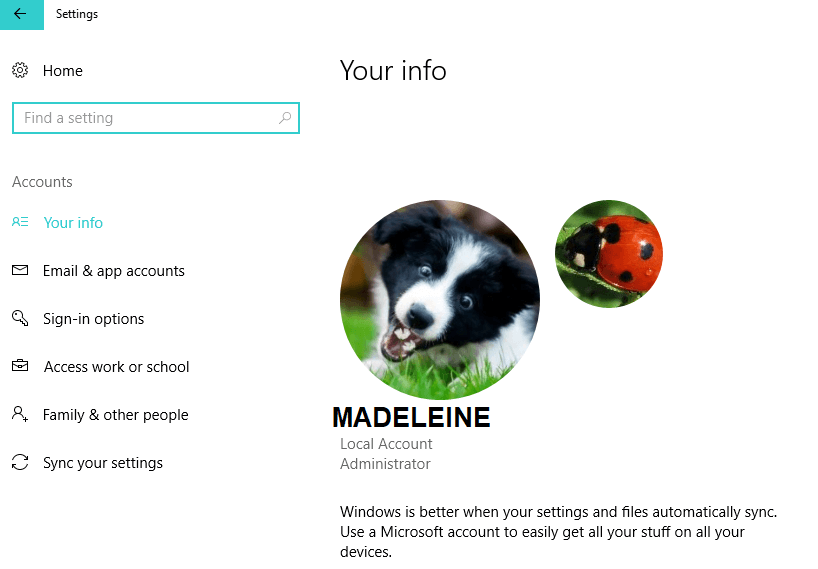
To start managing users in Windows 10, you need to open Settings and go to Accounts first. The first option in Accounts group is Your account that lets you manage your Microsoft account, customize your profile picture, your user name etc.
We just have to mention that if you want to manage your Microsoft account, you must do it online.
Steps to manage users accounts in Windows 10
Use a local account
If you don’t want to use Microsoft’s account and sync your settings, you can just click Sign in with local account instead to create a local account.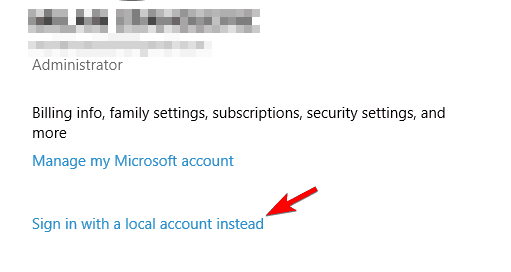
You won’t need to enter email account or phone number, just enter your username and password and you’re good to go. In addition, if you have your camera attached you can create a new profile picture as well.
In addition, if you want to add more Microsoft accounts, for example for your work or school, you can create them using the link at the bottom of the Your account page.
Edit sign-in options
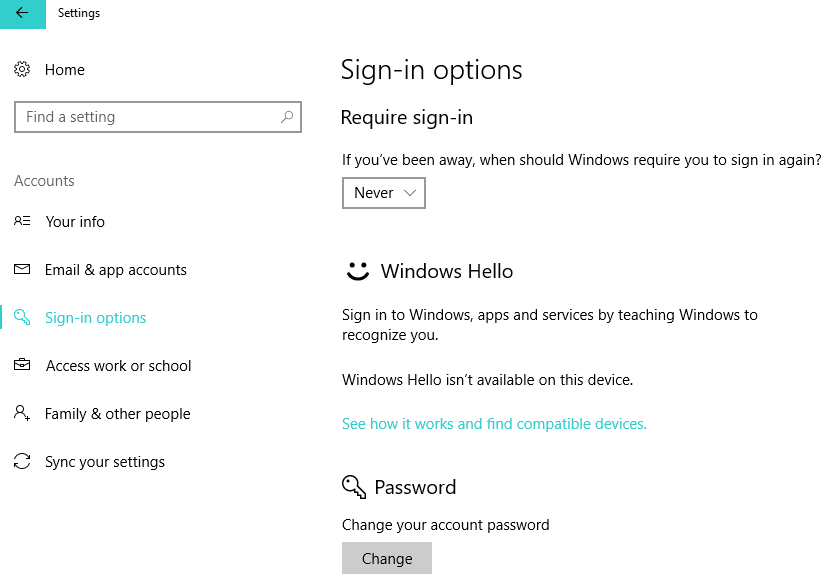
Next on our list are sign-in options, and from this section you can set if Windows 10 will require a password when your computer wakes from sleep mode or not.
In addition, you can also change your account password here as well. From this section you can also add a PIN password that you can use to unlock your account.
If you want, you can also add a picture password and use your favorite picture along with series of swipes and other gestures to unlock your PC. Last option is for fingerprint or card reader, so if you want maximum security this is probably the way to go.
Set Work Access
Next option is Work Access, and this option allows you to connect to a computer at work and access its apps, network and email.
Family & Other Users
Next we have Family & Other Users, and this section allows you to add new users. From this section you can create a user account for your child and monitor it using the Microsoft Family Safety.
That way you can make sure that your child visits only appropriate websites and respects time limits. In addition, you can also add other users from this section. Last option here is the Assigned access, and with this option you can allow a user to have access to only one Windows Store app.
Sync your Microsoft account settings
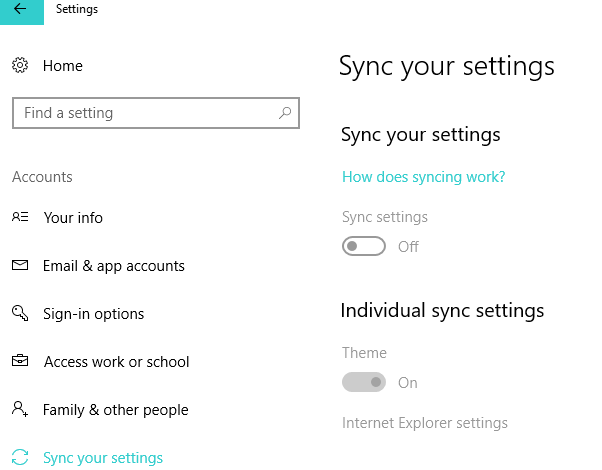
Last section is Sync your settings and it does just that. It syncs your settings with your Microsoft account across all Windows 10 devices. If you don’t want that, you can easily turn off syncing.
Microsoft account options in the latest Windows 10 OS versions
The newest Windows 10 versions, including the Fall Creators Update, the April 2018 Update and the October 2018 Update revamped the Microsoft account section of the Settings page. Here’s a screenshot of the available options:
As you can see, the UI has changed a bit. For example, Microsoft added a new option called ‘Email & App accounts‘. This feature allows you to customize your email, calendar and contacts. You can add several emails accounts for faster access and see what apps use your account information.
Windows 10 brings a variety of options when it comes to managing users. We hope that managing users in Windows 10 is bit more clear to you now.
If you have any additional questions, feel free to the post them in the comment section.
RELATED POSTS TO CHECK OUT:
12.3.1.9 Lab – Configure Users and Groups in Windows Answers
12.3.1.9 Lab – Configure Users and Groups in Windows Answers
Lab – Configure Users and Groups in Windows ( Answers Version )
Introduction
In this lab, you will create users and groups and delete users using the Local Users and Groups Manager. You will also assign group and user permission to the folders.
Recommended Equipment
- A computer with Windows installed
Part 1: Creating New Users
New users can be created individually or you can create a list of new users and groups with the Local Users and Groups Manager.
Step 1: Access Local Users and Groups Manager.
In this step, log on the computer using an account with administrative privileges provided by the Answers. In this lab, the initial user ITEUser is used and Studentxx and Staffxx accounts will be created in this lab.
- Click Control Panel > Administrative Tools > Computer Management. Click Local Users and Groups.

12.3.1.9 Lab – Configure Users and Groups in Windows Answers 01

12.3.1.9 Lab – Configure Users and Groups in Windows Answers 02

12.3.1.9 Lab – Configure Users and Groups in Windows Answers 03

12.3.1.9 Lab – Configure Users and Groups in Windows Answers 04
Step 2: Create new users.
In this step, you will create a few more local users using the Local Users and Groups Manager.
- In the Local Users and Groups window with the Users folder selected, click More Actions under Users and select New User in the right column.

12.3.1.9 Lab – Configure Users and Groups in Windows Answers 05

12.3.1.9 Lab – Configure Users and Groups in Windows Answers 06
What is Student01 required to do when logging in the first time?____________________________________________________________________________________
Change password.
Create users Student02, Staff01, and Staff02 or a list of user names provided by the Answers. Use cisco12345 as the password for these users. Unselect User must change password at next logon for each user. Click Close when finished creating all the users.

12.3.1.9 Lab – Configure Users and Groups in Windows Answers 07
Step 3: Verify user and group permissions.
The permission for the Users group allows the members to run most applications on the local computer. The group member inherited the permission when they joined the group during the creation of the account. These members cannot make any system wide changes. In this step, you will try to create another new user as a member of the Users group and use Internet Explorer to navigate to www.cisco.com.
- Log off the computer.
- Log on as any member of the Users group.
- Navigate to the Local Users and Groups Manager. Click Users.

12.3.1.9 Lab – Configure Users and Groups in Windows Answers 08
Part 2: Creating New Groups
In this part, you will create new groups named ITEStudent and ITEStaff and add members to the group. You will also create folders and assign
Step 1: Create new groups.
- Log off the computer. Log on to the computer using an account with administrative privileges. In this example, the account ITEUser has administrative privileges.
- Navigate to the Local Users and Groups Manager.
- Right-click the Groups folder and select New Group.

12.3.1.9 Lab – Configure Users and Groups in Windows Answers 09

12.3.1.9 Lab – Configure Users and Groups in Windows Answers 10
Step 2: Assign group permissions to folders.
- Create folders named Staff and Students in the C:\ drive.
- Select and then right-click the Students folder and select Properties.

12.3.1.9 Lab – Configure Users and Groups in Windows Answers 11
Part 3: Modifying User and Group Permissions
In this part, you will verify the results of the group permission on the folders Staff and Student. You will also modify user and group permissions.
Step 1: Verify and modify folder permissions.
- Log off the computer. Log on the computer as Student01.
- Navigate to the folder C:\Students. Create a folder named Student01 and create a text document in the folder. Were you successful? Explain.
____________________________________________________________________________________
____________________________________________________________________________________
Yes. As a user in the group ITEStudent, Student01 has full control in this folder. - Navigate to the folder C:\Staff. Create a folder named Student01 and place a text file in the folder. Were you successful? Explain.
____________________________________________________________________________________
____________________________________________________________________________________
No. As a user in the group ITEStudent, Student01 has no permission to access this folder. A user with administrative privilege needs to grant you access to this folder. - Now log off the computer and log on as Student02.
- Navigate to C:\. Can you place a text file in the Staff folder? Can you modify the text file in folder Student01? Explain.
____________________________________________________________________________________
____________________________________________________________________________________
No and Yes. As a user in the group ITEStudent, Student02 has no access to the Staff folder, but he has full control in Student folder, including files and folders created by other group members. - Create a new folder named Student02 in the folder C:\Students and create a text document in the folder.
- To prevent the user Student01 and other ITEStudent group members from modifying this folder and its content, right-click the folder Student02 and select Properties.
- In the Security tab, click Edit.
- Add the user Student02 with Full control permission to this folder. Select Full Control under the Allow column.

- Select the group ITEStudent. Select the Modify checkbox under the Deny column to prevent other ITEStudent group members from modifying this folder and its content. Click OK. Click Yes in the Windows Security window when prompted. Click OK to close the Properties window.
- Log off the computer and log on as Student01.
- Navigate to the folder C:\Students. Are you able to access the content in the Student01 and Student02 folders? Explain.
____________________________________________________________________________________
____________________________________________________________________________________
Yes and No. As a user in the group ITEStudent, Student01 still has access to Student01 folder, but there is no access to Student02 folder. - Log off the computer and log on as Staff01.
- Navigate to the folder C:\. Were you able to access the content in the folders Staff, Student\Student01 and Student\Student02? Explain.
____________________________________________________________________________________
____________________________________________________________________________________
Yes. As a user in the group ITEStaff, Staff01 has all the content in C:\Staff and C:\Student. The group permission did not deny write access to the student folders.


Step 2: Disable a user account.
At this time, the user account Staff02 is not used. In this step, you will disable this account.
- Log off the computer and log on as ITEUser or an account with administrative privileges.
- Navigate to the Local Users and Groups Manager.
- Select the Users folder. Double-click Staff02.
- Check Account is disabled.
- Click OK to continue.
- Log off the computer. Can you log on as Staff02? Explain.
____________________________________________________________________________________
____________________________________________________________________________________
No. Because the account has been disabled, Staff02 is not listed and you are unable to log on as Staff02.

Step 3: Clean up.
In this step, you will delete the users, groups, files, and folders created in this lab.
- Log on using an account with administrative privileges.
- Navigate to C:\ and delete the folders Staff and Student.
- Navigate to the Local Users and Groups Manager.
- Select Users.
- Right-click Staff01 and select Delete. Click Yes to confirm the user deletion. Repeat this for Staff02, Student01, and Student02.
- Select Groups.
- Right-click ITEStaff and select Delete. Click Yes to confirm the group deletion. Repeat this for ITEStudent.

Reflection
How would you give administrative privileges on the local computer to all the members of ITEStaff?
The members of the group ITEStaff inherits local administrative privileges when it is added to the built-in group Administrator. To change group permission, navigate to Control Panel > Administrative Tools > Computer Management > Local Users and Groups > right-click Add to Group. Click Add to add ITEStaff to the group Administrator.
How would you deny access to a file for everyone, except the owner?
In the file properties window, give full control to the owner and explicitly deny all access to other groups and users.


