- Using Mandatory (Read-Only) User Profiles in Windows 10
- Types of Mandatory User Profiles in Windows
- How to Create a Mandatory User Profile in Windows 10
- How to Assign a Mandatory Profile to Users
- Create mandatory user profiles
- Profile extension for each Windows version
- Mandatory user profile
- How to create a default user profile
- How to make the user profile mandatory
- Apply a mandatory user profile to users
- How to apply a mandatory user profile to users
- Apply policies to improve sign-in time
Using Mandatory (Read-Only) User Profiles in Windows 10
A mandatory user profile is a special pre-configured type of roaming user profile than can be changed only by administrators. Users who have been assigned a mandatory profile can work in Windows as usual during the login session, but no changes are saved to the profile after user logoff. At the next logon, the mandatory profile is loaded unchanged.
A directory with the mandatory profile can be located on the network shared folder and assigned to multiple domain users at once: for example, to terminal server (RDS) users, information kiosks, or users who don’t need a personal profile (schoolchildren, students, visitors). The administrator can configure folder redirection for mandatory profiles and users can keep personal files on the file servers (of course, it is recommended to enable disk quotas using the NTFS or the FSRM) in order to prevent users from storing unimportant files in the redirected folders).
Types of Mandatory User Profiles in Windows
There are two types of mandatory user profiles in Windows:
- A normal mandatory user profile – an administrator renames the file NTuser.dat (contains the user registry hive HKEY_CURRENT_USER) into NTuser.man. When using Ntuser.man, the system assumes that this profile is read-only and doesn’t save any changes to it. If the mandatory profile is stored on a remote server and the server becomes unavailable, users can logon using cached version of the mandatory profile;
- A super-mandatory user profile – when using this type of profile, the directory that contains the user profile is renamed, and the extension .man is added to the end of the folder name. Users with this profile type won’t be able to logon if the server, on which their profile is stored, is unavailable.
Some scenarios allow using mandatory profiles for local users as well, for example on public computers (kiosks, meeting rooms, etc.) instead of using an UWF filter. Any user can work in the same environment and no changes are saved when a user logs off.
Now we’ll show how to create a normal mandatory profile in Windows 10 and assign it to a user. In this example we’ll consider how to create a mandatory user profile on a local computer (the profile will be stored on the local drive), however, we’ll explain how to assign a mandatory user profile to domain accounts.
How to Create a Mandatory User Profile in Windows 10
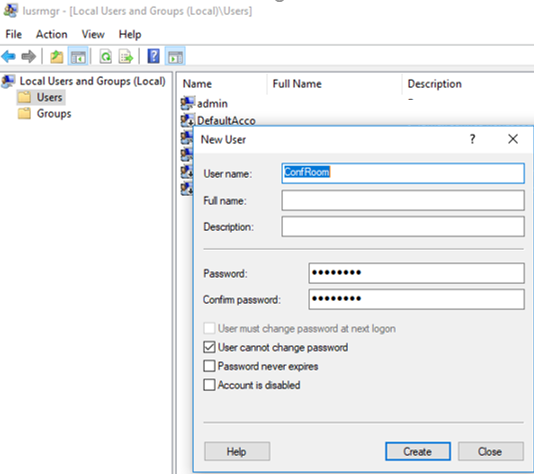
- Log on to a computer under the administrator account and start Local Users and Groups console (lusrmgr.msc);
- Create a new account, for example, ConfRoom;

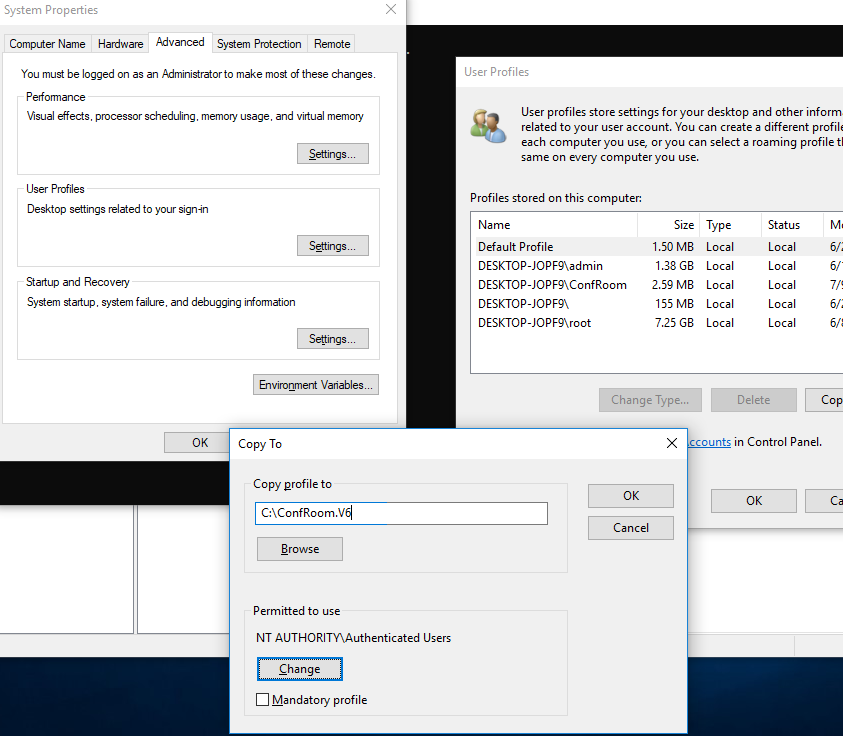
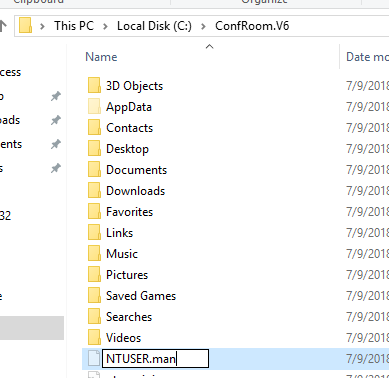
- Now you need to copy the default profile to a separate directory with a certain extension. Since we are using Windows 10 1703, this folder must have V6 suffix. For example, the name of the folder will be C:\ConfRoom.V6;
- Open the System Properties (SystemPropertiesAdvanced.exe);
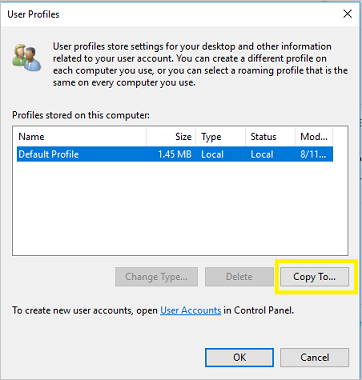
- In User Profiles section, click Settings;
- Select the Default Profile and click Copy To;
- Select C:\ConfRoom.V6 as a folder to copy the profile to (or you can copy the profile template to the network shared folder on the file server by specifying a UNC path, for example, \\lon-fs01\profiles\ConfRoom.V6).
- Select NT AUTHORITY\Authenticated Users in the permissions.
How to Assign a Mandatory Profile to Users
Now you can assign the mandatory profile to the user you want.
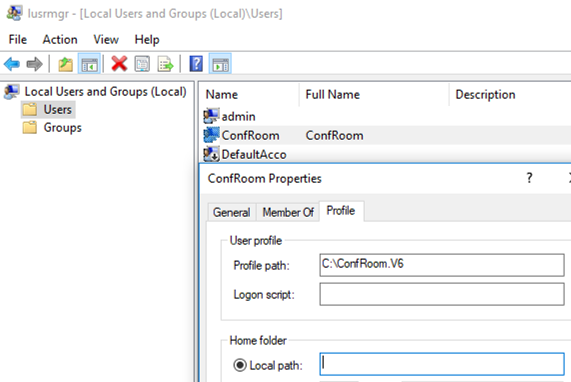
If you are using a local mandatory profile, go to Profile tab of the user properties and specify the path to the C:\ConfRoom.v6 directory in the Profile Path field.
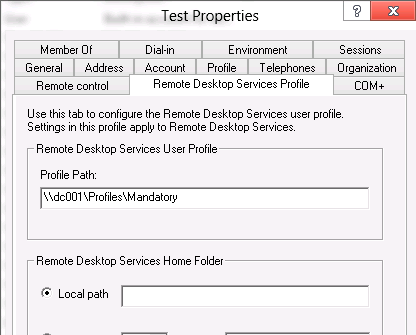
If you configure a roaming mandatory user profile in the AD domain, you need to specify the UNC path to the directory with the profile in the account properties in the ADUC console.
Then login to the system with the new user account and make all necessary settings (select the appearance, place the shortcuts, necessary files, configure the software, etc.).
Finish the user session and log on using the administrator account. Then rename NTUSER.dat into NTUSER.man in the the user profile folder.
Now try to logon to the system as a user with the mandatory profile and make sure that after you log off no changes are saved in the profile.
The User Profile Service service failed the sign-in. User profile cannot be loaded.
And the following event appears in the system log:
Windows could not load your roaming profile and is attempting to log you on with your local profile. Changes to the profile will not be copied to the server when you log off. Windows could not load your profile because a server copy of the profile folder already exists that does not have the correct security. Either the current user or the Administrators group must be the owner of the folder.
Make sure that the following permissions are assigned to the profile directory (with permissions inheritance to all child objects):
- ALL APPLICATION PACKAGES – Full Control (Start Menu does not work correct without it);
- Authenticated Users – Read and Execute;
- SYSTEM – Full Control;
- Administrators – Full Control.
The same permissions must be assigned to the user registry hive by loading ntuser.dat profile file using File -> Load Hive in regedit.exe.
When using roaming profiles, in order the Start menu to be displayed correctly on all devices, you need set the REG_DWORD key with the name SpecialRoamingOverrideAllowed and the value 1 in the HKLM\Software\Microsoft\Windows\CurrentVersion\Explorer\ section of the registry.
If you need to make changes to a mandatory profile, rename ntuser.man into ntuser.dat and configure the environment under the user account. Then rename the file again.
When using a mandatory profile on RDS servers, you can use the following Group Policies, in which you can specify the path to the profile directory and enable using mandatory profiles. The corresponding GPO section is: Computer Configuration -> Policies -> Administrative Templates -> Windows Components -> Remote Desktop Services -> Remote Desktop Session Host -> Profiles.
- Use mandatory profiles on the RD Session Host server = Enabled;
- Set path for Remote Desktop Services Roaming User Profile = Enabled + specify the UNC path.
Please, note that if you decided to use folder redirection together with the mandatory profile, it is not recommended to redirect AppData (Roaming) folder.
Create mandatory user profiles
Applies to
A mandatory user profile is a roaming user profile that has been pre-configured by an administrator to specify settings for users. Settings commonly defined in a mandatory profile include (but are not limited to): icons that appear on the desktop, desktop backgrounds, user preferences in Control Panel, printer selections, and more. Configuration changes made during a user’s session that are normally saved to a roaming user profile are not saved when a mandatory user profile is assigned.
Mandatory user profiles are useful when standardization is important, such as on a kiosk device or in educational settings. Only system administrators can make changes to mandatory user profiles.
When the server that stores the mandatory profile is unavailable, such as when the user is not connected to the corporate network, users with mandatory profiles can sign in with the locally cached copy of the mandatory profile, if one exists. Otherwise, the user will be signed in with a temporary profile.
User profiles become mandatory profiles when the administrator renames the NTuser.dat file (the registry hive) of each user’s profile in the file system of the profile server from NTuser.dat to NTuser.man . The .man extension causes the user profile to be a read-only profile.
Profile extension for each Windows version
The name of the folder in which you store the mandatory profile must use the correct extension for the operating system it will be applied to. The following table lists the correct extension for each operating system version.
| Client operating system version | Server operating system version | Profile extension |
|---|---|---|
| Windows XP | Windows Server 2003 Windows Server 2003 R2 | none |
| Windows Vista Windows 7 | Windows Server 2008 Windows Server 2008 R2 | v2 |
| Windows 8 | Windows Server 2012 | v3 |
| Windows 8.1 | Windows Server 2012 R2 | v4 |
| Windows 10, versions 1507 and 1511 | N/A | v5 |
| Windows 10, versions 1607, 1703, 1709, 1803, 1809, 1903 and 1909 | Windows Server 2016 and Windows Server 2019 | v6 |
Mandatory user profile
First, you create a default user profile with the customizations that you want, run Sysprep with CopyProfile set to True in the answer file, copy the customized default user profile to a network share, and then you rename the profile to make it mandatory.
How to create a default user profile
Sign in to a computer running Windows 10 as a member of the local Administrator group. Do not use a domain account.
Use a lab or extra computer running a clean installation of Windows 10 to create a default user profile. Do not use a computer that is required for business (that is, a production computer). This process removes all domain accounts from the computer, including user profile folders.
Configure the computer settings that you want to include in the user profile. For example, you can configure settings for the desktop background, uninstall default apps, install line-of-business apps, and so on.
Unlike previous versions of Windows, you cannot apply a Start and taskbar layout using a mandatory profile. For alternative methods for customizing the Start menu and taskbar, see Related topics.
Create an answer file (Unattend.xml) that sets the CopyProfile parameter to True. The CopyProfile parameter causes Sysprep to copy the currently signed-on user’s profile folder to the default user profile. You can use Windows System Image Manager, which is part of the Windows Assessment and Deployment Kit (ADK) to create the Unattend.xml file.
Uninstall any application you do not need or want from the PC. For examples on how to uninstall Windows 10 Application see Remove-AppxProvisionedPackage. For a list of uninstallable applications, see Understand the different apps included in Windows 10.
It is highly recommended to uninstall unwanted or unneeded apps as it will speed up user sign-in times.
At a command prompt, type the following command and press ENTER.
(Sysprep.exe is located at: C:\Windows\System32\sysprep. By default, Sysprep looks for unattend.xml in this same folder.)
If you receive an error message that says «Sysprep was not able to validate your Windows installation», open %WINDIR%\System32\Sysprep\Panther\setupact.log and look for an entry like the following:

Use the Remove-AppxProvisionedPackage and Remove-AppxPackage -AllUsers cmdlet in Windows PowerShell to uninstall the app that is listed in the log.
The sysprep process reboots the PC and starts at the first-run experience screen. Complete the set up, and then sign in to the computer using an account that has local administrator privileges.
Right-click Start, go to Control Panel (view by large or small icons) > System > Advanced system settings, and click Settings in the User Profiles section.
In User Profiles, click Default Profile, and then click Copy To.
In Copy To, under Permitted to use, click Change.

In Select User or Group, in the Enter the object name to select field, type everyone , click Check Names, and then click OK.
In Copy To, in the Copy profile to field, enter the path and folder name where you want to store the mandatory profile. The folder name must use the correct extension for the operating system version. For example, the folder name must end with «.v6» to identify it as a user profile folder for Windows 10, version 1607.
- If the device is joined to the domain and you are signed in with an account that has permissions to write to a shared folder on the network, you can enter the shared folder path.

- If the device is not joined to the domain, you can save the profile locally and then copy it to the shared folder location.
Click OK to copy the default user profile.
How to make the user profile mandatory
In File Explorer, open the folder where you stored the copy of the profile.
If the folder is not displayed, click View > Options > Change folder and search options. On the View tab, select Show hidden files and folders, clear Hide protected operating system files, click Yes to confirm that you want to show operating system files, and then click OK to save your changes.
Rename Ntuser.dat to Ntuser.man .
Apply a mandatory user profile to users
In a domain, you modify properties for the user account to point to the mandatory profile in a shared folder residing on the server.
How to apply a mandatory user profile to users
Open Active Directory Users and Computers (dsa.msc).
Navigate to the user account that you will assign the mandatory profile to.
Right-click the user name and open Properties.
On the Profile tab, in the Profile path field, enter the path to the shared folder without the extension. For example, if the folder name is \\server\profile.v6, you would enter \\server\profile.
Click OK.
It may take some time for this change to replicate to all domain controllers.
Apply policies to improve sign-in time
When a user is configured with a mandatory profile, Windows 10 starts as though it was the first sign-in each time the user signs in. To improve sign-in performance for users with mandatory user profiles, apply the Group Policy settings shown in the following table. (The table shows which operating system versions each policy setting can apply to.)
| Group Policy setting | Windows 10 | Windows Server 2016 | Windows 8.1 | Windows Server 2012 |
|---|---|---|---|---|
| Computer Configuration > Administrative Templates > System > Logon > Show first sign-in animation = Disabled |  | | | |
| Computer Configuration > Administrative Templates > Windows Components > Search > Allow Cortana = Disabled | | |  | |
| Computer Configuration > Administrative Templates > Windows Components > Cloud Content > Turn off Microsoft consumer experience = Enabled | | | | |
The Group Policy settings above can be applied in Windows 10 Professional edition.


