- Networking
- Содержание
- NetworkManager
- Use resolvconf
- /etc/resolvconf.conf
- dhcpcd and resolv.conf.head/tail
- Using a GUI Tool
- Using systemd
- Networking
- Содержание
- NetworkManager
- Use resolvconf
- /etc/resolvconf.conf
- dhcpcd and resolv.conf.head/tail
- Using a GUI Tool
- Using systemd
- Network Configuration in Manjaro
- Setting Up Network Interface
- Getting Started
- Static IP Setting via GUI
- Static IP Address Aliases
- Static IP Setting via CLI
- Setting Up Firewall with UFW in Manjaro
- Setting ufw Default Policies
- Enable SSH Connections for Manjaro Server
- UFW Configuration for IPv6
- Other Connections
- Conclusion
- About the author
- Usama Azad
Networking
Содержание
Networking on Manjaro generally works out of the box without any special user intervention. This article presents some specialized circumstances which some users may encounter and provides advice on how to overcome them.
Usually, your DNS servers will be provided by your ISP automatically through DHCP. However, sometimes it nesecary to use different DNS servers than the ones provided by your ISP. In this situation you may find that your DNS or other non-standard nameserver addresses will get reset on reboot as /etc/resolv.conf can be overwritten by NetworkManager or during the boot process. Here we will look at some techniques to preserve your settings.
NetworkManager
If you are using NetworkManager, this is one solution to the problem. The NetworkManager’s config drop folder is placed in /etc/NetworkManager/conf.d . In this folder you can place snippets which controls how NetworkManager works. The files should be named with a number and a description of its purpose and always end with .conf . The files are then applied in numerical order from the lowest to the highest. A configuration in a file with a higher number will override what could have been configured in a lower numbered file.
Use resolvconf
To have the resolvconf script handle the resolv.conf file for NetworkManager. Create a configuration file in NetworkManager’s config drop folder
Save the file with this content
To effectively make DNS handling a manual task create a file named
Save the file with this content
/etc/resolvconf.conf
The resolvconf.conf file is a shell script that is sourced by resolvconf, meaning that resolvconf.conf must contain valid shell commands. Take a look at its man page for more details and commands. The file is located at /etc/resolvconf.conf and will require root privelege to edit. For more information on how to edit a configuration file owned by root, please review this article.
As an example, we will prepend OpenDNS nameservers to the top of our resolvconf file whenever called. We can achieve this by adding the following lines to the bottom of resolvconf.conf.
After making any changes simply update and apply your settings with the following command
dhcpcd and resolv.conf.head/tail
An alternative solution if you are using dhcpd is to input our settings to the /etc/resolv.conf.head file. If this file does not exist then create it. The contents of /etc/resolv.conf.head get sent to the top of /etc/resolv.conf during the boot process.
Following our previous example, if we want to use the OpenDNS servers with this method, we could place the following in the file:
Using a GUI Tool
Most editions of Manjaro come with some type a GUI tool or applet to manage NetworkManager. This is the easiest way to set a static IP. Simply go into the tool, usually in the system tray or menu, and input the required parameters for your network.
Using systemd
If you don’t want to use NetworkManager the next easiest thing is to configure a static IP in systemd.
First, make sure you aren’t running NetworkManager
Next you will need to find the name of your network device. To locate the name, use the command ip a as seen here:
lo is the loopback device which can be ignored for the purposes of this article. The device we need here is identified above as ens33 . We will need this name in the next step.
Now create or edit a file to hold the network configuration at /etc/systemd/network/devicename.network . Using the example above, the file would be called /etc/systemd/network/ens33.network . This file will need to be created/edited as root. For more information on how to do that please review this article. An example of the contents of the file would look like this:
All that remains is to start and enable the service using:
NetworkManager is the default solution for networking on most Manjaro editions. If you would prefer to use dhcpcd, that is also supported.
First, ensure NetworkManager is disabled and not running
Next, start and enable the dhcpcd service
Источник
Network Configuration in Manjaro
As the Manjaro kernel boots up the machine, its Network Manager automatically connects to the DHCP server via the enabled network interface. It then provides the client with the IP address, subnet mask, lease time, DNS server, gateway, and other details.
If the machine works as an Apache server, it must be easily accessible to the clients via a static IP address. Besides, as a precaution, users also have to protect the machine from unnecessary access from outside the network. This demands the need to set the network interfaces manually via Manjaro Network Manager or through commands and configuration files.
In this article, we learn to configure the network interface via GUI and CLI manually. We also simplify the Unrestricted Firewall (ufw) configuration process for new users as a precautionary step after Manjaro installation.
Setting Up Network Interface
Manual network interface setting includes assigning the machine with an IP address, gateway, DNS server locations, routes, and subnet mask. It is done via Manjaro NewtrokManager and CLI.
Getting Started
Before getting started with the manual network configuration, the system needs to meet certain conditions:
- enabled network interfaces
- the ethernet cable is connected
- the interface has an IP address
- the routing table is all set
- the device can reach the system inside or outside the local network
- the hostname-to-address resolution works fine
Static IP Setting via GUI
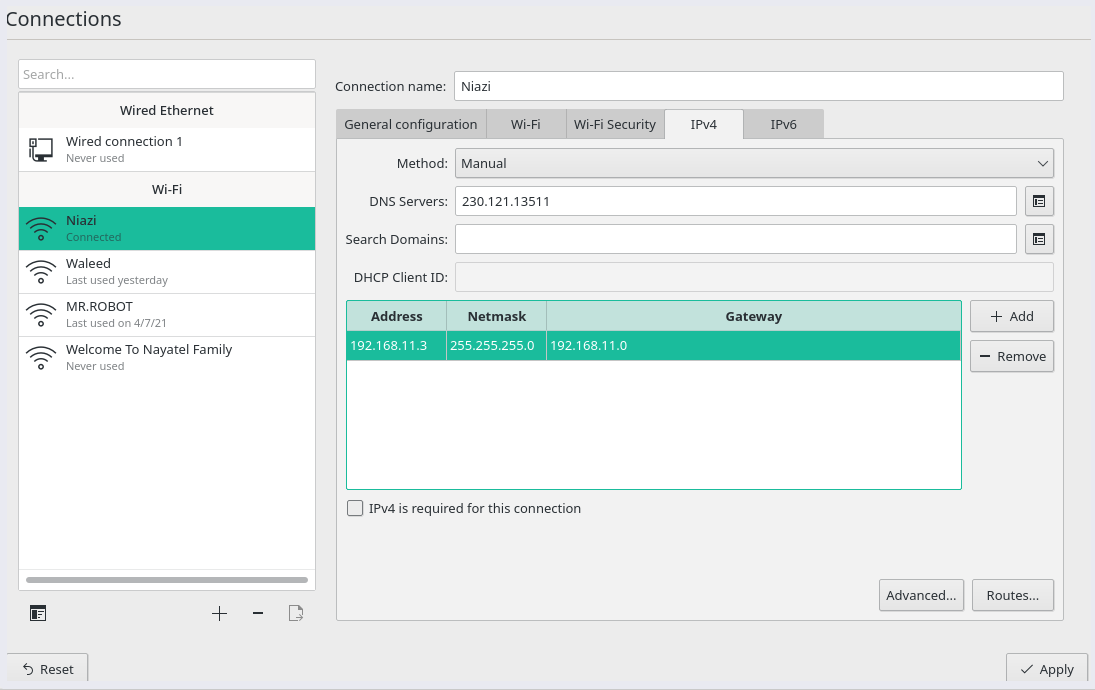
Search for the “Connections” inside the Manjaro application launcher. Inside the network connection menu, select the current network settings to edit/configure the connection.
Select the current connection and choose the IPv4 settings tab.
Select ‘Manual‘ from the ‘Method‘ drop-down menu for Static IP, and click on ‘Add‘ to fill in the address, subnet mask, gateway, and DNS server details. Lastly, click on ‘Apply‘ to restart the network with new settings.
Static IP Address Aliases
The GUI also allows to set up a number of addresses for a single interface. It’s possible by clicking on a ‘+’ sign or ‘Add’ button on the same screen to add a new IP address. Here are few details about address aliases:
- Each alias address requires a netmask but not gateway details.
- The save option greyed out without valid information.
- It does not need to be on the same netmask, even though it listens to traffic on the same physical network.
Use the following command to display the working interface with the two Ip addresses.
Static IP Setting via CLI
Another way to configure Static IP is via systemd. For Manjaro network interfaces, custom routes are configured inside /etc/systemd/network/ directory. The configuration files for each interface are identified based on the interface name. Hence, the file for network interface enp0s3 will be /etc/systemd/network/enp0s3.network.
Make sure to disable the NetworkManager, as it overwrites the manual settings.
$ sudo systemctl disable —now NetworkManager.service
Create or edit the above network interface file with root privileges. Here’s an example file:
$ sudo vim / etc / systemd / network / enp0s3.network
Address =192.168.11.0 / 24
Now enable and start the network service.
$ sudo systemctl enable —now systemd-networkd.service
To revert to the DHCP settings, delete the above file and restart the NetworkManager.
Setting Up Firewall with UFW in Manjaro
A functioning firewall is a critical part of any secure Linux system. By default, all Linux distributions come with an installed firewall configuration tool known as Uncomplicated Firewall (ufw). UFW is an interface for iptables and is designed to simplify the firewall configuration task.
According to the ufw man page, the tool does not provide full-fledged firewall functionality via CLI. Instead, it’s to ease the process of addition or removal of simple rules. Also, ufw aims to provide host-based firewalls.
To get started with securing the network, install ufw if not available:
$ sudo pacman -Syu ufw
Setting ufw Default Policies
Since we are getting started with the ufw configuration. By default, ufw is disabled. Check ufw status by typing the following command:
$ sudo service ufw status
Execute the following command to enable ufw settings.
$ sudo ufw enable
Enabling ufw will initiate the firewall default policy. That is, ufw only permits outgoing connections and denies all the incoming connections. In other words, the Manjaro server is not accessible from outside the network. While user applications can connect to the outside world.
If disabled, we can set the rules to execute ufw default policies.
$ sudo ufw default deny incoming
$ sudo ufw default allow outgoing
To enable the default policies, edit the /etc/default/ufw file. Note that the firewall settings will automatically initiate whenever the system reboots. These rules are sufficient to protect a personal Manjaro OS. However, a Manjaro server must respond to incoming requests.
Enable SSH Connections for Manjaro Server
The above setting denies all incoming connections. To allow legitimate SSH or HTTP connection to the Manjaro server requires creating rules in ufw. This setting will enable the user to connect and manage the server via a secure shell connection.
$ sudo ufw allow ssh
The above command is equivalent to setting a rule for a connection via an ssh port 22. Hence, UFW is aware of the ports utilized by the application protocols due to the services listed in the /etc/services file.
However, we need to specify an appropriate port if the SSH daemon listens to a different port. For instance, if the server listens on port 3333, use the following command to set the ufw rule:
$ sudo ufw allow 3333
UFW Configuration for IPv6
UFW supports IPv6 settings to manage firewall rules along with IPv4. To do that, edit the ufw configuration file in the /etc/default directory and following settings:
Now ufw is configured to add and manage policies for both IPv4 and IPv6.
Other Connections
ufw allows users to manage various subnet rules, specific IP addresses, port ranges, and network interfaces.
To specify port ranges:
$ sudo ufw allow 3000 : 4444 / tcp
To specify subnet with a specific destination port:
$ ufw allow from 192.168.100.0 / 24 to any port 81
To set rule for specific IP address
$ sudo ufw allow from 192.168.100.14
Additionally, it also allows creating rules to deny connections from IP addresses and services. All it requires is to replace allow with the deny command.
$ sudo ufw deny from 192.168.100.14
Conclusion
This article summarizes Manjaro’s manual network interface and firewall configuration settings for beginners. We discussed setting a static IP address via GUI and commands/configuration files. Moreover, the article also demonstrates setting the default Unrestricted Firewall (ufw) to allow limited access to the machine from users across the internet.
About the author

Usama Azad
A security enthusiast who loves Terminal and Open Source. My area of expertise is Python, Linux (Debian), Bash, Penetration testing, and Firewalls. I’m born and raised in Wazirabad, Pakistan and currently doing Undergraduation from National University of Science and Technology (NUST). On Twitter i go by @UsamaAzad14
Источник


