- Printing
- Содержание
- Managing Printers with HP Device Manager
- Managing Printers with CUPS
- CUPS Webpage Interface
- CUPS Desktop Interface Part 1: The Automatic Method
- CUPS Desktop Interface Part 2: The Manual Method
- Modifying an Installed Printer
- Printing
- Содержание
- Managing Printers with HP Device Manager
- Managing Printers with CUPS
- CUPS Webpage Interface
- CUPS Desktop Interface Part 1: The Automatic Method
- CUPS Desktop Interface Part 2: The Manual Method
- Modifying an Installed Printer
- Manjaro linux установка принтера hp
- Установка принтера panasonic kx-mb1500 на linux manjaro kde
- Не могу установить hplip-plugin
- [НЕАКТУАЛЬНО] Небольшой косяк с принтерами.
- Расскажите как подключать принтер?
- Не устанавливается принтер Xerox WorkCentre 3025
- Установка принтера HP LaserJet
- Manjaro (ArchLinux) сетевой принтер Linux-Linux
Printing
Содержание
Printing is undertaken through the use of CUPS (previously an acronym for Common Unix Printing System). This is a popular open source printing system used in most Linux distributions due to its ease of use.
First, install the manjaro-printer package using your favorite package manager or by using the command:
Note that you may need to add yourself to the sys group. To do this, us the command:
Once the necessary software has been installed, to start and enable printing capabilities, enter the following commands:
At this point you should be ready to configure a printer
Managing Printers with HP Device Manager
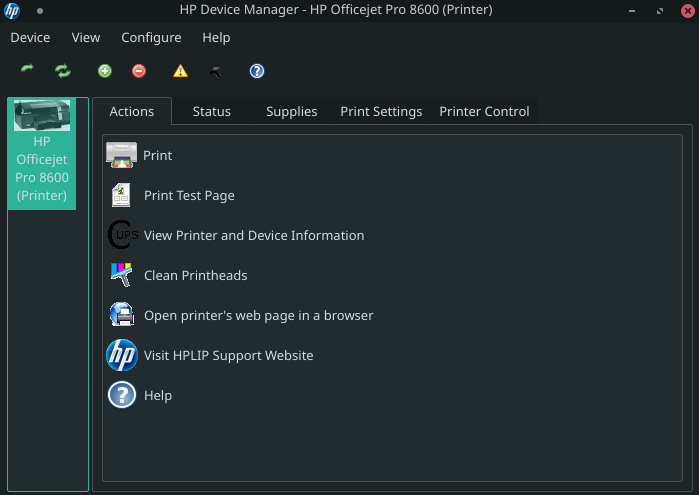
If have a printer made by HP, the easiest way to manage it is with the HP Device Manager( hp-toolbox ). It is wizard based and handles automatic detection and setup of your printer locally or across a network.
You can run it by selecting HP Device Manager from the menu or with the command hp-toolbox .
Managing Printers with CUPS
Another way to add a printer is to use CUPS directly. Assuming CUPS has been enabled (and started), upon connecting a printer, it should be automatically detected and configured for you to use. The process itself should take only about a minute. However, if the automatic detection and configuration doesn’t seem to work, then your printer can be manually set up with relative ease. There are two methods to do so:
- Webpage Interface: CUPS provides an webpage interface that will open in your default web browser to configure your printer. This interface also provides access to further information about CUPS, as well as on-line help.
- Desktop Interface: A standard desktop wizard is also available, which should be instantly familiar to those who have configured a printer before, whether using Linux or another operating system such as windows. Note that you may need to install the system-config-printer package using your favorite package manager or by using the command:
CUPS Webpage Interface
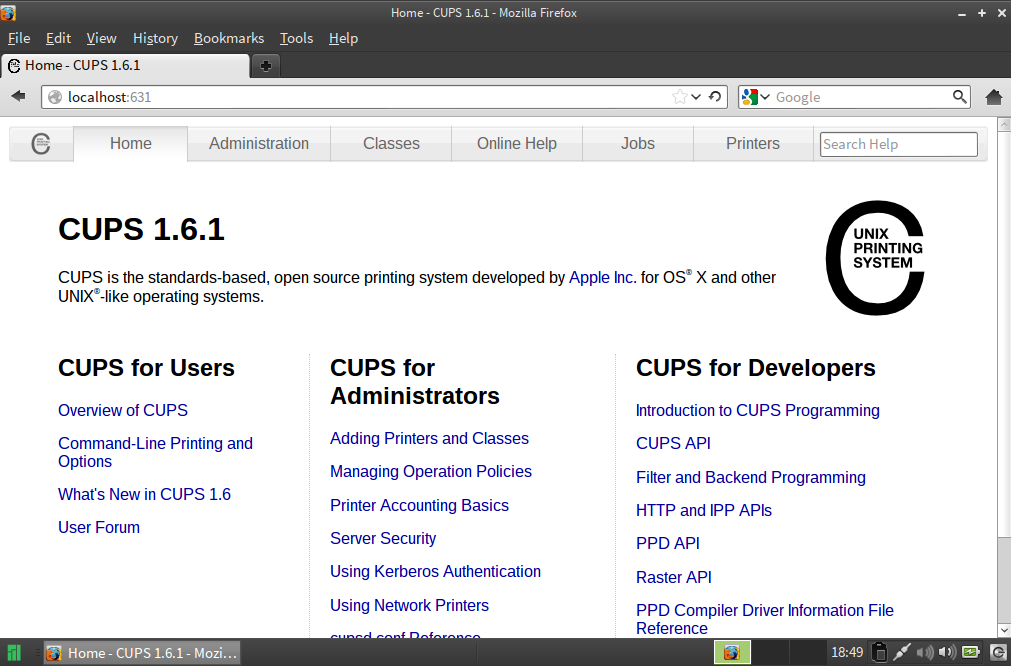
To access the webpage interface, select Manage Printing from your desktop menu. The interface will automatically open in your default web browser. Alternatively, you can also open your choice of web browser, and enter the following into the address bar:
CUPS Desktop Interface Part 1: The Automatic Method

1. Add your printer. Ensuring that your printer is properly connected and switched on, select Print Settings from your desktop menu. Once the Print Settings window has opened, click + add to add a new printer.
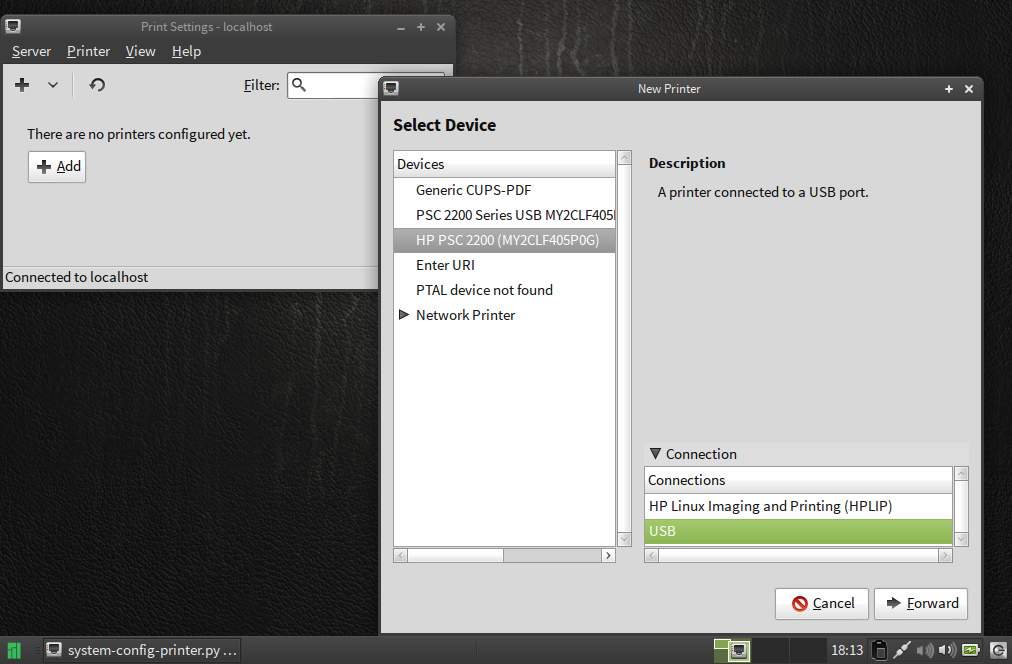
2. Select your printer name. Once the New Printer window has opened, under the Select Device heading, find the name of your printer and click to highlight it. If your printer is listed more than once, check the description on the right to ensure your selection is not for another function, such as scanning or faxing.
3. Select your printer connection. Under the Connection heading, click to highlight your printer’s connection method. As illustrated, this will usually always be ‘USB’.
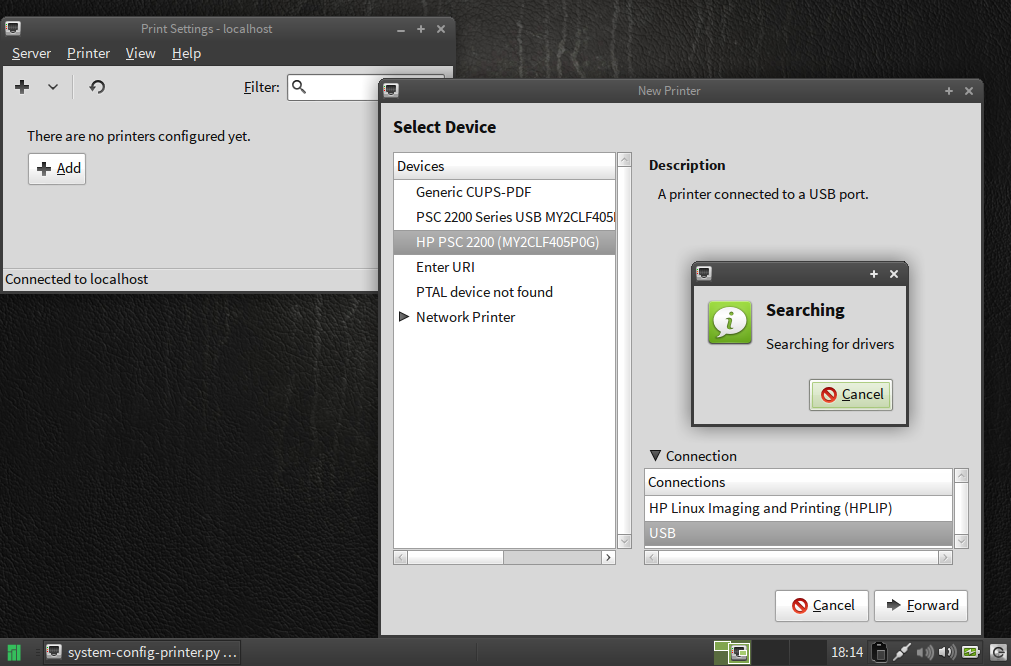
4. Install your printer driver. Once your printer name and connection have been highlighted, click the Forward button and CUPS will automatically search for the available drivers for it. In most instances, once the appropriate driver has been found it will be automatically installed, and the set-up process will have completed.
Otherwise, if the process did not succeed, it will be necessary to click the forward button again in order chose the appropriate driver yourself.
CUPS Desktop Interface Part 2: The Manual Method
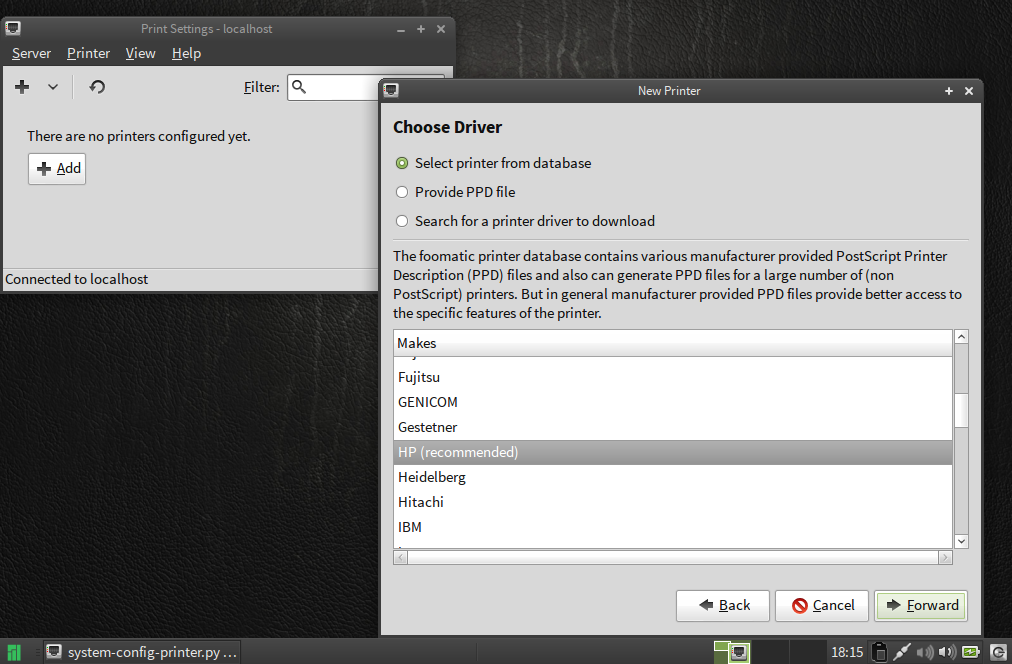
1. Select your printer make. If the Automatic method did not automatically find and install an appropriate driver for your printer, then clicking the forward button again will present the Chose Driver window. The first step is to select the make of your printer. As illustrated, as an HP printer is to be installed, the recommended choice of HP has been highlighted by clicking on it.
Once your make of printer has been highlighted, click the forward button to proceed to the next step.
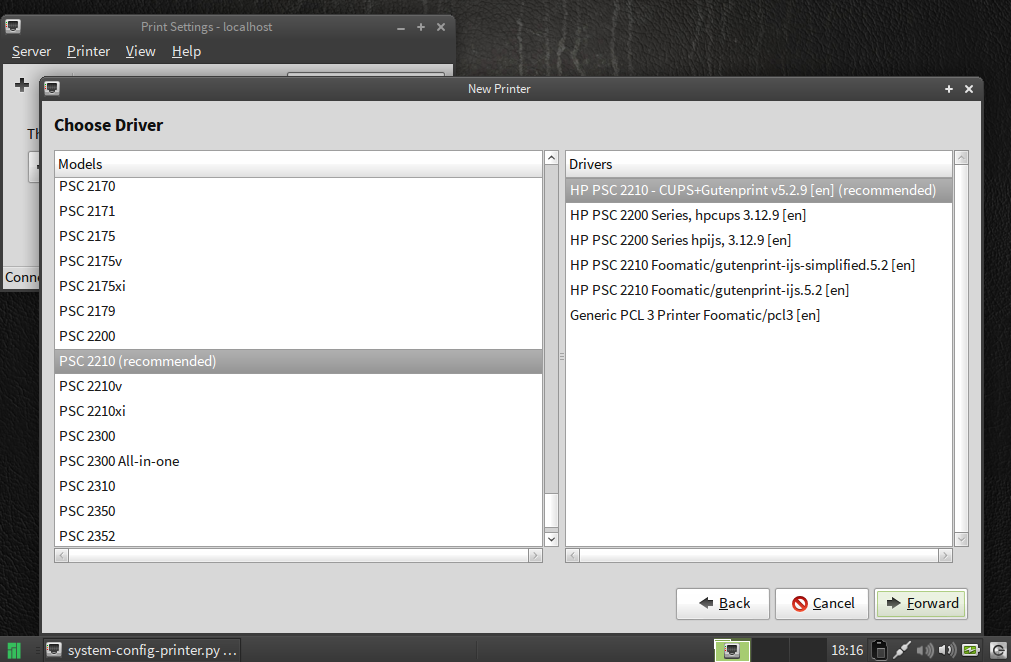
2. Select your printer model. Under the left-heading models, select the specific model of your printer. As illustrated, as the printer model to be installed in this instance is a Model 2210, the recommended choice of PSC 2210 has been highlighted by clicking on it.
3. Select your printer driver. At last! Under the right-heading Drivers, select the appropriate driver for your printer. As illustrated, the recommended printer driver has been clicked to highlight it. It is advised that you also select whatever driver is recommended for you.
Once your printer model and driver have been highlighted, click the forward button to proceed to the next step.
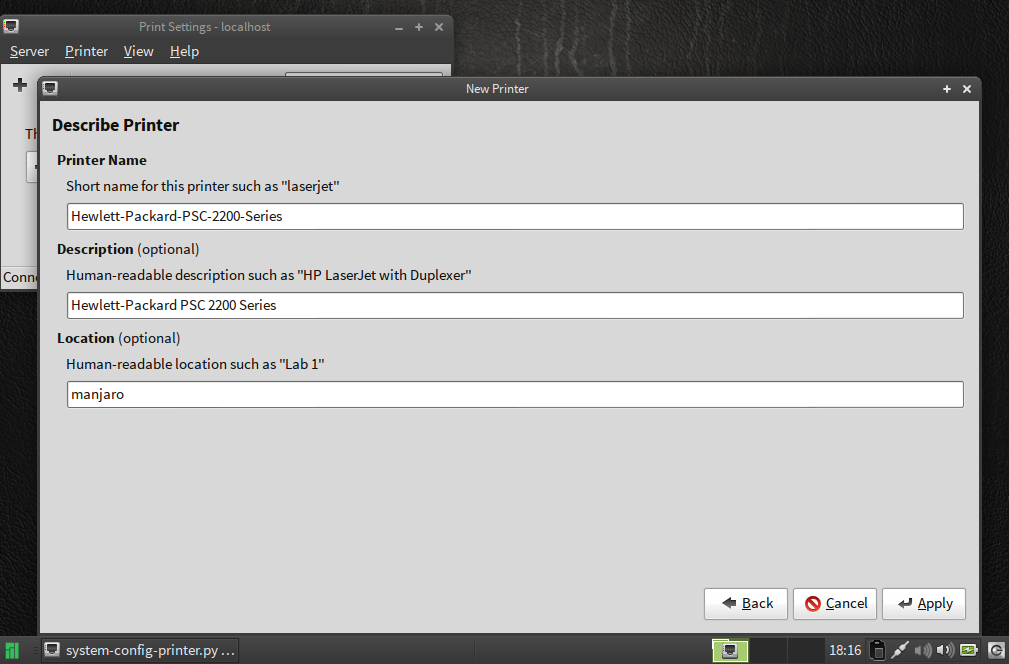
4. Choose your printer name, description (optional), and location (optional). Unless you want to change something, it will not be necessary to make any amendments here.
If you are happy with the information provided — or have made the desired changes — click the Apply button to complete the process.
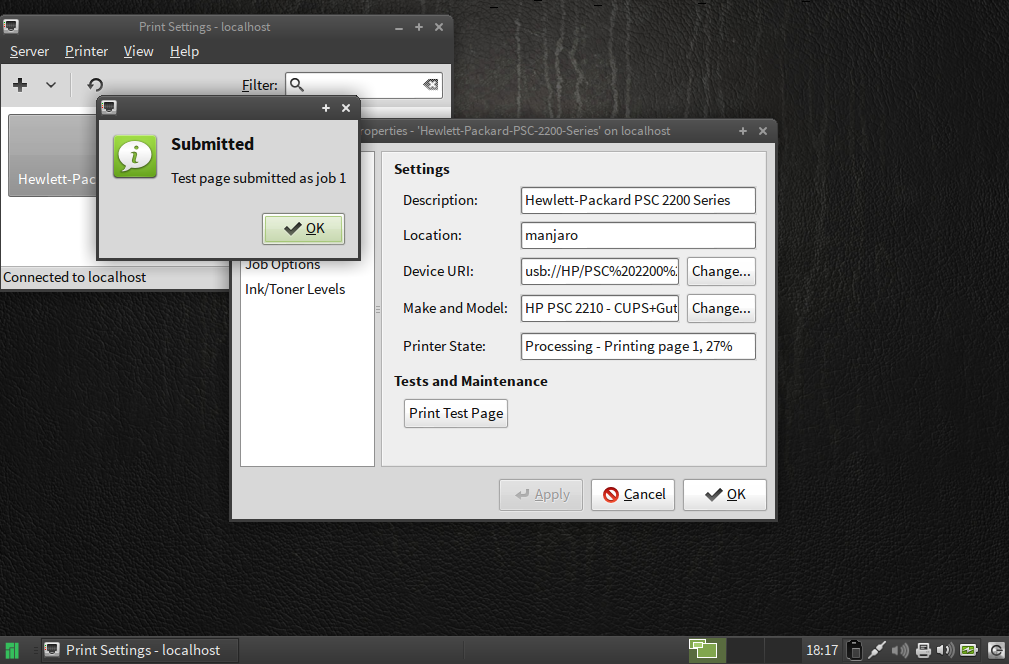
5. Configure your printer. Having clicked the Apply button in the previous step, your printer’s properties will be displayed. By selecting the categories on the right-hand side, you can view information and amend your printer’s settings if you wish. The standard settings will be fine for most people, so unless you have something specific in mind, there will be nothing you need to do.
6. Test your printer. Although optional, this step is highly recommended! Click the Print Test Page button to ensure that your printer is set up and working properly.
That’s it! Now click the OK button to close the window and start using your printer.
Modifying an Installed Printer
To configure an installed printer at any time:
1. select the Print Settings option from your desktop menu, and
2. double-click the printer’s icon.
The configuration window will appear. Select any of the categories on the left-hand side of the window to view the appropriate information and make any desired changes. Once complete, click the Apply and then OK buttons to confirm and save your changes, or click the Cancel button to close the window without making any changes.
Источник
Printing
Содержание
Printing is undertaken through the use of CUPS (previously an acronym for Common Unix Printing System). This is a popular open source printing system used in most Linux distributions due to its ease of use.
First, install the manjaro-printer package using your favorite package manager or by using the command:
Note that you may need to add yourself to the sys group. To do this, us the command:
Once the necessary software has been installed, to start and enable printing capabilities, enter the following commands:
At this point you should be ready to configure a printer
Managing Printers with HP Device Manager
If have a printer made by HP, the easiest way to manage it is with the HP Device Manager( hp-toolbox ). It is wizard based and handles automatic detection and setup of your printer locally or across a network.
You can run it by selecting HP Device Manager from the menu or with the command hp-toolbox .
Managing Printers with CUPS
Another way to add a printer is to use CUPS directly. Assuming CUPS has been enabled (and started), upon connecting a printer, it should be automatically detected and configured for you to use. The process itself should take only about a minute. However, if the automatic detection and configuration doesn’t seem to work, then your printer can be manually set up with relative ease. There are two methods to do so:
- Webpage Interface: CUPS provides an webpage interface that will open in your default web browser to configure your printer. This interface also provides access to further information about CUPS, as well as on-line help.
- Desktop Interface: A standard desktop wizard is also available, which should be instantly familiar to those who have configured a printer before, whether using Linux or another operating system such as windows. Note that you may need to install the system-config-printer package using your favorite package manager or by using the command:
CUPS Webpage Interface
To access the webpage interface, select Manage Printing from your desktop menu. The interface will automatically open in your default web browser. Alternatively, you can also open your choice of web browser, and enter the following into the address bar:
CUPS Desktop Interface Part 1: The Automatic Method
1. Add your printer. Ensuring that your printer is properly connected and switched on, select Print Settings from your desktop menu. Once the Print Settings window has opened, click + add to add a new printer.
2. Select your printer name. Once the New Printer window has opened, under the Select Device heading, find the name of your printer and click to highlight it. If your printer is listed more than once, check the description on the right to ensure your selection is not for another function, such as scanning or faxing.
3. Select your printer connection. Under the Connection heading, click to highlight your printer’s connection method. As illustrated, this will usually always be ‘USB’.
4. Install your printer driver. Once your printer name and connection have been highlighted, click the Forward button and CUPS will automatically search for the available drivers for it. In most instances, once the appropriate driver has been found it will be automatically installed, and the set-up process will have completed.
Otherwise, if the process did not succeed, it will be necessary to click the forward button again in order chose the appropriate driver yourself.
CUPS Desktop Interface Part 2: The Manual Method
1. Select your printer make. If the Automatic method did not automatically find and install an appropriate driver for your printer, then clicking the forward button again will present the Chose Driver window. The first step is to select the make of your printer. As illustrated, as an HP printer is to be installed, the recommended choice of HP has been highlighted by clicking on it.
Once your make of printer has been highlighted, click the forward button to proceed to the next step.
2. Select your printer model. Under the left-heading models, select the specific model of your printer. As illustrated, as the printer model to be installed in this instance is a Model 2210, the recommended choice of PSC 2210 has been highlighted by clicking on it.
3. Select your printer driver. At last! Under the right-heading Drivers, select the appropriate driver for your printer. As illustrated, the recommended printer driver has been clicked to highlight it. It is advised that you also select whatever driver is recommended for you.
Once your printer model and driver have been highlighted, click the forward button to proceed to the next step.
4. Choose your printer name, description (optional), and location (optional). Unless you want to change something, it will not be necessary to make any amendments here.
If you are happy with the information provided — or have made the desired changes — click the Apply button to complete the process.
5. Configure your printer. Having clicked the Apply button in the previous step, your printer’s properties will be displayed. By selecting the categories on the right-hand side, you can view information and amend your printer’s settings if you wish. The standard settings will be fine for most people, so unless you have something specific in mind, there will be nothing you need to do.
6. Test your printer. Although optional, this step is highly recommended! Click the Print Test Page button to ensure that your printer is set up and working properly.
That’s it! Now click the OK button to close the window and start using your printer.
Modifying an Installed Printer
To configure an installed printer at any time:
1. select the Print Settings option from your desktop menu, and
2. double-click the printer’s icon.
The configuration window will appear. Select any of the categories on the left-hand side of the window to view the appropriate information and make any desired changes. Once complete, click the Apply and then OK buttons to confirm and save your changes, or click the Cancel button to close the window without making any changes.
Источник
Manjaro linux установка принтера hp
Мой принтер (МФУ Kyocera FS-1025MFP), подключенный как сетевой, не устанавливался штатными средствами, модель не отображалась в поиске, драйверы от ближайших сородичей модели не подошли. Как решить:
0. Скачать у производителя пакет драйверов «Linux print driver»:
https://www.kyoceradocumentsolutions.ru/index/service_support/download_center.false.driver.fs1025mfp._.en.html
1. Извлечь из скачанного архива «LinuxDrv_1.1203_FS-1x2xMFP.zip»
в папке Linux/64bit/Global/russian.tar.gz/
файлы Kyocera_FS-1025MFPGDI.ppd и rastertokpsl
2. Скопировать второй файл командой
sudo cp rastertokpsl /usr/lib/cups/filter/rastertokpsl
3. Установить принтер через Параметры системы — Принтеры — Добавить принтер — FS-1025MFP (Kyocera FS-1025MFP) — Далее
Указать файл PPD: Kyocera_FS-1025MFPGDI.ppd (распакованный)
Как альтернативный вариант, можно воспользоваться скриптом из пакета с драйвером (не проверял) или написать собственный скипт (не умею).
У меня стоит:
OS: Manjaro 19.0.2 Kyria
DE: KDE 5.68.0 / Plasma 5.18.3
Установка принтера panasonic kx-mb1500 на linux manjaro kde
Не могу установить hplip-plugin
[НЕАКТУАЛЬНО] Небольшой косяк с принтерами.
Расскажите как подключать принтер?
Доброго времени суток. Я недавно сменил дистрибутив на manjaro (до этого стояло убунту), потому что arch мне кажется более интересным, а manjaro — производная от него. Немного умею лазать в терминале сильно не понимаю как все работает (Но очень хочу)
СОБСТВЕННО ПРОБЛЕМА:
Хочу подключить принтер pantum6500m через приложение не получается, нет драйверов. В убунте запускал deb пакет( или программу, не знаю как называется) и он сам его устанавливал. Как нужно поступать в manjaro?
Если что-то руками нужно писать то скиньте, пожалуйста хотя бы где про это читать. Потому что я для этого и устанавливал, чтоб разбираться.
Не устанавливается принтер Xerox WorkCentre 3025
Установка принтера HP LaserJet
Manjaro (ArchLinux) сетевой принтер Linux-Linux
Добрый день!
На ПК_1 установлена Manjaro, расшарен принтер Canon LBP 6018. На ПК_2 тоже установлена Manjaro, не могу с помощью настроек установить сетевой принтер который на ПК_1, не видит, хотя просто сетевые принтеры видит. При этом если запустить Manjaro Live т.е. с флешки без проблем обнаруживает все сетевые принтеры в том числе и на ПК_1.
P/S: Если установить LinuxMint, то вообще сразу автоматически устанавливает все сетевые принтеры в том числе и с ПК_1.
Как решить проблему на Manjaro c принтером и как можно сделать, чтобы тоже автоматом устанавливал сетевые принтера, очень удобно для офиса.
Бьюсь уже третий день! Все ни как. Avahi демон работает. Manjaro не видит сетевые принтеры которые подключены к ПК и именно после установки ОС Manjaro, с live все видить даже без настройки сети. Где копать? Что он может прописать или наоборот не прописать или незапустить после установки ОС? Прошу помощи.
Заметил еще один момент, после установки системы, если зайти в сеть, нету рабочей группы Samba, хотя она запущена, и нет сети Linux. В ZeroConf нет служб. Потом если в Octopi еще раз просто опять повторно установить, avahi, nss-dns, samba, cups, то уже отображается рабочая группа, но сети Linux нет, в Zeroconf появились службы протоколы IP4 и IP6 (Примечание настройка сети вручную — стат. IP c пропиской DNS и шлюза).
Источник


