- Диагностика ошибок MDM в Windows 10 Diagnose MDM failures in Windows 10
- Скачайте журнал диагностических сведений MDM с компьютеров Windows 10 Download the MDM Diagnostic Information log from Windows 10 PCs
- Используйте команду для сбора журналов непосредственно с компьютеров Windows 10 Use command to collect logs directly from Windows 10 PCs
- Понимание структуры кабины Understanding cab structure
- Сбор журналов непосредственно с компьютеров Windows 10 Collect logs directly from Windows 10 PCs
- Удаленный сбор журналов с компьютеров Windows 10 Collect logs remotely from Windows 10 PCs
- MDM enrollment of Windows 10-based devices
- Connect corporate-owned WindowsВ 10-based devices
- Connect your device to an Active Directory domain (join a domain)
- Out-of-box-experience
- Use the Settings app
- Help with connecting to an Active Directory domain
- Connect your device to an Azure AD domain (join Azure AD)
- Out-of-box-experience
- Use the Settings app
- Help with connecting to an Azure AD domain
- Connect personally owned devices
- Connect to a work or school account
- Use the Settings app
- Connect to MDM on a desktop (enrolling in device management)
- Use the Settings app
- Help with connecting personally owned devices
- Connect your Windows 10-based device to work using a deep link
- Connect to MDM using a deep link
- Manage connections
- Disconnect
- Collecting diagnostic logs
Диагностика ошибок MDM в Windows 10 Diagnose MDM failures in Windows 10
Чтобы диагностировать проблемы с регистрацией или управлением устройствами на устройствах с Windows 10, управляемых MDM-сервером, можно изучить журналы MDM, собранные с рабочего стола. To help diagnose enrollment or device management issues in Windows 10 devices managed by an MDM server, you can examine the MDM logs collected from the desktop. В следующих разделах описаны процедуры сбора журналов MDM. The following sections describe the procedures for collecting MDM logs.
Скачайте журнал диагностических сведений MDM с компьютеров Windows 10 Download the MDM Diagnostic Information log from Windows 10 PCs
На управляемом устройстве перейдите к работе илиучебному зачету > «Параметры > учетных записей». On your managed device go to Settings > Accounts > Access work or school.
Щелкните свою трудовую или школьную учетную запись, а затем щелкните Info. Click your work or school account, then click Info. 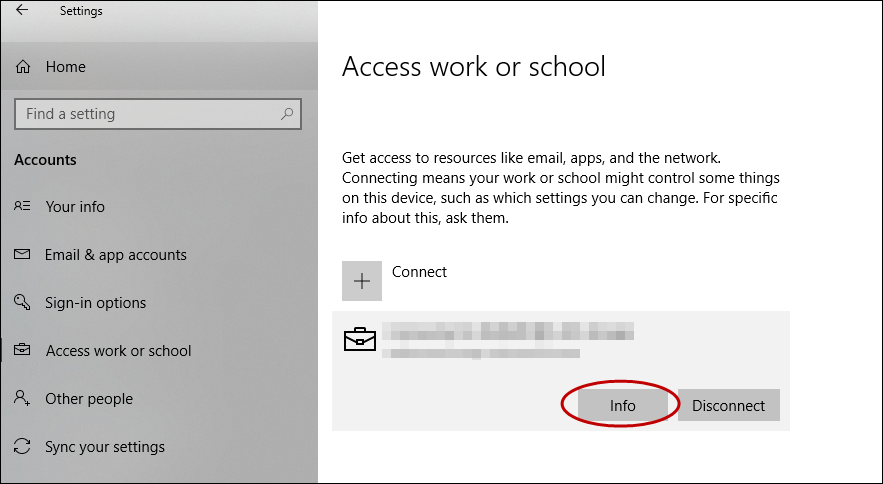
В нижней части страницы Параметры нажмите кнопку Создать отчет. At the bottom of the Settings page, click Create report. 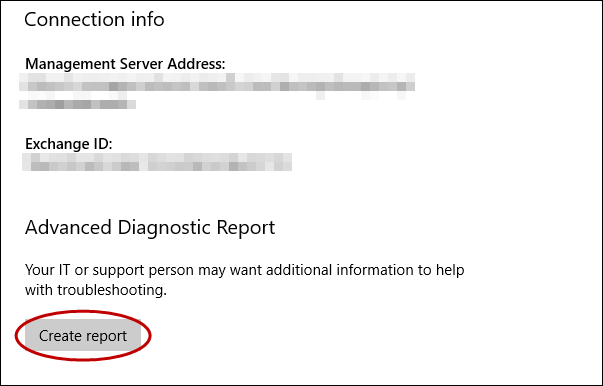
Открывается окно, которое отображает путь к файлам журнала. A window opens that shows the path to the log files. Нажмите Экспорт. Click Export.
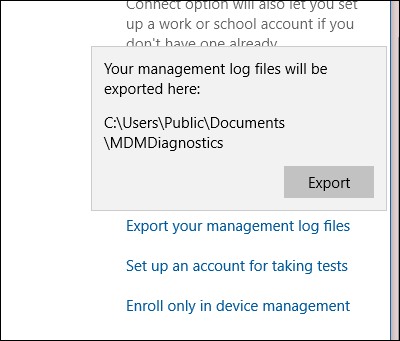
В Обозревателе файлов перейдите к c:\Users\Public\Documents\MDMDiagnostics, чтобы увидеть отчет. In File Explorer, navigate to c:\Users\Public\Documents\MDMDiagnostics to see the report.
Используйте команду для сбора журналов непосредственно с компьютеров Windows 10 Use command to collect logs directly from Windows 10 PCs
Вы также можете собирать журналы диагностических сведений MDM с помощью следующей команды: You can also collect the MDM Diagnostic Information logs using the following command:
- В Обозревателе файлов перейдите к c:\Users\Public\Documents\MDMDiagnostics, чтобы увидеть отчет. In File Explorer, navigate to c:\Users\Public\Documents\MDMDiagnostics to see the report.
Понимание структуры кабины Understanding cab structure
Файл кабины будет иметь журналы в соответствии с областями, которые были использованы в команде. The cab file will have logs according to the areas that were used in the command. Это объяснение основано на областях DeviceEnrollment, DeviceProvisioning и Autopilot. This explanation is based on DeviceEnrollment,DeviceProvisioning and Autopilot areas. Это относится к файлам кабин, собранным с помощью командной строки или концентратора отзывов It applies to the cab files collected via command line or Feedback Hub
- DiagnosticLogCSP_Collector_Autopilot_*: этлс автопилота DiagnosticLogCSP_Collector_Autopilot_*: Autopilot etls
- DiagnosticLogCSP_Collector_DeviceProvisioning_*: подготовка etls (Microsoft-Windows-Provisioning-Diagnostics-Provider) DiagnosticLogCSP_Collector_DeviceProvisioning_*: Provisioning etls (Microsoft-Windows-Provisioning-Diagnostics-Provider)
- MDMDiagHtmlReport.html. Сводный снимок конфигураций и политик пространства MDM. MDMDiagHtmlReport.html: Summary snapshot of MDM space configurations and policies. Включает URL-адрес управления, IDM-сервер устройства, сертификаты, политики. Includes, management url, MDM server device id, certificates, policies.
- MdmDiagLogMetadata,json: mdmdiagnosticstool metadata file, contains command line arguments used to run the tool MdmDiagLogMetadata,json: mdmdiagnosticstool metadata file, contains command line arguments used to run the tool
- MDMDiagReport.xml: содержит более подробное представление о конфигурациях пространства MDM, например переменных регистрации MDMDiagReport.xml: contains a more detail view into the MDM space configurations, e.g enrollment variables
- MdmDiagReport_RegistryDump.reg: содержит сбросы из общих местоположений реестра MDM MdmDiagReport_RegistryDump.reg: contains dumps from common MDM registry locations
- MdmLogCollectorFootPrint.txt: журналы инструментов mdmdiagnosticslog при запуске команды MdmLogCollectorFootPrint.txt: mdmdiagnosticslog tool logs from running the command
- *.evtx. Общий зритель событий записи microsoft-windows-devicemanagement-enterprise-diagnostics-provider-admin.evtx главный, который содержит события MDM. *.evtx: Common event viewer logs microsoft-windows-devicemanagement-enterprise-diagnostics-provider-admin.evtx main one that contains MDM events.
Сбор журналов непосредственно с компьютеров Windows 10 Collect logs directly from Windows 10 PCs
Начиная с Windows 10 версии 1511, журналы MDM запечатлены в viewer событий в следующем расположении: Starting with the Windows 10, version 1511, MDM logs are captured in the Event Viewer in the following location:
- Журналы приложений и служб > Microsoft > Windows > DeviceManagement-Enterprise-Diagnostic-Provider Applications and Services Logs > Microsoft > Windows > DeviceManagement-Enterprise-Diagnostic-Provider
Вот снимок экрана: Here’s a screenshot:

В этом расположении канал администрирования регистрит события по умолчанию. In this location, the Admin channel logs events by default. Однако, если вам нужны дополнительные **** журналы сведений, вы можете включить журналы отлаживка, выбрав параметр Show Analytic и Debug logs в меню View in Event Viewer. **** However, if you need more details logs you can enable Debug logs by choosing Show Analytic and Debug logs option in View menu in Event Viewer.
Сбор журналов администратора To collect Admin logs
- Щелкните правой кнопкой мыши узел Admin. Right click on the Admin node.
- Выберите Сохранить все события как. Select Save all events as.
- Выберите расположение и введите имя файла. Choose a location and enter a filename.
- Нажмите кнопку Сохранить. Click Save.
- Выберите отображаемую информацию для этих языков, а затем выберите английский. Choose Display information for these languages and then select English.
- Нажмите кнопку Ок. Click Ok.
Дополнительные сведения о журнале можно включить в журналы отлаговок. For more detailed logging, you can enable Debug logs. Щелкните правой кнопкой мыши узел отлаговка и нажмите кнопку Включить журнал. Right click on the Debug node and then click Enable Log.
Сбор журналов отлаговок To collect Debug logs
- Щелкните правой кнопкой мыши узел Отлаговка. Right click on the Debug node.
- Выберите Сохранить все события как. Select Save all events as.
- Выберите расположение и введите имя файла. Choose a location and enter a filename.
- Нажмите кнопку Сохранить. Click Save.
- Выберите отображаемую информацию для этих языков, а затем выберите английский. Choose Display information for these languages and then select English.
- Нажмите кнопку Ок. Click Ok.
Вы можете открыть файлы журналов (.evtx) в обозревателе событий на компьютере Windows 10 с обновлением в ноябре 2015 г. You can open the log files (.evtx files) in the Event Viewer on a Windows 10 PC running the November 2015 update.
Удаленный сбор журналов с компьютеров Windows 10 Collect logs remotely from Windows 10 PCs
Когда компьютер уже зарегистрирован в MDM, можно удаленно собирать журналы с компьютера через канал MDM, если ваш MDM-сервер поддерживает это. When the PC is already enrolled in MDM, you can remotely collect logs from the PC through the MDM channel if your MDM server supports this. CSP DiagnosticLog можно использовать, чтобы включить канал просмотра событий с полным именем. The DiagnosticLog CSP can be used to enable an event viewer channel by full name. Вот имена просмотра событий для каналов администрирования и отлаговки: Here are the Event Viewer names for the Admin and Debug channels:
- Microsoft-Windows-DeviceManagement-Enterprise-Diagnostics-Provider%2FAdmin Microsoft-Windows-DeviceManagement-Enterprise-Diagnostics-Provider%2FAdmin
- Microsoft-Windows-DeviceManagement-Enterprise-Diagnostics-Provider%2FDebug Microsoft-Windows-DeviceManagement-Enterprise-Diagnostics-Provider%2FDebug
Пример: Включить ведение журнала канала отлаговка Example: Enable the Debug channel logging
MDM enrollment of Windows 10-based devices
In today’s cloud-first world, enterprise IT departments increasingly want to let employees use their own devices, or even choose and purchase corporate-owned devices. Connecting your devices to work makes it easy for you to access your organization’s resources, such as apps, the corporate network, and email.
When you connect your device using mobile device management (MDM) enrollment, your organization may enforce certain policies on your device.
Connect corporate-owned WindowsВ 10-based devices
You can connect corporate-owned devices to work by either joining the device to an Active Directory domain, or to an Azure Active Directory (Azure AD) domain. WindowsВ 10 does not require a personal Microsoft account on devices joined to Azure AD or an on-premises Active Directory domain.
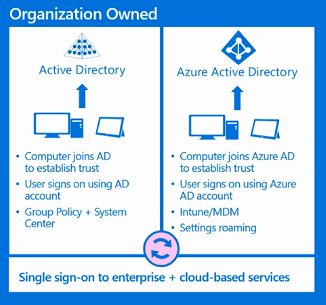
Connect your device to an Active Directory domain (join a domain)
Devices running WindowsВ 10 Pro, WindowsВ 10 Enterprise, or WindowsВ 10 Education can be connected to an Active Directory domain using the Settings app.
Mobile devices cannot be connected to an Active Directory domain.
Out-of-box-experience
Joining your device to an Active Directory domain during the out-of-box-experience (OOBE) is not supported. To join a domain:
On the Who Owns this PC? page, select My work or school owns it.

Next, select Join a domain.
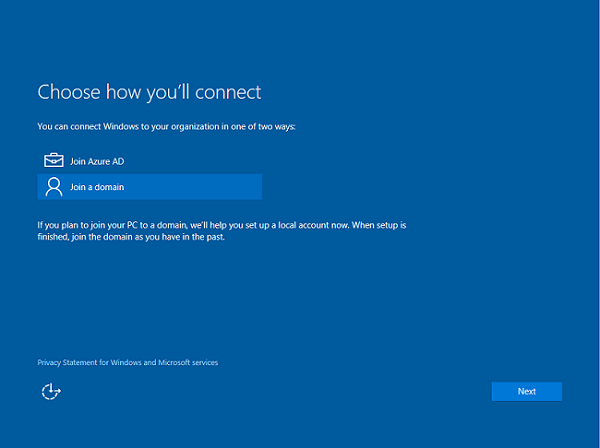
You’ll see a prompt to set up a local account on the device. Enter your local account details, and then select Next to continue.

Use the Settings app
To create a local account and connect the device:
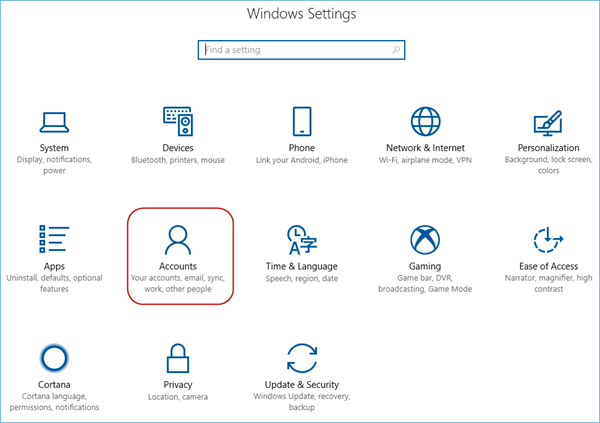
Launch the Settings app.

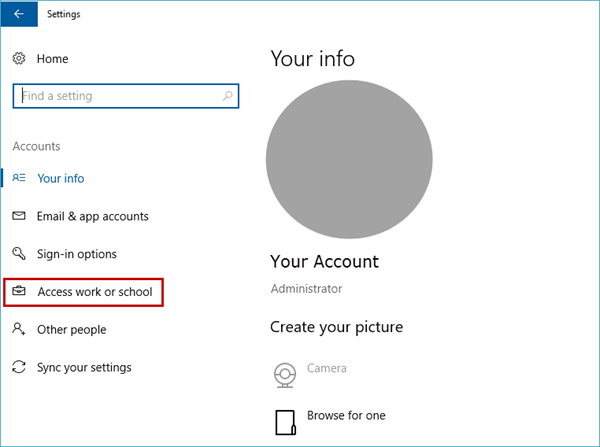
Next, select Accounts.

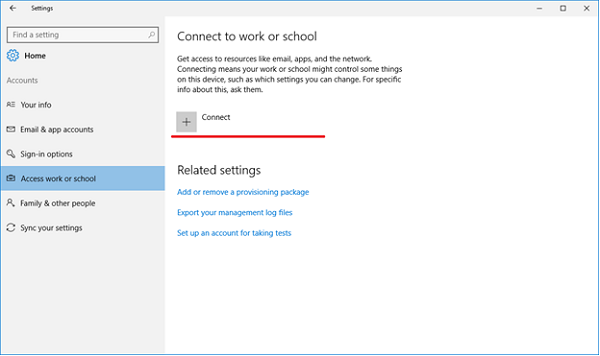
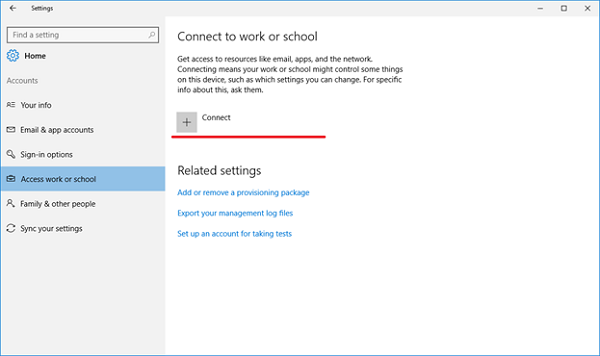
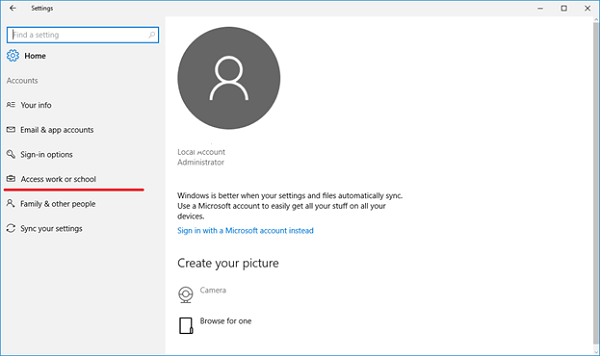
Navigate to Access work or school.

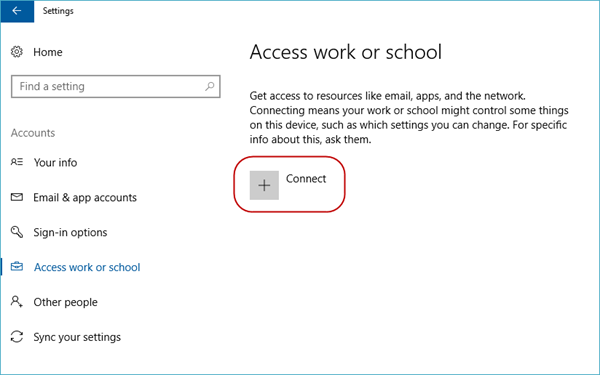
Select Connect.
Under Alternate actions, select Join this device to a local Active Directory domain.

Type in your domain name, follow the instructions, and then select Next to continue. After you complete the flow and restart your device, it should be connected to your Active Directory domain. You can now sign in to the device using your domain credentials.

Help with connecting to an Active Directory domain
There are a few instances where your device cannot be connected to an Active Directory domain.
| Connection issue | Description |
|---|---|
| Your device is already connected to an Active Directory domain. | Your device can only be connected to a single Active Directory domain at a time. |
| Your device is connected to an Azure AD domain. | Your device can either be connected to an Azure AD domain or an Active Directory domain. You cannot connect to both simultaneously. |
| You are logged in as a standard user. | Your device can only be connected to an Azure AD domain if you are logged in as an administrative user. You’ll need to switch to an administrator account to continue. |
| Your device is running WindowsВ 10 Home. | This feature is not available on WindowsВ 10 Home, so you will be unable to connect to an Active Directory domain. You will need to upgrade to WindowsВ 10 Pro, WindowsВ 10 Enterprise, or WindowsВ 10 Education to continue. |
Connect your device to an Azure AD domain (join Azure AD)
All Windows devices can be connected to an Azure AD domain. These devices can be connected during OOBE. Additionally, desktop devices can be connected to an Azure AD domain using the Settings app.
Out-of-box-experience
To join a domain:
Select My work or school owns it, then select Next.
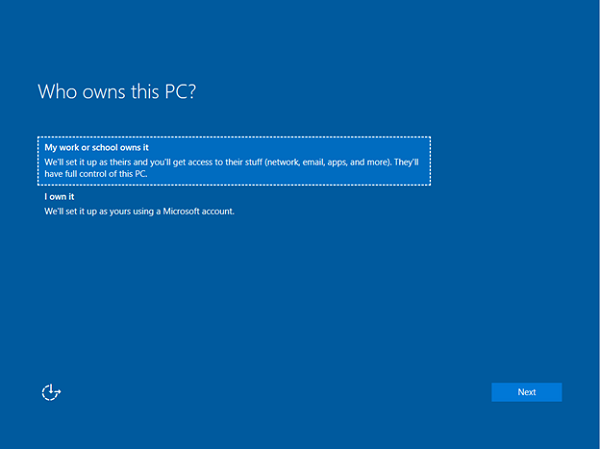
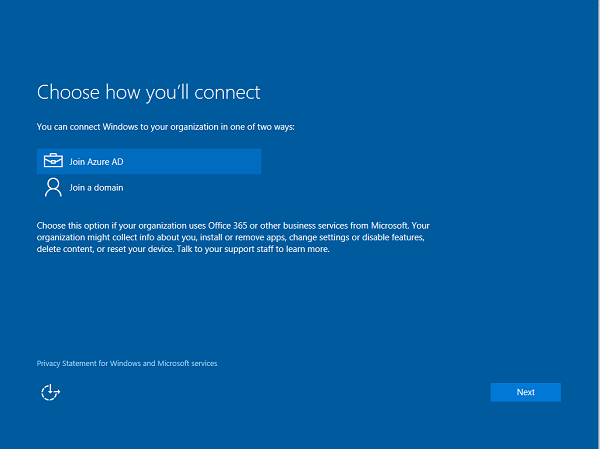
Select Join Azure AD, and then select Next.
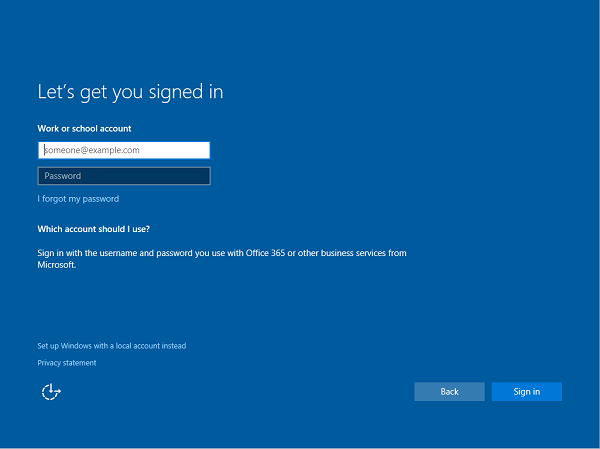
Type in your Azure AD username. This is the email address you use to log into Microsoft Office 365 and similar services.
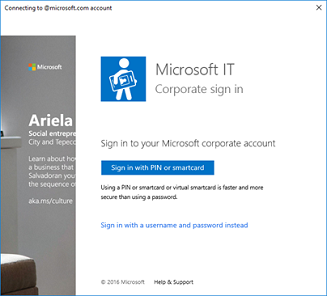
If the tenant is a cloud-only, password hash sync, or pass-through authentication tenant, this page will change to show the organization’s custom branding, and you will be able to enter your password directly on this page. If the tenant is part of a federated domain, you will be redirected to the organization’s on-premises federation server, such as Active Directory Federation Services (AD FS) for authentication.
Based on IT policy, you may also be prompted to provide a second factor of authentication at this point. If your Azure AD tenant has auto-enrollment configured, your device will also be enrolled into MDM during this flow. For more information, see these steps. If your tenant is not configured for auto-enrollment, you will have to go through the enrollment flow a second time to connect your device to MDM. After you complete the flow, your device will be connected to your organization’s Azure AD domain.
Use the Settings app
To create a local account and connect the device:
Launch the Settings app.
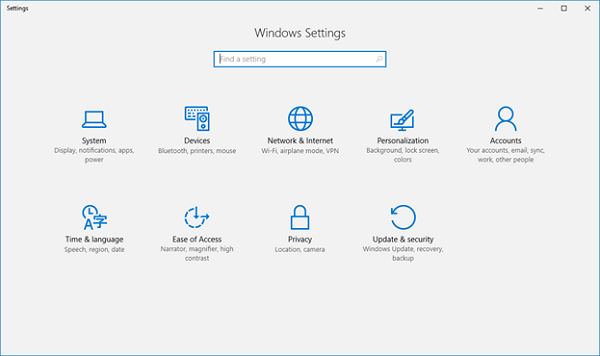
Next, navigate to Accounts.

Navigate to Access work or school.

Select Connect.
Under Alternate Actions, selct Join this device to Azure Active Directory.
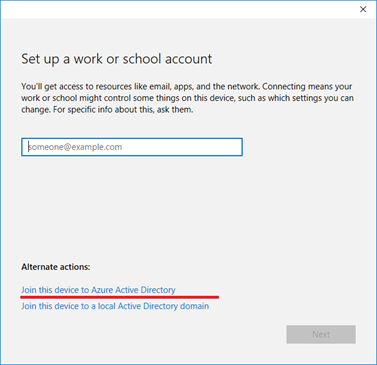
Type in your Azure AD username. This is the email address you use to log into Office 365 and similar services.

If the tenant is a cloud-only, password hash sync, or pass-through authentication tenant, this page changes to show the organization’s custom branding, and you can enter your password directly on this page. If the tenant is part of a federated domain, you are redirected to the organization’s on-premises federation server, such as AD FS, for authentication.
Based on IT policy, you may also be prompted to provide a second factor of authentication at this point.
If your Azure AD tenant has auto-enrollment configured, your device will also be enrolled into MDM during this flow. For more information, see this blog post. If your tenant is not configured for auto-enrollment, you will have to go through the enrollment flow a second time to connect your device to MDM.
After you reach the end of the flow, your device should be connected to your organization’s Azure AD domain. You may now log out of your current account and sign in using your Azure AD username.
Help with connecting to an Azure AD domain
There are a few instances where your device cannot be connected to an Azure AD domain.
| Connection issue | Description |
|---|---|
| Your device is connected to an Azure AD domain. | Your device can only be connected to a single Azure AD domain at a time. |
| Your device is already connected to an Active Directory domain. | Your device can either be connected to an Azure AD domain or an Active Directory domain. You cannot connect to both simultaneously. |
| Your device already has a user connected to a work account. | You can either connect to an Azure AD domain or connect to a work or school account. You cannot connect to both simultaneously. |
| You are logged in as a standard user. | Your device can only be connected to an Azure AD domain if you are logged in as an administrative user. You’ll need to switch to an administrator account to continue. |
| Your device is already managed by MDM. | The connect to Azure AD flow will attempt to enroll your device into MDM if your Azure AD tenant has a preconfigured MDM endpoint. Your device must be unenrolled from MDM to be able to connect to Azure AD in this case. |
| Your device is running WindowsВ 10 Home. | This feature is not available on WindowsВ 10 Home, so you will be unable to connect to an Azure AD domain. You will need to upgrade to WindowsВ 10 Pro, WindowsВ 10 Enterprise, or WindowsВ 10 Education to continue. |
Connect personally owned devices
Personally owned devices, also known as bring your own device (BYOD), can be connected to a work or school account, or to MDM. WindowsВ 10 does not require a personal Microsoft account on devices to connect to work or school.
Connect to a work or school account
All WindowsВ 10-based devices can be connected to a work or school account. You can connect to a work or school account either through the Settings app or through any of the numerous Universal Windows Platform (UWP) apps, such as the universal Office apps.
Use the Settings app
To create a local account and connect the device:
Launch the Settings app, and then select Accounts >Start > Settings > Accounts.
Navigate to Access work or school.
Select Connect.
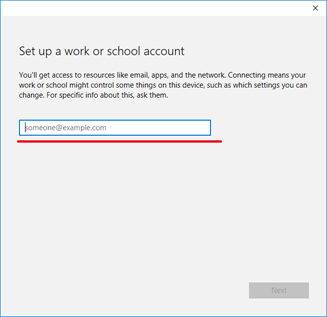
Type in your Azure AD username. This is the email address you use to log into Office 365 and similar services.
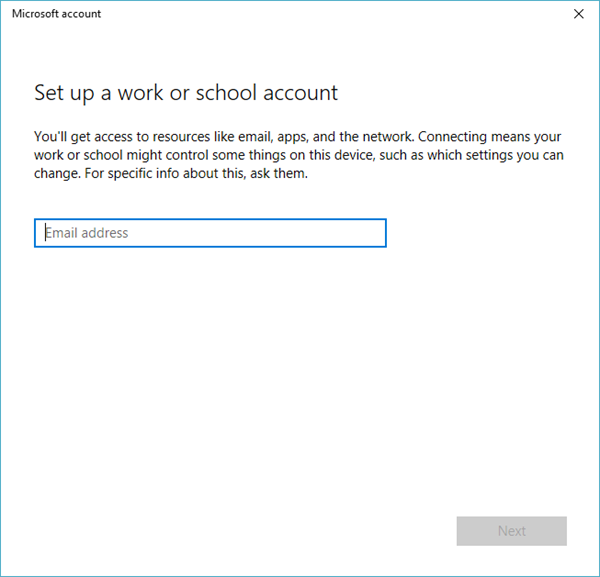
If the tenant is a cloud-only, password hash sync, or pass-through authentication tenant, this page changes to show the organization’s custom branding, and can enter your password directly into the page. If the tenant is part of a federated domain, you are redirected to the organization’s on-premises federation server, such as AD FS, for authentication.
Based on IT policy, you may also be prompted to provide a second factor of authentication at this point.
If your Azure AD tenant has auto-enrollment configured, your device will also be enrolled into MDM during this flow. For more information, see this blog post. If your tenant is not configured for auto-enrollment, you will have to go through the enrollment flow a second time to connect your device to MDM.
Starting in Windows 10, version 1709, you will see the status page that shows the progress of your device being set up.

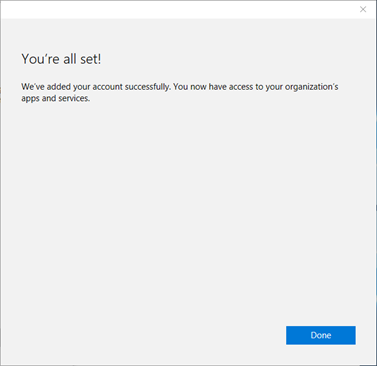
After you complete the flow, your Microsoft account will be connected to your work or school account.
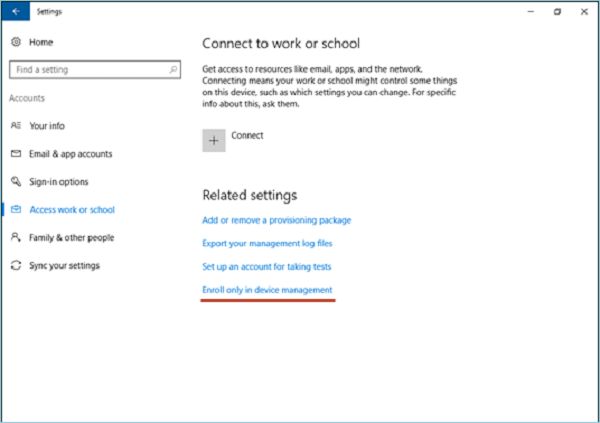
Connect to MDM on a desktop (enrolling in device management)
All WindowsВ 10-based devices can be connected to MDM. You can connect to an MDM through the Settings app.
Use the Settings app
To create a local account and connect the device:
Launch the Settings app.

Next, navigate to Accounts.
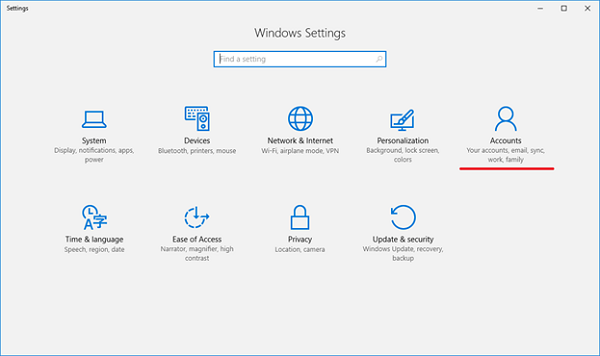
Navigate to Access work or school.
Select the Enroll only in device management link (available in servicing build 14393.82, KB3176934). For older builds, see Connect your Windows 10-based device to work using a deep link.
Type in your work email address.
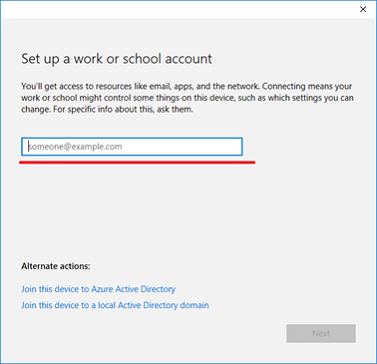
If the device finds an endpoint that only supports on-premises authentication, this page will change and ask you for your password. If the device finds an MDM endpoint that supports federated authentication, you’ll be presented with a new window that will ask you for additional authentication information.
Based on IT policy, you may also be prompted to provide a second factor of authentication at this point. Starting in Windows 10, version 1709, you will see the enrollment progress on screen.
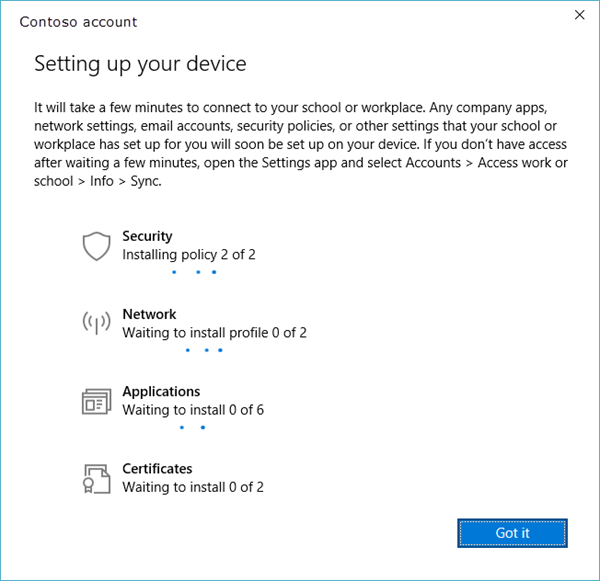
After you complete the flow, your device will be connected to your organization’s MDM.
Help with connecting personally owned devices
There are a few instances where your device may not be able to connect to work.
| Error Message | Description |
|---|---|
| Your device is already connected to your organization’s cloud. | Your device is already connected to either Azure AD, a work or school account, or an AD domain. |
| We could not find your identity in your organization’s cloud. | The username you entered was not found on your Azure AD tenant. |
| Your device is already being managed by an organization. | Your device is either already managed by MDM or Microsoft Endpoint Configuration Manager. |
| You don’t have the right privileges to perform this operation. Please talk to your admin. | You cannot enroll your device into MDM as a standard user. You must be on an administrator account. |
| We couldn’t auto-discover a management endpoint matching the username entered. Please check your username and try again. If you know the URL to your management endpoint, please enter it. | You need to provide the server URL for your MDM or check the spelling of the username you entered. |
Connect your Windows 10-based device to work using a deep link
WindowsВ 10-based devices may be connected to work using a deep link. Users will be able to select or open a link in a particular format from anywhere in WindowsВ 10, and be directed to the new enrollment experience.
In WindowsВ 10, version 1607, deep linking will only be supported for connecting devices to MDM. It will not support adding a work or school account, joining a device to Azure AD, and joining a device to Active Directory.
The deep link used for connecting your device to work will always use the following format.
| Parameter | Description | Supported Value for WindowsВ 10 |
|---|---|---|
| mode | Describes which mode will be executed in the enrollment app. Added in Windows 10, version 1607 | Mobile Device Management (MDM), Adding Work Account (AWA), and Azure Active Directory Joined (AADJ). |
| username | Specifies the email address or UPN of the user who should be enrolled into MDM. Added in Windows 10, version 1703. | string |
| servername | Specifies the MDM server URL that will be used to enroll the device. Added in Windows 10, version 1703. | string |
| accesstoken | Custom parameter for MDM servers to use as they see fit. Typically, this can be used as a token to validate the enrollment request. Added in Windows 10, version 1703. | string |
| deviceidentifier | Custom parameter for MDM servers to use as they see fit. Typically, this can be used to pass in a unique device identifier. Added in Windows 10, version 1703. | GUID |
| tenantidentifier | Custom parameter for MDM servers to use as they see fit. Typically, this can be used to identify which tenant the device or user belongs to. Added in Windows 10, version 1703. | GUID or string |
| ownership | Custom parameter for MDM servers to use as they see fit. Typically, this can be used to determine whether the device is BYOD or Corp Owned. Added in Windows 10, version 1703. | 1, 2, or 3. Where «1» means ownership is unknown, «2» means the device is personally owned, and «3» means the device is corporate-owned |
AWA and AADJ values for mode are only supported on Windows 10, version 1709 and later.
Connect to MDM using a deep link
Deep links only work with Internet Explorer or Microsoft Edge browsers. When connecting to MDM using a deep link, the URI you should use is: ms-device-enrollment:?mode=mdm ms-device-enrollment:?mode=mdm&username=someone@example.com&servername=https://example.server.com
To connect your devices to MDM using deep links:
Starting with WindowsВ 10, version 1607, create a link to launch the built-in enrollment app using the URI ms-device-enrollment:?mode=mdm, and user-friendly display text, such as Click here to connect Windows to work:
(Be aware that this will launch the flow equivalent to the Enroll into the device management option in WindowsВ 10, version 1511.)
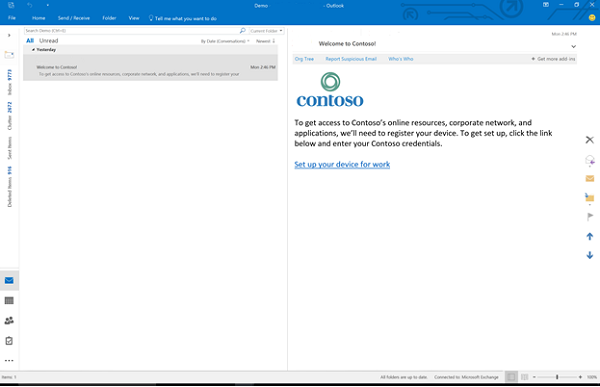
IT admins can add this link to a welcome email that users can select to enroll into MDM.
IT admins can also add this link to an internal web page that users refer to enrollment instructions.
After you select the link or run it, WindowsВ 10 launches the enrollment app in a special mode that only allows MDM enrollments (similar to the Enroll into device management option in WindowsВ 10, version 1511).
Type in your work email address.
If the device finds an endpoint that only supports on-premises authentication, this page will change and ask you for your password. If the device finds an MDM endpoint that supports federated authentication, you’ll be presented with a new window that will ask you for additional authentication information. Based on IT policy, you may also be prompted to provide a second factor of authentication at this point.
After you complete the flow, your device will be connected to your organization’s MDM.
Manage connections
To manage your work or school connections, select Settings > Accounts > Access work or school. Your connections will show on this page and selecting one will expand options for that connection.
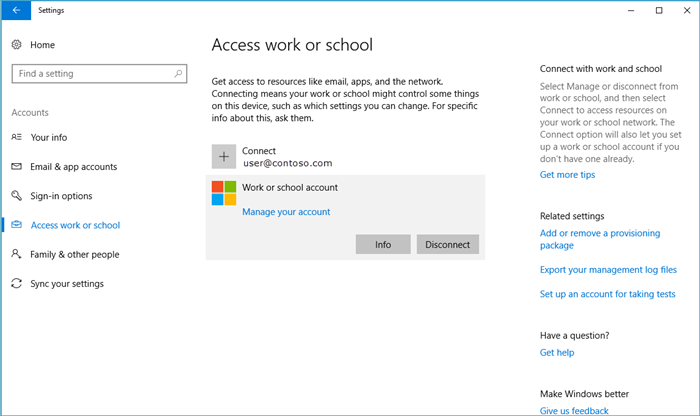
The Info button can be found on work or school connections involving MDM. This includes the following scenarios:
- Connecting your device to an Azure AD domain that has auto-enroll into MDM configured.
- Connecting your device to a work or school account that has auto-enroll into MDM configured.
- Connecting your device to MDM.
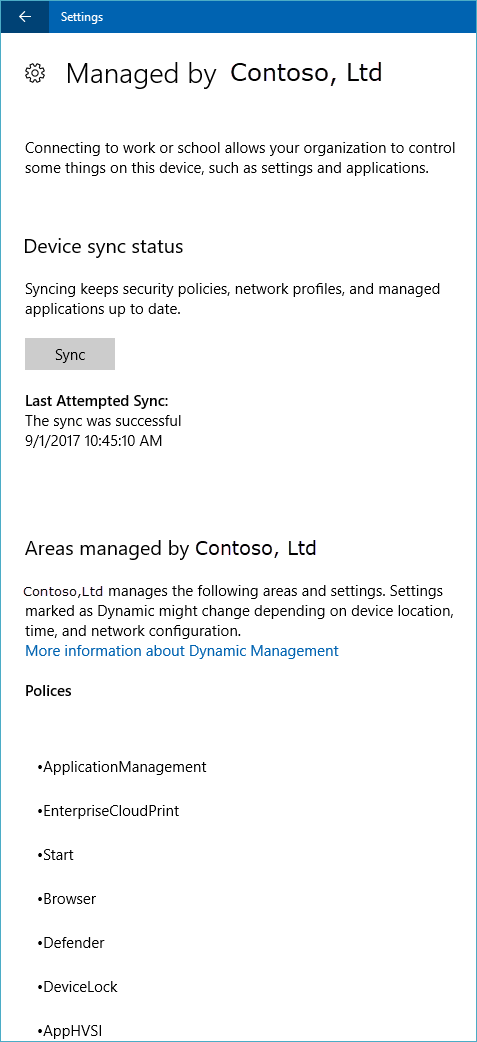
Selecting the Info button will open a new page in the Settings app that provides details about your MDM connection. You’ll be able to view your organization’s support information (if configured) on this page. You’ll also be able to start a sync session which forces your device to communicate to the MDM server and fetch any updates to policies if needed.
Starting in Windows 10, version 1709, selecting the Info button will show a list of policies and line-of-business apps installed by your organization. Here is an example screenshot.
Starting in Windows 10, version 1709, the Manage button is no longer available.
Disconnect
The Disconnect button can be found on all work connections. Generally, selecting the Disconnect button will remove the connection from the device. There are a few exceptions to this:
- Devices that enforce the AllowManualMDMUnenrollment policy will not allow users to remove MDM enrollments. These connections must be removed by a server-initiated unenroll command.
- On mobile devices, you cannot disconnect from Azure AD. These connections can only be removed by wiping the device.
Disconnecting might result in the loss of data on the device.
Collecting diagnostic logs
You can collect diagnostic logs around your work connections by going to Settings > Accounts > Access work or school, and then selecting the Export your management logs link under Related Settings. Next, select Export, and follow the path displayed to retrieve your management log files.
Starting in Windows 10, version 1709, you can get the advanced diagnostic report by going to Settings > Accounts > Access work or school, and selecting the Info button. At the bottom of the Settings page, you will see the button to create a report, as shown here.


