- Mediatek mt65xx usb vcom drivers in windows
- [2021] Download Install VCOM Drivers MediaTek MT65xx MT67xx MT68xx USB
- Download
- Steps to Install MediaTek MT65xx MT67xx MT68xx USB VCOM Driver [2021 Update]
- [Video Guide] Install MediaTek MT65xx MT67xx MT68xx USB VCOM Drivers On Windows
- Как устанавливать USB VCOM драйвера для прошивки устройств на чипсете MT65xx через SP Flash Tool
- Краткая инструкция по установке USB VCOM драйвера для прошивки устройств на чипсете MT65xx через SP Flash Tool
- Install MediaTek MT65xx USB VCOM Drivers [for Windows all]
- Install MediaTek VCOM Drivers on Windows
- Prerequisites: (Only for Windows 8, Windows 10 or later)
- Steps: to install MediaTek VCOM drivers
- Install Mediatek MT65XX USB VCOM Drivers in Windows 8 & 8.1
Mediatek mt65xx usb vcom drivers in windows
Thl 5000 — Прошивка (OS 4.4.х, 5.х.х)
 ThL 5000
Описание | Обсуждение » | Покупка » | Прошивка » | Брак » | Прошивка MIUI »
- Не забывайте делать backup регулярно, чтобы иметь возможность отката рабочей конфигурации смартфона!
- Кнопка RESET находится под правой сим-картой
- Обязательно перед любой манипуляцией с программной частью сделайте бэкап раздела NVRAM всеми доступными способами!
- Всё, что Вы делаете — Вы делаете на ваш страх и риск! Авторы руководств не несут ответственности за неумелые действия владельцев!
- резерв
[b]
Q: Не работает какое-либо приложение на определенной прошивке или устройстве.
A: Проще и быстрее искать ответ в теме по приложению, т.к. некоторые приложения не совместимы с процессором МТК, а соответственно с конфигурационными и системными файлами/библеотеками. В теме по приложению может быть мод под устройство. Но если приложения работало на одной прошивке, а на другой нет — обращайтесь в QMS автору прошивки с просьбой исправить проблему.
Q: Почему у меня скачет индикатор заряда батареи? Самозаряды и резкие разряды.
A: Проблема решена! Описание решения Здесь
Q: Про ART. Работает ли он на нашем устройстве?
A: ответ Однако есть прошивки с работающим ART, портированные с других устройств!
Q: В окошке чехла при входящем не отображается фотка звонящего.
A: Достоверно рабочего решения нет.
Q: Дисплей кажется пересвеченным, блеклым
A: Установите одно ядро из прошивок 1.1.1, 1.1.2 или старше — для пересвеченных дисплеев
Q: Не включается телефон после глубокого разряда
A: Возможное решение здесь
[2021] Download Install VCOM Drivers MediaTek MT65xx MT67xx MT68xx USB
MediaTek MT65xx Preloader USB drivers help in flashing different files to your phone. Especially, custom ROMs and root packages via the SP Flash tool. Moreover, it also allows proper data transfers among the connected devices. In short, if you have a MediaTek powered smartphone then you should have installed VCOM drivers. This is a very important tool for all MediaTek smartphones.
These drivers are compatible with all Android devices running MediaTek MT65xx chipset. Follow the in-depth guide below in order to get the latest Mediatek drivers on your PC. Also, in case you have stuck anywhere between the process, let us know in the comments section at the end of this guide.

Download
Steps to Install MediaTek MT65xx MT67xx MT68xx USB VCOM Driver [2021 Update]
The steps below can be applied to any PC running Windows XP/7/8/8.1/10. However, for Windows 8 and newer, you need to disable Driver Signature Verification. There are plenty of guides online showing you how to disable digital Driver Signature Verification so you can use them before you proceed to install this driver package.
- Download MediaTek MT65xx MT67xx MT68xx USB VCOM drivers from above and extract them.
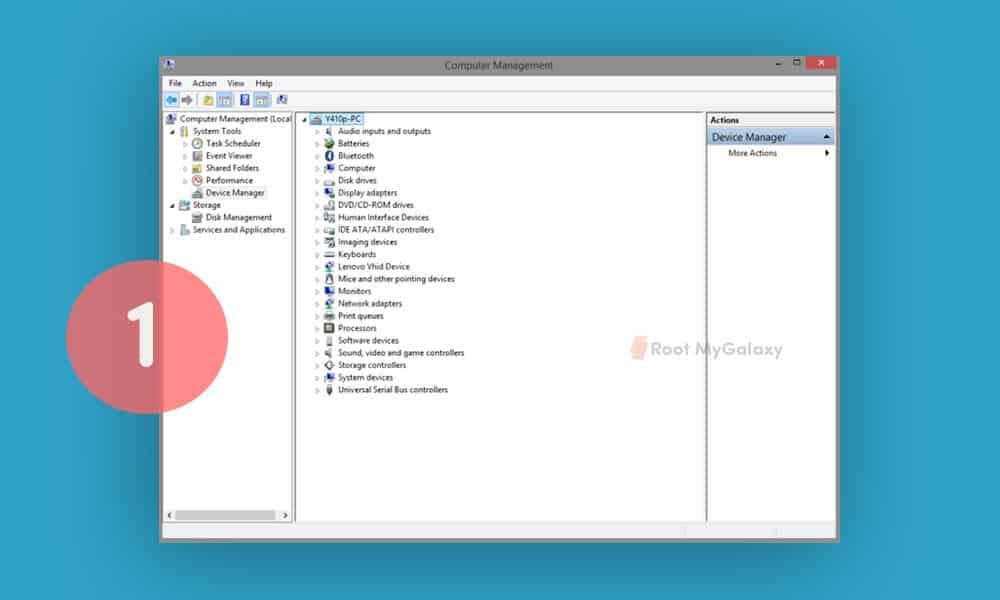
- You need to access Device Manager . Do so by right-clicking on My Computer and clicking on “Manage”. In the new window that pops up, select “Device Manager” from the menu shown on the left.
- The computer you are using will be shown at the top with its name. Right-click on the name and select Add Legacy Hardware.
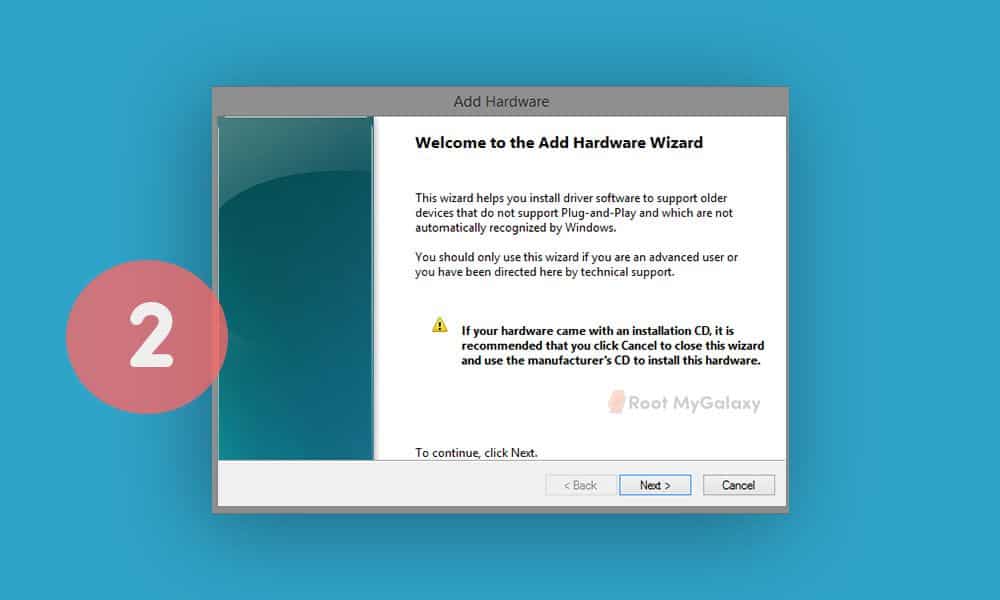
- A new wizard will pop up. Just click on Next.
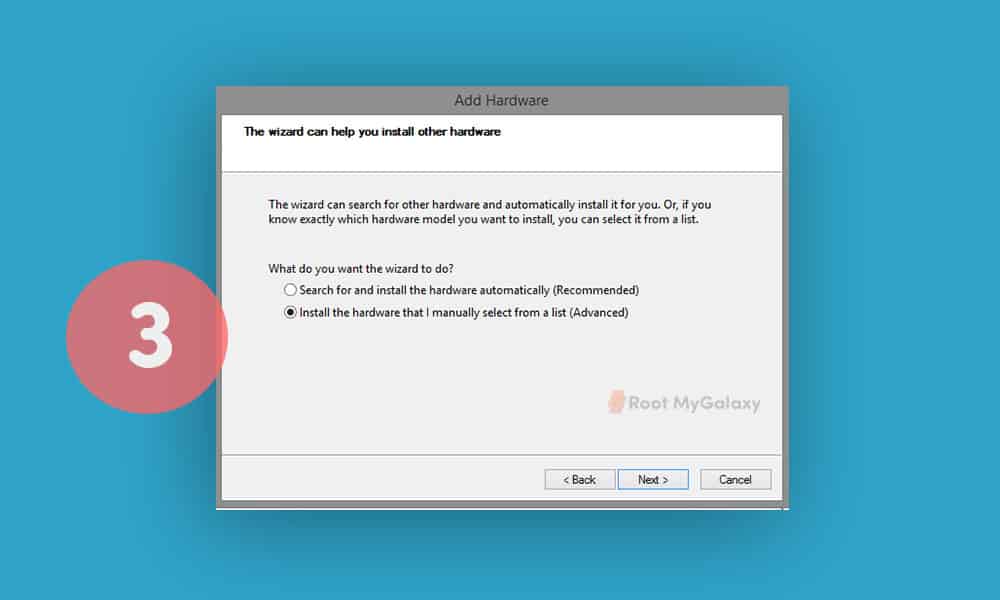
- From the following menu choose the second option shown in the screenshot below and click Next .
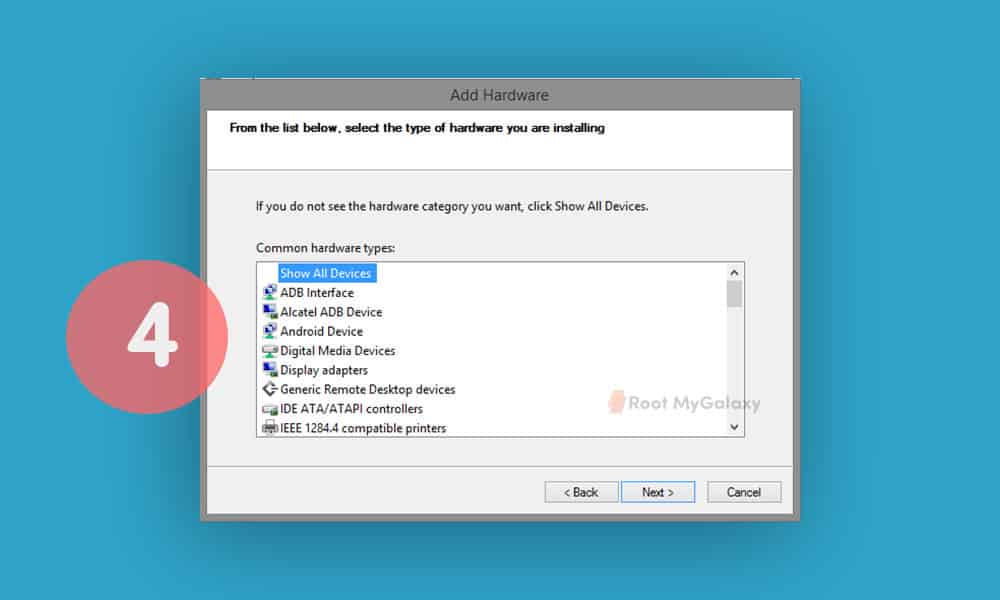
- You will be shown a long list on the following screen. Just select Show All Devices and click Next .
- Click on Have Disk in the following window and select any .inf file you extracted in Step 1.
- Once selected, click Next. There will be a security warning on which you can select Install Anyway.
- Restart your PC and connect your Mediatek MT65xx device.
[Video Guide] Install MediaTek MT65xx MT67xx MT68xx USB VCOM Drivers On Windows
Video Credit: Geeki Review (yt)
That’s all to it! After you install correct USB drivers for your Mediatek device, you can use different tools to flash different files and also stop worrying about failed data transfers.
Как устанавливать USB VCOM драйвера для прошивки устройств на чипсете MT65xx через SP Flash Tool
![]()
Краткая инструкция по установке USB VCOM драйвера для прошивки устройств на чипсете MT65xx через SP Flash Tool
1. Если у вас Windows 8\8.1 или windows 10, то отключите проверку цифровой подписи драйвера по данной инструкции: Отключение проверки цифровой подписи драйверов на Windows 8 | Отключение обязательной проверки подписи драйвера на windows 10 в параметрах загрузки . Если Windows 7 или другая система, то можно пропустить данный пункт
2. Если вы уже устанавливали драйвер, но что-то пошло не так и хотите переустановить его, то удалите драйвер по данной инструкции: Как полностью удалить драйвера для «чистой» переустановки? [Инструкция]
3. Скачайте из вложений архив с драйверами и распакуйте его. Я не гарантируют что данный драйвер подойдёт именно к вашему устройству (по-идее на всех MT65xx должен работать), так что возможно вам придётся найти архив именно для вашего устройства, однако способ установки будет точно такой же как описан тут. Если в архиве с драйверами который вы нашли для вашего устройства, находятся только exe файлы, то эта инструкция не по установке exe. В данной инструкции описывается установка драйверов в формате .inf, которые устанавливаются вручную через диспетчер устройств (загляните в распакованный архив и убедитесь что там находятся разные файлы в формате .inf)
4. Запустите диспетчер устройств на вашем ПК (мой компьютер -> свойства -> диспетчер устройств). Далее выключите устройство, вытащите из него батарею и вставьте её обратно, однако устройство не включайте. Если батарея несъёмная, то просто выключите устройство
5. Теперь внимательно смотрим на диспетчер устройств и в это же время подключаем к компьютеру наше выключенное устройство. Как только там отобразится новое подключённое устройство под названием MT65xx Preloader (название может чуть отличаться, если не ошибаюсь, но будет присутствовать слово Preloader), делаем правый клик по устройству и выбираем обновить драйвер, затем поиск драйвера на компьютере, потом кнопка обзор и указываем путь куда мы распаковали наши драйвера (папка извлечённая из архива где находятся файлы .inf)
6. После установки драйвера желательно перезагрузить ПК. Если драйвер установится, то Flash Tool будет распознавать ваше устройство и прошивка пойдёт
Если я что-то написал не так, то пожалуйста поправьте меня, сам устанавливал таким образом драйвер на устройство на MT65xx только пару раз, возможно есть еще подводные камни.
Для тех кто «в БРОНЕПОЕЗДЕ» вот инструкция в картинках: Инструкция по установке драйверов для SP Flash Tool на Windows 10 данный способ установки драйверов подходит для любой версии ОС Windows, т.е. не только для десятки
Install MediaTek MT65xx USB VCOM Drivers [for Windows all]


MT65xx Preloader USB drivers are required to be correctly installed on Windows for flashing devices running on MediaTek chipset with custom or stock compatible Android ROM.
For non-techies, flashing, however is another job which is performed by another tool such as for MediaTek devices, SP Flash Tool is most common utility software among consumers. Such tools first need to detect and communicate with the device which is going to be flashed. That’s where most of the beginners fail having successfully connected their devices to the computer so does the flashing tool. If you are a beginner, this tutorial will help you pass connecting your MediaTek powered smartphone successfully .
Note: This tutorial is not for flashing devices but just for making your device ready to be flashed.
Install MediaTek VCOM Drivers on Windows
Note: If you are on 64-bit Windows or Windows 8 or later versions, you will need to disable digital driver signature enforcement as told in prerequisites below. Or otherwise, Windows XP, Vista (32-bit) or Windows 7 (32-bit) users should ignore the prerequisites section and proceed to the steps to install VCOM drivers as there as unsigned drivers installation will be allowed on those PC.
Prerequisites: (Only for Windows 8, Windows 10 or later)
64-bit Windows editions require digitally signed drivers. As many devices ship with unsigned drivers.
Restart computer with Advanced Startup Options
(Windows 8 or later):
- A simple trick is to Shift+Restart– then wait till the computer restarts with advanced startup options. (Usually you need to go through System settings to advanced startup.
- Once restarted with Advanced Startup Options, Choose Troubleshoot > Advanced options > Startup Settings > Restart – (your computer will restart again with a list options)
- Press 7 to initiate a reboot with “Disable driver signature enforcement”.
Windows Vista 64-bit or Windows 7 64-bit:
- You can normal restart your PC and press F8 on the startup. Then you can choose “disable driver signature enforcement“
Windows will now restart and will allow you to install unsigned drivers. You can now perform following steps without any trouble.
Steps: to install MediaTek VCOM drivers
- First of all, download drivers (.zip).
- Extract the downloaded zip file in some folder.
- You can now do one of the following:
- From the extracted zip file, you can run InstallDriver.exe with administrative rights (Run as Administrator) to install the drivers automatically.
- You will be prompted with a security warning to install unsigned drivers; You must accept that and continue with installation by clicking Install Anyway. Otherwise the drivers won’t install.
- After using this step to install driver automatically, you don’t need to continue with following steps as the drivers have been installed.
- OR the recommended way to continue with the following steps to install drivers manually via device manager.
- From the extracted zip file, you can run InstallDriver.exe with administrative rights (Run as Administrator) to install the drivers automatically.
- Open Device Manager – you can open device manager by many ways; one is to Right-click my computer > properties > device manager.
- While in Device Manager, right-click on the top node (PC name) and choose Add legacy hardware

- Follow the on screen instructions to “install the hardware that I manually select from a list“. Then choose “Show All Devices” and then “Have Disk“
- Now in Have Disk, browse to the folder (you have extracted in 2nd step above) and open the folder according to your Windows version.
- 2K_XP_COM – for Windows XP and earlier versions
- Vista – for Windows Vista
- Win7 – for Windows 7 and later inc. 8 and 10
- Once in a folder, click Open again to select the folder.
- A list of drivers will be provided to install, Just click Next > on the wizard to install drivers.
You will be prompted with a security warning to install unsigned drivers; You must accept that and continue with installation by clicking Install Anyway. Otherwise the drivers won’t install. - That’s it. MediaTek drivers have been installed. You may need to restart the computer.

You can comment below and ask about any trouble.
Install Mediatek MT65XX USB VCOM Drivers in Windows 8 & 8.1
Install MTK65XX Preloader USB Vcom Drivers for SP Flash Tools in Windows 8 and 8.1 and in Windows 10
Generally many users face the problem of VCom drivers are not getting installed for their MediaTek device, we require VCom drivers usually when we flash firmware in our device with SP Flash Tools or any other similar tool.
Earlier before i posted this guide for installing VCOM Drivers in Windows Xp and 7 and today this one is for installing the same drivers in Windows 8, 8.1 and 10.
How to Install USB VCOM Drivers in Windows 8 and up :-
Step 1 :- Firstly we have disable digital driver signature verification by going into the advanced startup options for that First, press win + I to launch the charm bar, and click Change PC Settings at the bottom. Then, go to General, and scroll to the bottom of the page, click Restart Now button under Advanced Startup section.
Note :- In Windows 8.1 and Up, the Advanced Startup option has moved to Update and recovery section under Recovery.
Step 2 :- The computer reboots to a startup menu, in which click Troubleshoot and click Advanced Options at next screen, Choose Startup Settings next, and click Restart button. The computer reboots and prompts another menu to choose. One of the items is to Disable driver signature enforcement. Press number 7 or F7 to continue booting to Windows 8 with digital sign enforcement disabled.
Step 3 :- Now you have disabled Driver Signature Verification for the current boot, now you can Install any driver including VCOM Drivers, just follow the below guide from the below link for installing the VCOM Drivers, it is as same as Windows 7.
If you face any problem then comment below.


