- Viewing and Editing Memory in WinDbg
- Debugger Command Window
- Opening a Memory Window
- Using a Memory Window
- Memory Options Dialog Box
- Additional Information
- How to Check Ram Type in Windows 10 like DDR, DDR2
- How to Check Ram Type in Windows 10
- Find using Task Manager
- How to Check Ram Type in Windows 10 through Command Prompt (Admin)
- How to Check Ram Type in Windows 10 via PowerShell
- Check Ram Size in Windows 10 using Settings
- Find RAM Size using System Information
- Using 3rd Party tools
- RAMMon
- ScanMyPC
- Closing words
Viewing and Editing Memory in WinDbg
In WinDbg, you can view and edit memory by entering commands or by using a Memory window.
Debugger Command Window
You can view memory by entering one of the Display Memory commands in the Debugger Command window. You can edit memory by entering one of the Enter Values commands in the Debugger Command window. For more information, see Accessing Memory by Virtual Address and Accessing Memory by Physical Address.
Opening a Memory Window
To open a Memory window, choose Memory from the View menu. (You can also press ALT+5 or select the Memory button ( ) on the toolbar. ALT+SHIFT+5 closes the active Memory window.)
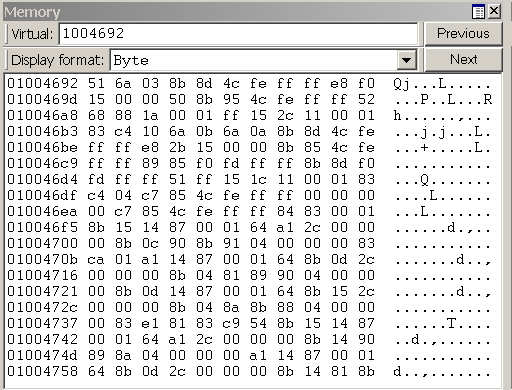
The following screen shot shows an example of a Memory window.
Using a Memory Window
The Memory window displays data in several columns. The column on the left side of the window shows the beginning address of each line. The remaining columns display the requested information, from left to right. If you select Bytes in the Display format menu, the ASCII characters that correspond to these bytes are displayed in the right side of the window.
NoteВ В By default, the Memory window displays virtual memory. This type of memory is the only type of memory that is available in user mode. In kernel mode, you can use the Memory Options dialog box to display physical memory and other data spaces. The Memory Options dialog box is described later in this topic.
In the Memory window, you can do the following:
To write to memory, select inside the Memory window and type new data. You can edit only hexadecimal data—you cannot directly edit ASCII and Unicode characters. Changes take effect as soon as you type new information.
To see other sections of memory, use the Previous and Next buttons on the Memory window toolbar, or press the PAGE UP or PAGE DOWN keys. These buttons and keys display the immediately preceding or following sections of memory. If you request an invalid page, an error message appears.
To navigate within the window, use the RIGHT ARROW, LEFT ARROW, UP ARROW, and DOWN ARROW keys. If you use these keys to move off of the page, a new page is displayed. Before you use these keys, you should resize the Memory window so that it does not have scroll bars. This sizing enables you to distinguish between the actual page edge and the window cutoff.
To change the memory location that is being viewed, enter a new address into the address box at the top of the Memory window. Note that the Memory window refreshes its display while you enter an address, so you could get error messages before you have completed typing the address. NoteВ В The address that you enter into the box is interpreted in the current radix. If the current radix is not 16, you should prefix a hexadecimal address with 0x. To change the default radix, use the n (Set Number Base) command in the Debugger Command window. The display within the Memory window itself is not affected by the current radix.
To change the data type that the window uses to display memory, use the Display format menu in the Memory window toolbar. Supported data types include short words, double words, and quad-words; short, long, and quad integers and unsigned integers; 10-byte, 16-byte, 32-byte, and 64-byte real numbers; ASCII characters; Unicode characters; and hexadecimal bytes. The display of hexadecimal bytes includes ASCII characters as well.
The Memory window has a toolbar that contains two buttons, a menu, and a box and has a shortcut menu with additional commands. To access the menu, select and hold (or right-click) the title bar or select the icon near the upper-right corner of the window (). The toolbar and shortcut menu contain the following choices:
(Toolbar only) The address box enables you to specify a new address or offset. The exact meaning of this box depends on the memory type you are viewing. For example, if you are viewing virtual memory, the box enables you to specify a new virtual address or offset.
(Toolbar only) Display format enables you to select a new display format.
(Toolbar and menu) Previous (on the toolbar) and Previous page (on the shortcut menu) cause the previous section of memory to be displayed.
(Toolbar and menu) Next (on the toolbar) and Next page (on the shortcut menu) cause the next section of memory to be displayed.
(Menu only) Toolbar turns the toolbar on and off.
(Menu only) Auto-fit columns ensures that the number of columns displayed in the Memory window fits the width of the Memory window.
(Menu only) Dock or Undock causes the window to enter or leave the docked state.
(Menu only) Move to new dock closes the Memory window and opens it in a new dock.
(Menu only) Set as tab-dock target for window type sets the selected Memory window as the tab-dock target for other Memory windows. All Memory windows that are opened after one is chosen as the tab-dock target are automatically grouped with that window in a tabbed collection.
(Menu only) Always floating causes the window to remain undocked even if it is dragged to a docking location.
(Menu only) Move with frame causes the window to move when the WinDbg frame is moved, even if the window is undocked. For more information about docked, tabbed, and floating windows, see Positioning the Windows.
(Menu only) Properties opens the Memory Options dialog box, which is described in the following section within this topic.
(Menu only) Help opens this topic in the Debugging Tools for Windows documentation.
(Menu only) Close closes this window.
Memory Options Dialog Box
When you select Properties on the shortcut menu, the Memory Options dialog box appears.
In kernel mode, there are six memory types available as tabs in this dialog box: Virtual Memory, Physical Memory, Bus Data, Control Data, I/O (I/O port information), and MSR (model-specific register information). Select the tab that corresponds to the information that you want to access.
In user mode, only the Virtual Memory tab is available.
Each tab enables you to specify the memory that you want to display:
In the Virtual Memory tab, in the Offset box, specify the address or offset of the beginning of the memory range that you want to view.
In the Physical Memory tab, in the Offset box, specify the physical address of the beginning of the memory range that you want to view. The Memory window can display only described, cacheable physical memory. If you want to display physical memory that has other attributes, use the d* (Display Memory) command or the !d\* extension.
In the Bus Data tab, in the Bus Data Type menu, specify the bus data type. Then, use the Bus number, Slot number, and Offset boxes to specify the bus data that you want to view.
In the Control Data tab, use the Processor and Offset text boxes to specify the control data that you want to view.
In the I/O tab, in the Interface Type menu, specify the I/O interface type. Use the Bus number, Address space, and Offset boxes to specify the data that you want to view.
In the MSR tab, in the MSR box, specify the model-specific register that you want to view.
Each tab also includes a Display format menu. This menu has the same effect as the Display format menu in the Memory window.
Select OK in the Memory Options dialog box to cause your changes to take effect.
Additional Information
For more information about memory manipulation and a description of other memory-related commands, see Reading and Writing Memory.
How to Check Ram Type in Windows 10 like DDR, DDR2
Sometimes it becomes essential to know How to Check Ram Type in Windows 10 before you change or add a new memory stick or buy a new system. There are 24 RAM specifications like DDR, DDR2, SDRAM, EDRAM you might need to find out at this moment. Several built-in utilities help you to find out this info such as task manager, Command Prompt, PowerShell. You will get here few methods using these including 3rd party tools so that you could find out the memory type easily on your system.
How to Check Ram Type in Windows 10
Random Access Memory in short RAM is utilized by CPU as temporary memory storage to make the performance faster. RAM type determines the quality of memory chip and DDR, RDRAM, and SDRAM are supposed to be better.
Below methods will be thoroughly helpful to know How to Check Ram Type in Windows 10.
Find using Task Manager
When you want to check Ram Type in Windows 10, the task manager is the easiest and effective native utility. We have already written an article in some different context – How to Analyze Resources Performance in Task Manager Windows 10. You will get your requisite information from here in only a few clicks on your system.
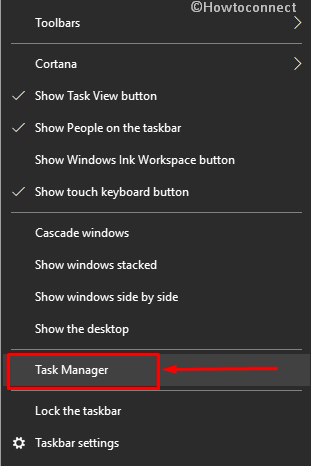
- Make a right-click on any void space in the Taskbar and select Task Manager from the list.
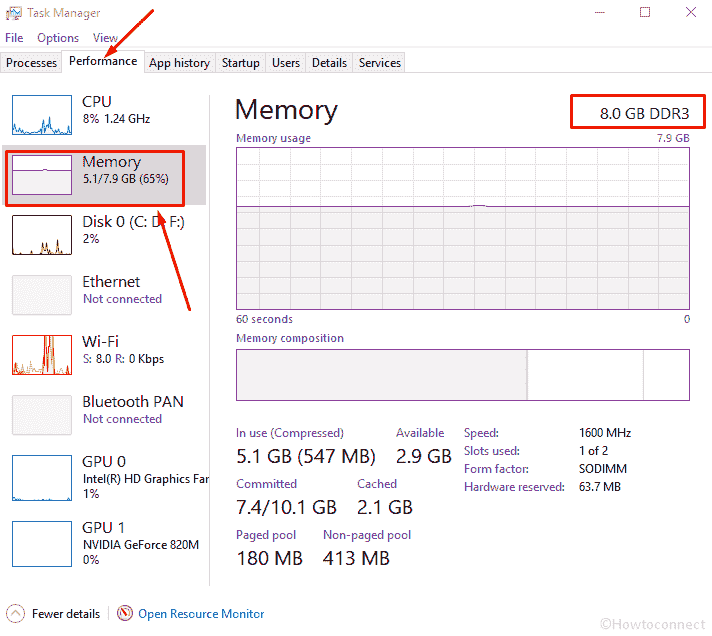
- The tool opens with Processes tab by default, so select Performance (just next) to switch.
- Once the Task Manager comes, do a click on Memory from the left pane.
- You will observe RAM type and size from the upper section which clearly reveals at the top.
- If you want extra information such as numbers of slots, committed memory, cached memory then go down just below the graphical view.
How to Check Ram Type in Windows 10 through Command Prompt (Admin)
Another way to check the ram type is possible through running a simple command in Command Prompt. This will output your RAM type in numeral form so we are giving a table deciphering the meaning of each number.
Step-1: Type cmd in the Cortana search box located beside Start.
Step-2: At once a UAC pop up will appear, choose Yes.
Step-3: Once “Command Prompt” appears at the top, put a right click on it and choose “Run as Administrator”.

Step-4: Type the below command here and Hit the Enter button:
wmic MemoryChip get MemoryType
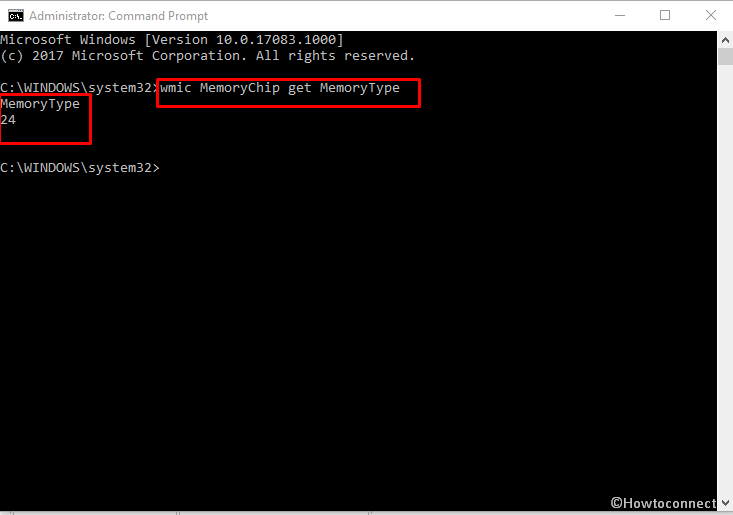
Description will not appear after the command runs instead you see number representation. Match the number with the following list to ascertain your RAM type.
| RAM type in Number | Type of Physical Memory |
| 0 | Unknown |
| 1 | Other |
| 2 | DRAM |
| 3 | Synchronous DRAM |
| 4 | Cache DRAM |
| 5 | EDO |
| 6 | EDRAM |
| 7 | VRAM |
| 8 | SRAM |
| 9 | RAM |
| 10 | ROM |
| 11 | Flash |
| 12 | EEPROM |
| 13 | FEPROM |
| 14 | EPROM |
| 15 | CDRAM |
| 16 | 3DRAM |
| 17 | SDRAM |
| 18 | SGRAM |
| 19 | RDRAM |
| 20 | DDR |
| 21 | DDR2 |
| 22 | DDR2 FB=DIMM |
| 24 | DDR3 |
| 25 | FBD2 |
How to Check Ram Type in Windows 10 via PowerShell
Fortunately, few PowerShell commands tell you the whole story of the Ram Type, size, number, slots manufacturer, serial number, speed and a lot more. And it needs the lesser effort rather than the command prompt because you can open it simply from Power user menu. So we suggest using PowerShell when you are going to Check Ram Type in Windows 10.
- Press Windows logo and X keys altogether and let the Power menu appear. Select Windows PowerShell (Admin) from the list.

- Select “Yes” on the “User account control” pop up covering the system screen.
- Soon you will experience Administrator: Windows PowerShell on your computer. Copy the following piece of command, paste there and then press Enter:
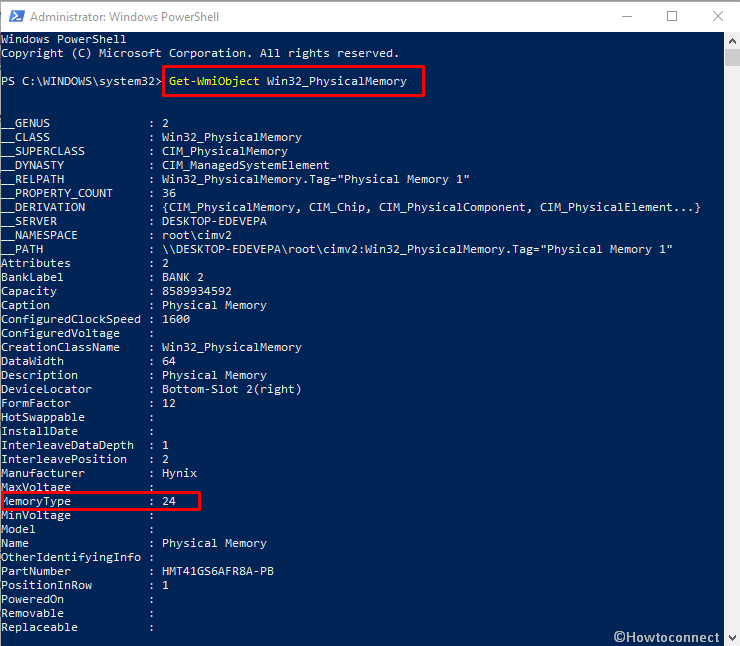
- One more command also works pretty effectively, so copy (without quotes) it from underneath, paste, and hit Enter as an alternative:

If you need to detect only the size of RAM there are two additional methods further.
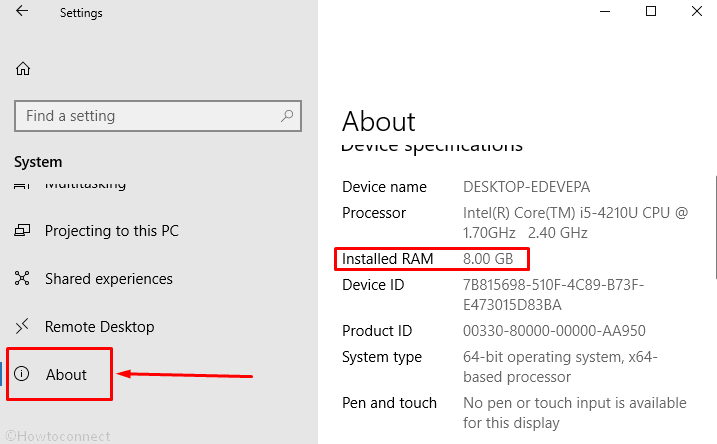
Check Ram Size in Windows 10 using Settings
The Settings application has About section that includes the info about the Installed RAM. See the method –
- Hold down the Windows logo key and I letter on your keyboard at the same time.
- Once the Windows Settings appears, select System.
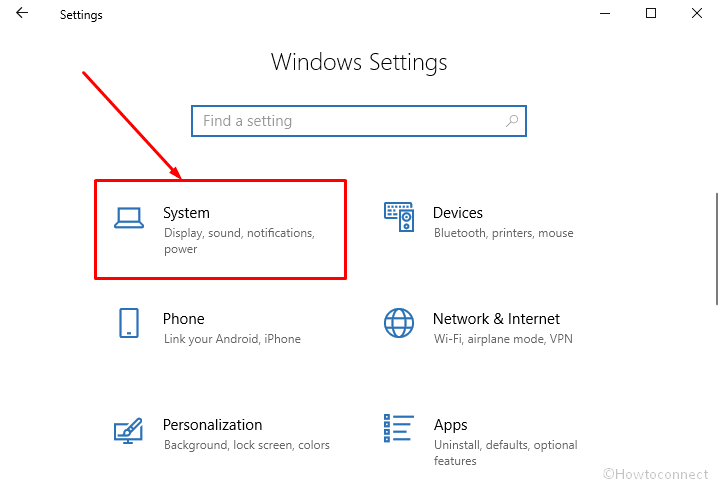
- Go to the left pane on the next screen, scroll down and make a click on About. Move to the opposite side and Locate Installed RAM to find the magnitude of the memory.
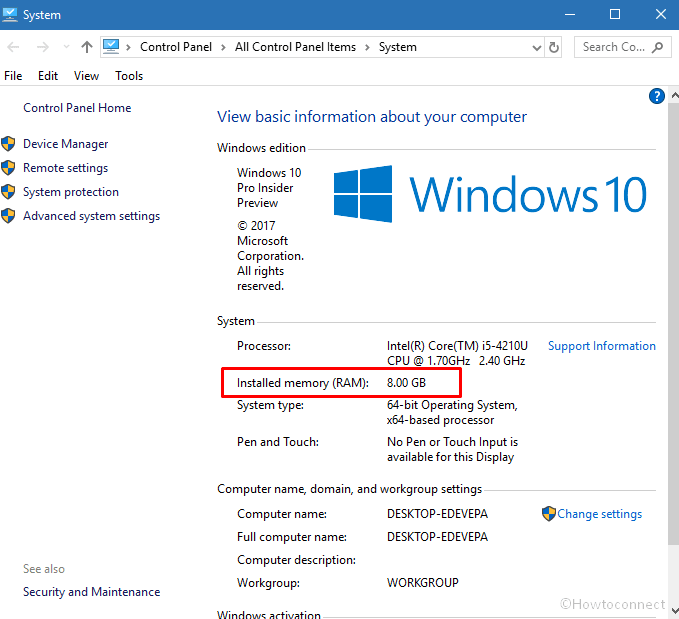
- If you want to see the same information on the Control panel then click on System info.

- Alternatively, You can get access the same location following this path – Control panel => System.
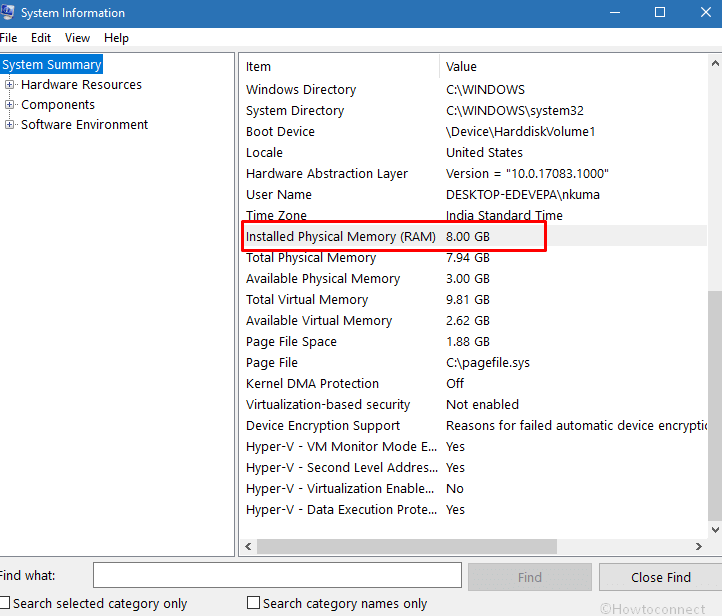
Find RAM Size using System Information
System information tool reveals a report of your PC configuration that includes RAM, Hardware resources, “components”, software environment. So far as the question of memory, you can find its volume installed on your computer.
- Perform a Click in the search bar located at the taskbar just before the Task view icon, type msinfo32 and then hit Enter.

- Once the System information window comes up, find Installed Physical Memory (RAM) and its volume.
This was all about How to Check Ram Type in Windows 10 using the built-in tools,
Using 3rd Party tools
Few third party tools play outstanding roles to check Ram type in Windows 10 when you are going to memory upgrade on your system. We are here sorting the foolproof applications taking into account that you could gain the info without a hitch.
CPU-Z is the most popular freeware and provides all the information about hardware in your computer. You get Ram type, channel #, size, NB frequency, cycle time, and a lots more on a simple interface. The powerful hardware detection tool is based on kernel-mode software driver and collects the information in real time. Qusere engine of this app is very prompt so you don’t need to wait anymore. So you can use this utility without hesitation to check the memory type on your Windows system.
1. Download CPU Z from here and install following the onscreen instructions.
2. Launch the tool and go to Memory tab see all the specifications.
RAMMon
This is a simple working Windows-based application that allows seeing the details of Ram modules. RAMMon uses system information dll SDK to retrieve data of memory installed on your device. You will find the RAM type such as DDR, DDR2, DDR4, XMP, EPP, write recovery time, maximum capacity, bandwidth speed comic locker speed and everything you need. Hinging on RAM type, and other distinct SPD data can be reclaimed as well, for example, the module thickness, width, and other. RAMMon is absolutely free for personal use and has a very small size.
- Navigate to RAMMon official website and download the utility https://www.passmark.com/ftp/rammon.exe.
- Open the tool and perceive all the data you wanted.
SIW is one more tool that lets you check ram type with a lot of additional information on Windows. If you need to find out Memory type, manufacturer name, total and used volume, number of slots, serial number then this is an ideal application. An extra feature is you can create XML report of the info provided by SIW. The software comes as trial version for 30 days, so grab it at current time without paying any cost.
1. Take SIW from https://www.gtopala.com/thank-you/siwviewer.php, download and install on your system. Double click on the Setup icon and allow to expand on the system screen.
2. Select Memory tab from the left pane and find the RAM Type in the Properties column.
ScanMyPC
ScanMyPC is one of the easy-going tools that displays RAM Type on the browser window. The app reads details set on your computer by the manufacturer with the model and throws out on its website. When you run ScanMyPC it automatically sends there and asks you to click on View results. You comprehend the description of System Manufacturer, System Series / Model, Motherboard, Total Installed Memory, Memory Type, Modules Installed, Operating System. If you need to get more about your RAM click on Show Advanced Details.
Closing words
When you have performed finding out with the help of How to Check Ram Type in Windows 10 like DDR, DDR2, SDRAM etc, choosing best one is easy. Now check the capacity that will fulfill your need and upgrade or purchase your memory chip to have a good computing experience. We hope the methods will help you to enjoy Windows 10 PC.


