Настраиваем «Диспетчер серверов» Windows 10 для управления серверами неродного домена
Не так давно Microsoft выпустила очень интересный инструмент Диспетчер серверов (Remote Server Administration Tools). Данный пакет дал возможность системным администраторам наглядно видеть состояние всех Windows серверов и запущенных на них сервисов.
В интернете существует огромное количество статей про данный инструмент и причина для появления ещё одной, очевидно должна быть не тривиальной. И такая причина есть – это возможность мониторинга и управления серверами с ноутбука или компьютера, которые не входят в один домен с администрируемыми серверами, что может быть очень актуально, например, для приходящего сисадмина.
Установка
Прежде чем переходить к основному вопросу нашей статьи кратко разберём один из вариантов установки.
Для начала нужно скачать с сайта Microsoft соответствующий вашей операционной системе установочный пакет. Для Windows 10 для этого пройдите по следующей ссылке, выберите язык, после чего вам будет доступен список доступных пакетов для выбранного вами языка:
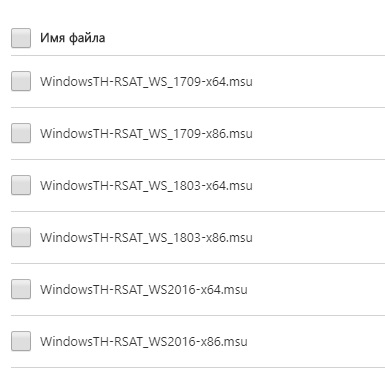
Обратите внимание, здесь вам нужно выбрать тип операционной системы x64 или x86, а также версию установленной ОС Windows. Версию ОС Windows можно узнать, выполнив, например, команду winver в командной строке Windows:
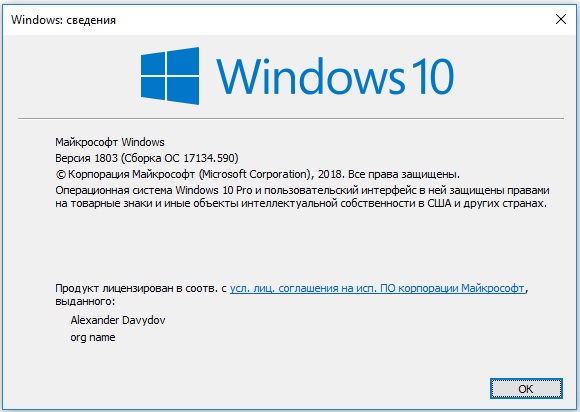
А моём случае это версия 1803, а так как у меня установлена 64-ёх разрядная версия, я буду скачивать установочный пакет WindowsTH-RSAT_WS_1803-x64.msu.
После установки данного пакета открываем папку C:\Windows\System32 и запускаем приложение ServerManager.exe

При необходимости вы можете создать ярлык для данного приложения на рабочем столе или закрепить его на Панели задач.
Добавление серверов в «Диспетчер серверов»
Для добавления серверов, которым мы хотим управлять открываем Управление -> Добавление серверов.
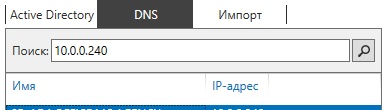
В открывшемся окне нам нужна вкладка DNS (ну или вы можете создать текстовый файл со списком IP-адресов ваших серверов и воспользоваться вкладкой Импорт). Вводим в строке поиска IP-адрес или имя нашего сервера, жмём лупу и добавляем нужный сервер в список:
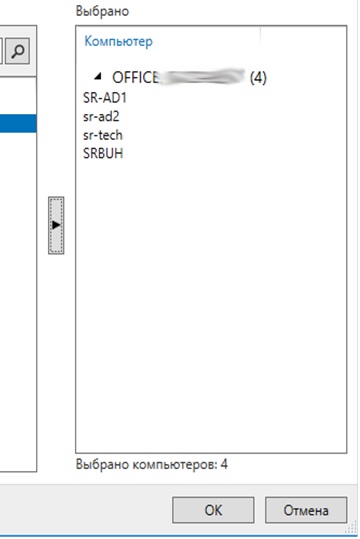
После того, как все сервера добавлены в список жмём ОК:
Если серверы находятся в вашем домене и у вас есть права Администратора, то на этом настройку Диспетчера серверов можно заканчивать.
Если же серверы находятся в неродном для вашего ПК домене, придётся выполнить ещё ряд настроек.
Настройка доступа к серверам
Если после добавления серверов на странице «Все серверы» вы видите следующую картину:
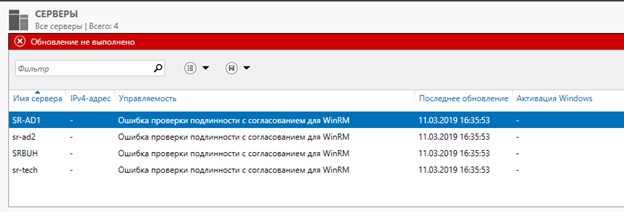
То вам необходимо выполнить следующие действия:
- Убедиться, что пользователь, который осуществляет доступ к серверам обладает правами Администратора данных серверов или домена, при необходимости установить в настройках подключения соответствующего пользователя.
- Если ваш ПК и серверы находятся в разных доменах необходимо прописать все управляемы серверы в списке доверенных хостов вашего ПК.
Определяем пользователя
Для того, чтобы определить или изменить пользователя, кликаем правой кнопкой мыши на соответствующем сервере на странице «Все серверы» Диспетчера серверов и выбираем пункт меню «Управлять как…».
В открывшемся окне вводим полное имя пользователя включая домен, например admin@mytestdomen.ru и его пароль.
Добавляем серверы в список доверенных хостов
Для добавления сервера в список доверенных хостов, необходимо открыть командную строку с правами администратора, после чего выполнить в ней следующий запрос:
winrm set winrm/config/client @
Где 10.0.0.10 – IP-адрес добавляемого сервера, вместо которого можно использовать имя соответствующего сервера, например sr-ad1.mytestdomen.ru
После чего в списке серверов у вас произойдут примерно такие изменения:

Но при попытке добавить следующий сервер, вы столкнётесь с тем, что запись предыдущего сервера будет затираться и активным будет оставаться только последний. Чтобы этого избежать необходимо запустить в командной строке команду, которая добавить в список доверенных хостов все необходимые нам сервера сразу. Для это перечисляем все наши серверы через запятую, примерно так:
winrm set winrm/config/client @
Если вы всё сделали верно наслаждаемся возможностью управлять серверами со своего рабочего ноутбука.
Надеюсь, данная статья была вам полезна.
Данная статья не подлежит комментированию, поскольку её автор ещё не является полноправным участником сообщества. Вы сможете связаться с автором только после того, как он получит приглашение от кого-либо из участников сообщества. До этого момента его username будет скрыт псевдонимом.
Менеджер игровых серверов windows


| 2,657 | уникальных посетителей |
| 74 | добавили в избранное |

This guide differs from others you may have read because of one important factor: the Game Server Manager program. This program automates things for you as a server owner and provides a host of useful tools and features to make setting up and running your server so much easier.
Game Server Manager features — an overview
— Automatic update checking and applying via SteamCMD (with configurable delay and server warning message)
— Players online graph
— Built-in Telnet and RCON client, which can be used manually or set to automatically send messages and commands (such as shutdown and shutdown notices) to the server
— Auto-restart if server goes down
— Message/command broadcast system
— Player list showing everyone online, including ping, score, team and time online.
— INI File Parser, which displays a list of all ini file settings (across multiple files) in a list that you can sort, filter, edit, import and export as you wish.
— CPU and RAM usage display, with graph
— Network bandwidth monitor, with graph
— Ability to output status, players online and server name to a file — formatted however you want
— Single-click access to configuration.
— Detailed server information
— Internal and external IP address display
— Server up-time display
— Optional timed daily server restart.
— Timed incremental backups. Perform a daily backup of game data to a zip file.
— Automatically update game — Ability to run a maintenance / update program between restarts. e.g. SteamCMD to perform daily updates automatically. The server will start back up again when this program finished / ends so you minimise downtime.
— Option to delay timed restarts. i.e. The server will be turned off and the program will wait X seconds before attempting to restart it.
— Telnet to server
— 1 click backup and maintenance
— Remote commands to start, stop, backup, update and send commands to your server.
— Game Profiles — Multiple instances of the program can be run with multiple configurations.
— Designed to be «universal» and work with a multitude of games.
Head to this [www.jimbobslimbob.com] website to download Game Server Manager.
Extract the zip file to a location of your choosing and run the program. There is an installer and basic zip version available on the website. Choose whichever best suits you.
If you have not got it already, head to this site and download and extract SteamCMD.
Open GSM (Game Server Manager) and head to «Settings/Tools > Time Restart and Maintenance«. Click the «. » button under «Program location» and select the location of your SteamCMD executable. This will set up GSM to use SteamCMD for updating.
Add the following command into the command-line parameters box at the bottom of the screen:
+login anonymous +force_install_dir «C:\Valheim» +app_update 896660 +quit
Replace «C:\Valheim» with wherever you want it installed
Run the maintenance program via the «Tools» tab and let SteamCMD update and install the game for you.
Please note: The first time it is performed on the machine, you may need to enter a «Steam Guard Code» before being allowed access. This is Steam’s additional security layer where it will send you an e-mail with a code to input. Input it when prompted by SteamCMD.
You will need to forward the following ports (usually performed from your router’s admin page) to the machine that you are hosting the server on:
2456 — 2458 TCP/UDP
These are the default ports. If you alter them then don’t forget to alter the port forwarding rules as well.
You will also have to ensure that the executable «valheim_server.exe» (located in the «bin» subfolder under your main installation folder) is allowed through any firewalls you have active.
We now need to tell GSM some things about the server. Head to «Server Details» in the settings screen and select your Valheim executable «valheim_server.exe«. This file will be in the folder you installed the game.».
To get the program to correctly query it, enter the IP address of the server and the query port in the relevant field. If you are running your own server this would normally be «127.0.0.1:2457» and select «Common» as the Query Type. If you have altered the default ports, you may need to do so here as well. The query port is 2457 by default.
Tick «Detect via query» in the «Monitoring» tab if you want the status of the server to be detected by a server query, rather than seeing if the program is running (recommended).
It is recommended that you tick «Check server status, every» in the «Monitoring» tab under settings. You may want to increase the interval at which the check is performed if your server takes longer to be «ready». This actively monitors the server and updates the «Main» and «Players Online» tabs and gives you access to the following:
- Automatically restarting the server if it goes down/crashes
- Players online graph
- Performance (RAM and CPU) graph
- Network bandwidth graph
- Ability to output the status to a file (to share or embed, for example)
Currently, you can set a number of options via the command-line (accessed via the «Server Details» tab).
Enter the following here, altering as necessary:
-nographics -batchmode -name «YourServerName» -port 2456 -world «YourWorldName» -password «YourServerPassword» -public 1
Note: the contents of the included batch file «start_headless_server.bat» contains these for reference.
The next time you start the server, the settings you selected will be directly applied to the server.
To start the server simply click on «Start Server» on the «Main» tab. To stop the server, use the button next to start.
The main screen is split into tabs, showing different information on your server. Here you can see the number of players online, up-time, server status, performance and bandwidth details, graphs and access various tools and functions.
The Game Server Manager was designed to be highly configurable and there are many things you can do with it. Some of those features are discussed in the sections below.
The program has a built in incremental backup system for game files. To use this you must set up the locations first.
Go to «Settings/Tools» and click «Program Settings«. Navigate to the «Backup» tab. Click the button to the right of the various «Folder to backup» («. «) to browse for the folder you wish to backup.
The default folder for game data is «C:\Users\(Your Username)\AppData\LocalLow\IronGate\Valheim\worlds.«.
Ensure you select the folders you want to backup in GSM (you can choose up to 5). Next set the location that you want the backups to be saved to in the box below.
Optional: if you want the program to automatically backup game data daily, you can set the relevant option in this screen. Simply tick «Backup data, at» and enter a time (24-hour clock).
You can then manually perform a backup by clicking «Backup Game Data» under the «Settings/Tools» tab.
The program has a built in feature to restart a server at a specific time of day. This can be found in the «Timed Restart» tab under the program settings.
Set up the time you want this to be performed and tick the «Timed restart, at» tickbox if you want to do this.
Even if you do not wish to set a timed restart, you can still make use of this screen. By selecting a program and entering any optional command line parameters in the «Run a program before starting server» section, you can enable updating the server — either manually or automatically.
For example, if you use SteamCMD to update your game, select the SteamCMD executable here and enter any command line details in the relevant box (see Initial Setup section).
Once this is set, you now have the option to perform this action on timed restarts. It will do it all for you!
You can then also use «Run Maintenance Program» under the «Settings/Tools» tab to run this program manually at any time.
Additional tip: if you have also set a backup location you can use «Perform Maintenance Now» under the «Settings/Tools» tab to perform the following sequence:
1. Back up game data
2. Stop Server
3. Run the «maintenance» program
4. Start the server back up again.
Regardless of whether you installed the game via the Steam client or some other method, you can still use SteamCMD to update Valheim. As long as you point SteamCMD to the location of your Valheim installation, it will update it from there.
Download SteamCMD from here.
Head to the «Program Settings» and navigate to «Timed Restart» tab. Select the SteamCMD executable under «Program Location». Next, you need to tell SteamCMD what game we are updating — and where it is. To do this, we can add a number of commands in the command-line parameters field. Here are some of the ones you may need to use (put spaces between separate commands — and omit any shown in the commands):
or
+login anonymous
This will log you into Steam and allow the game to be downloaded.
Please note: The first time it is performed on the machine, you may need to enter a «Steam Guard Code» before being allowed access. This is Steam’s additional security layer where it will send you an e-mail with a code to input. Input it when prompted by SteamCMD.
«
Tells SteamCMD that the game is located here. Enter the full path of Valheim here (e.g. «C:\Valheim»).
+app_update 896660
Will tell SteamCMD to go ahead and update Valheim
validate
Validate that the game files are all present and correct. Tag this at the end of the above statement, without a «+» sign.
+quit
Tells SteamCMD to quit — this should always be the last command on your list.
So, an example command line could be:
+login MySteamUsername MySteamPassword +force_install_dir «C:\MyGameLocation» +app_update 896660 validate +quit
Once this has been set up you can use both the «Run Maintenance Program» (simply runs the program) and «Perform Maintenance» (will Back up game data, stop server, run the «maintenance» program, and finally start the server back up again) buttons under the «Settings/Tools» tab to update the game. Moreover, if you have set a timed restart, it will update the game before starting the server back up!
Once you have the above set, you can also tell the program to check for game updates at a regular interval. When an update is found it will automatically stop the server, update it and restart it again.
To do this, head to the «SteamCMD Auto-Updates» tab under «Program Settings» and fill out the details on this screen. You will need to enter your Steam username and password here, along with an «appid» (896660) and «branch» (public).
Once entered, select a time frame for how often the program should check for updates and tick the «Check for game updates, every» box. You are now good to go!
You can even make the program delay an update once found, for a configurable time period, in order to broadcast a message to players on your server, warning them of the impending update.
This will allow you to start, stop, backup and run maintenance (update) your server remotely (regardless of any built in features a game has).
To do this you will need to have access to the folder that the program is running in via VPN, FTP or some other means. I will not cover how to do that here, since that is really another topic altogether. I will assume that for this guide, you already have access to the folder.
The program periodically looks to see if any of the files listed below are sitting in the folder with it. If it sees any of them it will perform the corresponding actions (and remove the file). So, to perform any of the actions listed below all you have to do is create/copy a file into the Game Server Manager folder with the corresponding name (contents of file makes no difference). The program will see the file and perform the action. Simple as that!
Start the server
File: start.txt
Stop the server
File: stop.txt
Perform a backup
File: backup.txt
Full maintenance cycle (backup, stop server, run maintenance program, start server)
File: update.txt
Restart the server
File: restart.txt
NOTE: Ensure you have set a sufficient delay in the «Server Shutdown» tab or else the server may attempt to restart before it has properly shut down.
Restart the server with command-line parameter set #1
File: parm1.txt
The command-line parameter for this is set in the «Telnet Commands» tab. You can also access this feature via the «Quick Tasks» dropdown button on the «Main» tab.
NOTE: Ensure you have set a sufficient delay in the «Server Shutdown» tab or else the server may attempt to restart before it has properly shut down.
Restart the server with command-line parameter set #2
File: parm2.txt
The command-line parameter for this is set in the «Telnet Commands» tab. You can also access this feature via the «Quick Tasks» dropdown button on the «Main» tab.
NOTE: Ensure you have set a sufficient delay in the «Server Shutdown» tab or else the server may attempt to restart before it has properly shut down.
Send command(s) to the server
File: telnetsend.txt
The program will read all text in this file and send it to the server console (provided you set this up under «Initial Setup > Setting Up GSM»)
NOTE:You only need to perform port forwarding if your server is going to be accessed over the internet. If you are hosting a LAN game then it is not required.
1. Find your hosting machine’s LAN (internal) — displayed on the «Main» tab of GSM.
2. Log into your router’s admin page in a web browser. This is variable — but most router’s by standard, have the details written on the device itself somewhere (a sticker). It will be something like 192.168.0.1 or 192.168.0.255. or whatever. You will undoubtedly require a password, which is no doubt also on the sticker. If there is nothing on the router itself then you may have to get in contact with your ISP (if it’s an ISP’s router) or Google for the default login details of your specific router model.
3. Once you are into the router’s admin pages, search for something called «port forwarding» amongst the menus. Difficult to say exactly where it would be, since all routers are different. Again, Google may be your friend here.
4. Set up a «rule» under the port forwarding screen to direct UDP / TCP traffic from the required ports to the LAN address you found in #1.
5. Save the rules and you should be good go go.
Final Note: If your hosting machine is set up to dynamically retrieve a LAN address on your network then it is possible that subsequent boots will alter your LAN address and cause port forwards to be pointing to the wrong machine. If this happens, you can either alter the port forwards again, or, even better, change your LAN address to static (and set an address manually). Another Google can help you with this.
My friends cannot join the game
If you can connect locally but your friends cannot, it is almost always a firewall, AV or port forwarding issue. Ensure all is configured as it should be.
Things to check:
1. Have you let the server executable through any firewalls you have (Windows, router etc.)? Remember that Windows firewall has 3 different «profiles» (Domain, Private and Public), so ensure you have the correct ones ticked — or tick them all. Also ensure it is allowed through in both directions (incoming and outgoing).
2. Have you port forwarded all the required ports to the correct internal IP address of the server?
3. Is your server’s local IP static? If not, it is liable to change on reboots and mess up your port forwarding rules. You should ideally set it to static to prevent any further changes. Either way, check to ensure your local IP has not altered and subsequently nullified your port forward rules.
4. Do you have any other software (Anti-virus, VPN or VLAN software like Hamachi) that could be interfering with network communication for the server?
Game Server Manager says my server is «Offline» when it is not
Ensure you have entered the correct IP address and port under Server Details (1) for the IP:Port of server to query. This should be «127.0.0.1:2457» by default, but if you have altered ports or are hosting on another IP address then you will need to change this.
I cannot connect to my server from the same machine I host on
There could be a port conflict. You could try and alter the ports used by the server.
I hope this guide and the Game Server Manager was useful to you.
It may interest you to know that the program has been tried and tested not only with Valheim — it works with Neverwinter Nights, Killing Floor 2, Eden Star, Empyrion, Avorion, 7 Days to Die, GRAV, Medieval Engineers and Space Engineers too. Infact, any game that uses the standard querying language should work with it.
I have also used it to a lesser capacity in hosting servers for Project Zomboid, Evochron Mercenary, Planet Explorers, Void Expanse and many more that I am sure I have forgotten.
Hopefully now you have read the guide, you will have a good understanding as to how it works if you want to try it out on other games.
The Game Server Manager program is being updated regularly by myself. It has all been done in my spare time, to aid server hosters.


