- Группировка файлов по папкам на Mac
- Создание папки
- Перемещение файлов по папкам
- Быстрая группировка нескольких объектов в новую папку
- Объединение двух папок с одинаковыми именами
- Как объединять папки на Mac (macOS)
- Как объединить папки с одинаковым именем на Mac
- Как объединять папки с разными именами на Mac
- How to merge folders on your Mac
- Merge folders with the same name on Mac
- Merge folders with different names on Mac
- Wrapping it up
- macOS 101: The Many Ways to Merge Folders on the Mac
Группировка файлов по папкам на Mac
Все данные на компьютере Mac (документы, изображения, картинки, музыка, приложения и другие данные) содержатся в папках. При создании документов, установке приложений и выполнении других действий можно создавать новые папки для систематизации данных.
Создание папки
На Mac нажмите значок Finder  в Dock, чтобы открыть окно Finder, затем перейдите в место, в котором требуется создать папку.
Можно также нажать рабочий стол, если Вы хотите создать папку на рабочем столе.
Выберите «Файл» > «Новая папка» или нажмите сочетание клавиш Shift-Command-N.
Если команда «Новая папка» недоступна, Вы не можете создать папку в текущем месте.
Введите имя папки, затем нажмите клавишу Return.
Перемещение файлов по папкам
На Mac нажмите значок Finder в Dock, чтобы открыть окно Finder.
Выполните одно из следующих действий.
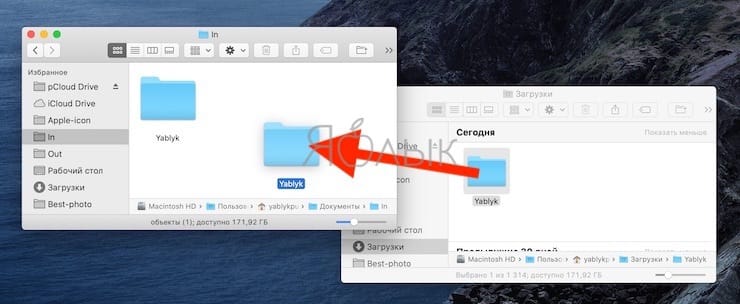
Поместите объект в папку: перетяните его в папку.
Поместите несколько объектов в папку: выберите объекты, затем перетяните один из объектов в папку.
Все выбранные объекты перемещаются в папку.
Сохраните объект в исходном местоположении и поместите копию в папку: Выберите объект, нажмите клавишу Option и, удерживая ее, перетяните объект в папку.
Сохраните объект в исходном местоположении и поместите его псевдоним в новую папку: удерживая клавиши Option и Command, перетяните объект в папку, чтобы создать псевдоним.
Создайте копию объекта в той же папке: Выберите объект, затем выберите «Файл» > «Дублировать» или нажмите сочетание клавиш Command-D.
Скопируйте файлы на другой диск: Перетяните файлы на диск.
Переместите файлы на другой диск: Удерживая клавишу Command, перетяните файлы на диск.
Быстрая группировка нескольких объектов в новую папку
Вы можете быстро создать папку, объединив в нее объекты на рабочем столе или в окне Finder.
На Mac выберите все объекты, которые Вы хотите сгруппировать.
Нажмите один из выбранных объектов, удерживая клавишу Control, затем выберите «Новая папка из выбранного».
Введите имя папки, затем нажмите клавишу Return.
Объединение двух папок с одинаковыми именами
Если есть две папки с одинаковыми именами в разных местах, их можно объединить в одну.
Удерживая клавишу Option, перетяните одну папку на Mac туда, где находится другая папка с таким же названием. В появившемся диалоговом окне нажмите кнопку «Объединить».
Опция «Объединить» появляется только в том случае, когда в одной из папок есть элементы, которых нет в другой папке. Если в папках содержатся разные версии одинаково названных файлов, будут доступны только опции «Остановить» или «Заменить».
Чтобы создать удобный список файлов, у которых есть что-то общее, на основании заданных Вами критериев, используйте смарт-папку.
Источник
Как объединять папки на Mac (macOS)
Вполне вероятно, что с вами такое уже случалось – вы создавали папку с оригинальным именем, а потом забыли об этом и создали папку с таким же именем в другом месте. Вы могли сделать это для своих рабочих файлов, финансовых документов или школьных заданий. А в результате у вас появилось две разные папки в разных местах, но с одинаковыми именами. А информация содержится частично там, частично тут.

С другой стороны, возможно, вы дали именам папок слегка отличающиеся имена, но проблема осталась все той же. Есть два отдельных каталога, но нужен только один.
Вы можете объединять на Mac папки с одинаковыми именами, конечно, с некоторыми оговорками. А если вам понадобится объединить каталоги с разными именами, то можно сделать это вручную, просто переместив содержимое из одного места в другое.
Ниже мы подробно расскажем, как это сделать, чтобы вы могли очистить свой Mac от лишних папок, объединив их.
Как объединить папки с одинаковым именем на Mac
При подготовке к объединению двух папок с одинаковым именем вам нужно будет выбрать окончательное местоположение. Это означает, что необходимо заранее спланировать – переместить папку A в папку Б или наоборот. Затем, когда вы будете готовы, выполните следующие действия:
1. Выберите первую папку. Это будет та, которую вы хотите переместить в местоположение второй папки. Чтобы открыть второе окно с папкой в Finder, нажмите сочетание клавиш ⌘Command + N.
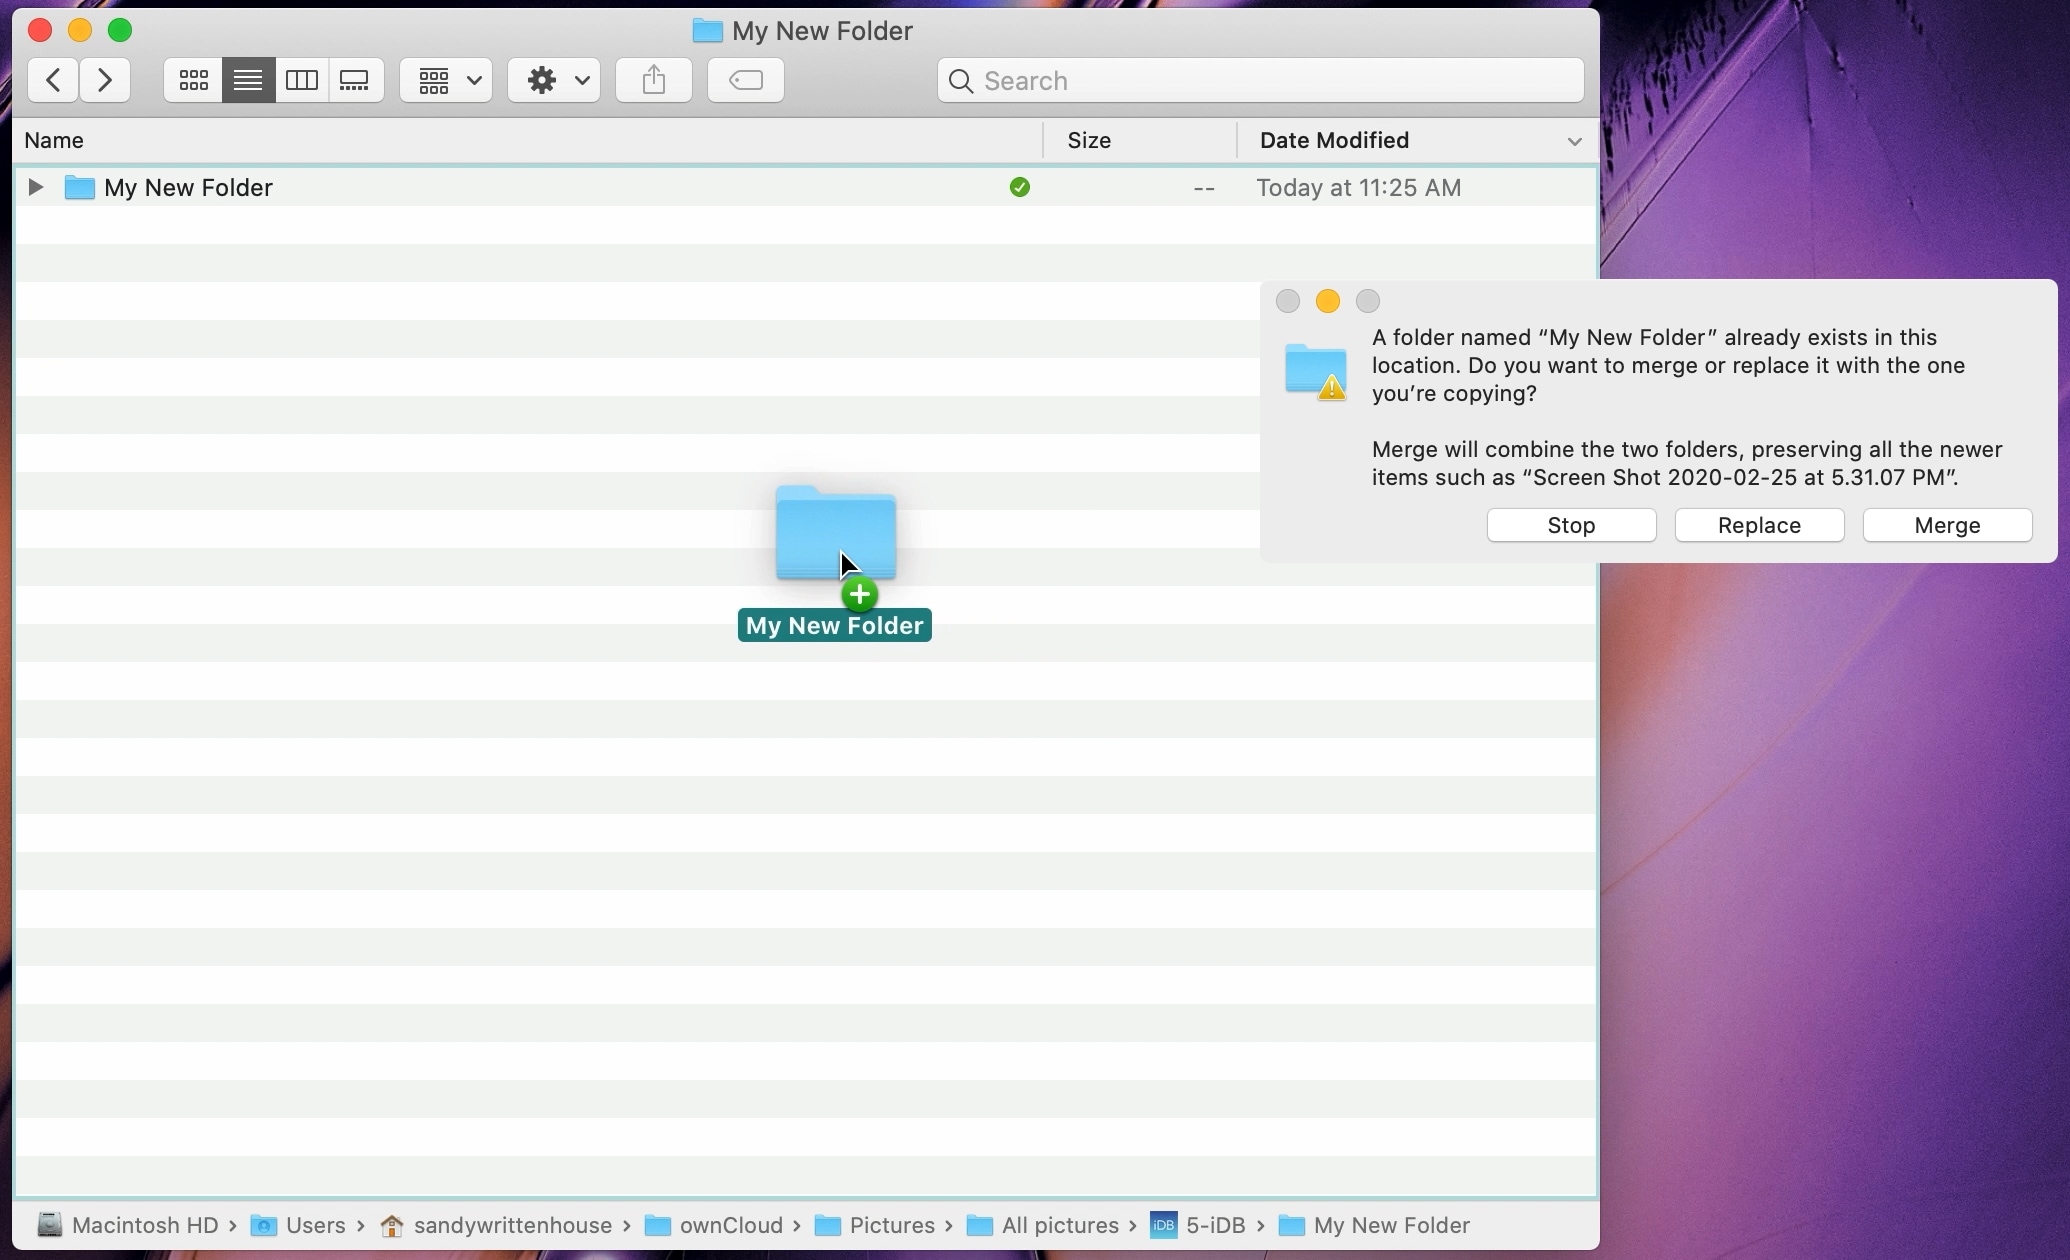
2. Удерживая нажатой клавишу ⌥Option (Alt), перетащите первую папку в каталог со второй папкой и отпустите ее. Но продолжайте удерживать нажатой клавишу ⌥Option (Alt), пока не увидите всплывающее окно.
3. В появившемся окне нажмите «Объединить».

Эта опция «Объединить» появится во всплывающем окне, только если:
- Вы продолжаете удерживать клавишу ⌥Option (Alt) до тех пор, пока не отпустите папку.
- Одна из папок содержит элементы, которых нет в другой папке. Если обе папки содержат одинаковые элементы или версии, вы увидите только варианты «Остановить» и «Заменить».
Как объединять папки с разными именами на Mac
Если ваши папки содержат хотя бы немного отличающиеся имена, вы можете легко дать одной из них имя другой и выполнить описанные выше шаги по объединению. Но если вы предпочитаете не делать этого или имеете одинаковые элементы в каждой папке, вы можете выполнить перемещение элементов вручную и удалить одну ненужную уже папку.
1. Откройте обе папки. Чтобы открыть второе окно с папкой в Finder, нажмите сочетание клавиш ⌘Command + N.
2. В одной папке, из которой вы хотите удалить элементы, выберите из меню Правка → Выбрать все или используйте сочетание клавиш ⌘Command + A.
3. Перетащите выбранные элементы из первой папки во вторую.
4. Если у вас есть элементы с одинаковыми именами в каждой папке, то вы увидите всплывающее сообщение с вопросом, хотите ли вы сохранить оба элемента, сделать пропуск или произвести замену.

- Если вы выберете «Оставить оба», к перемещаемому элементу будет добавлено слово «копия» в конце имени файла.
- Если вы выберете «Остановить», то остальные элементы будут перемещены, а дубликаты останутся в первой папке.
- Если вы выберете «Заменить», элементы, которые вы перемещаете, заменят имеющиеся элементы во второй папке.
5. После того, как вы успешно переместите свои элементы, вы можете при желании удалить пустую папку, просто перетащив ее в корзину.
Источник
How to merge folders on your Mac
Have you ever created a folder, forgot you did it, and created another one with the same name in another spot? Maybe you did it for work files, tax documents, or school assignments. Now you end up with two different folders in two different locations that have the same name.
On the other hand, maybe you created those folders with slightly different names. But, you still have the same problem, right? You still have two separate folders that should really be only one.
You can merge folders on Mac that have the same name, of course there are some caveats. And for those folders you want to merge with different names, you can “merge” them manually by simply moving the contents.
We’ll show you how to do both of these so you can clean up your Mac by merging folders.
Merge folders with the same name on Mac
When you prepare to merge two folders with the same name, you’ll need to decide on the final location. Meaning, will you move folder A to folder B’s location or vice versa. Then when you’re ready, follow these steps.
1) Select the first folder. This is the one that you want to move to the second folder’s location.
2) Hold down your Option key, drag the folder onto the other one, and release – be sure to keep holding down the Option key until you see the pop-up message below.
3) In the pop-up window, click Merge.
The Merge option will only appear in the pop-up window if:
- You continue to hold down the Option key until after you release the folder
- One of the folders contains items that aren’t in the other folder. If both folders contain the same items or versions of, you will only see Stop and Replace options.
Merge folders with different names on Mac
If your folders contain slightly different names, you can easily rename one to the other and follow the steps above to merge them. But, if you prefer not to do that or have the same items in each folder, you can perform a manual move of the items and delete one folder.
1) Open both folders.
2) In one folder that you want to remove items from, click Edit > Select All from the menu bar or use the keyboard shortcut Command + A.
3) Drag the selected items from the first folder into the second one.
4) If you have items with the same name in each folder, you’ll see a pop-up message asking if you want to Keep Both, Stop, or Replace.

If you choose to Keep Both, the items you move will have the word “copy” added to the end of the filenames.
If you choose Stop, the rest of the items will be moved while the duplicate will remain in the first folder.
If you choose Replace, the items you move will replace those in the second folder.
5) Once you successfully move your items, you can delete the empty folder if you like, by dragging it to the Trash.
Wrapping it up
If you need to merge folders on your Mac, you have a couple of easy ways to do it. And the first method is ideal if you’re able to use it.
Do you have a need to merge folders? If so, share any tips you have in the comments below!
And for more help with your Mac or other devices, browse through our Tutorials section.
Источник
macOS 101: The Many Ways to Merge Folders on the Mac
One of the shortcomings of the Finder is the lack of options when it comes to managing folders and their content. While there are a few issues that are often mentioned, the one we’re going to address here is how to merge folders that have the same name.
It seems to happen quite often when you have a project you’re working on in two different locations, say at home and at work. Or perhaps you’re working on a project on just one Mac, but you have a folder for the currently active project, and one for the updates you’re planning to perform.
In either case, the goal is to unite the two folders so they contain all of the files found in each one. When there are two files with the same name, you want the most recent version to be used, and the older one to be replaced.
Seems simple enough, but for a long time this type of basic file/folder manipulation was beyond the capabilities of the Mac’s Finder. Of course, there are quite a few third-party utilities that can perform the merge function for you; there are even some Apple utilities that can assist in this undertaking. But we’re going to start with just the Finder we use every day, and try out some of its merging options.
Options When Moving Files
When moving or copying files (we’re primarily going to refer to moving files, though you could also be copying files) from a source folder to a destination folder, there are a number of options for how file merging is performed.
The first option is none at all. If the files you’re moving are unique, that is, the names don’t match any of the files currently in the destination folder, then no merge option is presented, and files are simply moved to their new home in the destination folder.
 (The default options for merging files conceal a fourth option that can be accessed under certain conditions.)
When one or more file names in the source folder match one or more file names in the destination folder, then the Finder will present four options in a dialog box for how to merge the files into the destination folder.
Actually, you’ll only see three of the four merge options; the last one is hidden, but we’ll show you how to access it.
Keep Both: When a file name matches, both versions are kept in the destination folder, with the file that came from the source folder having a version number appended to its name. As an example, if both the source and destination folder had a file named ExampleFile, then after the move, the destination folder would contain files named ExampleFile and ExampleFile 1.
Stop: As the name implies, selecting this merge option halts the merge function entirely; no files will be moved from the source and no files in the destination will be replaced.
Replace: Selecting the Replace option will cause any file in the destination folder that has the same name to be replaced by the file from the source folder.
 (The Skip option replaces the usual Keep Both button provided there are multiple files being moved and you hold down the option key once the dialog box is presented.)
Skip: This is the hidden option that can be revealed by holding down the option key when the dialog box is present. Skip replaces the Keep Both option and allows you to skip over the currently listed file. This is the same as the Stop function, but only applies to the currently listed file in the dialog box. You can use Skip when you spot a file during the merge process that you didn’t mean to move.
Options When Merging Folders
So far, we’ve looked at the options available when moving one or more files between folders. But there are different options when you find yourself moving folders with identical names into a folder.
In this example, you’re moving a folder into a folder that already has a folder with the same name. That’s a lot of items called folder, so let’s add some names to make it easier to follow along.
In this example, you have two folders named Project X, a super-secret assignment you’ve been working on. You have two folders with the same name because you’ve been working on this project on two different computers, and now you want to merge the two folders into one, keeping the most recent versions of any files they contain, and discarding older versions.
While there are quite a few syncing apps that can do this for you, the Finder can also take care of this basic task.
For the Finder to perform the merge you’ll need a destination folder to hold the merged folders; for this example, we’ll simply call this folder Merged. The two source folders have the same name, Project X, but they’re located in two different locations on your Mac.
Start by moving one of the Project X folders to the Merged folder; either one will do.
Hold down the Option key while you drag the second Project X folder onto the Merged folder.
 (When you move a folder to a location that contains a folder with the same name, the Finder will present a number of merging options.)
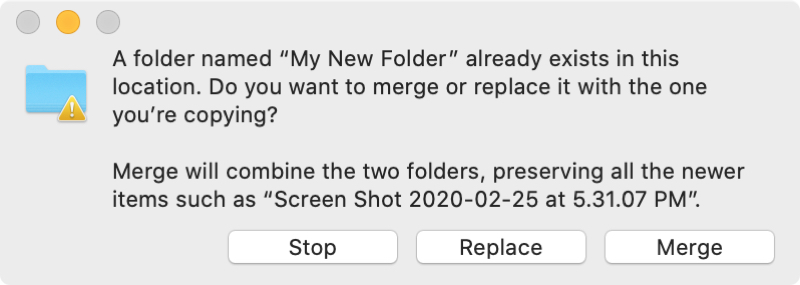
A dialog box will open, presenting two or three options, depending on the state of the files in each Project X folder:
Stop: This will halt any move process, leaving both folders untouched.
Replace: This will cause the folder already present in the target folder (Merged) to be completely replaced by the one you’re moving.
Merge: This option will combine the contents of both folders, keeping the newest version of files with matching names, and preserving all files with unique names. The end result will be a folder that contains the newest version of each file from the two folders.
Merging Subfolders
When merging folders, any subfolders will also undergo the merge functions, with this caveat: The Finder only offers the merge option if there are changes in the top-level folders. In this example, if the Project X folders are identical, with the same names and modification dates, even though there are changes in one or more subfolders, the option to merge will not be presented.
Because it’s not easy to know if there are changes within subfolders, you can use the Ditto command to perform the merge and ensure that all files are properly copied no matter where they reside.
Use Ditto to Merge
If you find yourself in the situation where only subfolders have changes that need to be merged, you can use the Ditto command from within Terminal. Ditto will perform a recursive merge, starting at the top level of the folder, merging all the files, and then continuing on to each subfolder it encounters. The end result is that all files and subfolders in the two Project X folders will be merged.
 (The Ditto command can merge folders and all subfolders they may contain.)
To use Ditto, follow these instructions, once again using Project X as the example:
Launch Terminal, located at /Applications/Utilities/.
In the Terminal window that opens, enter the following after the Terminal prompt:
Ditto source_folder destination_folder
Where source_folder is the pathname to one of the Project X folders, and destination_folder is the pathname to the other Project X folder.
An easy way to enter the pathnames is to open a Finder window and navigate to the location of the first folder, and then drag it onto the Terminal window. Terminal will convert the dragged folder into the pathname for you.
Press the space key once after you drag the first folder into Terminal, and then repeat the process with the second folder, dragging it onto the Terminal window.
Once both folders have been dragged onto the Terminal window, press the return key to execute the Ditto command.
The results of the Ditto merge will be present in the second folder (destination_folder) you dragged to the Terminal window. You can view the results in the Finder.
Note: We will update once we confirm this tip is compatible with macOS Mojave
Источник


