- Microsoft defender windows server 2019
- Можно ли полностью удалить Защитник Windows?
- Методы удаления Windows Defender
- Удаление защитника Windows через диспетчер серверов
- Как удалить защитник виндовс через PowerShell
- Как удалить защитник windows через Windows Admin Center
- Установка обновлений Microsoft Defender в образы Windows 10 и Windows Server
- Поддержка образов Windows 10 и Windows Server
- Как использовать инструмент для обслуживания обновлений Microsoft Defender
- Microsoft Defender Antivirus on Windows Server
- The process at a glance
- Enable the user interface on Windows Server
- Turn on the GUI using the Add Roles and Features Wizard
- Turn on the GUI using PowerShell
- Install Microsoft Defender Antivirus on Windows Server
- Use the Add Roles and Features Wizard
- Use PowerShell
- Verify Microsoft Defender Antivirus is running
- Update antimalware Security intelligence
- Submit samples
- Submit a file
- Enable automatic sample submission
- Configure automatic exclusions
- Need to set Microsoft Defender Antivirus to passive mode?
- Set Microsoft Defender Antivirus to passive mode using a registry key
- Disable Microsoft Defender Antivirus using the Remove Roles and Features wizard
- Turn off the Microsoft Defender Antivirus user interface using PowerShell
- Are you using Windows Server 2016?
Microsoft defender windows server 2019
Добрый день! Уважаемые читатели и гости IT блога Pyatilistnik.org. Не так давно мы с вами установили Windows Server 2019 и произвели его базовую настройку. Развернули на сервере разные сервисы и запустили его в производственную среду. Идет время и на нем появляется проблема, что встроенный антивирус защитник Windows он же Windows Defender, начинает потреблять очень много процессорных мощностей и было принято решение его удалить. Или же у вас есть желание установить другой антивирус, а защитник Windows не отключать, а удалить совсем, как это сделать. Именно этот момент мы и разберем сегодня в данной заметке.
Можно ли полностью удалить Защитник Windows?
И так, как я и писал выше, мой Windows Defender на 2019 сервере стал кушать много CPU, примерно 25%, нечто подобное я уже видел на сервере печати, где процесс «Print Filter Pipeline Host » на 100% использовал процессор или же недавний пример с процессом Wmiprvse.exe. Пример такого поведения в Windows Server предостаточно, было принято решение отключить защитника, как службу да и еще к тому же установить сторонний антивирус Касперского, так сказать убить два зайца сразу. И какого же было мое удивление, когда я начал искать информацию об отключении Windows Defener, что в Windows Server 2016 и 2019, его можно удалить, как обычный компонент. Это правильнее, так как в системе становится меньше служб и меньше нужно обновлять ее, короче одни плюсы.
Методы удаления Windows Defender
Хоть разработчики и обошли данной возможностью Windows 10, но в Windows Server 2016 и 2019 она есть и вы полностью можете убрать из них защитник. Сделать это можно тремя методами:
Что конкретно мы деинсталлируем данными методами. Откройте через пуск «Параметры Windows», или просто нажмите сочетание клавиш WIN+I. Перейдите в раздел «Обновление и безопасность».
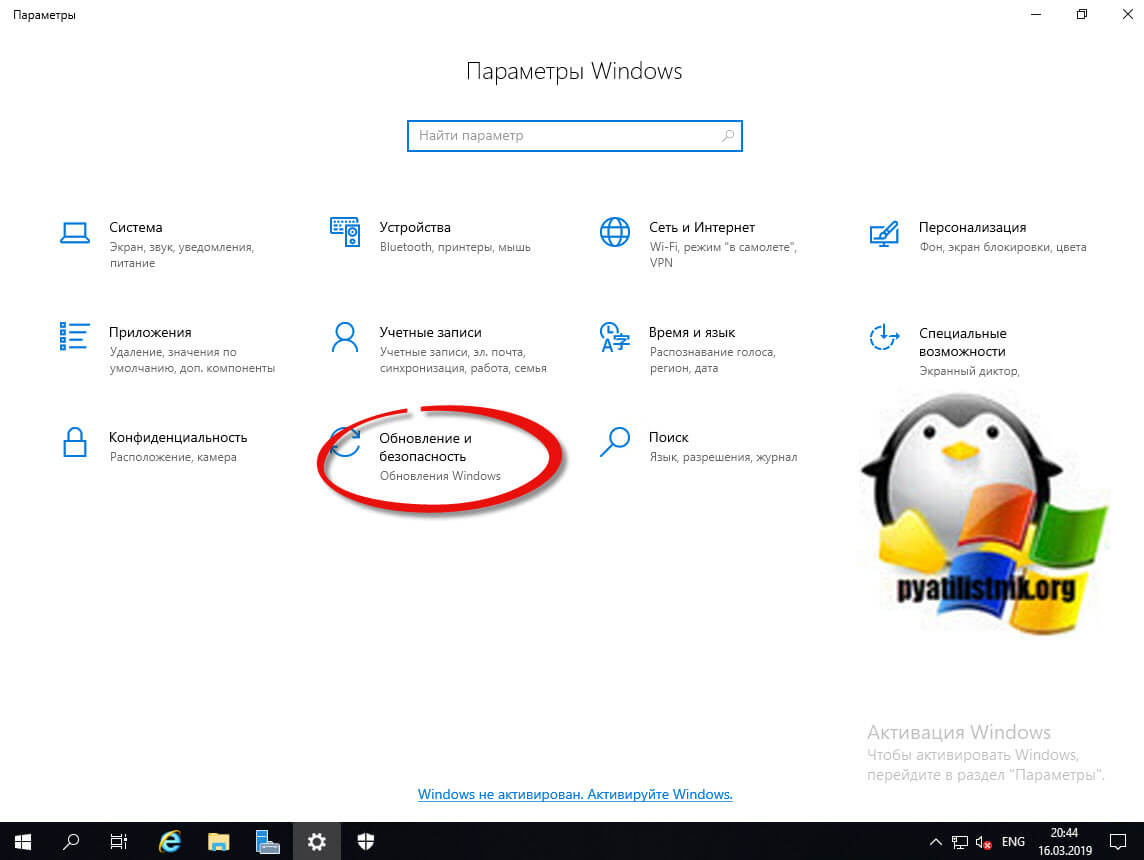
Находим пункт «Безопасность Windows» и нажимаем «Открыть службу безопасность Windows».
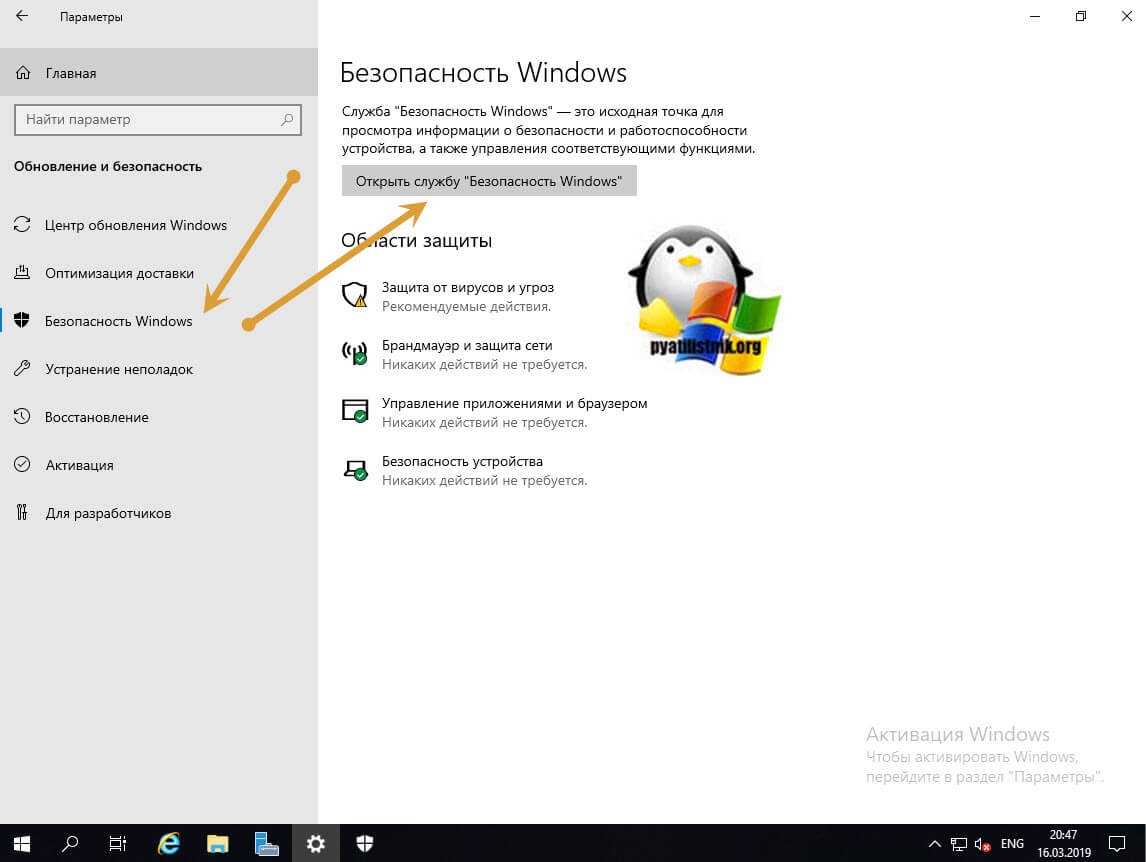
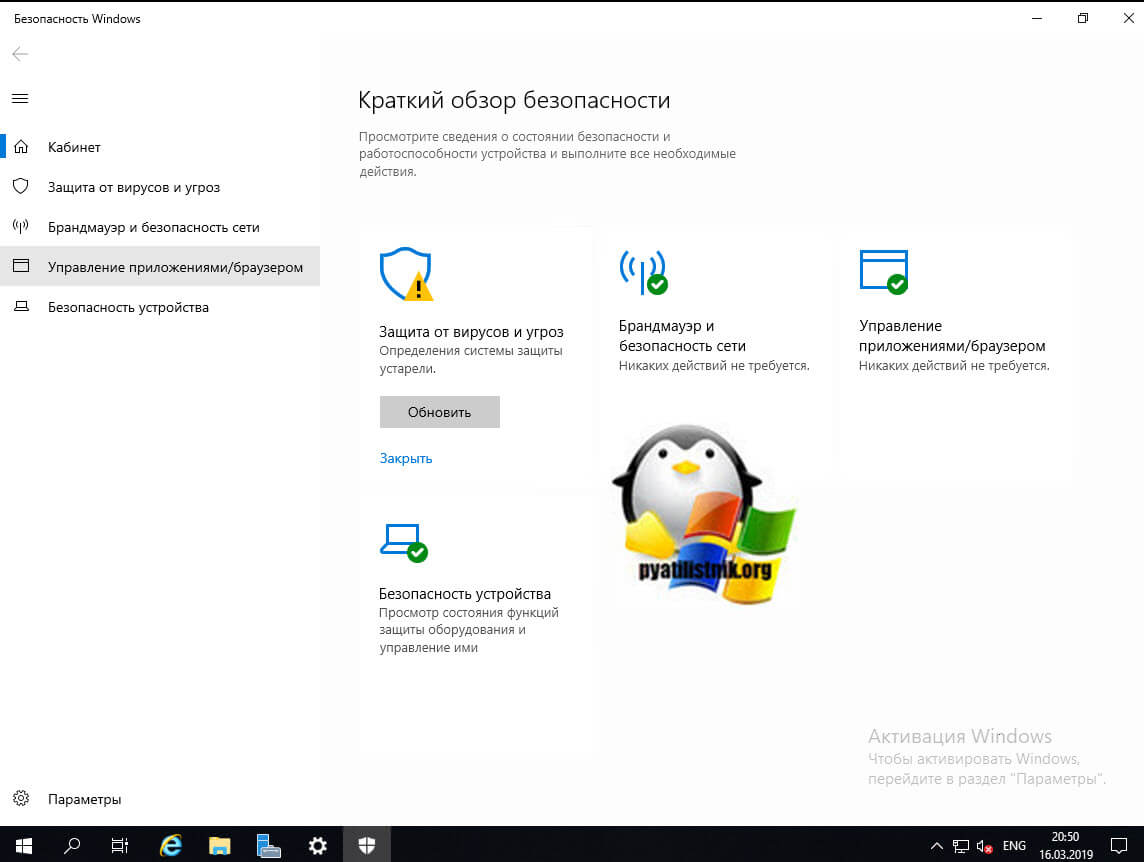
У вас откроется Windows Defender, в котором можно управлять четырьмя пунктами:
- Защита от вирусов и угроз
- Брандмауэр и безопасность сети
- Управление приложениями/браузер
- Безопасность устройств
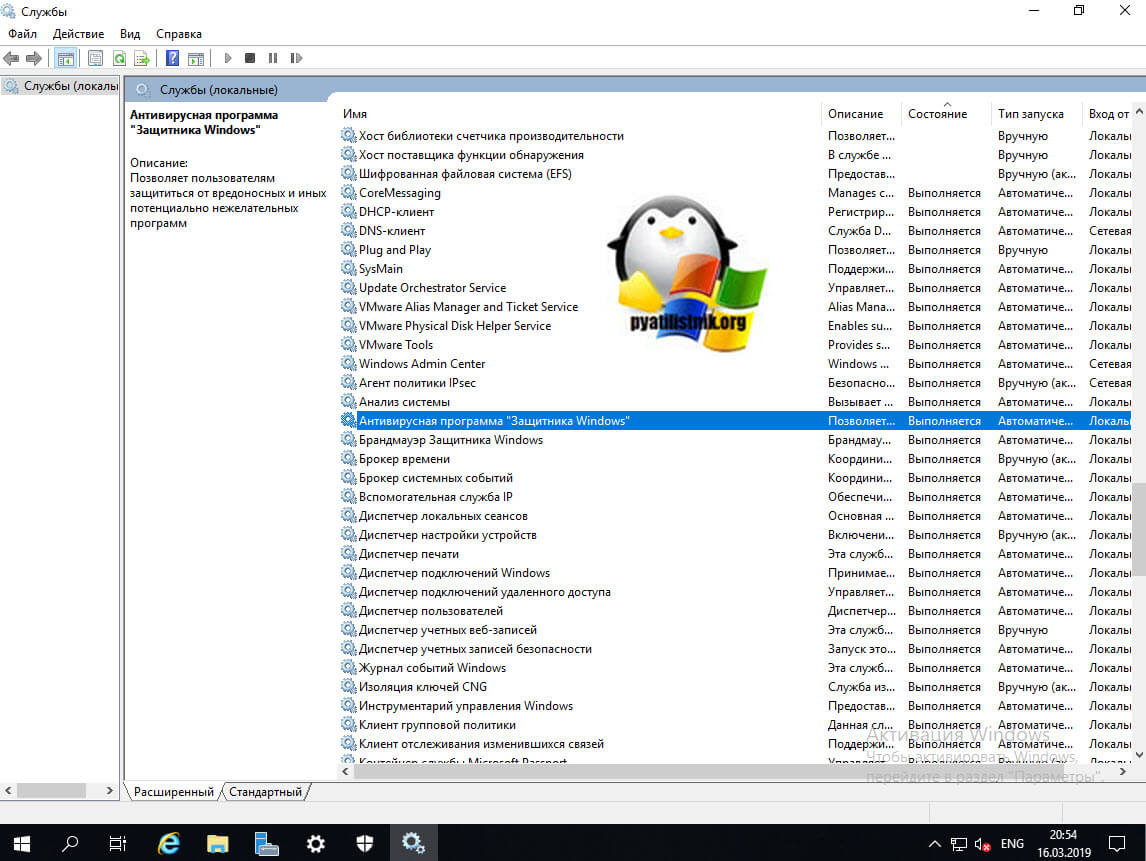
Если посмотреть службы в Windows Server 2019, то вы обнаружите вот такие две:
- Антивирусная программа «Защитник Windows»
- Брандмауэр Защитника Windows
Удаление защитника Windows через диспетчер серверов
Оснастка «Диспетчер серверов» или ServerManager.exe, это основной инструмент администрирования серверов, начиная с Windows Server 2012 R2, который плотно вошел в инструменты системного администратора. Открываем ее и переходим в пункт «Управление — Удаление роли или компоненты».
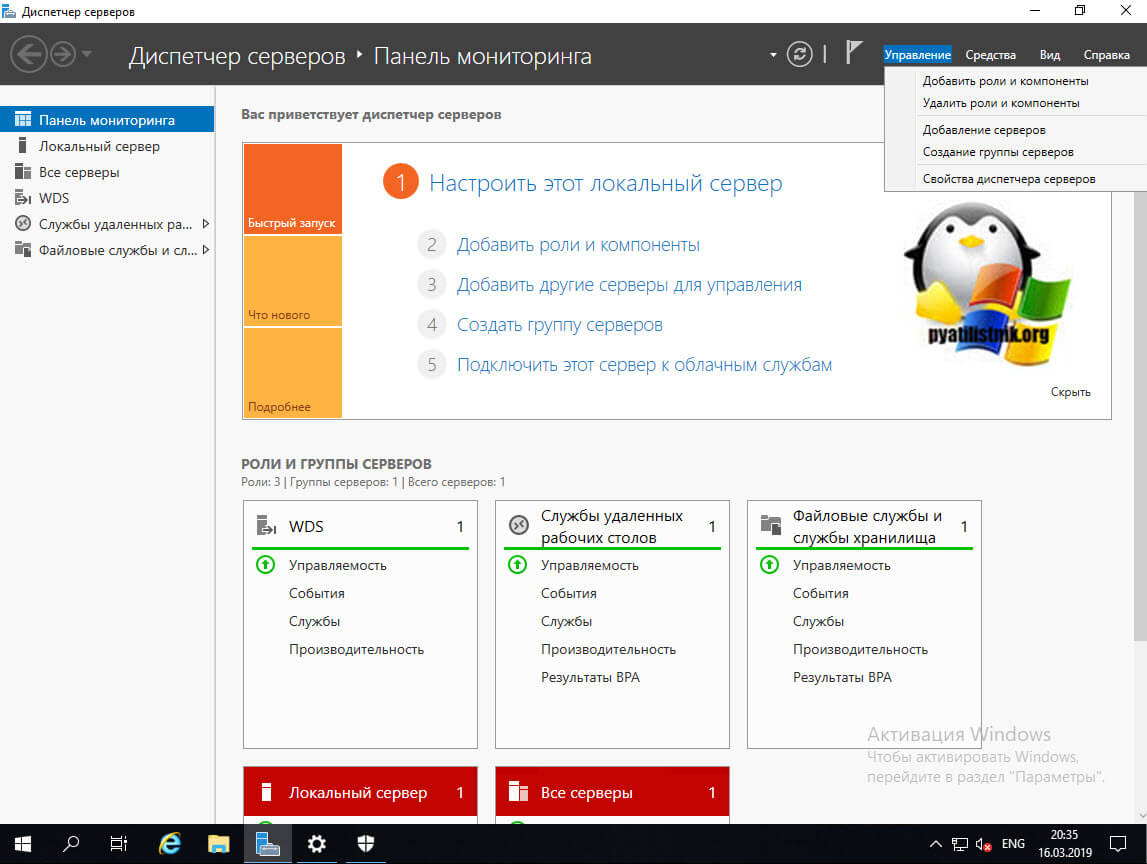
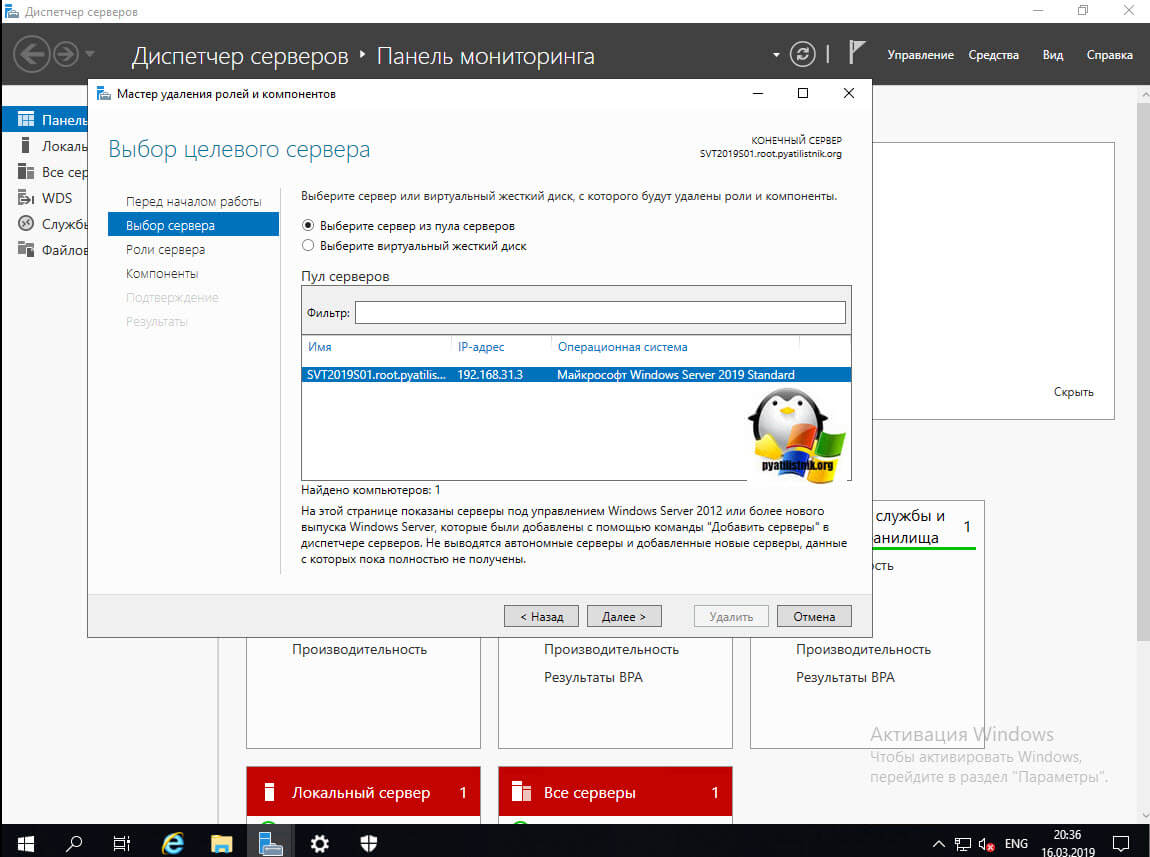
Выбираем сервер с которого мы планируем полностью удалить защитник Windows. Напоминаю, что «Диспетчер серверов» может управлять и удаленным сервером или целым пулом серверов. В моем примере я выберу свой локальный сервер, на котором я устанавливал WDS роль.
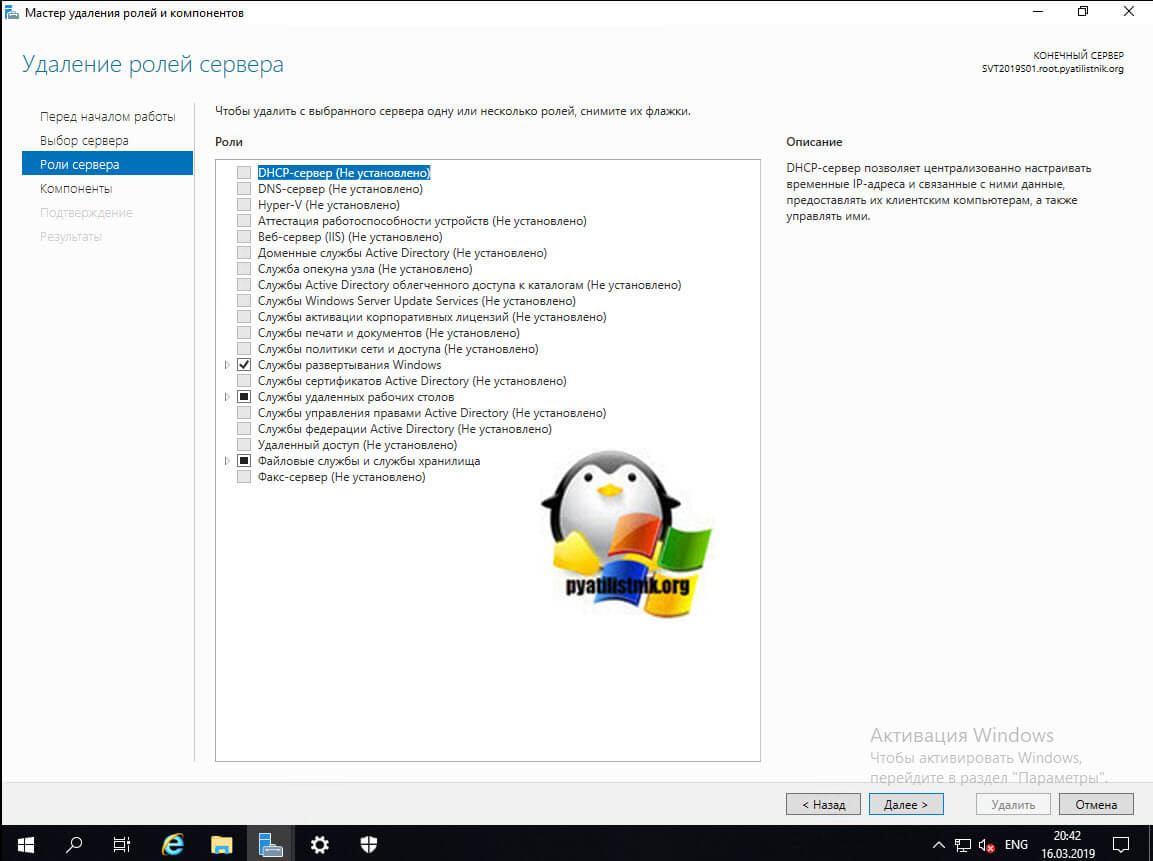
Снимаем галку «Windows Defender Antivirus», это позволит его полностью удалить с сервера. Нажимаем далее.
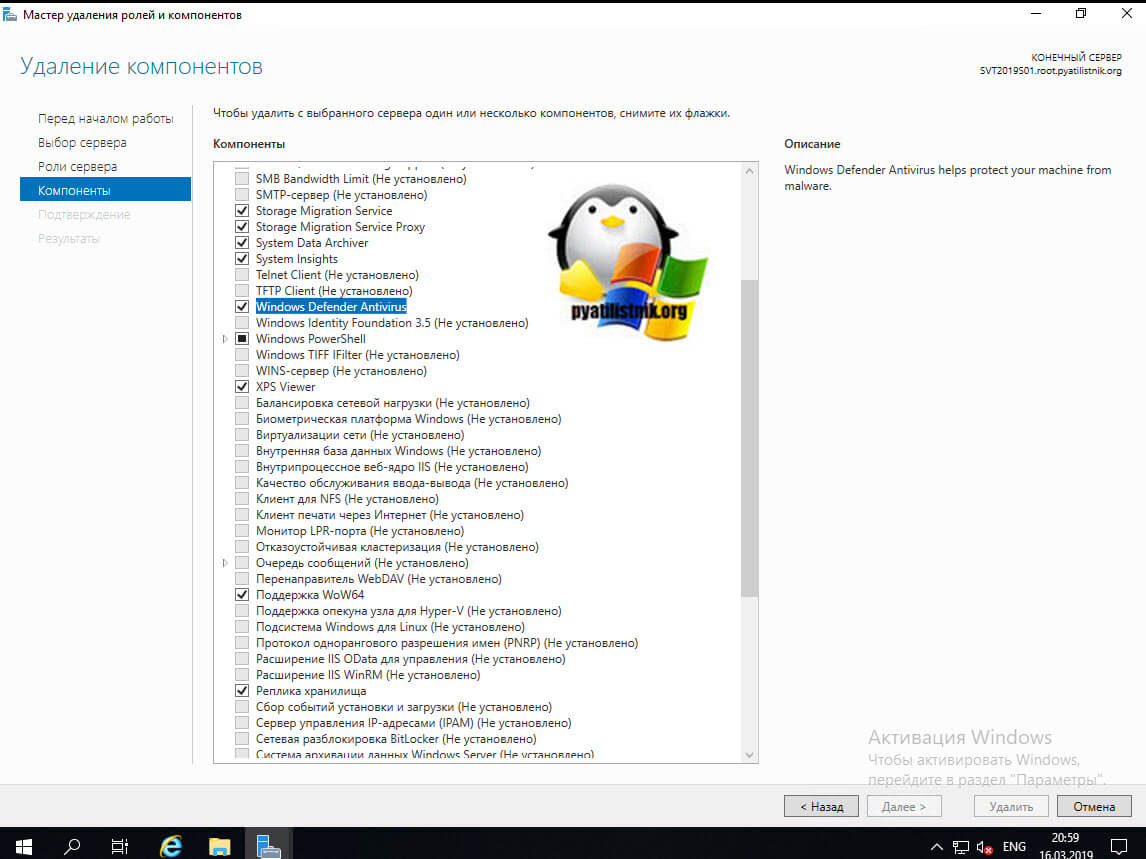
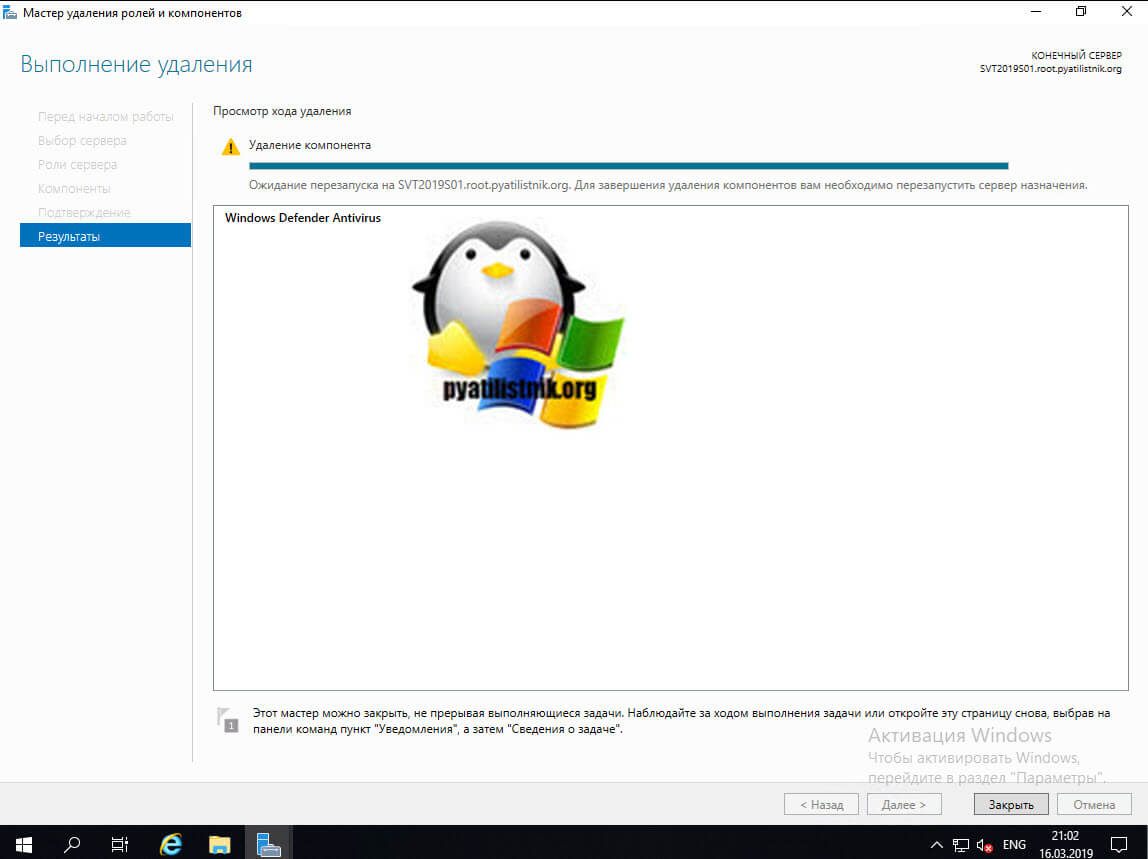
Нажимаем кнопку «Удалить». Сам процесс занимает около минуты.

После удаления компонента, нужна обязательная перезагрузка сервера. Выполните ее, когда у вас будет возможность, но лучше не затягивать, сервера начинают тупить в таком состоянии ожидания.
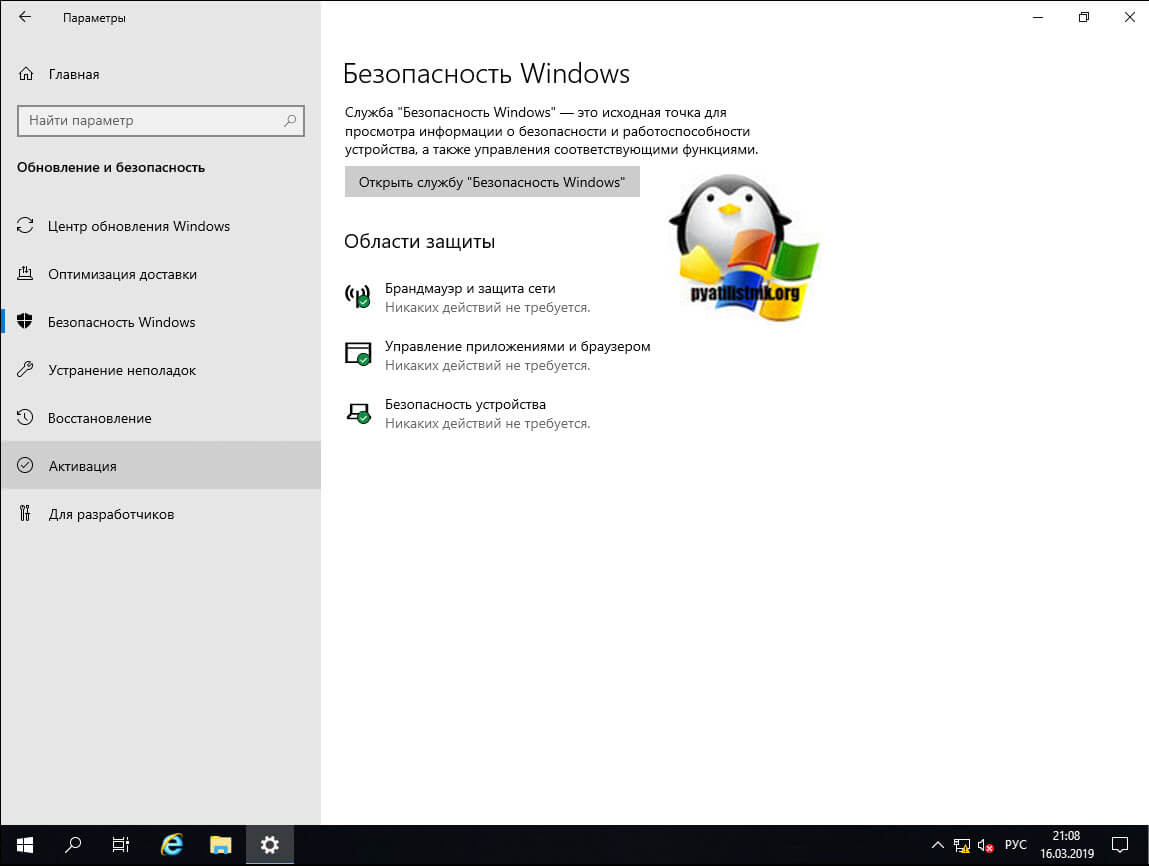
Все, теперь после перезагрузки защитник windows удален с сервера. Можете это проверить. Откройте пункт «Безопасность Windows» и убедитесь, что там пропал пункт «Защита от вирусов и угроз»
Как удалить защитник виндовс через PowerShell
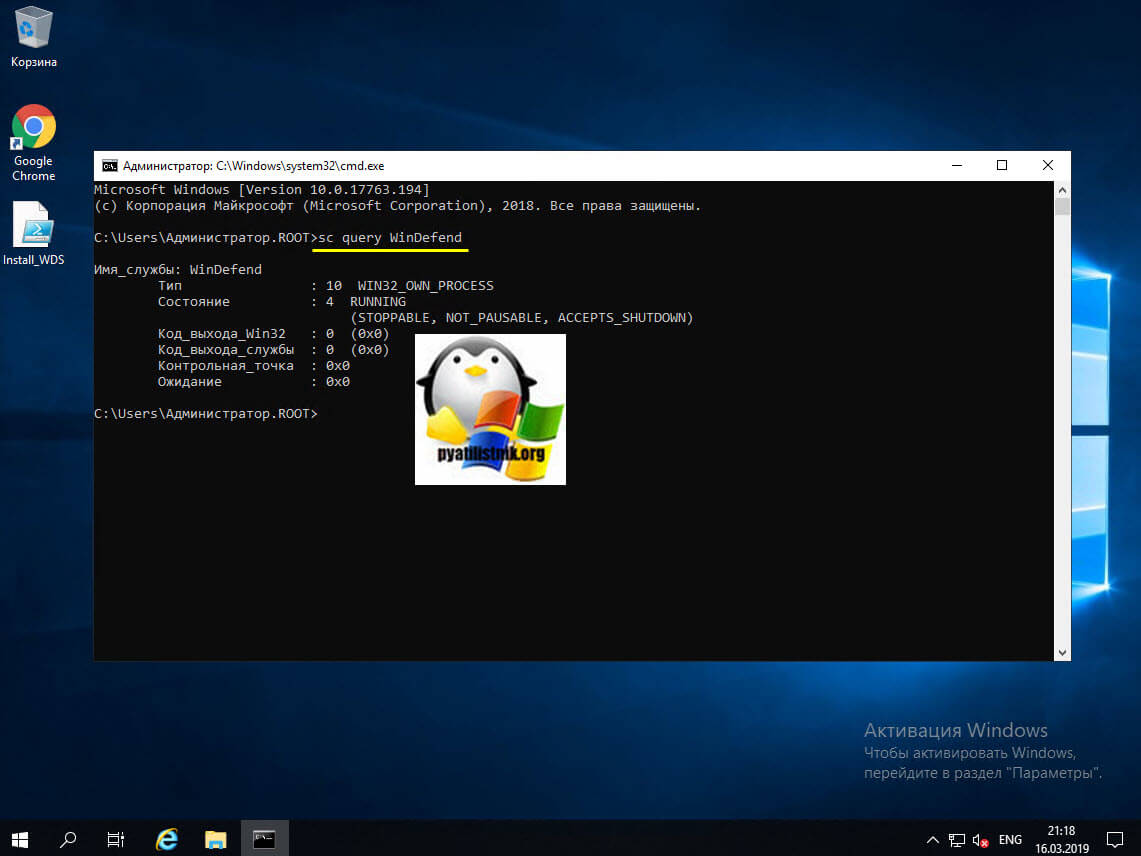
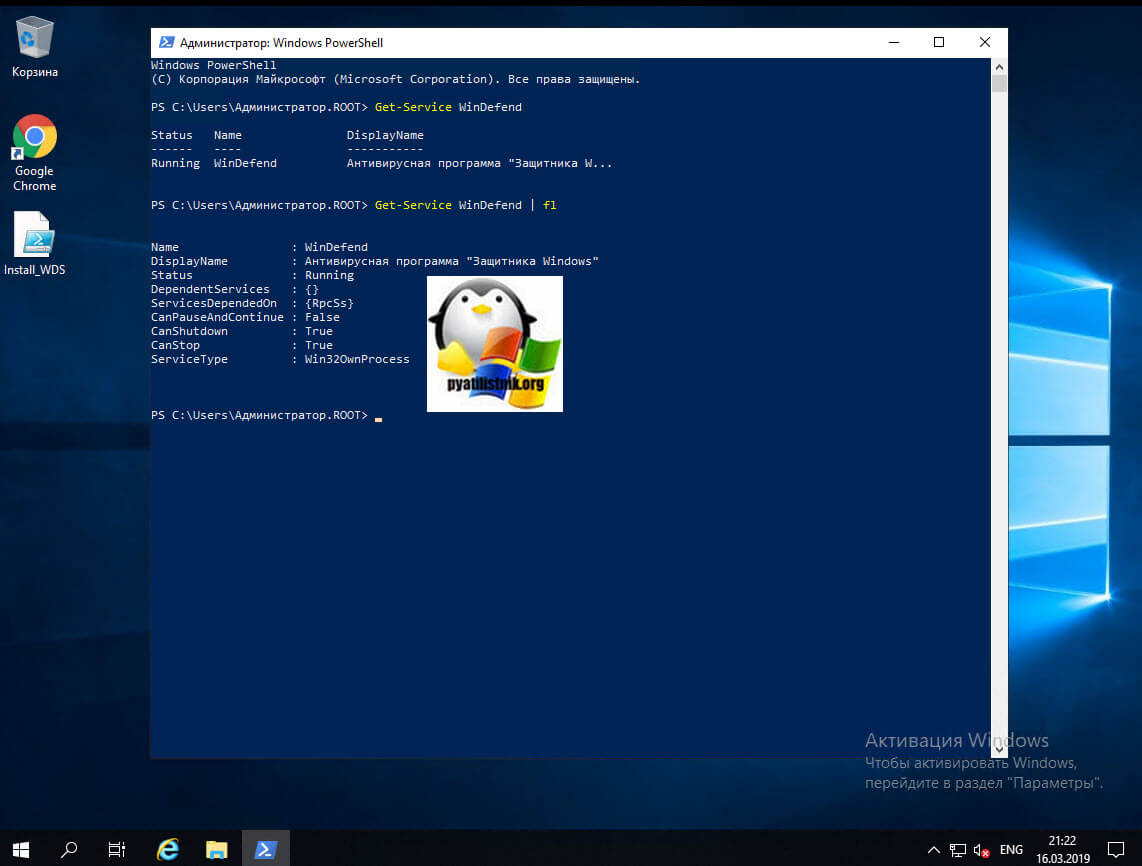
Windows PowerShell, не зря называют мощным средством по управлению серверов, его возможности практически бесконечны. Полностью удалить защитник в Windows Server 2019, можно специальным командлетом. Для этого для начала проверьте состояние службы и есть ли у вас вообще в системе Windows Defender. Для этого в командной строке введите команду:
Как видите состояние у Windefend «RUNNING», что означает, что она запущена.
Можно посмотреть ее состояние и через оснастку PowerShell, лучше ее открыть от имени администратора. Введите команду:
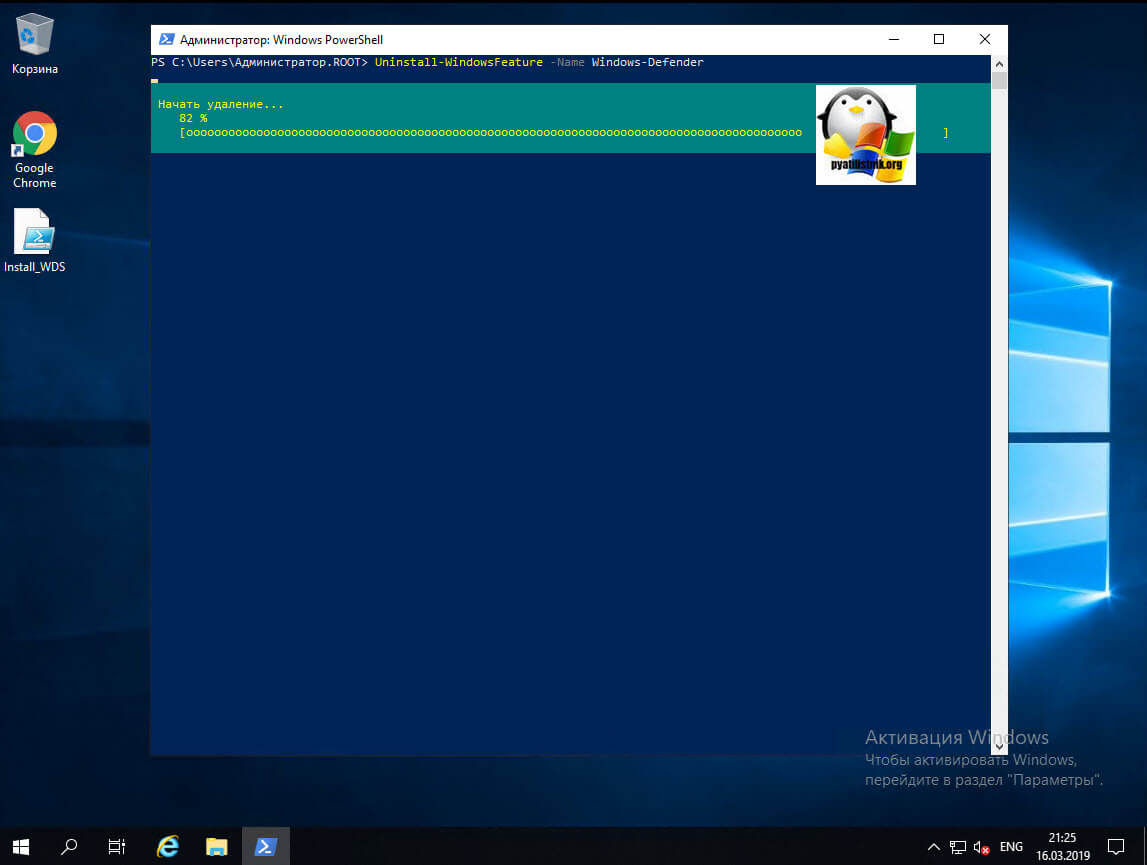
Чтобы полностью удалить защитник виндовс, вам необходимо в PowerShell ввести вот такую команду:
Начнется процесс деинсталляции компонента Windows Server 2019, вы будите видеть шкалу прогресса.
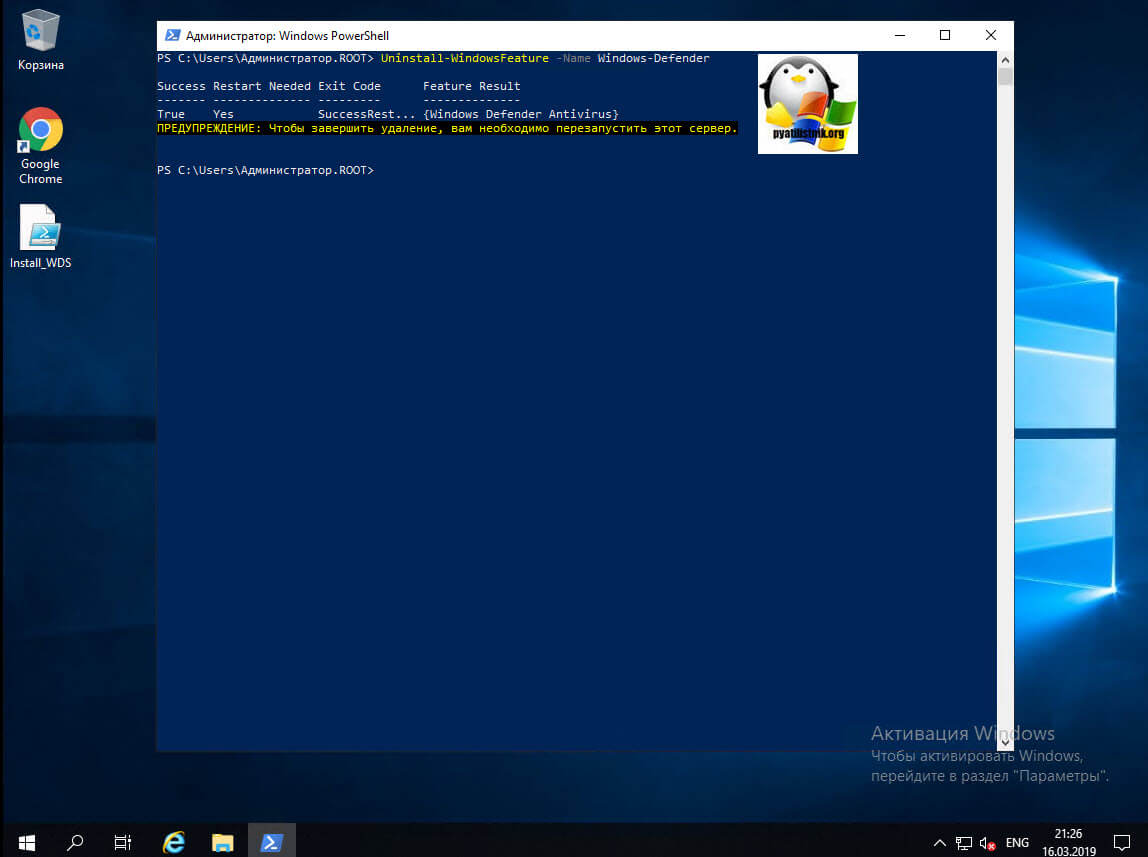
Вы увидите сообщение, что служба Windows Defender Antivirus успешно удалена, и чтобы завершить удаление, вам необходимо перезапустить этот сервер.
Как удалить защитник windows через Windows Admin Center
Напоминаю, что Windows Admin Center — это новый инструмент управления серверами, локальными и удаленными, из браузера. Он легко может удалять компоненты, в нашем случае Windows Defender. Открываем его и переходим пункт «Роли и компоненты», находим «Windows Defender Antivirus» и удаляем его.
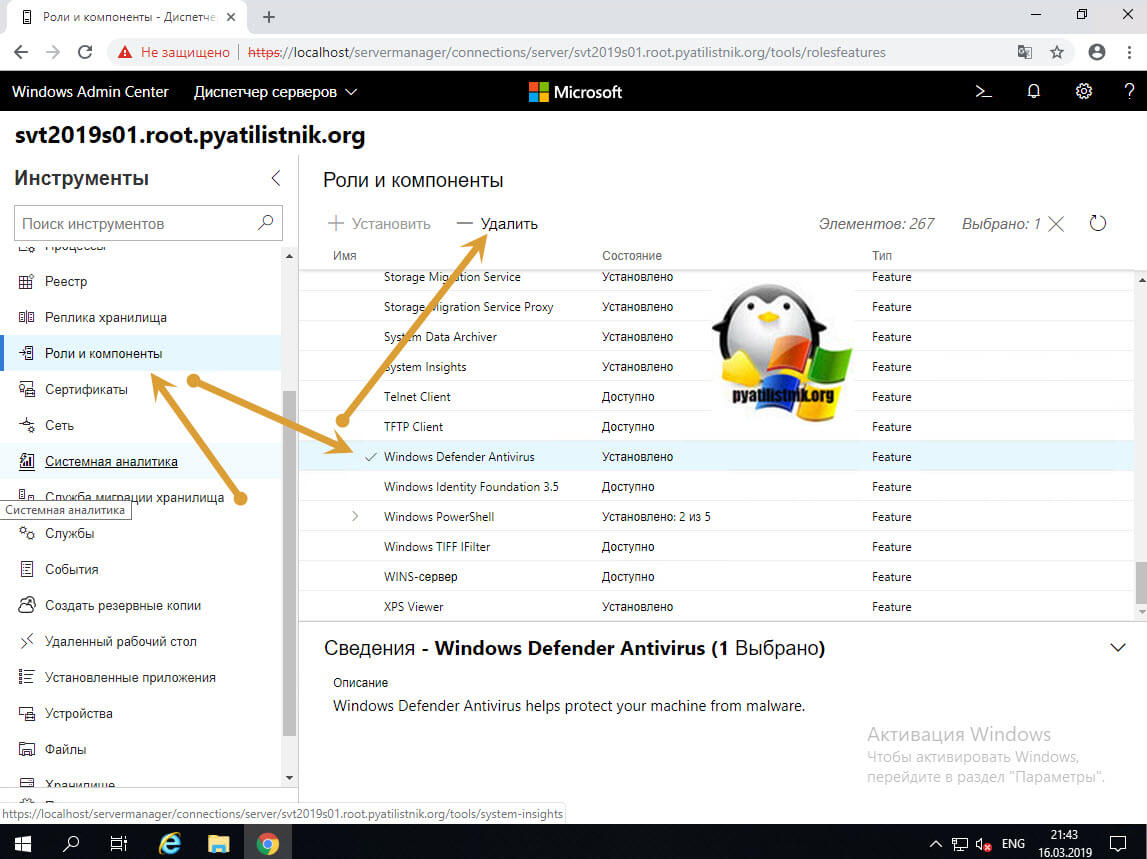
Появится всплывающее окно, где будут проверенны зависимости, если их нет, нажмите кнопку «Да», чтобы запустить процесс деинсталляции.
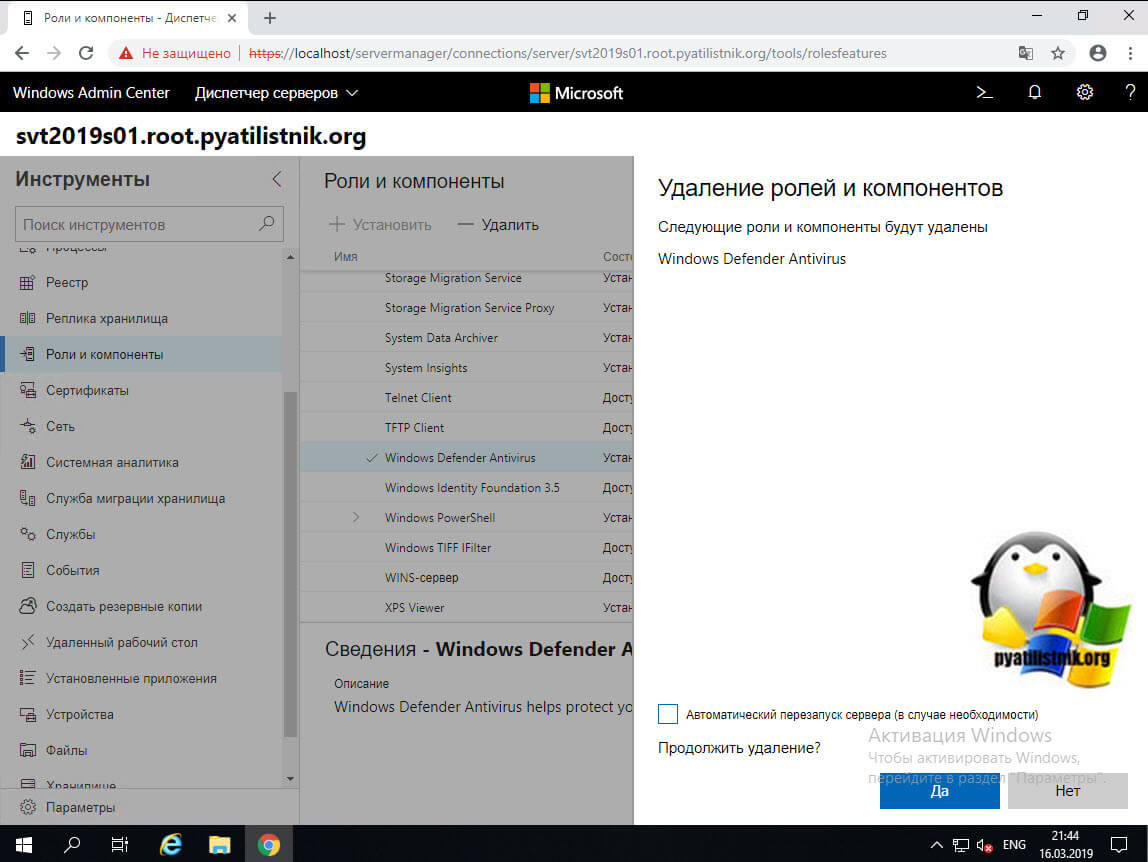
В оповещениях вы можете следить за процессом удаления, после чего вам потребуется перезагрузка.
Установка обновлений Microsoft Defender в образы Windows 10 и Windows Server
Данное нововведение призвано минимизировать пробелы в защиты после установки свежей системы, когда антивирусные сигнатуры еще не обновлены.
Сервисный инструмент реализован в виде скрипта PowerShell и может использоваться для ручного обновления установочных образов Windows в форматах WIM или VHD и добавления в них пакетов обновления Microsoft Defender, а также для удаления этих обновлений и отображения подробной информации о примененных пакетах для антивируса.
Поддержка образов Windows 10 и Windows Server
Пакеты Microsoft Defender, примененные с использованием данного инструмента включают ежемесячные обновления и исправления, а также новейшие обновления безопасности.
После развертывания обновлений в установочных образах Windows будет обновлены версии клиента антивредоносной программы, антивирусного движка и сигнатурных определений.
Для запуска нового инструмента для добавления в образы системы антивирусных обновлений (DefenderUpdateWinImage.ps1) вам потребуется 64-разрядная среда Windows 10 с PowerShell 5.1 или более поздними версиями. Кроме того, в системе должны быть установлены модули Microsoft.Powershell.Security и DISM.
Не используйте этот пакет для обновления загрузочных образов, так как он может повредить операционную систему Windows, работающую внутри виртуальной машины.
Инструмент поддерживает установочные образы следующих операционных систем: Windows 10 (редакции Enterprise, Pro и Домашняя), Windows Server 2019 и Windows Server 2016.
Как использовать инструмент для обслуживания обновлений Microsoft Defender
Чтобы воспользоваться скриптом для добавления антивирусных обновлений в установочные образы, вам нужно скачать соответствующий пакет обновления defender-update-kit-[x86|x64].zip для архитектуры вашего образа (доступны обновления для 32-битных и 64-битных образов).
Чтобы применить обновление для Microsoft Defender с помощью DefenderUpdateWinImage.ps1 используйте следующую команду:
Чтобы удалить или откатить обновления, запустите следующую команду:
Чтобы вывести список всех установленных обновлений, выполните команду:
Microsoft Defender Antivirus on Windows Server
Applies to:
Microsoft Defender Antivirus is available on the following editions/versions of Windows Server:
- Windows Server 2019
- Windows Server, version 1803 or later
- Windows Server 2016.
In some instances, Microsoft Defender Antivirus is referred to as Endpoint Protection; however, the protection engine is the same. Although the functionality, configuration, and management are largely the same for Microsoft Defender Antivirus on Windows 10, there are a few key differences on Windows Server:
- In Windows Server, automatic exclusions are applied based on your defined Server Role.
- In Windows Server, Microsoft Defender Antivirus does not automatically disable itself if you are running another antivirus product.
The process at a glance
The process of setting up and running Microsoft Defender Antivirus on a server platform includes several steps:
Enable the user interface on Windows Server
By default, Microsoft Defender Antivirus is installed and functional on Windows Server. The user interface (GUI) is installed by default on some SKUs, but is not required because you can use PowerShell or other methods to manage Microsoft Defender Antivirus. If the GUI is not installed on your server, you can add it by using the Add Roles and Features wizard, or by using PowerShell cmdlets.
Turn on the GUI using the Add Roles and Features Wizard
When you get to the Features step of the wizard, under Windows Defender Features, select the GUI for Windows Defender option.
In Windows Server 2016, the Add Roles and Features Wizard looks like this:

In Windows Server 2019, the Add Roles and Feature Wizard is similar.
Turn on the GUI using PowerShell
The following PowerShell cmdlet will enable the interface:
Install Microsoft Defender Antivirus on Windows Server
You can use either the Add Roles and Features Wizard or PowerShell to install Microsoft Defender Antivirus.
Use the Add Roles and Features Wizard
Refer to this article, and use the Add Roles and Features Wizard.
When you get to the Features step of the wizard, select the Microsoft Defender Antivirus option. Also select the GUI for Windows Defender option.
Use PowerShell
To use PowerShell to install Microsoft Defender Antivirus, run the following cmdlet:
Event messages for the antimalware engine included with Microsoft Defender Antivirus can be found in Microsoft Defender AV Events.
Verify Microsoft Defender Antivirus is running
To verify that Microsoft Defender Antivirus is running on your server, run the following PowerShell cmdlet:
To verify that firewall protection is turned on, run the following PowerShell cmdlet:
As an alternative to PowerShell, you can use Command Prompt to verify that Microsoft Defender Antivirus is running. To do that, run the following command from a command prompt:
The sc query command returns information about the Microsoft Defender Antivirus service. When Microsoft Defender Antivirus is running, the STATE value displays RUNNING .
Update antimalware Security intelligence
To get updated antimalware security intelligence, you must have the Windows Update service running. If you use an update management service, like Windows Server Update Services (WSUS), make sure that updates for Microsoft Defender Antivirus Security intelligence are approved for the computers you manage.
By default, Windows Update does not download and install updates automatically on Windows Server 2019 or Windows Server 2016. You can change this configuration by using one of the following methods:
| Method | Description |
|---|---|
| Windows Update in Control Panel | — Install updates automatically results in all updates being automatically installed, including Windows Defender Security intelligence updates. — Download updates but let me choose whether to install them allows Windows Defender to download and install Security intelligence updates automatically, but other updates are not automatically installed. |
| Group Policy | You can set up and manage Windows Update by using the settings available in Group Policy, in the following path: Administrative Templates\Windows Components\Windows Update\Configure Automatic Updates |
| The AUOptions registry key | The following two values allow Windows Update to automatically download and install Security intelligence updates: — 4 — Install updates automatically. This value results in all updates being automatically installed, including Windows Defender Security intelligence updates. — 3 — Download updates but let me choose whether to install them. This value allows Windows Defender to download and install Security intelligence updates automatically, but other updates are not automatically installed. |
To ensure that protection from malware is maintained, we recommend that you enable the following services:
Windows Error Reporting service
Windows Update service
The following table lists the services for Microsoft Defender Antivirus and the dependent services.
| Service Name | File Location | Description |
|---|---|---|
| Windows Defender Service (WinDefend) | C:\Program Files\Windows Defender\MsMpEng.exe | This is the main Microsoft Defender Antivirus service that needs to be running at all times. |
| Windows Error Reporting Service (Wersvc) | C:\WINDOWS\System32\svchost.exe -k WerSvcGroup | This service sends error reports back to Microsoft. |
| Windows Defender Firewall (MpsSvc) | C:\WINDOWS\system32\svchost.exe -k LocalServiceNoNetwork | We recommend leaving the Windows Defender Firewall service enabled. |
| Windows Update (Wuauserv) | C:\WINDOWS\system32\svchost.exe -k netsvcs | Windows Update is needed to get Security intelligence updates and antimalware engine updates |
Submit samples
Sample submission allows Microsoft to collect samples of potentially malicious software. To help provide continued and up-to-date protection, Microsoft researchers use these samples to analyze suspicious activities and produce updated antimalware Security intelligence. We collect program executable files, such as .exe files and .dll files. We do not collect files that contain personal data, like Microsoft Word documents and PDF files.
Submit a file
Visit the sample submission portal, and submit your file.
Enable automatic sample submission
To enable automatic sample submission, start a Windows PowerShell console as an administrator, and set the SubmitSamplesConsent value data according to one of the following settings:
| Setting | Description |
|---|---|
| 0 — Always prompt | The Microsoft Defender Antivirus service prompts you to confirm submission of all required files. This is the default setting for Microsoft Defender Antivirus, but is not recommended for installations on Windows Server 2016 or 2019 without a GUI. |
| 1 — Send safe samples automatically | The Microsoft Defender Antivirus service sends all files marked as «safe» and prompts for the remainder of the files. |
| 2 — Never send | The Microsoft Defender Antivirus service does not prompt and does not send any files. |
| 3 — Send all samples automatically | The Microsoft Defender Antivirus service sends all files without a prompt for confirmation. |
Configure automatic exclusions
To help ensure security and performance, certain exclusions are automatically added based on the roles and features you install when using Microsoft Defender Antivirus on Windows Server 2016 or 2019.
Need to set Microsoft Defender Antivirus to passive mode?
If you are using a non-Microsoft antivirus product as your primary antivirus solution, set Microsoft Defender Antivirus to passive mode.
Set Microsoft Defender Antivirus to passive mode using a registry key
If you are using Windows Server, version 1803 or Windows Server 2019, you can set Microsoft Defender Antivirus to passive mode by setting the following registry key:
- Path: HKLM\SOFTWARE\Policies\Microsoft\Windows Advanced Threat Protection
- Name: ForcePassiveMode
- Type: REG_DWORD
- Value: 1
Disable Microsoft Defender Antivirus using the Remove Roles and Features wizard
See Install or Uninstall Roles, Role Services, or Features, and use the Remove Roles and Features Wizard.
When you get to the Features step of the wizard, clear the Windows Defender Features option.
If you clear Windows Defender by itself under the Windows Defender Features section, you will be prompted to remove the interface option GUI for Windows Defender.
Microsoft Defender Antivirus will still run normally without the user interface, but the user interface cannot be enabled if you disable the core Windows Defender feature.
Turn off the Microsoft Defender Antivirus user interface using PowerShell
To turn off the Microsoft Defender Antivirus GUI, use the following PowerShell cmdlet:
Are you using Windows Server 2016?
If you are using Windows Server 2016 and a third-party antimalware/antivirus product that is not offered or developed by Microsoft, you’ll need to disable/uninstall Microsoft Defender Antivirus.
You can’t uninstall the Windows Security app, but you can disable the interface with these instructions.
The following PowerShell cmdlet uninstalls Microsoft Defender Antivirus on Windows Server 2016:


