- Install Hyper-V on Windows 10
- Check Requirements
- Enable Hyper-V using PowerShell
- Enable Hyper-V with CMD and DISM
- Enable the Hyper-V role through Settings
- Hyper-V в Windows 10 Hyper-V on Windows 10
- О Hyper-V в Windows About Hyper-V on Windows
- Начало работы с Hyper-V Get started with Hyper-V
- Связь с сообществом и поддержка Connect with Community and Support
- Виртуальная машина Hyper-V: пошаговая инструкция
- Установка виртуальной машины Hyper-V в Windows 10
- Создание виртуальной сетевой карты
- Настройка виртуальной машины Hyper-V
- Запускаем виртуальную машину Hyper-V
- How To Enable Hyper-V On Windows 10 Home
- Does your system support virtualization?
- Enable Hyper-V in Windows 10 Home
- Disable Hyper-V from Windows 10 Home
- Continue Reading:
- 40 thoughts on “ How To Enable Hyper-V On Windows 10 Home ”
Install Hyper-V on Windows 10
Enable Hyper-V to create virtual machines on Windows 10.
Hyper-V can be enabled in many ways including using the Windows 10 control panel, PowerShell or using the Deployment Imaging Servicing and Management tool (DISM). This documents walks through each option.
Note: Hyper-V is built into Windows as an optional feature — there is no Hyper-V download.
Check Requirements
- Windows 10 Enterprise, Pro, or Education
- 64-bit Processor with Second Level Address Translation (SLAT).
- CPU support for VM Monitor Mode Extension (VT-c on Intel CPUs).
- Minimum of 4 GB memory.
The Hyper-V role cannot be installed on Windows 10 Home.
Upgrade from Windows 10 Home edition to Windows 10 Pro by opening up Settings > Update and Security > Activation.
For more information and troubleshooting, see Windows 10 Hyper-V System Requirements.
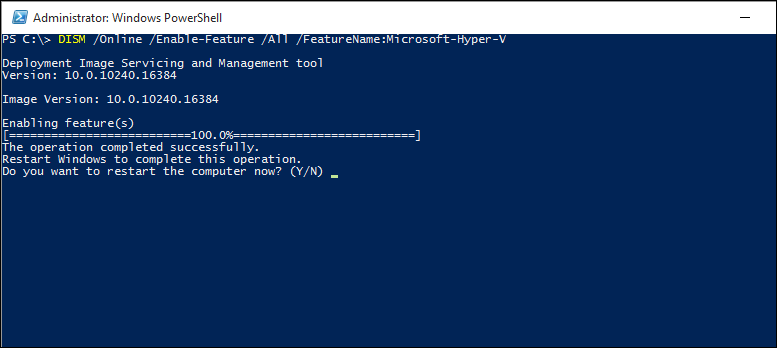
Enable Hyper-V using PowerShell
Open a PowerShell console as Administrator.
Run the following command:
If the command couldn’t be found, make sure you’re running PowerShell as Administrator.
When the installation has completed, reboot.
Enable Hyper-V with CMD and DISM
The Deployment Image Servicing and Management tool (DISM) helps configure Windows and Windows images. Among its many applications, DISM can enable Windows features while the operating system is running.
To enable the Hyper-V role using DISM:
Open up a PowerShell or CMD session as Administrator.
Type the following command:
For more information about DISM, see the DISM Technical Reference.
Enable the Hyper-V role through Settings
Right click on the Windows button and select вЂApps and Features’.
Select Programs and Features on the right under related settings.
Select Turn Windows Features on or off.
Select Hyper-V and click OK.
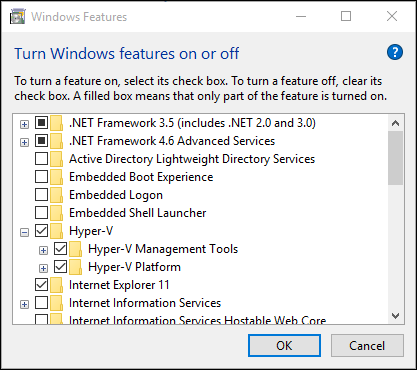
When the installation has completed you are prompted to restart your computer.
Hyper-V в Windows 10 Hyper-V on Windows 10
Технология виртуализации Hyper-V включена во многие версии Windows 10. Many versions of Windows 10 include the Hyper-V virtualization technology. Hyper-V позволяет запускать виртуализированные компьютерные системы поверх физического узла. Hyper-V enables running virtualized computer systems on top of a physical host. Эти виртуализированные системы можно использовать и контролировать как физические компьютерные системы, но они находятся в виртуализированной и изолированной среде. These virtualized systems can be used and managed just as if they were physical computer systems, however they exist in virtualized and isolated environment. Специальное программное обеспечение, называемое низкоуровневой оболочкой, управляет доступом между виртуальными системами и физическими аппаратными ресурсами. Special software called a hypervisor manages access between the virtual systems and the physical hardware resources. Виртуализация обеспечивает быстрое развертывание компьютерных систем, быстрое восстановление системы до предыдущего рабочего состояния и возможность миграции систем между физическими узлами. Virtualization enables quick deployment of computer systems, a way to quickly restore systems to a previously known good state, and the ability to migrate systems between physical hosts.
В следующих документах подробно описывается функция Hyper-V в Windows 10, приводится краткое интерактивное руководство и содержатся ссылки на дополнительные ресурсы и форумы сообщества. The following documents detail the Hyper-V feature in Windows 10, provide a guided quick start, and also contain links to further resources and community forums.
О Hyper-V в Windows About Hyper-V on Windows
Следующие статьи содержат введение в Hyper-V в ОС Windows и сведения об этой технологии. The following articles provide an introduction to and information about Hyper-V on Windows.
Начало работы с Hyper-V Get started with Hyper-V
В следующих документах содержится краткое интерактивное введение в Hyper-V в Windows 10. The following documents provide a quick and guided introduction to Hyper-V on Windows 10.
Связь с сообществом и поддержка Connect with Community and Support
Дополнительные ресурсы технической поддержки и сообщества. Additional technical support and community resources.
Виртуальная машина Hyper-V: пошаговая инструкция
Оказывается, далеко не все в курсе, что в Windows 10 уже есть всё необходимое, чтобы создать виртуальную машину для своих экспериментов. Не нужно ничего дополнительно покупать и скачивать, да и установка интуитивно понятна.
Изначально гипервизор Hyper-V (именно так называется виртуальная машина от Microsoft) использовался исключительно в серверной версии Windows. Технология Hyper-V позволяет инсталлировать в виртуальную машину практически любую операционную систему под ваши задачи, по аналогии с популярной VirtualBox.
Примечание. Механизм Hyper-V встроен в Windows в качестве дополнительной функции. Отдельно скачать Hyper-V нельзя.
Для запуска Hyper-V требуется 64-разрядный процессор и не менее 4 ГБ оперативной памяти. Коме того, процессор должен поддерживать аппаратную виртуализацию (практически все современные компьютеры и ноутбуки это умеют).
Установка виртуальной машины Hyper-V в Windows 10
По умолчанию компоненты виртуальной машины Hyper-V в Windows 10 отключены. Для её активации следует в «Панели управления» кликнуть по ссылке «Включение или отключение компонентов Windows» и поставить галочку напротив «Hyper-V».
По окончанию установки потребуется перезагрузить компьютер, а в главном меню в разделе «Средства администрирования» появится новый пункт «Диспетчер Hyper-V».
Прежде чем создавать виртуальную машину (ВМ) и накатывать на неё гостевую операционную систему, я бы рекомендовал заняться настройкой сети для неё, ведь наверняка вам потребуется возможность выхода в Интернет из вашей ВМ.
Создание виртуальной сетевой карты
Открыв «Диспетчер Hyper-V», на вкладке «Действие» переходим в «Диспетчер виртуальных коммутаторов». Далее жмём «Создать виртуальный сетевой коммутатор», тип выбираем «Внешняя» и нажимаем кнопку «Создать виртуальный коммутатор»:
Тут указываем название нашего виртуального сетевого адаптера, например «VirtualNet». При наличие нескольких физических сетевых адаптеров, в поле «Внешняя сеть» выбираете ту, к которой подключен Интернет.
Собственно, на этом настройка виртуального сетевого адаптера закончена и можно приступать к созданию и настройке виртуальной машины.
Настройка виртуальной машины Hyper-V
В разделе «Действие» нажимаем «Создать» и выбираем пункт «Виртуальная машина». Запустится «Мастер создания виртуальной машины»:
Первым делом зададим ей имя. Я назвал просто «win7», так как гостевой операционной системой у меня должна была стать 32-битная «семёрка». Здесь же, при желании, можно поменять месторасположение файлов виртуальной машины:
Далее мастер предлагает выбрать поколение виртуальной машины Hyper-V. В моём случае без вариантов, так как только первое поколение поддерживает 32-битные системы:
Далее указываем размер оперативной памяти для ВМ. Тут следует помнить, что при запуске виртуальной машины, основной операционной системе данная память станет недоступна.
На следующем шаге «Настройка сети», нам как раз и пригодится созданный ранее виртуальный сетевой адаптер:
Мы почти у цели, осталось только создать виртуальный жесткий диск. Указываем его месторасположения (или оставляем как есть) и задаём необходимый объем:
Собственно, на этом создание и настройку виртуальной машины можно считать законченной (она появится в списке управления виртуальными машинами Hyper-V после нажатия на кнопку «Готово»). Указываем образ диска, с которого будем устанавливать систему:
Запускаем виртуальную машину Hyper-V
Чтобы запустить только что созданную виртуальную машину дважды кликаем по её названию в диспетчере Hyper-V:
Настройки виртуальной машины, которые мы задавали ранее, не окончательные и их можно легко поменять, если что-то не устроит в процессе работы.
Подписывайтесь на канал и узнавайте первыми о новых материалах, опубликованных на сайте.
ЕСЛИ СЧИТАЕТЕ СТАТЬЮ ПОЛЕЗНОЙ,
НЕ ЛЕНИТЕСЬ СТАВИТЬ ЛАЙКИ И ДЕЛИТЬСЯ С ДРУЗЬЯМИ.
How To Enable Hyper-V On Windows 10 Home
Hyper-V is Microsoft’s virtualization platform. It is available on Windows Server Operating Systems but Microsoft has added the Hyper-V functionality to Windows 8.1 and Windows 10.
Unfortunately, the Hyper-V feature is only available in Windows 10 Professional and Enterprise editions. You can’t install it on Windows 10 Home Edition by default.
However, using the steps in this article, we’ll show you how to enable Hyper-V in the Windows 10 Home edition.
Does your system support virtualization?
Before moving forward, we need to check if our system supports virtualization. Hardware virtualization is required for Hyper-V to function correctly. Otherwise, you can use other virtualization platforms like Virtualbox and VMWare.
There are four basic requirements for Hyper-V to be installed on a Windows 10 computer:
- VM Monitor Mode Extensions
- Virtualization enabled in firmware
- Second level address translation
- Data execution prevention
You can check all these requirements by opening the Command Prompt (Run –> cmd) and running the systeminfo command. You can check the Hyper-V requirements section.
Most modern computers support all the requirements of Hyper-V. But some systems have virtualization disabled from BIOS. You can go to the BIOS setup computer at the startup and enable Virtualization.
Enable Hyper-V in Windows 10 Home
Follow the steps below to install and enable Hyper-V in Windows 10 Home.
- Download Hyper-V Enabler from here:
Hyper-V installer and enabler for Windows 10 Home (317 bytes, 24,486 hits)
You can search for Hyper-V in the start menu to start creating virtual machines on your Windows 10 Home computer.
I noticed an interesting thing that Hyper-V was installed within a virtual machine. So I could create a virtual machine within a virtual machine.
Disable Hyper-V from Windows 10 Home
If you don’t want this functionality in your computer, you can always disable it. There are two ways to disable:
- Go to Run –> optionalfeatures. This will open the Optional Features window.
- Uncheck Hyper-V and Hyper-V management tools.
- Restart the computer.
You can also do this using the command-line:
PowerShell
Command Prompt
Sometimes Hyper-V is very useful even for home users. It can be used to test and evaluate new software without hurting the host system. But there are times when enabling virtualization support or installing Hyper-V is not recommended.
Hyper-V requires some system resources to run its virtual machines. For example, if you have 4 GB RAM, you won’t be able to give any resources to the virtual machine. So it would not be wise to enable Hyper-V functionality.
For what purpose do you want to enable Hyper-V functionality on your Windows 10 Home computer? Please share your thoughts in the comments below.
Continue Reading:
Usman Khurshid is a seasoned IT Pro with over 15 years of experience in the IT industry. He has experience in everything from IT support, helpdesk, sysadmin, network admin, and cloud computing. He is also certified in Microsoft Technologies (MCTS and MCSA) and also Cisco Certified Professional in Routing and Switching. Reach him at Twitter @usmank11
40 thoughts on “ How To Enable Hyper-V On Windows 10 Home ”
When I reboot my laptop, this line appears on the screen “couldn’t complete features undoing changes”
When I reboot my laptop, this line appears on the screen “couldn’t complete features undoing changes”
I have successfully installed the hyper v but when I am checking in the task manager under virtualization section there still showing disabled
You should enable virtualization from the system BIOS otherwise Hyper-V will not work.
it takes so long time to get install ..
Thanks a lot! I have a doubt, sir. This is not regarding the hyper V installation but when I try to install CentOS7 on VM it shows that boot error and reboot by choosing a proper option. Can you please tell me a solution for this?
Hi Usman, I installed this & it worked for me. But I am not able to uninstall it using the command that you pasted above. It only disables hyper v but I would like to uninstall it from my system. Any help would be appreciated.
Don’t worry about it. When the next windows feature upgrade happens it will disappear.
It takes so long to install, but thx
Thank You! This is the only Windows Pro feature I use and I could NOT justify the additional $99 to upgrade for ability to use one application.
After RUnning your script. Hyper visor is installed but not showing in search.
Could yould u please update on this.
You can go to Start Menu –> Windows Administrative Tools –> Hyper-V.
thanks that was my question too.
really appreciate the tutorial!
Hi,
Thanks for the .bat file.
I can’t seem to find Hyper-V.
I’ve checked if it’s enabled, I ran the .bat as Adminstrator and even checked in the start menu. Can you please tell me where it is located?
Thanks, but it don´t works for my Win 10 2004:
1. The featurename was changed from “Microsoft-Hyper-V” to “HypervisorPlatform” and “VirtualMachinePlatform”, yep two features.
2. Once I enabled this two features and restart, I can view they are activated in the optionalfeatures, but I don’t find the hyper-v manager or equivalet in administrative tools or searching in windows search bar.
I use es-mx win10 version, if someone has a win10 2004 in another idiom, please test and comment.
Great work Usman, congratulations. I confess I was a little concerned about running a third party batch file, but it worked perfectly on my Windows 10 Home edition. However, I found that I have now another problem as Hyper-V is not working due to other(s) virtualization application(s) and I have to find them and discover how to disable them (the following message appers: “A hypervisor has been detected. Features required for Hyper-V will not be displayed”).
The message you mentioned means that Hyper-V is enabled on your computer. It should work fine. Please try to open Hyper-V from Start Menu –> Administrative Tools.
Great, but how i uninstall now?
Thank you very much! It worked. I would just add to others, that first you need
to close your Visual Studio if it is open. Otherwise that Bat file will run in an infinite loop.
Thank you soo much. Very Appropriate comment at the correct place. I was wondering what’s happening in the script.
I don’t have Visual Studio, yet the BAT file has been running in loop for 15 min now. What to do.
it’s not a loop, check hyper-v.txt as a reference, all you need to do is to wait. For those hesitating about the .bat file, you can edit it and check those codes.
Great tutorial.
Anyone know how to add users to Hyper-V Administrators group (to not need admin privileges) to run V-machines on Windows 10 Home then? (Since windows 10 have no typical group management console).
Hi bik128, you can use the following tutorial to add your user to Hyper-V administrators group:
https://www.itechtics.com/lusrmgr/
Hmm for some reason my PC now lags very badly.. I hope this changes after another restart.. how could this be?
Thanks for the guide anyways!
Hyper-V takes some resources for running smoothly. If you are low on resources, turning on Hyper-V will not be well advised.


