Для чего нужен процесс Windows Audio Device Graph Isolation
Windows Audio Device Graph Isolation является официальной частью Windows. Процесс работает в качестве основного звукового «движка» Windows 10. Он обрабатывает цифровой сигнал, в том числе в целью получения передовых эффектов улучшения звука, предоставляемых Windows.

Windows Audio Device Graph Isolation отделена от стандартной службы Windows Audio. Такая изоляция сервисов позволяет разработчикам аппаратных аудиопродуктов включать собственную службу улучшения качества звука без необходимости замены самой службы Windows Audio.
Это, в свою очередь, приводит к лучшей стабильности. Windows Audio настолько глубоко связана с Windows, что сбой в её работе, скорее всего, повлечет отказ всей системы, а не только звуковой системы.
Изоляция цифровой обработки звукового сигнала – более восприимчивой к сбоям – это защита от глобальных проблем в работе системы Windows 10.
Этот тип изоляции также гарантирует, что Windows всегда предоставит способ улучшения звука, независимо от того, какой тип оборудования вы используете. Так как производители аудио оборудования очень часто не дают доступ к таким функциям.
Следует также отметить, что в случае некоторых аудио аппаратных средств производители могут фактически заменить Windows Audio Device Graph Isolation своей собственной цифровой службой обработки сигналов.
Посмотрите, например, на сервис, используемый Creative SoundBlaster Recon3D.

Почему процесс потребляет много системных ресурсов
К сожалению, плохо написанный драйвер для улучшения звука может вызывать проблем больше, чем просто случайный сбой.
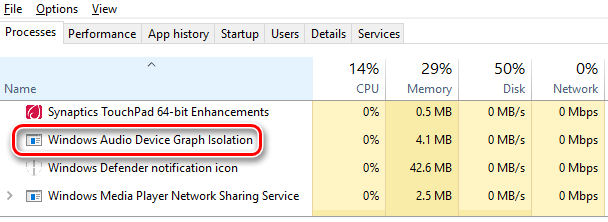
Некоторые пользователи отмечают появление проблем с Windows Audio Device Graph Isolation, вызывающими значительное повышение использования системных ресурсов (центральный процессор, память или даже жесткий диск).
В обычных условиях Windows Audio Device Graph Isolation использует 0% ресурсов процессора, минимум памяти и отсутствует дисковая активность. Эти цифры могут показывать всплеск, когда применяются звуковые эффекты, но они должны быстро вернуться к базовому уровню. Если Вы видите, что Windows Audio Device Graph Isolation использует слишком много ресурсов, то Вам следует заняться поиском проблем на устройстве.

Хорошая новость заключается в том, что, в большинстве случаев, проблема легко решается, так как часто достаточно отключить процесс. Также Вы можете попробовать отключить некоторые звуковые эффекты с помощью программного обеспечения производителя вашего звукового устройства.
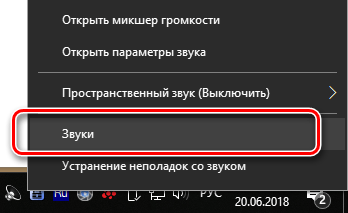
Вы также можете сделать это прямо в Windows. Откройте диалоговое окно Свойства звука, щелкнув правой кнопкой мыши значок динамика в области уведомлений и нажав кнопку Звуки . Вы также можете открыть Панель управления и запустить звуковой апплет там.
На вкладке Воспроизведение выберите устройство, которое, как вы подозреваете, может вызвать проблемы, а затем нажмите кнопку Свойства .
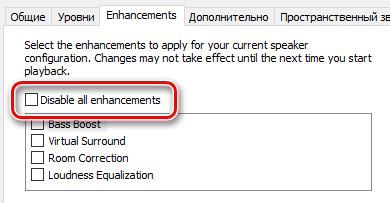
На вкладке Enhancements диалогового окна «Свойства устройства» вы увидите список эффектов, поддерживаемых устройством. То, что вы видите, полностью зависит от используемого устройства. Активируйте опцию Disable all enhancements и посмотрите, решит ли это вашу проблему.
Если отключение всех улучшений всё же решить эту проблему, то Вы поймёте, что находитесь на правильном пути, и можете вернуться и попытаться отключить каждое конкретное улучшение, чтобы сузить круг поиска причины.
Если отключение всех улучшений для устройства не решает вашу проблему, то вы должны повторно включить их и перейти к тестированию другого устройства.
Можно ли отключить Windows Audio Device Graph Isolation
Вы не можете отключить Windows Audio Device Graph Isolation, не отключив основной сервис Windows Audio, а его отключение приведёт к отсутствию звука в вашей системе.
Вы даже не сможете временно завершить задачу. Если вы попытаетесь, Windows отобразит уведомление с рекомендацией использовать средство устранения неполадок.
Может ли этот процесс быть вирусом
Windows Audio Device Graph Isolation является официальным компонентом Windows, и, скорее всего, это не вирус. Хотя мы не встречали сообщений о каких-либо вирусах, захватывающих этот процесс, всегда возможно, что мы увидим что-то такое в будущем.
Если вы хотите быть уверенными, вы можете проверить базовое расположение файла процесса. В Диспетчере задач щелкните правой кнопкой мыши Windows Audio Device Graph Isolation и выберите опцию Открыть расположение файла .
Если файл хранится в папке Windows\System32, то вы можете быть уверены, что не имеете дело с вирусом.
Fix sound problems in Windows 10
If you’re having audio problems, the following suggestions might help. The tips are listed in order, so start with the first one, see if that helps, and then continue to the next one if it doesn’t.
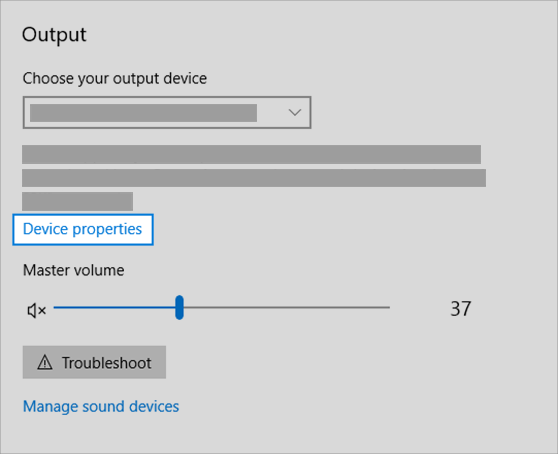
If multiple audio output devices are available, check that you have the appropriate one selected. Here’s how:
Select the Speakers icon on the taskbar.
Next, select the arrow to open a list of audio devices connected to your computer.
Check that your audio is playing to the audio device you prefer, such as a speaker or headphones.
If this doesn’t help, continue to the next tip.
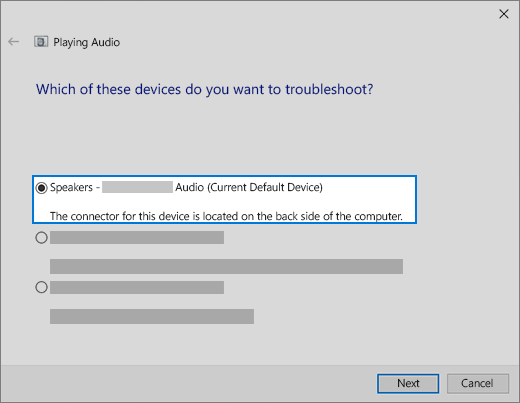
The audio troubleshooter might be able to fix audio problems automatically.
To run the troubleshooter
In the search box on the taskbar, type audio troubleshooter, select Fix and find problems with playing sound from the results, then select Next.
Select the device you want to troubleshoot and then continue through the troubleshooter.
You can also launch the troubleshooter from audio Settings. Select Start > Settings > System > Sound > Troubleshoot.
If running the troubleshooter doesn’t help, continue to the next tip.
To check for updates
Select Start > Settings > Update & Security > Windows Update > Check for updates.
Do one of the following:
If the status says «You’re up to date, go to the next tip.
If the status says «Updates are available,» select Install now.
Select the updates you want to install, then select Install.
Restart your PC and see if your sound is working properly.
If that didn’t solve your problem, continue to the next tip.
Try these steps
Check your speaker and headphone connections for loose cords or cables. Make sure all cords and cables are plugged in.
If you have multiple 5mm jacks to plug into, especially on a surround sound system, make sure all cords and cables are plugged into the correct jack.
If it’s not clear which jack goes with which cord, consult your hardware manufacturer, or try the most obvious outputs one at a time and see if they work.
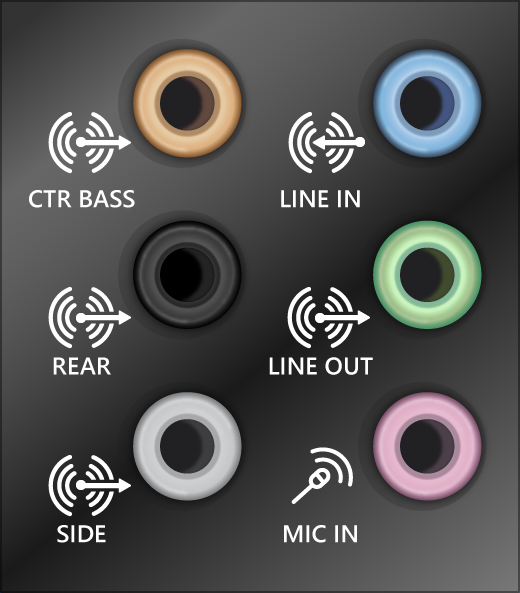
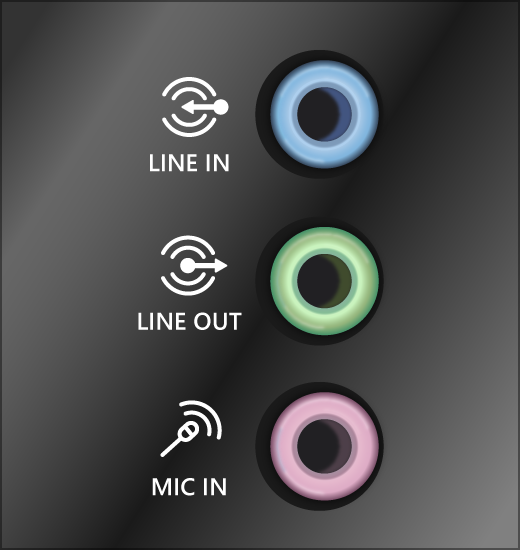
Note: Some systems use a green jack for output and pink for mic input and others will be labeled «headphone» or «microphone.»
Make sure the power is turned on and check the volume level.
Make sure the mute setting is not turned on, and try turning up all the volume controls.
Remember some speakers and apps have their own volume controls. Be sure to check them all.
Try connecting your speaker and headphones to a different USB port.
It’s possible that your speakers won’t work when your headphones are plugged in. Unplug your headphones and see if that helps.
If your cables and volume are OK, see the next sections for additional troubleshooting.
Check to make sure your audio devices aren’t muted and haven’t been disabled.
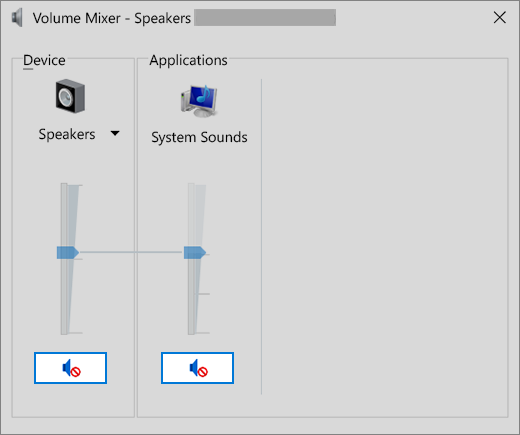
Right-click the Speakers icon on the taskbar, and then select Open Volume mixer.
You’ll see a set of volume controls for your devices. Make sure none of them are muted. If any of them are muted, you’ll see a red circle with a line through it next to the volume control. In that case, select the volume control to unmute.
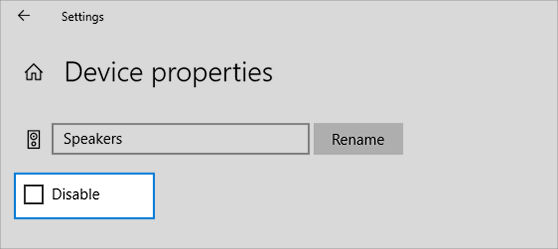
Check your device properties to make sure that your devices have not been disabled by mistake. Select Start > Settings > System > Sound .
Select your audio device, and then select Device properties. Be sure to select Device properties for both the output and input devices.
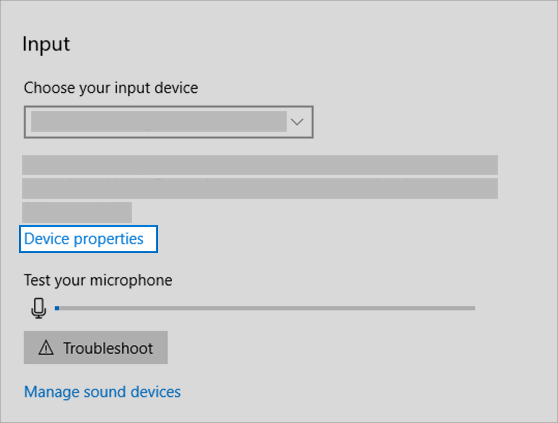
Make sure the Disable check box is cleared for the output and input devices.
If that didn’t solve your problem, continue to the next tip.
Hardware problems can be caused by outdated or malfunctioning drivers. Make sure your audio driver is up to date and update it if needed. If that doesn’t work, try uninstalling the audio driver (it will reinstall automatically). If that doesn’t work, try using the generic audio driver that comes with Windows. If you’re having audio issues after installing updates, try rolling back your audio driver.
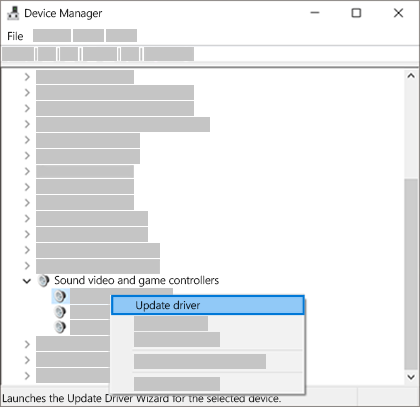
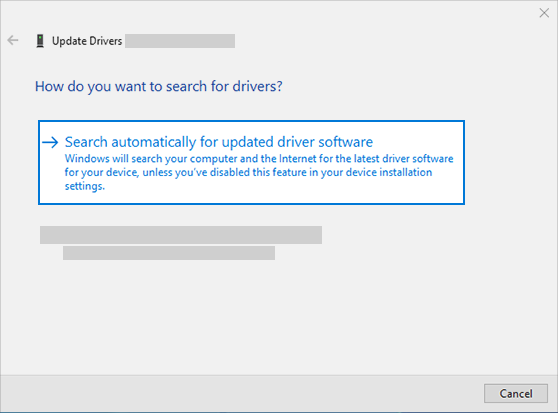
To update your audio driver automatically
In the search box on the taskbar, type device manager, then select it from the results.
Select the arrow next to Sound, video and game controllers to expand it.
Right-click the listing for your sound card or audio device, such as headphones or speakers, select Update driver, then select Search automatically for updated driver software. Follow the instructions to complete the update.
If Windows doesn’t find a new driver, look for one on the device manufacturer’s website and follow those instructions. If that doesn’t work, try uninstalling your audio driver.
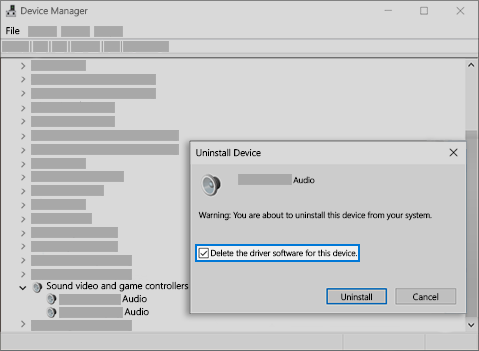
To uninstall your audio driver
In the search box on the taskbar, type device manager, then select it from the results.
Select the arrow next to Sound, video and game controllers to expand it.
Right-click the listing for your sound card or audio device, select Uninstall device, select the Delete the driver software for this device check box, and then select Uninstall.
Restart your PC.
Note: Be sure to save documents and any other current work before you restart.
This restart will automatically prompt your PC to reinstall your audio driver.
To restart, select Start > Power > Restart .
If those options didn’t work, try using the generic audio driver that comes with Windows.
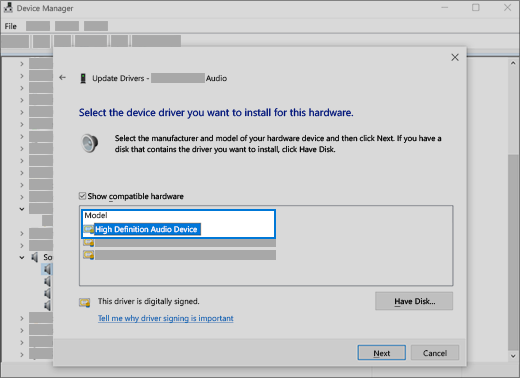
To use the generic audio driver that comes with Windows
In the search box on the taskbar, type device manager, then select it from the results.
Select the arrow next to Sound, video and game controllers to expand it.
Right-click the listing for your sound card or audio device, then select Update driver > Browse my computer for driver software > Let me pick from a list of device drivers on my computer.
Select the audio device whose driver you want to update, select Next, and then follow the instructions to install it.
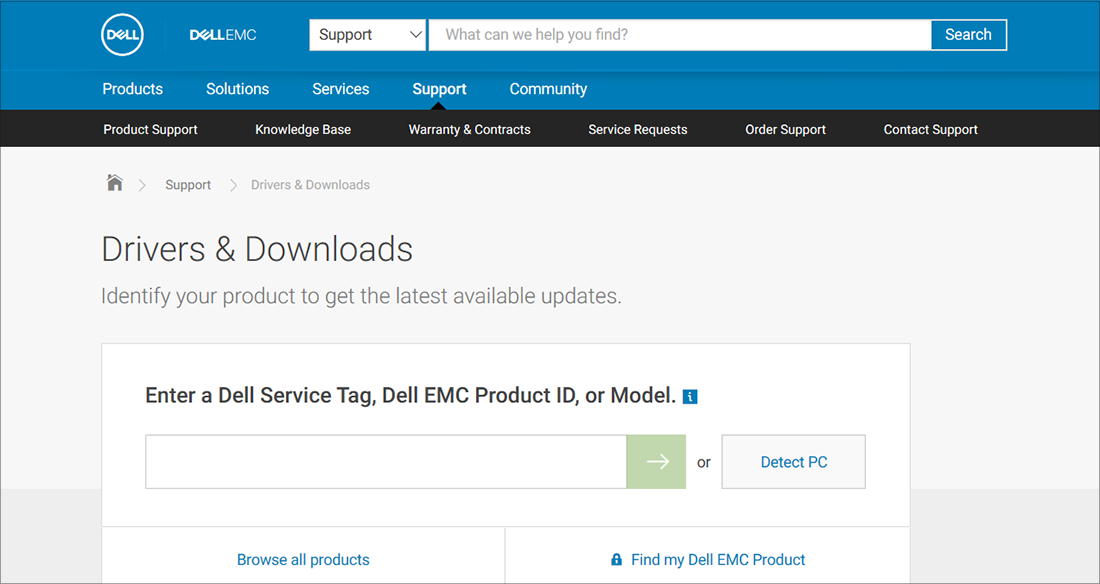
If these steps didn’t solve your audio issue, visit your device manufacturer’s website and install the most recent audio/sound drivers for your device. Following is an example of a driver download page for a sound device manufacturer.
If you have audio issues after installing updates
If your audio was working before you ran Windows Update and now isn’t working, try rolling back your audio driver.
To roll back your audio driver
In the search box on the taskbar, type device manager, then select it from the results.
Select the arrow next to Sound, video and game controllers to expand it.
Right-click the listing for your sound card or audio device, then select Properties.
Select the Driver tab, then select Roll Back Driver.
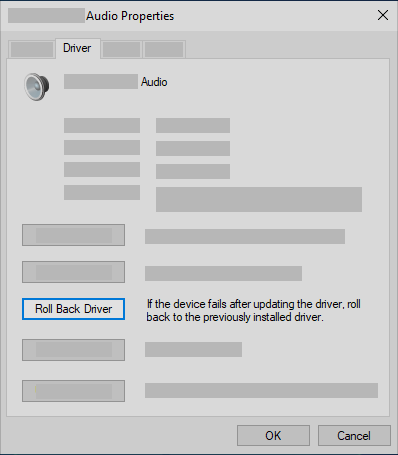
Read and follow the instructions and then select Yes if you want to roll back your audio driver.
If rolling back your audio driver didn’t work or wasn’t an option, you can try to restore your PC from a system restore point.
Restore your PC from a system restore point
When Microsoft installs updates on your system, we create a system restore point in case problems arise. Try restoring from that point and see if that fixes your sound problems. For more info, see «Restore from a system restore point» in Recovery options in Windows 10.
If you’re connecting to an audio device—such as headphones or speakers—using USB or HDMI, you might need to set that device as the default audio device. If you’re using an external monitor that doesn’t have built-in speakers, make sure that the monitor isn’t already selected as your default output device. if it is, you won’t have any audio. You can check that when you set your default output audio device. Here’s how:
In the search box on the taskbar, type control panel, then select it from the results.
Select Hardware and Sound from the Control Panel, and then select Sound.
On the Playback tab, right-click the listing for your audio device, select Set as Default Device, and then select OK.
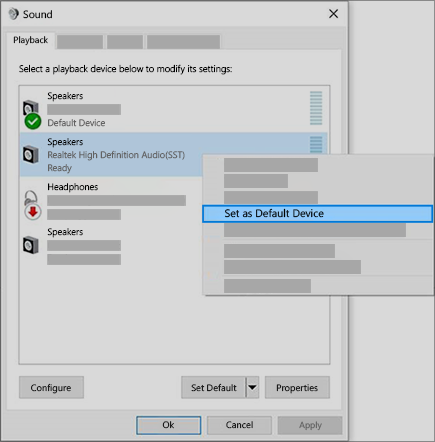
If setting your audio device as the default device doesn’t help, continue to the next tip for additional troubleshooting.
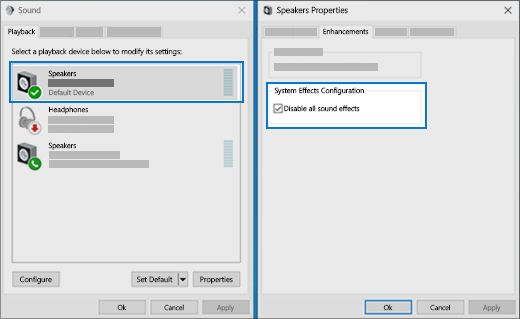
Sometimes having audio enhancements on can result in audio issues. Disabling them may resolve your issue.
In the search box on the taskbar, type control panel, then select it from the results.
Select Hardware and Sound from the Control Panel, and then select Sound.
On the Playback tab, right-click the Default Device, and then select Properties.
On the Enhancements tab, select either the Disable all enhancements or the Disable all sound effects check box (depending on which option you see), select OK, and try to play your audio device.
If that doesn’t work, on the Playback tab, select another default device (if you have one), select either the Disable all enhancements or the Disable all sound effects check box (depending on which option you see), select OK, and try to play audio again. Do this for each default device.
If turning off audio enhancements doesn’t help, see the next sections for additional troubleshooting.
In the search box on the taskbar, type services, then select it from the results.
Select each of the following services, right-click, and then select Restart:
Windows Audio Endpoint Builder
Remote Procedure Call (RPC)
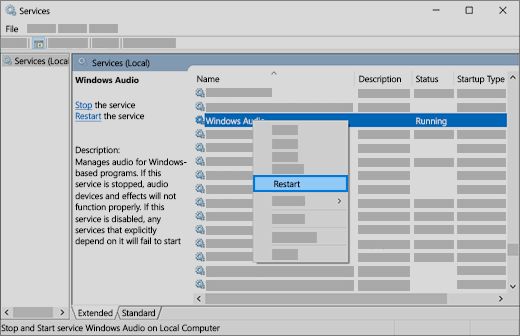
If restarting these services doesn’t resolve your issue, see the next sections for more troubleshooting.
In the search box on the taskbar, type control panel, and then select it from the results.
Select Hardware and Sound from the Control Panel, and then select Sound.
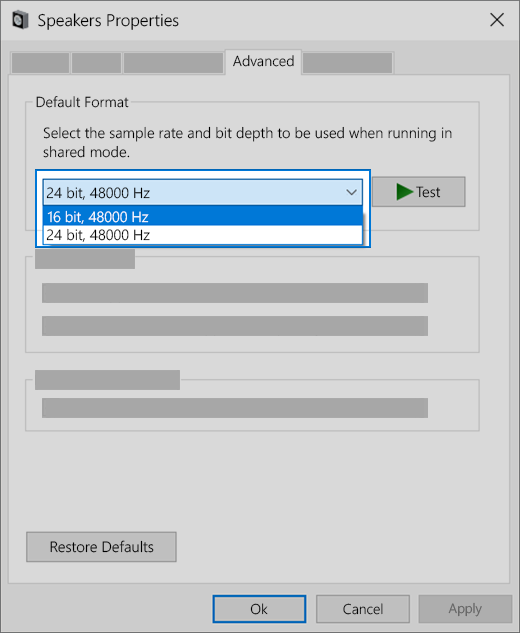
On the Playback tab, right-click (or press and hold) Default Device, and then select Properties.
On the Advanced tab, under Default Format, change the setting, select OK,and then test your audio device. If that doesn’t work, try changing the setting again.
If trying different audio formats doesn’t help, see the next sections for additional troubleshooting.
Many updates require you to restart your device.
To check and see if you have installed updates pending and need to restart
Save your work and close all open applications.
Select Start > Power . If you have installed updates pending, you’ll see options to Update and restart and Update and shut down.
Select one of those restart options to apply the updates
If restarting doesn’t help, see the next section for additional troubleshooting.
Some audio problems might be caused by an issue with the audio system’s IDT High Definition Audio CODEC. This can be fixed with a manual driver update which allows you to choose the sound driver you want to use.
Note: Not all systems will have an IDT High Definition Audio CODEC.
To check and see if you have one, and to manually update the driver
In the search box on the taskbar, type device manager, then select it from the results.
Select the arrow next to Sound, video and game controllers to expand it.
Look for IDT High Definition Audio CODEC. If it’s listed, right-click it and select Update driver, then select Browse my computer for driver software > Let me pick from a list of device drivers on my computer.
You’ll see a list of pre-installed drivers. Select High Definition Audio Device, and then select Next.
1. Select Start > Settings > Privacy , and then select Microphone from the left menu.
Under Allow access to the microphone on this device, select Change. Make sure the toggle is turned On.
If you’re having this issue with a specific app, scroll down to Choose which Microsoft Store apps can access your microphone and make sure that the toggle next to that app is turned On as well.


