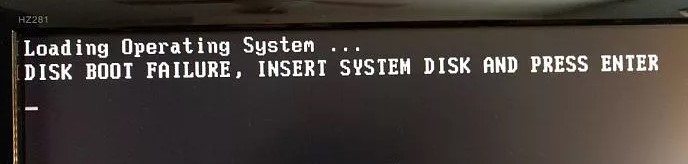
- Disk Boot Failure Insert System Disk and Press Enter — Что делать?
- 1. Извлечение USB устройств
- 2. Изменить порядок загрузки в BIOS
- 3. Сброс BIOS по умолчанию
- 4. Отключение устройств
- 5. Провод к HDD или SSD
- 6. Исправить Windows
- How to create a boot disk
- Creating an MS-DOS boot disk
- Creating a Windows 3.x boot disk
- Creating a Windows 95 boot disk
- Creating a Windows 98 and ME boot disk
- Copying additional files
- Creating a Windows NT boot disk
- Creating a Windows 2000 boot disk
- Creating a Windows XP boot disk
- Create MS-DOS bootable diskette
- Create Windows XP setup diskettes
- How to use a boot disk
- Create bootable WinPE media
- Step 1: Create working files
- Step 2: Customize WinPE (Usually not needed)
- Common customizations
- Step 3: Create bootable media
- Create a bootable WinPE USB drive
- Create a WinPE ISO, DVD, or CD
- Create a WinPE VHD to use with Hyper-V
- Troubleshooting
Disk Boot Failure Insert System Disk and Press Enter — Что делать?
При включении компьютера с операционной системой Windows 10/7/8.1 вы можете столкнуться с ошибкой «Disk Boot Failure Insert System Disk and Press Enter«, что означает невозможность загрузиться с HDD или SSD диска. Данная ошибка может возникать из-за неправильно выставленного приоритета загрузки в BIOS, слабое питание, добавления второго SSD диска, битые сектора на диске, провод Sata или слот M.2 не плотно закреплены.
1. Извлечение USB устройств
Если к компьютеру или ноутбуку подключено много USB устройств как флешка или принтер, то извлеките их, перезагрузите компьютер. В большинстве случаев флешки не дает правильно загрузиться диску, так как скорее всего в BIOS выставлена загрузка с флешки, а не самого жесткого диска. Также это может быть недостаток мощности блоки, так как он тратит свои ватты на подключенные устройства. Если вы устранили проблему извлечением флешки, то ниже способ поможет вам выставить приоритет загрузки диска на первое, чтобы в дальнейшем ошибка не появлялась.
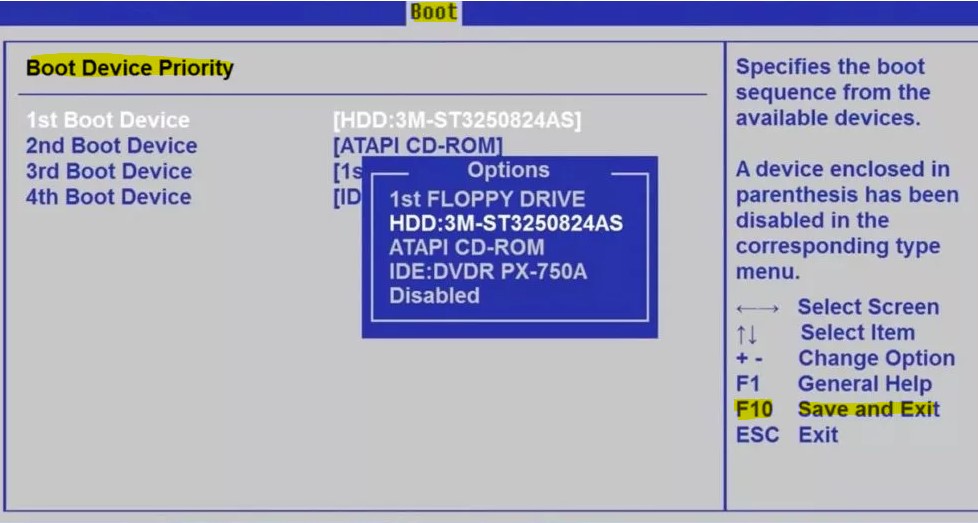
2. Изменить порядок загрузки в BIOS
Распространенная причина появления ошибки Disk Boot Failure — это неправильная выставленная конфигурация загрузки в BIOS. Для того, чтобы проверить и изменить приоритет загрузки, нажимайте непрерывно кнопку DEL или F2 сразу при включении компьютера или ноутбука.
Так как BIOS у каждого производителя материнской платы разный, я опишу примерные действия. Вы можете воспользоваться Google картинками, вбив туда модель материнской платы. К примеру, «Как выставить загрузку в BIOS Lenovo«.
В BIOS переходим во вкладу Boot и находим строку «Boot Device Priority«. Параметр также может называться по другому «Hard Disk Device Priority» или «Boot Option«. Нажимаем на него и в следующем окне выставляем на (1st Boot Device) первое место HDD или SSD диск на котором Windows и нажимаем F10, чтобы сохранить выставленные параметры.
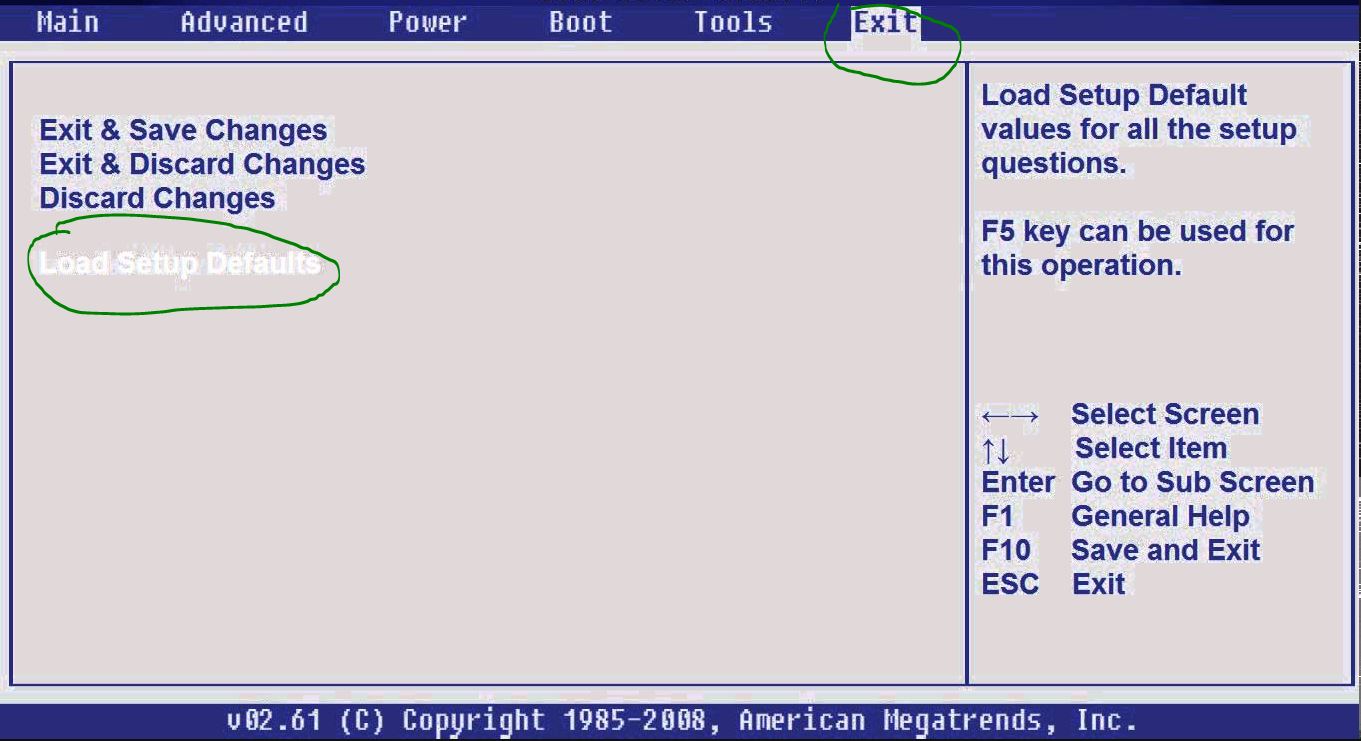
3. Сброс BIOS по умолчанию
Параметры BIOS можно вернуть по умолчанию, ели вы их меняли и не помните, что изменили. Зайдите в BIOS нажав при включении компьютера Del или F2. В BIOS перейдите во вкладку EXIT и выберите Load Setup Defaults, после чего нажмите F10 для сохранения изменений.
Примечание: Иногда сброс параметров BIOS по умолчанию не помогает, вы можете достать питашку с материнской платы на 3 минуты, чтобы сбросить параметры BIOS.
4. Отключение устройств
Отключение DVD привода может исправить ошибку «Disk Boot Failure» при включении компьютера. Выключите компьютер, с розетки в том числе, откройте крышку с леовго бока корпуса ПК. Далее отключите все провода от DVD привода, после чего перезагрузите систему. Это касается и Floppy диска, если он у вас имеется.
Примечание: Если у вы недавно установили какое-либо новое оборудование, как второй SSD, то отключите его.
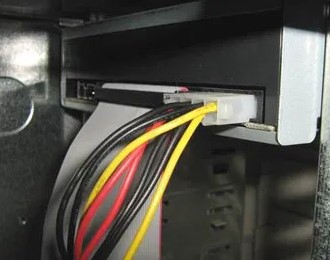
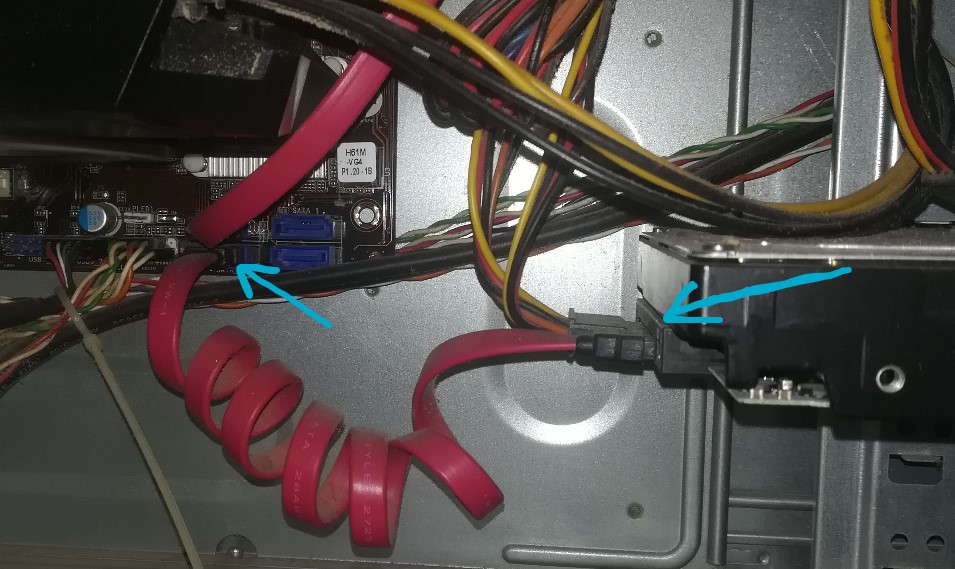
5. Провод к HDD или SSD
Ошибка «Disk Boot Failure» может появится, когда провод не плотно присоединен к с лотам материнской платы или самого диска. Проверьте, плотно ли присоединены провода между материнской платой и HDD диском. Попробуйте всунуть провод в другое гнездо на материнской плате. Это касается и M2 SSD дисков, которые могут быть неплотно всунуты.
6. Исправить Windows
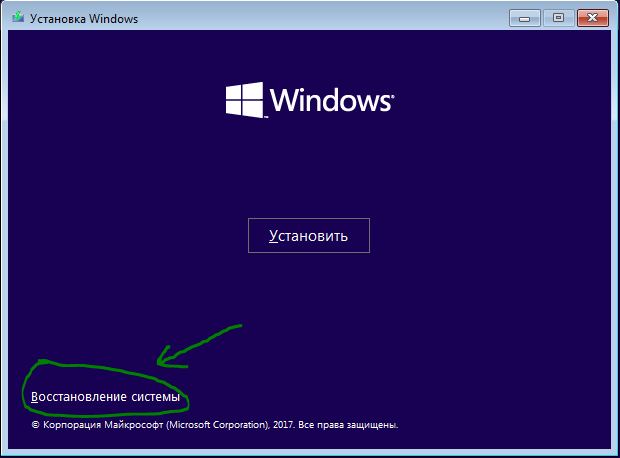
Создайте установочную флешку с Windows 10 на другом компьютере или ноутбуке и начните установку. Когда дойдете до пункта установки, то нажмите снизу на «Восстановления системы«. Далее вас перекинет в дополнительные параметры загрузки.
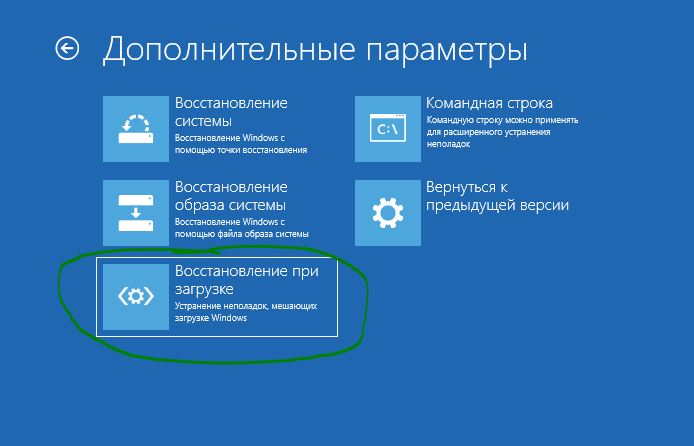
В дополнительных параметров загрузки выберите «Восстановление при загрузке«. Далее будет произведен автоматический поиск неисправностей, как повреждение загрузочной записи, и восстановление при обнаружении. Если ошибка «Disk Boot Failure Insert System Disk and Press Enter» не устранилась, то зайдите обратно и запустите командную строку.
В командной строке введите команду chkdsk C: /f /r . Вы должны понимать, что фактически раздел на котором Windows может быть и не «C:». Если у вас не получается ввести команду, то попробуйте ввести chkdsk /f /r . Эта команда восстановит битые сектора на диске, если они имеются.
How to create a boot disk
This page provides details about creating a boot diskette, or floppy disk, for Windows and not how to create a bootable CD. If you’re looking for steps for newer versions of Windows (e.g., Windows 7, 8, or 10), see: How to create a recovery disk in Windows.

A boot disk allows you to boot from a diskette instead of your hard drive. This diskette can fix issues that may arise during the lifetime of your computer or help load older MS-DOS games. Keep in mind this diskette is completely different than a restore CD or disc that may have been included with your computer.
After creating a boot diskette, it’s highly recommended you write-protect the diskette to prevent any virus from infecting the disk or the disk getting erased.
Creating an MS-DOS boot disk
These steps are for users who have MS-DOS installed on the computer. Find your version of Windows in the next section and follow the steps.
To create an MS-DOS diskette, begin by getting to the DOS directory by typing:
Once at the C:\DOS directory, skip to copying files.
Creating a Windows 3.x boot disk
These steps are for users who have Windows 3.x installed on the computer.
To create a Windows 3.x diskette, from Windows Program Manager, click File and then choose the option to Exit Windows, which gets you to a prompt; at the prompt, type:
Once at the C:\DOS directory, skip to copying files.
Creating a Windows 95 boot disk
These steps are for users who have Windows 95 installed on the computer.
In Windows 95, Microsoft has created a new method of creating a bootable recovery diskette. Unfortunately, however, this diskette does not support CD-ROM support and is missing a few recommended files. To do this, click Start, Settings, Control Panel, double-click the Add/Remove program’s icon, click the startup disk, and create the disk.
Alternatively, to create a Windows 95 boot diskette manually from Windows, click Start, Shutdown, and choose the option to restart the computer in an MS-DOS prompt. At the prompt, type:
Once at the C:\DOS directory, skip to copying files.
Creating a Windows 98 and ME boot disk
These steps are for users who have Windows 98 or Windows ME installed on the computer.
An excellent feature of Windows 98 and ME is its boot diskette. Using Windows to create a Windows 98 boot diskette gets all the needed boot files and CD-ROM support. To create a Windows 98 boot diskette, click Start, Settings, Control Panel, double-click the Add Remove program’s icon, click the startup disk, and create the disk.
Alternatively, to create a Windows 98 boot diskette manually from Windows, click Start, Shutdown, and choose the option to restart the computer in an MS-DOS prompt. At the prompt, type:
Once at the C:\DOS directory, skip to copying files.
Copying additional files
When making a boot disk, if you are running «Stacker» or some kind of a DoubleSpace or drive swapper program, this could not work.
Once in DOS and at the correct directory (mentioned earlier), you’re ready to create your bootable diskette. Insert a diskette that does not contain any information since it is going to be erased.
At the prompt, if you have MS-DOS 6.2, Windows 3.x, Windows 95, Windows 98, type:
If you have MS-DOS 5.0 Type using double density 5.25″ diskettes type:
If you have MS-DOS 3.11 through 4.0 using double density 5.25″ diskettes, type:
Once the diskette is formatted and the system are transferred, you’ll be returned to your original directory. In this directory, type:
If you’re planning to use this diskette as a diskette to load games or you feel that you need mouse support, you need to copy the mouse driver onto the boot diskette. The MS-DOS mouse driver is mouse.com or mouse.sys. Locate this file and copy it to your bootable diskette.
For CD-ROM support, visit our CD-ROM drivers page for information on loading your CD-ROM driver.
Once you have copied the above files, create an autoexec.bat and a config.sys. Get to the floppy drive by typing A:, once at the floppy drive, type:
Press and hold Ctrl + Z to return ^Z. Once this is displayed, press Enter to copy the file.
Press and hold Ctrl + Z to return ^Z. Once this is displayed, press Enter to copy the file.
Congratulations, after completing the above steps, you have a bootable floppy diskette.
Creating a Windows NT boot disk
To create a boot diskette, you must have access to the i386 directory on your Windows NT CD or possibly your hard drive.
Format the floppy diskette you want to make a bootable Windows NT boot disk using the Windows NT machine.
Copy boot.ini, ntdetect.com, and ntldr to the floppy diskette.
If you are using any SCSI devices that you need access to, you need to also load these drivers onto the diskette.
Creating a Windows 2000 boot disk
To create a Windows 2000 Professional bootable diskette, you need four 1.44 MB diskettes and the Windows 2000 Professional CD.
Click Start, Run, browse to the CD-ROM drive.
Open the «BOOTDISK» folder and double-click makeboot.exe and click ok to launch the program to create the diskette.
Users can also create an Emergency Repair Disk by clicking Start, Programs, Accessories, System Tools, and opening backup. From the backup window, click the button for Emergency Repair Disk and follow each of the steps.
Creating a Windows XP boot disk
The Microsoft Windows XP CD is a bootable CD and doesn’t need a bootable floppy diskette. Booting from the Windows XP CD allows you to not only install or reinstall Windows XP, but also troubleshoot.
Create MS-DOS bootable diskette
When formatting a floppy diskette, users have the option of creating an MS-DOS startup disk, follow the steps below to do this.
- Place diskette in the computer.
- Open My Computer, right-click the A: drive and click Format.
- In the Format window, check Create an MS-DOS startup disk.
- Click Start.
Create Windows XP setup diskettes
Microsoft has phased out bootable floppy diskettes in favor of bootable CDs and has not included a method of creating a bootable floppy diskette in Windows XP or from the CD.
How to use a boot disk
Once the bootable diskette is successfully created, follow the steps below to use the boot disk.
- Place the diskette into write-protect mode (in case a virus is on the computer, this prevents the virus from transfer itself onto the diskette).
- Insert the diskette into the computer and reset or turn on the computer to begin the boot process.
- As the computer is booting, answer the questions prompted (if any).
- Once at the A:\> prompt, take the appropriate actions depending on the situation of the computer.
- How to use the Windows command line (DOS).
Create bootable WinPE media
The Windows Assessment and Deployment Kit (ADK) and WinPE Add ons include the CopyPE and MakeWinPEMedia command line utilities. When run from the Deployment and Imaging Tools Environment, CopyPE creates a working set of WinPE files, that MakeWinPEMedia can use to create bootable WinPE media. MakeWinPEMedia can create bootable WinPE USB drives, virtual hard disks, or ISOs that allow you to boot a VHD or burn to a DVD or CD.
To create bootable WinPE media, install:
- The ADK with the Deployment Tools option checked during setup
- The WinPE Add ons
If you’re using the ADK for Windows 10, version 1803 or earlier, Windows PE is included in the ADK when you choose the Windows Preinstallation environment option during setup and doesn’t require a separate addon.
separate add-on that you download and install after you install the ADK. See Download and install the Windows ADK to download th version of WinPE for the version of the ADK you’re using.
Step 1: Create working files
No matter what type of media you’re going to create, the first thing to do is create a working set of WinPE files on your technician PC.
Start the Deployment and Imaging Tools Environment as an administrator.
Run copype to create a working copy of the Windows PE files. For more information about copype, see Copype command line options.
Step 2: Customize WinPE (Usually not needed)
Note, when you add more packages to WinPE, it slows WinPE performance and boot time. Only add additional packages when necessary.
Common customizations
Add an update. If you’re going to be capturing an FFU at the end of the lab, apply KB4048955 to your WinPE image. To learn more, see: WinPE: mount and customize.
Add a video or network driver. (WinPE includes generic video and network drivers, but in some cases, additional drivers are needed to show the screen or connect to the network.). To learn more, see WinPE: Add drivers.
Add PowerShell scripting support. To learn more, see WinPE: Adding Windows PowerShell support to Windows PE. PowerShell scripts are not included in this lab.
Set the power scheme to high-performance. Speeds deployment. Note, our sample deployment scripts already set this scheme automatically. See WinPE: Mount and Customize: High Performance.
Optimize WinPE: Recommended for devices with limited RAM and storage (for example, 1GB RAM/16GB storage). After you add drivers or other customizations to Windows PE, see WinPE: Optimize and shrink the image to help reduce the boot time.
Step 3: Create bootable media
Now that you now have a set of working files, you can use MakeWinPEMedia to build bootable WinPE media.
Create a bootable WinPE USB drive
Attach a USB drive to your technician PC.
Start the Deployment and Imaging Tools Environment as an administrator.
Optional You can format your USB key prior to running MakeWinPEMedia. MakeWinPEMedia will format your WinPE drive as FAT32. If you want to be able to store files larger than 4GB on your WinPE USB drive, you can create a multipartition USB drive that has an additional partition formatted as NTFS. See Create a multipartition USB drive for instructions.
Use MakeWinPEMedia with the /UFD option to format and install Windows PE to the USB flash drive, specifying the USB key’s drive letter:
This command reformats the partition.
The bootable WinPE USB drive is ready. You can use it to boot a PC into WinPE.
Create a WinPE ISO, DVD, or CD
Use MakeWinPEMedia with the /ISO option to create an ISO file containing the Windows PE files:
Optional Burn a DVD or CD: In Windows Explorer, right-click the ISO file, and select Burn disc image > Burn, and follow the prompts.
Create a WinPE VHD to use with Hyper-V
You can create a bootable VHD to use with Hyper-V.
When running Windows PE in Hyper-V, consider using an ISO file format instead of a VHD to enable faster setup of the virtual PC.
To install Windows PE to a VHD:
Create a virtual hard drive (.vhdx):
Prepare the drive by using MakeWinPEMedia:
Detach the drive:
Troubleshooting
If WindowsВ PE doesn’t appear, try the following workarounds, rebooting the PC each time:
To boot a PC that supports UEFI mode: In the firmware boot menus, try manually selecting the boot files: \EFI\BOOT\BOOTX64.EFI.
If your PC requires storage or video drivers to boot, try adding those same drivers to the WindowsВ PE image. For more information, see WinPE: Mount and Customize.


