- Update drivers in Windows 10
- Before you begin
- Update the device driver
- Reinstall the device driver
- More help
- Automatically get recommended drivers and updates for your hardware
- Drivers and information
- How to check device driver versions on Windows 10
- How to determine driver version using Device Manager
- How to determine driver version using PowerShell
- More Windows 10 resources
- The Dell XPS 15 is our choice for best 15-inch laptop
- Halo: MCC’s live service elements make it better, not worse
- Microsoft’s Surface Duo is not ‘failing up’
- These are the best PC sticks when you’re on the move
- Driver Verifier
- Where can I download Driver Verifier?
- When to use Driver Verifier
- How to start Driver Verifier
- How to control Driver Verifier
- How to debug Driver Verifier violations
Update drivers in Windows 10
Before you begin
Driver updates for Windows 10, along with many devices, such as network adapters, monitors, printers, and video cards, are automatically downloaded and installed through Windows Update. You probably already have the most recent drivers, but if you’d like to manually update or reinstall a driver, here’s how: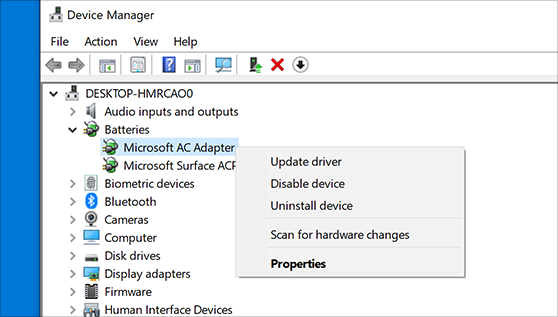
Update the device driver
In the search box on the taskbar, enter device manager, then select Device Manager.
Select a category to see names of devices, then right-click (or press and hold) the one you’d like to update.
Select Search automatically for updated driver software.
Select Update Driver.
If Windows doesn’t find a new driver, you can try looking for one on the device manufacturer’s website and follow their instructions.
Reinstall the device driver
In the search box on the taskbar, enter device manager, then select Device Manager.
Right-click (or press and hold) the name of the device, and select Uninstall.
Restart your PC.
Windows will attempt to reinstall the driver.
More help
If you can’t see the desktop and instead see a blue, black, or blank screen, see Troubleshoot blue screen errors or Troubleshoot black or blank screen errors.
Automatically get recommended drivers and updates for your hardware
Support for Windows 7 ended on January 14, 2020
We recommend you move to a Windows 10 PC to continue to receive security updates from Microsoft.
You can have Windows automatically download recommended drivers and detailed information for your hardware and devices. This is a good way to make sure all your hardware and devices work properly.
Drivers and information
Windows can find and download two kinds of updates for devices connected to your computer:
Drivers. A driver is software that allows your computer to communicate with hardware devices. Without drivers, the devices you connect to your computer—for example, a mouse or external hard drive—won’t work properly. Windows can automatically check if there are drivers available for new devices that you connect to your computer.
For hardware that you’ve connected to your computer in the past, updated drivers might become available at a later date; but those drivers aren’t installed automatically. To install these optional updates, go to Windows Update in Control Panel, check for updates, and then view and install driver updates that are available for your computer.
Information. Windows can download high-resolution icons for many hardware devices that you connect to your computer, along with detailed information about them, such as product name, manufacturer, and model number—even detailed information about the sync capabilities of a device. These details can make it easier for you to distinguish between similar devices that are connected to your computer, such as different mobile phones.
You can check Windows Update at any time to see if it found new drivers and icons for your hardware, especially if you recently installed a new device. If you want to have Windows Update automatically check for the latest drivers and icons, here’s how:
Open Devices and Printers by clicking the Start button  , and then, on the Start menu, clicking Devices and Printers.
Right-click the name of your computer, and then click Device installation settings.
Click Yes, do this automatically (recommended), and then click Save changes.  If you’re prompted for an administrator password or confirmation, type the password or provide confirmation.
If Yes is already selected, click Cancel to close the dialog box.
To get all important and recommended updates for your computer and your devices, make sure that Windows Update is turned on and configured properly.
Even if you have Windows Update set to automatically download and install all important and recommended updates, you still might not be getting all of the updated drivers available for your devices. For instance, optional updates might include updated drivers that become available for hardware or devices you’ve already installed. Windows doesn’t automatically download and install optional updates, but you will be notified when optional updates are available.
To get all the available updates for your devices, periodically check Windows Update for all available updates, including optional updates. You can review the available updates and then select them from the list of updates that Windows finds for your computer. Here’s how to do this:
Open Windows Update by clicking the Start button . In the search box, type Update, and then, in the list of results, click Windows Update.
In the left pane, click Check for updates, and then wait while Windows looks for the latest updates for your computer.
If there are any available updates, click the link in the box under Windows Update to see more information about each update. Each type of update might include drivers.
On the Select the updates you want to install page, look for updates for your hardware devices, select the check box for each driver that you want to install, and then click OK. There might not be any driver updates available.
On the Windows Update page, click Install updates. If you’re prompted for an administrator password or confirmation, type the password or provide confirmation.
Windows Update tells you if an update is important, recommended, or optional.
Some updates require you to restart your computer.
Windows Update will tell you if the updates were successfully installed.
How to check device driver versions on Windows 10

On computers, a device driver is a package with instructions that allows (in this case) Windows 10 to communicate and control a particular piece of hardware (such as graphics card, printers, Bluetooth and network adapters).
Understanding the driver version currently installed on your computer can be useful information to determine if an update is needed, as manufacturers usually release driver updates multiple times a year to improve performance and stability, add new features, and fix issues.
In this Windows 10 guide, we walk you through the steps to check the version of a device driver using Device Manager and PowerShell.
How to determine driver version using Device Manager
To determine the driver version for a particular piece of hardware with Device Manager, use these steps:
- Open Start.
- Search for Device Manager and click the top result to open the experience.
- Expand the branch for the device that you want to check the driver version.
Right-click the device and select the Properties option.

Check the installed driver version of the device.
![]()
Once you complete these steps, you’ll know the current driver version, which you can check against the version number available on your manufacturer support website to determine if Windows 10 is using the most up-to-date release.
Alongside the driver version, using the «Driver» tab, you can also find out other useful information, such as the date when the current version of the driver was installed, and if the driver has been properly signed.
How to determine driver version using PowerShell
If you want to check the driver version for one or more devices, you can also use this PowerShell command:
- Open Start.
- Search for PowerShell, right-click the top result, and select Run as administrator.
Type the following command to list the drivers installed on your computer and press Enter:
Get-WmiObject Win32_PnPSignedDriver| select DeviceName, Manufacturer, DriverVersion
After completing the steps, the command will display all the device drivers currently installed on your system alphabetically with their manufacturer names and versions.
More Windows 10 resources
For more helpful articles, coverage, and answers to common questions about Windows 10, visit the following resources:
![]()
The Dell XPS 15 is our choice for best 15-inch laptop
For a lot of people, a 15-inch laptop is a perfect size that offers enough screen for multitasking, and in a lot of cases, some extra performance from powerful hardware. We’ve rounded up the best of the best at this size.
![]()
Halo: MCC’s live service elements make it better, not worse
Halo: The Master Chief Collection is more popular than ever, but some fans don’t agree with the live service approach 343 Industries has taken with it. Here’s why those elements are, at the end of the day, great for the game and for Halo overall.
![]()
Microsoft’s Surface Duo is not ‘failing up’
Microsoft announced this week that it was expanding Surface Duo availability to nine new commercial markets. While Surface Duo is undoubtedly a work in progress, this is not a sign of a disaster. It’s also doesn’t mean that Surface Duo is selling a ton either. Instead, the reason for the expansion is a lot more straightforward.
![]()
These are the best PC sticks when you’re on the move
Instant computer — just add a screen. That’s the general idea behind the ultra-portable PC, but it can be hard to know which one you want. Relax, we have you covered!
Driver Verifier
Driver Verifier monitors Windows kernel-mode drivers and graphics drivers to detect illegal function calls or actions that might corrupt the system. Driver Verifier can subject Windows drivers to a variety of stresses and tests to find improper behavior. You can configure which tests to run, which allows you to put a driver through heavy stress loads or through more streamlined testing. You can also run Driver Verifier on multiple drivers simultaneously, or on one driver at a time.
- Running Driver Verifier could cause the computer to crash.
- You should only run Driver Verifier on computers that you are using for testing and debugging.
- You must be in the Administrators group on the computer to use Driver Verifier.
- Driver Verifier is not included in Windows 10 S, so we recommend testing driver behavior on Windows 10 instead.
Where can I download Driver Verifier?
You don’t need to download Driver Verifier, because it is included with most versions of Windows in %WinDir%\system32\ as Verifier.exe. (Driver Verifier is not included with Windows 10 S.) Driver Verifier is not distributed separately as a download package.
For information about changes in Driver Verifier for Windows 10 and previous versions of Windows, see Driver Verifier: What’s New.
When to use Driver Verifier
Run Driver Verifier throughout development and testing of your driver. More specifically, use Driver Verifier for the following purposes:
To find problems early in the development cycle, when they are easier and less costly to correct.
For troubleshooting and debugging test failures and computer crashes.
To monitor behavior when you deploy a driver for testing using the WDK, Visual Studio, and the tests from the Windows Hardware Lab Kit (Windows HLK) or Windows Hardware Certification Kit (for Windows 8.1). For more information about testing drivers, see Testing a Driver.
How to start Driver Verifier
You should only run Driver Verifier on test computers, or on computers that you are testing and debugging. To get the most benefit from Driver Verifier, you should use a kernel debugger and connect to the test computer. For more information about debugging tools, see Debugging Tools for Windows (WinDbg, KD, CDB, NTSD).
Start a Command Prompt window by selecting Run as administrator, and type verifier to open Driver Verifier Manager.
Select Create standard settings (the default task), and select Next.
You can also choose Create custom settings to select from predefined settings, or to select individual options. For more information, see Driver Verifier options and rule classes and Selecting Driver Verifier Options.
Under Select what drivers to verify, choose one of the selection schemes described in the following table.
| Option | Recommended use |
|---|---|
| Automatically select unsigned drivers | |
| Automatically select drivers built for older versions of Windows | |
| Automatically select all drivers installed on this computer | |
| Select driver names from a list |


