- Windows Defender Offline
- О программе
- Что нового
- Полезные ссылки
- Подробное описание
- Инструкция по использованию Windows Defender Offline
- Защита компьютера с помощью автономного Microsoft Defender
- В каких случаях следует использовать автономный Microsoft Defender?
- Где найти результаты проверки?
- Использование автономного Защитника Windows в Windows 7 и Windows 8.1
- How to control USB devices and other removable media using Microsoft Defender for Endpoint
- Discover plug and play connected events
- Allow or block removable devices
- Restrict USB drives and other peripherals
- Allow installation and usage of USB drives and other peripherals
- Prevent installation and usage of USB drives and other peripherals
- Look up device ID
- Block installation and usage of removable storage
- Allow installation and usage of specifically approved peripherals
- Prevent installation of specifically prohibited peripherals
- Allow installation and usage of specifically approved peripherals with matching device instance IDs
- Prevent installation and usage of specifically prohibited peripherals with matching device instance IDs
- Limit services that use Bluetooth
- Use Microsoft Defender for Endpoint baseline settings
- Prevent threats from removable storage
- Enable Microsoft Defender Antivirus Scanning
- Block untrusted and unsigned processes on USB peripherals
- Protect against Direct Memory Access (DMA) attacks
- Create customized alerts and response actions
- Respond to threats
Windows Defender Offline


| Разработчик: | Microsoft (США) |
| Лицензия: | Freeware (бесплатно) |
| Версия: | [18.04.2021] |
| Обновлено: | 2021-04-18 |
| Системы: | Windows 10 / 8.1 / 8 / 7 / Vista 32|64-bit |
| Интерфейс: | русский |
| Рейтинг: |  |
| Ваша оценка: | |
| Категория: | Загрузочные диски |
| Размер: | 251 MB / 278 MB (x64) |
О программе
Что нового
Полезные ссылки
Подробное описание
Windows Defender Offline — ISO-образ, который содержит антивирусный сканер Microsoft, работающий с загрузочного CD/DVD диска.
Загрузочный диск Windows Defender Offline используется в системах, зараженных руткитами и специфическими вредоносными угрозами, препятствующими работе антивируса в системе Windows, блокирующих доступ к веб-сайтам по безопасности и т.д.
Загрузочный диск от Microsoft позволит запустить зараженный компьютер, просканирует систему на наличие вредоносного ПО и руткитов и удалит следы обнаруженных угроз.
Найденные угрозы (вирусы, программы-шпионы, руткиты, потеницально опасное ПО) могут быть отправлены на анализ с помощью сервиса онлайн-сообщества Miscrosoft Active Protection Service. Данные позволят добавить новые угрозы в вирусную базу и в дальнейшем защитить компьютеры с установленной защитой Microsoft от подобных угроз.
Инструкция по использованию Windows Defender Offline
Чтобы использовать Windows Defender Offline, необходимо выполнить четыре приведенные ниже основные действия.
• Загрузите ISO-образ Windows Defender Offline и запишите на CD/DVD-носитель. Также Вы можете использовать инструмент для создания загрузочного CD/DVD-диска или загрузочной USB-флешки.
• Запустите компьютер, используя загрузочный носитель с Windows Defender Offline.
• Проверьте систему на наличие вредоносных программ, руткитов, а также потенциально нежелательного ПО.
• Удалите все вредоносные объекты, обнаруженные на компьютере.
Windows Defender Offline не является полноценной заменой антивирусу, который защищает ваш компьютера в режиме реального времени. Используйте загрузочный диск в ситуациях, когда невозможно запустить ОС Windows из-за заражения вирусами или другими вредоносными программами.
Защита компьютера с помощью автономного Microsoft Defender
Автономный Microsoft Defender — это мощный автономный инструмент проверки, который можно запустить из доверенной среды без загрузки ОС. В этом разделе описываются способы использования автономного Microsoft Defender в Windows 10, Windows 8.1 и Windows 7.
В каких случаях следует использовать автономный Microsoft Defender?
Запустите автономный Microsoft Defender, если:
Безопасность Windows (в предыдущих версиях Windows — «Центр безопасности Защитника Windows») обнаруживает на вашем компьютере пакеты программ rootkit или сложно удаляемые вредоносные программы и оповещает вас о необходимости запуска автономного Microsoft Defender. Возможно, появится сообщение о том, что на вашем устройстве обнаружена вредоносная программа, или в системе безопасности Windows появляется сообщение о том, что требуется дополнительная очистка.
Вы подозреваете, что на вашем компьютере есть вредоносные программы, которые скрываются, но программа для обеспечения безопасности не обнаруживает ничего. В этом случае можно запустить проверку компьютера автономным Microsoft Defender, перейдя в раздел «Параметры» меню «Безопасность Windows». Для этого выполните следующие действия.
Нажмите кнопку Пуск и выберите Параметры > Обновление и безопасность > Безопасность Windows > Защита от вирусов и угроз .
На экране «Защита от вирусов и угроз» выполните одно из следующих действий:
В последней версии Windows 10: в разделе текущие угрозывыберите Параметры сканирования.
В предыдущих версиях Windows: в области Ж урнал угроз выберите Запустить новое расширенное сканирование.
Выберите Проверка автономного Microsoft Defender, а затем — Проверить сейчас.
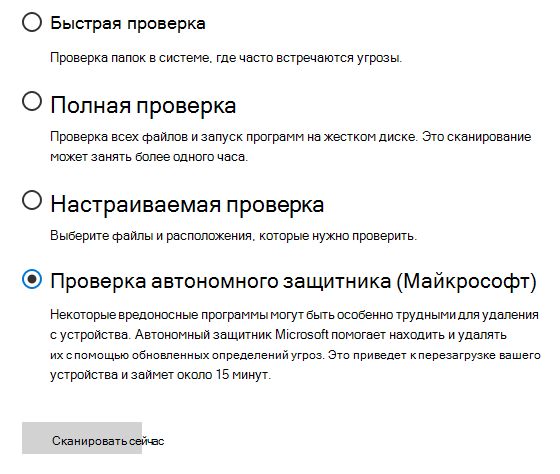
Вам будет предложено выйти из Windows. После этого компьютер должен выполнить перезапуск. Загрузится автономный Microsoft Defender, и он выполнит быструю проверку компьютера в среде восстановления. После завершения проверки (как правило, она занимает около 15 минут) компьютер автоматически выполнит перезапуск.
Перед использованием автономного Microsoft Defender сохраните все открытые файлы и закройте все приложения и программы.
Обычно требуются права администратора на компьютере, на котором планируется запустить автономный Microsoft Defender.
При возникновении неустранимой системной ошибки на синем экране во время автономной проверки выполните принудительный перезапуск и попробуйте еще раз запустить проверку автономного Microsoft Defender. Если ошибка на синем экране снова исчезнет, обратитесь в службу поддержки Майкрософт.
Где найти результаты проверки?
Чтобы просмотреть результаты проверки автономного Microsoft Defender:
Нажмите кнопку Пуск и выберите параметры > Обновление & безопасность > Безопасность Windows > вирус & защита от угроз .
На экране Защита от вирусов & угроз в Windows 10 в разделе текущие угрозывыберите Параметры сканирования, а затем выберите Журнал защиты (в предыдущих версиях Windows это может сказать История угроз).
Использование автономного Защитника Windows в Windows 7 и Windows 8.1
Примечание: В более ранних версиях Windows автономный защитник Майкрософт по-прежнему вызывается старым именем: автономный защитник Windows
Если вы используете автономный Защитник Windows в Windows 7 или Windows 8.1, выполните эти четыре простых действия.
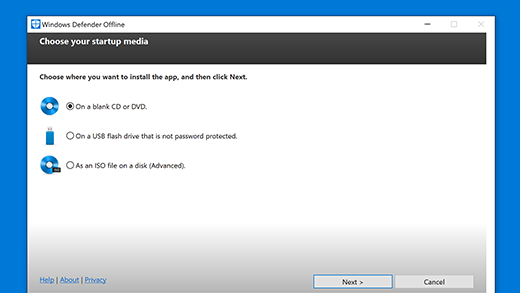
Скачайте автономный Защитник Windows и установите его на компакт-диск, DVD-диск или USB-устройство флэш-памяти.
Перезагрузите компьютер, используя носитель, содержащий автономный Защитник Windows. Это означает, что компакт-диск, DVD-диск или устройство флэш-памяти, созданное на шаге 1, должно быть установлено в компьютер во время перезапуска. Следуйте указаниям для загрузки с диска, содержащего данный носитель.
Проверьте компьютер на предмет наличия вирусов и других вредоносных программ.
Удалите все вредоносные программы, обнаруженные на компьютере.
Автономный Защитник Windows предоставит пошаговые указания по выполнению этих четырех действий. Если Microsoft Security Essentials или Центр безопасности Защитника Windows предлагает скачать и запустить автономный Защитник Windows, важно это сделать. Это поможет обеспечить сохранность данных и компьютера.
Для начала найдите пустой компакт-диск или DVD-диск либо USB-устройство флэш-памяти, на котором свободно не менее 250 МБ, а затем скачайте и запустите средство по созданию съемного носителя. Вам будут предложены подробные указания для создания съемного носителя.
Примечание: Рекомендуется скачивать автономный Защитник Windows и создавать компакт-диск, DVD-диск или USB-устройство флэш-памяти на компьютере, который не заражен вредоносными программами, поскольку они могут препятствовать созданию носителя.
How to control USB devices and other removable media using Microsoft Defender for Endpoint
Microsoft recommends a layered approach to securing removable media, and Microsoft Defender for Endpoint provides multiple monitoring and control features to help prevent threats in unauthorized peripherals from compromising your devices:
Configure to allow or block only certain removable devices and prevent threats.
Allow or block removable devices based on granular configuration to deny write access to removable disks and approve or deny devices by using USB device IDs. Flexible policy assignment of device installation settings based on an individual or group of Azure Active Directory (Azure AD) users and devices.
Prevent threats from removable storage introduced by removable storage devices by enabling:
— Microsoft Defender Antivirus real-time protection (RTP) to scan removable storage for malware.
— The Attack Surface Reduction (ASR) USB rule to block untrusted and unsigned processes that run from USB.
— Direct Memory Access (DMA) protection settings to mitigate DMA attacks, including Kernel DMA Protection for Thunderbolt and blocking DMA until a user signs in.
Create customized alerts and response actions to monitor usage of removable devices based on these plug and play events or any other Microsoft Defender for Endpoint events with custom detection rules.
Respond to threats from peripherals in real-time based on properties reported by each peripheral.
These threat reduction measures help prevent malware from coming into your environment. To protect enterprise data from leaving your environment, you can also configure data loss prevention measures. For example, on Windows 10 devices you can configure BitLocker and Windows Information Protection, which will encrypt company data even if it is stored on a personal device, or use the Storage/RemovableDiskDenyWriteAccess CSP to deny write access to removable disks. Additionally, you can classify and protect files on Windows devices (including their mounted USB devices) by using Microsoft Defender for Endpoint and Azure Information Protection.
Discover plug and play connected events
You can view plug and play connected events in Microsoft Defender for Endpoint advanced hunting to identify suspicious usage activity or perform internal investigations. For examples of Defender for Endpoint advanced hunting queries, see the Microsoft Defender for Endpoint hunting queries GitHub repo.
Sample Power BI report templates are available for Microsoft Defender for Endpoint that you can use for Advanced hunting queries. With these sample templates, including one for device control, you can integrate the power of Advanced hunting into Power BI. See the GitHub repository for PowerBI templates for more information. See Create custom reports using Power BI to learn more about Power BI integration.
Allow or block removable devices
The following table describes the ways Microsoft Defender for Endpoint can allow or block removable devices based on granular configuration.
| Control | Description |
|---|---|
| Restrict USB drives and other peripherals | You can allow/prevent users to install only the USB drives and other peripherals included on a list of authorized/unauthorized devices or device types. |
| Block installation and usage of removable storage | You can’t install or use removable storage. |
| Allow installation and usage of specifically approved peripherals | You can only install and use approved peripherals that report specific properties in their firmware. |
| Prevent installation of specifically prohibited peripherals | You can’t install or use prohibited peripherals that report specific properties in their firmware. |
| Allow installation and usage of specifically approved peripherals with matching device instance IDs | You can only install and use approved peripherals that match any of these device instance IDs. |
| Prevent installation and usage of specifically prohibited peripherals with matching device instance IDs | You can’t install or use prohibited peripherals that match any of these device instance IDs. |
| Limit services that use Bluetooth | You can limit the services that can use Bluetooth. |
| Use Microsoft Defender for Endpoint baseline settings | You can set the recommended configuration for ATP by using the Defender for Endpoint security baseline. |
Restrict USB drives and other peripherals
To prevent malware infections or data loss, an organization may restrict USB drives and other peripherals. The following table describes the ways Microsoft Defender for Endpoint can help prevent installation and usage of USB drives and other peripherals.
| Control | Description |
|---|---|
| Allow installation and usage of USB drives and other peripherals | Allow users to install only the USB drives and other peripherals included on a list of authorized devices or device types |
| Prevent installation and usage of USB drives and other peripherals | Prevent users from installing USB drives and other peripherals included on a list of unauthorized devices and device types |
All of the above controls can be set through the Intune Administrative Templates. The relevant policies are located here in the Intune Administrator Templates:
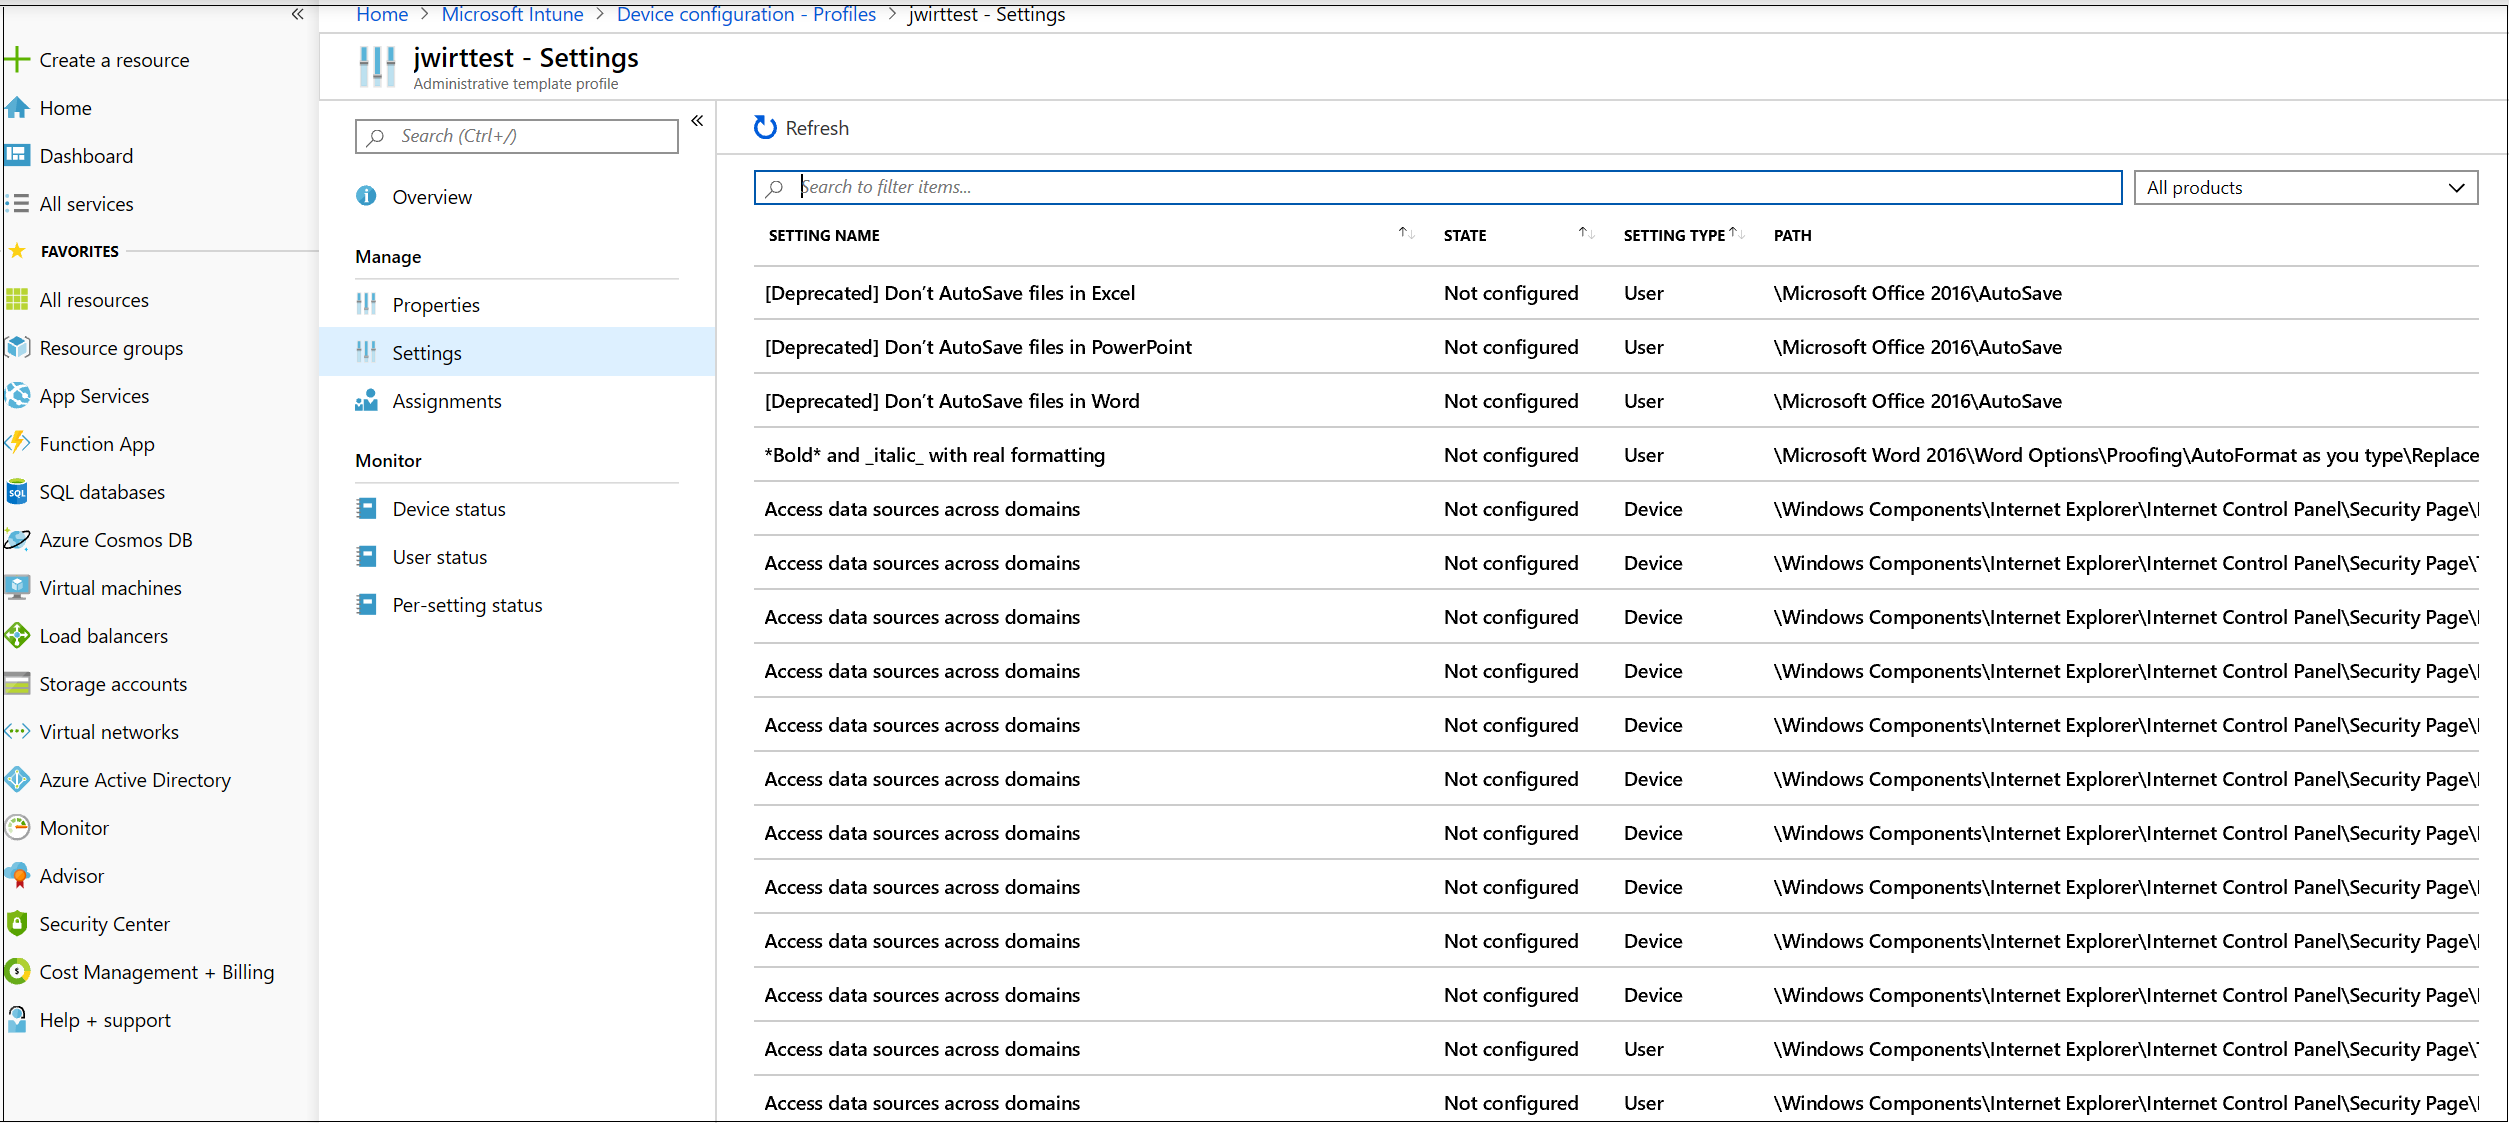
Using Intune, you can apply device configuration policies to Azure AD user and/or device groups. The above policies can also be set through the Device Installation CSP settings and the Device Installation GPOs.
Always test and refine these settings with a pilot group of users and devices first before applying them in production. For more information about controlling USB devices, see the Microsoft Defender for Endpoint blog.
Allow installation and usage of USB drives and other peripherals
One way to approach allowing installation and usage of USB drives and other peripherals is to start by allowing everything. Afterwards, you can start reducing the allowable USB drivers and other peripherals.
Because an unauthorized USB peripheral can have firmware that spoofs its USB properties, we recommend only allowing specifically approved USB peripherals and limiting the users who can access them.
- Enable Prevent installation of devices not described by other policy settings to all users.
- Enable Allow installation of devices using drivers that match these device setup classes for all device setup classes.
To enforce the policy for already installed devices, apply the prevent policies that have this setting.
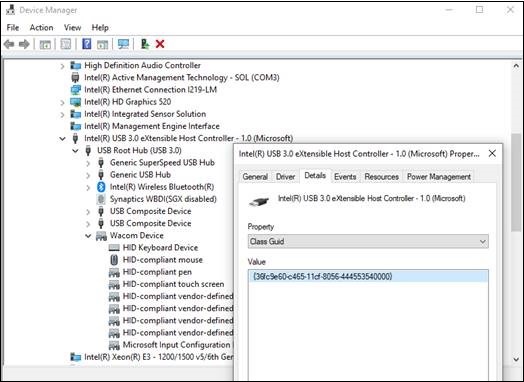
When configuring the allow device installation policy, you must allow all parent attributes as well. You can view the parents of a device by opening Device Manager and view by connection.

In this example, the following classes needed to be added: HID, Keyboard, and <36fc9e60-c465-11cf-8056-444553540000>. See Microsoft-provided USB drivers for more information.
If you want to restrict to certain devices, remove the device setup class of the peripheral that you want to limit. Then add the device ID that you want to add. Device ID is based on the vendor ID and product ID values for a device. For information on device ID formats, see Standard USB Identifiers.
To find the device IDs, see Look up device ID.
- Remove class USBDevice from the Allow installation of devices using drivers that match these device setup.
- Add the device ID to allow in the Allow installation of device that match any of these device IDs.
Prevent installation and usage of USB drives and other peripherals
If you want to prevent the installation of a device class or certain devices, you can use the prevent device installation policies:
- Enable Prevent installation of devices that match any of these device IDs and add these devices to the list.
- Enable Prevent installation of devices using drivers that match these device setup classes.
The prevent device installation policies take precedence over the allow device installation policies.
The Prevent installation of devices that match any of these device IDs policy allows you to specify a list of devices that Windows is prevented from installing.
To prevent installation of devices that match any of these device IDs:
- Look up device ID for devices that you want Windows to prevent from installing.

- Enable Prevent installation of devices that match any of these device IDs and add the vendor or product IDs to the list.
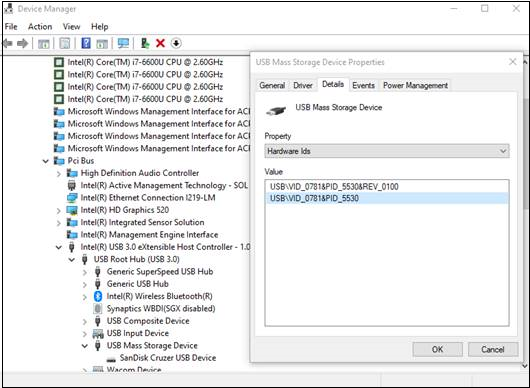

Look up device ID
You can use Device Manager to look up a device ID.
- Open Device Manager.
- Click View and select Devices by connection.
- From the tree, right-click the device and select Properties.
- In the dialog box for the selected device, click the Details tab.
- Click the Property drop-down list and select Hardware Ids.
- Right-click the top ID value and select Copy.
For information about Device ID formats, see Standard USB Identifiers.
For information on vendor IDs, see USB members.
The following is an example for looking up a device vendor ID or product ID (which is part of the device ID) using PowerShell:
The Prevent installation of devices using drivers that match these device setup classes policy allows you to specify device setup classes that Windows is prevented from installing.
To prevent installation of particular classes of devices:
- Find the GUID of the device setup class from System-Defined Device Setup Classes Available to Vendors.
- Enable Prevent installation of devices using drivers that match these device setup classes and add the class GUID to the list.

Block installation and usage of removable storage
Click Intune > Device configuration > Profiles > Create profile.

Use the following settings:
- Name: Type a name for the profile
- Description: Type a description
- Platform: Windows 10 and later
- Profile type: Device restrictions

Click Configure > General.
For Removable storage and USB connection (mobile only), choose Block. Removable storage includes USB drives, whereas USB connection (mobile only) excludes USB charging but includes other USB connections on mobile devices only.

Click OK to close General settings and Device restrictions.
Click Create to save the profile.
Allow installation and usage of specifically approved peripherals
Peripherals that are allowed to be installed can be specified by their hardware identity. For a list of common identifier structures, see Device Identifier Formats. Test the configuration prior to rolling it out to ensure it blocks and allows the devices expected. Ideally test various instances of the hardware. For example, test multiple USB keys rather than only one.
Prevent installation of specifically prohibited peripherals
Microsoft Defender for Endpoint blocks installation and usage of prohibited peripherals by using either of these options:
Allow installation and usage of specifically approved peripherals with matching device instance IDs
Peripherals that are allowed to be installed can be specified by their device instance IDs. Test the configuration prior to rolling it out to ensure it allows the devices expected. Ideally test various instances of the hardware. For example, test multiple USB keys rather than only one.
You can allow installation and usage of approved peripherals with matching device instance IDs by configuring DeviceInstallation/AllowInstallationOfMatchingDeviceInstanceIDs policy setting.
Prevent installation and usage of specifically prohibited peripherals with matching device instance IDs
Peripherals that are prohibited to be installed can be specified by their device instance IDs. Test the configuration prior to rolling it out to ensure it allows the devices expected. Ideally test various instances of the hardware. For example, test multiple USB keys rather than only one.
You can prevent installation of the prohibited peripherals with matching device instance IDs by configuring DeviceInstallation/PreventInstallationOfMatchingDeviceInstanceIDs policy setting.
Limit services that use Bluetooth
Using Intune, you can limit the services that can use Bluetooth through the «Bluetooth allowed services». The default state of «Bluetooth allowed services» settings means everything is allowed. As soon as a service is added, that becomes the allowed list. If the customer adds the Keyboards and Mice values, and doesn’t add the file transfer GUIDs, file transfer should be blocked.

Use Microsoft Defender for Endpoint baseline settings
The Microsoft Defender for Endpoint baseline settings represent the recommended configuration for threat protection. Configuration settings for baseline are located in the edit profile page of the configuration settings.

Prevent threats from removable storage
Removable storage devices can introduce additional security risk to your organization. Microsoft Defender for Endpoint can help identify and block malicious files on removable storage devices.
Microsoft Defender for Endpoint can also prevent USB peripherals from being used on devices to help prevent external threats. It does this by using the properties reported by USB peripherals to determine whether or not they can be installed and used on the device.
Note that if you block USB devices or any other device classes using the device installation policies, connected devices, such as phones, can still charge.
Always test and refine these settings with a pilot group of users and devices first before widely distributing to your organization.
The following table describes the ways Microsoft Defender for Endpoint can help prevent threats from removable storage.
For more information about controlling USB devices, see the Microsoft Defender for Endpoint blog.
| Control | Description |
|---|---|
| Enable Microsoft Defender Antivirus Scanning | Enable Microsoft Defender Antivirus scanning for real-time protection or scheduled scans. |
| Block untrusted and unsigned processes on USB peripherals | Block USB files that are unsigned or untrusted. |
| Protect against Direct Memory Access (DMA) attacks | Configure settings to protect against DMA attacks. |
Because an unauthorized USB peripheral can have firmware that spoofs its USB properties, we recommend only allowing specifically approved USB peripherals and limiting the users who can access them.
Enable Microsoft Defender Antivirus Scanning
Protecting authorized removable storage with Microsoft Defender Antivirus requires enabling real-time protection or scheduling scans and configuring removable drives for scans.
- If real-time protection is enabled, files are scanned before they are accessed and executed. The scanning scope includes all files, including those on mounted removable devices such as USB drives. You can optionally run a PowerShell script to perform a custom scan of a USB drive after it is mounted, so that Microsoft Defender Antivirus starts scanning all files on a removable device once the removable device is attached. However, we recommend enabling real-time protection for improved scanning performance, especially for large storage devices.
- If scheduled scans are used, then you need to disable the DisableRemovableDriveScanning setting (enabled by default) to scan the removable device during a full scan. Removable devices are scanned during a quick or custom scan regardless of the DisableRemovableDriveScanning setting.
We recommend enabling real-time monitoring for scanning. In Intune, you can enable real-time monitoring for Windows 10 in Device Restrictions > Configure > Microsoft Defender Antivirus > Real-time monitoring.
Block untrusted and unsigned processes on USB peripherals
End-users might plug in removable devices that are infected with malware. To prevent infections, a company can block USB files that are unsigned or untrusted. Alternatively, companies can leverage the audit feature of attack surface reduction rules to monitor the activity of untrusted and unsigned processes that execute on a USB peripheral. This can be done by setting Untrusted and unsigned processes that run from USB to either Block or Audit only, respectively. With this rule, admins can prevent or audit unsigned or untrusted executable files from running from USB removable drives, including SD cards. Affected file types include executable files (such as .exe, .dll, or .scr) and script files such as a PowerShell (.ps), VisualBasic (.vbs), or JavaScript (.js) files.
- Sign in to the Microsoft Endpoint Manager.
- Click Devices >Windows >Configuration Policies >Create profile.
- Use the following settings:
- Platform: Windows 10 and later
- Profile type: Device restrictions
- Click Create.
- For Unsigned and untrusted processes that run from USB, choose Block.
- Click OK to close settings and Device restrictions.


Protect against Direct Memory Access (DMA) attacks
DMA attacks can lead to disclosure of sensitive information residing on a PC, or even injection of malware that allows attackers to bypass the lock screen or control PCs remotely. The following settings help to prevent DMA attacks:
Beginning with Windows 10 version 1803, Microsoft introduced Kernel DMA Protection for Thunderbolt to provide native protection against DMA attacks via Thunderbolt ports. Kernel DMA Protection for Thunderbolt is enabled by system manufacturers and cannot be turned on or off by users.
Beginning with Windows 10 version 1809, you can adjust the level of Kernel DMA Protection by configuring the DMA Guard CSP. This is an additional control for peripherals that don’t support device memory isolation (also known as DMA-remapping). Memory isolation allows the OS to leverage the I/O Memory Management Unit (IOMMU) of a device to block unallowed I/O, or memory access, by the peripheral (memory sandboxing). In other words, the OS assigns a certain memory range to the peripheral. If the peripheral attempts to read/write to memory outside of the assigned range, the OS blocks it.
Peripherals that support device memory isolation can always connect. Peripherals that don’t can be blocked, allowed, or allowed only after the user signs in (default).
On Windows 10 systems that do not support Kernel DMA Protection, you can:
Create customized alerts and response actions
You can create custom alerts and response actions with the WDATP Connector and the custom detection rules:
Wdatp Connector response Actions:
Investigate: Initiate investigations, collect investigation package, and isolate a machine.
Threat Scanning on USB devices.
Restrict execution of all applications on the machine except a predefined set MDATP connector is one of over 200 pre-defined connectors including Outlook, Teams, Slack, etc. Custom connectors can be built.
Custom Detection Rules Response Action: Both machine and file level actions can be applied.
For information on device control related advance hunting events and examples on how to create custom alerts, see Advanced hunting updates: USB events, machine-level actions, and schema changes.
Respond to threats
You can create custom alerts and automatic response actions with the Microsoft Defender for Endpoint Custom Detection Rules. Response actions within the custom detection cover both machine and file level actions. You can also create alerts and automatic response actions using PowerApps and Flow with the Microsoft Defender for Endpoint connector. The connector supports actions for investigation, threat scanning, and restricting running applications. It is one of over 200 pre-defined connectors including Outlook, Teams, Slack, and more. Custom connectors can also be built. See Connectors to learn more about connectors.
For example, using either approach, you can automatically have the Microsoft Defender Antivirus run when a USB device is mounted onto a machine.


