Microsoft windows deleted files
Deletes one or more files. This command performs the same actions as the erase command.
The del command can also run from the Windows Recovery Console, using different parameters. For more information, see Windows Recovery Environment (WinRE).
If you use del to delete a file from your disk, you can’t retrieve it.
Syntax
Parameters
| Parameter | Description |
|---|---|
| Specifies a list of one or more files or directories. Wildcards may be used to delete multiple files. If a directory is specified, all files within the directory will be deleted. | |
| /p | Prompts for confirmation before deleting the specified file. |
| /f | Forces deletion of read-only files. |
| /s | Deletes specified files from the current directory and all subdirectories. Displays the names of the files as they are being deleted. |
| /q | Specifies quiet mode. You are not prompted for delete confirmation. |
| /a[:] | Deletes files based on the following file attributes:
. |
| /? | Displays help at the command prompt. |
Remarks
If you use the del /p command, you’ll see the following message:
FileName, Delete (Y/N)?
To confirm the deletion, press Y. To cancel the deletion and to display the next file name (if you specified a group of files), press N. To stop the del command, press CTRL+C.
If you disable command extension, the /s parameter will display the names of any files that weren’t found ,instead of displaying the names of files that are being deleted.
If you specify specific folders in the parameter, all of the included files will also be deleted. For example, if you want to delete all of the files in the \work folder, type:
You can use wildcards (* and ?) to delete more than one file at a time. However, to avoid deleting files unintentionally, you should use wildcards cautiously. For example, if you type the following command:
The del command displays the following prompt:
Are you sure (Y/N)?
To delete all of the files in the current directory, press Y and then press ENTER. To cancel the deletion, press N and then press ENTER.
Before you use wildcard characters with the del command, use the same wildcard characters with the dir command to list all the files that will be deleted.
Examples
To delete all the files in a folder named Test on drive C, type either of the following:
To delete all files with the .bat file name extension from the current directory, type:
To delete all read-only files in the current directory, type:
SDelete v2.04
By Mark Russinovich
Published: November 25, 2020
 Download SDelete (518 KB)
Introduction
One feature of Windows NT/2000’s (Win2K) C2-compliance is that it implements object reuse protection. This means that when an application allocates file space or virtual memory it is unable to view data that was previously stored in the resources Windows NT/2K allocates for it. Windows NT zero-fills memory and zeroes the sectors on disk where a file is placed before it presents either type of resource to an application. However, object reuse does not dictate that the space that a file occupies before it is deleted be zeroed. This is because Windows NT/2K is designed with the assumption that the operating system controls access to system resources. However, when the operating system is not active it is possible to use raw disk editors and recovery tools to view and recover data that the operating system has deallocated. Even when you encrypt files with Win2K’s Encrypting File System (EFS), a file’s original unencrypted file data is left on the disk after a new encrypted version of the file is created.
The only way to ensure that deleted files, as well as files that you encrypt with EFS, are safe from recovery is to use a secure delete application. Secure delete applications overwrite a deleted file’s on-disk data using techniques that are shown to make disk data unrecoverable, even using recovery technology that can read patterns in magnetic media that reveal weakly deleted files. SDelete (Secure Delete) is such an application. You can use SDelete both to securely delete existing files, as well as to securely erase any file data that exists in the unallocated portions of a disk (including files that you have already deleted or encrypted). SDelete implements the Department of Defense clearing and sanitizing standard DOD 5220.22-M, to give you confidence that once deleted with SDelete, your file data is gone forever. Note that SDelete securely deletes file data, but not file names located in free disk space.
Using SDelete
SDelete is a command line utility that takes a number of options. In any given use, it allows you to delete one or more files and/or directories, or to cleanse the free space on a logical disk. SDelete accepts wild card characters as part of the directory or file specifier.
Usage: sdelete [-p passes] [-r] [-s] [-q] [. ]
sdelete [-p passes] [-z|-c [percent free]] sdelete [-p passes] [-z|-c] <physical disk number>
| Parameter | Description |
|---|---|
| -c | Clean free space. Specify an option amount of space to leave free for use by a running system. |
| -p | Specifies number of overwrite passes (default is 1). |
| -r | Remove Read-Only attribute. |
| -s | Recurse subdirectories. |
| -z | Zero free space (good for virtual disk optimization). |
| -nobanner | Do not display the startup banner and copyright message. |
How SDelete Works
Securely deleting a file that has no special attributes is relatively straight-forward: the secure delete program simply overwrites the file with the secure delete pattern. What is more tricky is securely deleting Windows NT/2K compressed, encrypted and sparse files, and securely cleansing disk free spaces.
Compressed, encrypted and sparse are managed by NTFS in 16-cluster blocks. If a program writes to an existing portion of such a file NTFS allocates new space on the disk to store the new data and after the new data has been written, deallocates the clusters previously occupied by the file. NTFS takes this conservative approach for reasons related to data integrity, and in the case of compressed and sparse files, in case a new allocation is larger than what exists (the new compressed data is bigger than the old compressed data). Thus, overwriting such a file will not succeed in deleting the file’s contents from the disk.
To handle these types of files SDelete relies on the defragmentation API. Using the defragmentation API, SDelete can determine precisely which clusters on a disk are occupied by data belonging to compressed, sparse and encrypted files. Once SDelete knows which clusters contain the file’s data, it can open the disk for raw access and overwrite those clusters.
Cleaning free space presents another challenge. Since FAT and NTFS provide no means for an application to directly address free space, SDelete has one of two options. The first is that it can, like it does for compressed, sparse and encrypted files, open the disk for raw access and overwrite the free space. This approach suffers from a big problem: even if SDelete were coded to be fully capable of calculating the free space portions of NTFS and FAT drives (something that’s not trivial), it would run the risk of collision with active file operations taking place on the system. For example, say SDelete determines that a cluster is free, and just at that moment the file system driver (FAT, NTFS) decides to allocate the cluster for a file that another application is modifying. The file system driver writes the new data to the cluster, and then SDelete comes along and overwrites the freshly written data: the file’s new data is gone. The problem is even worse if the cluster is allocated for file system metadata since SDelete will corrupt the file system’s on-disk structures.
The second approach, and the one SDelete takes, is to indirectly overwrite free space. First, SDelete allocates the largest file it can. SDelete does this using non-cached file I/O so that the contents of the NT file system cache will not be thrown out and replaced with useless data associated with SDelete‘s space-hogging file. Because non-cached file I/O must be sector (512-byte) aligned, there might be some leftover space that isn’t allocated for the SDelete file even when SDelete cannot further grow the file. To grab any remaining space SDelete next allocates the largest cached file it can. For both of these files SDelete performs a secure overwrite, ensuring that all the disk space that was previously free becomes securely cleansed.
On NTFS drives SDelete‘s job isn’t necessarily through after it allocates and overwrites the two files. SDelete must also fill any existing free portions of the NTFS MFT (Master File Table) with files that fit within an MFT record. An MFT record is typically 1KB in size, and every file or directory on a disk requires at least one MFT record. Small files are stored entirely within their MFT record, while files that don’t fit within a record are allocated clusters outside the MFT. All SDelete has to do to take care of the free MFT space is allocate the largest file it can — when the file occupies all the available space in an MFT Record NTFS will prevent the file from getting larger, since there are no free clusters left on the disk (they are being held by the two files SDelete previously allocated). SDelete then repeats the process. When SDelete can no longer even create a new file, it knows that all the previously free records in the MFT have been completely filled with securely overwritten files.
To overwrite file names of a file that you delete, SDelete renames the file 26 times, each time replacing each character of the file’s name with a successive alphabetic character. For instance, the first rename of «foo.txt» would be to «AAA.AAA».
The reason that SDelete does not securely delete file names when cleaning disk free space is that deleting them would require direct manipulation of directory structures. Directory structures can have free space containing deleted file names, but the free directory space is not available for allocation to other files. Hence, SDelete has no way of allocating this free space so that it can securely overwrite it.
Download SDelete (518 KB)
Runs on:
- Client: Windows Vista and higher
- Server: Windows Server 2008 and higher
- Nano Server: 2016 and higher
—>
Восстановление утерянных или удаленных файлов
Примечание: Если вы недавно обновили Windows 10 и не можете найти файлы, см. раздел Поиск утерянных файлов после обновления до Windows 10.
Если вам не удается найти файл на компьютере или если вы случайно удалили или изменили его, то вы можете восстановить его из резервной копии (если вы используете программу архивации данных) или попытаться восстановить его предыдущую версию. Предыдущие версии — это копии файлов и папок, которые Windows автоматически сохраняет в составе точки восстановления. Предыдущие версии иногда называют теневыми копиями.
Чтобы восстановить файл из резервной копии, убедитесь, что доступен носитель или диск, на который сохранена резервная копия, а затем выполните указанные ниже действия.
Восстановление файлов из резервной копии
Откройте функцию «Резервное копирование и восстановление», нажатием кнопки  «Начните», выберите панель управления,выберите «Система и обслуживание», а затем выберите «Резервное копирование и восстановление».
Выберите Восстановить мои файлы, а затем следуйте инструкциям в мастере.
Восстановите удаленные файлы и папки или предыдущее состояние файла или папки.
Восстановление удаленного файла или папки
Откройте «Компьютер», нажатием кнопки «Начните «Компьютер» и выберите «Компьютер».
Найдите папку, в которой хранился нужный файл или папка, щелкните ее правой кнопкой мыши, а затем щелкните «Восстановить прежнюю версию». Если папка была расположена на верхнем уровне диска, например по пути C:\, щелкните диск правой кнопкой мыши и выберите Восстановить прежнюю версию.
Вы увидите список доступных предыдущих версий файла или папки. В этот список включаются и файлы, сохраненные при резервном копировании (если вы используете программу архивации данных), и точки восстановления (если доступны оба типа архивации).
Примечание: Чтобы восстановить прежнюю версию файла или папки, включенных в библиотеку, щелкните файл или папку правой кнопкой мыши в расположении, в котором он или она сохранены, а не в библиотеке. Например, чтобы восстановить предыдущую версию рисунка, включенного в библиотеку «Изображения», но сохраненного в папке «Мои рисунки», щелкните папку «Мои рисунки» правой кнопкой мыши, а затем — «Восстановить предыдущую версию».
Предыдущие версии файлов
Дважды щелкните предыдущую версию папки с файлом или папкой, которую нужно восстановить. (Например, если файл был удален сегодня, выберите версию папки со вчерашнего дня, которая должна содержать файл.)
Перетащите файл или папку, которую вы хотите восстановить, в другое место, например на рабочий стол или в другую папку.
Версия файла или папки будет сохранена в выбранном расположении.
Совет: Если вы не помните точное имя или расположение файла или папки, можно выполнить их поиск, введя часть имени в поле поиска в библиотеке «Документы».
Восстановление файла или папки в предыдущее состояние
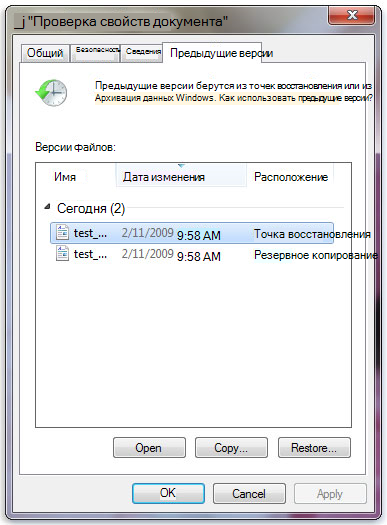
Щелкните правой кнопкой мыши файл или папки и выберите Восстановить прежнюю версию.
Вы увидите список доступных предыдущих версий файла или папки. В этот список включаются и файлы, сохраненные при резервном копировании (если вы используете программу архивации данных), и точки восстановления (если доступны оба типа архивации).
Вкладка «Предыдущие версии», на которой отображены предыдущие версии файлов
Прежде чем восстанавливать предыдущую версию файла или папки, выберите ее, а затем щелкните Открыть, чтобы убедиться, что это нужная вам версия.
Примечание: Вам не удастся открыть или скопировать предыдущие версии файлов, созданных программой архивации данных, но вы можете восстановить их.
Для восстановления предыдущей версии выберите ее, а затем щелкните Восстановить.
Предупреждение: Этот файл или папка заменит текущую версию файла или папки на вашем компьютере, причем замена будет необратимой.
Примечание: Если эта кнопка «Восстановить» недоступна, вам не удастся восстановить предыдущую версию файла или папки в его или ее первоначальном расположении. Возможно, вам удастся открыть или сохранить их в другое расположение.


